


كيفية إزالة الصوت من برنامج Premiere Pro بشكل احترافي [2024]
يُعد التوقيت المثالي للصوت أمرًا ضروريًا لأي فيديو. من الممتع جدًا عندما يتلاشى الصوت ويدخل أو يخرج من المشهد في الوقت المناسب داخل الفيديو. لهذا السبب يعمل العديد من المستخدمين، من المحررين المحترفين إلى الهواة، بدقة لضمان توافق الصوت تمامًا مع توقيت كل مشهد. في هذا الدليل، سنوضح لك كيفية عمل تلاشي للصوت في Premiere Pro، لمساعدتك على إنشاء مقاطع فيديو بجودة احترافية وصوت خالٍ من العيوب. فلنبدأ.

الجزء 1: ما هي تأثيرات Fade Out وFade In في Premiere Pro
هناك العديد من تأثيرات التلاشي التدريجي في Premiere Pro، وفهم كل منها ضروري للتمييز بين كل غرض فريد. هنا، نستكشف ثلاثة تأثيرات تلاشي أساسية: الكسب المستمر والقوة المستمرة والتلاشي الأسّي.
مكسب ثابت
يؤدي الكسب الثابت إلى تغيير الصوت بمعدل ثابت أثناء ظهوره واختفاءه أثناء الانتقال بين المقاطع. قد تؤدي هذه الطريقة في بعض الأحيان إلى تغيير مفاجئ، حيث إنها لا تخلق انتقالًا سلسًا. عادةً، يتم ضبط هذه الانتقالات يدويًا باستخدام الإطارات الرئيسية للتحكم بشكل أفضل في عملية الظهور والاختفاء.
قوة ثابتة
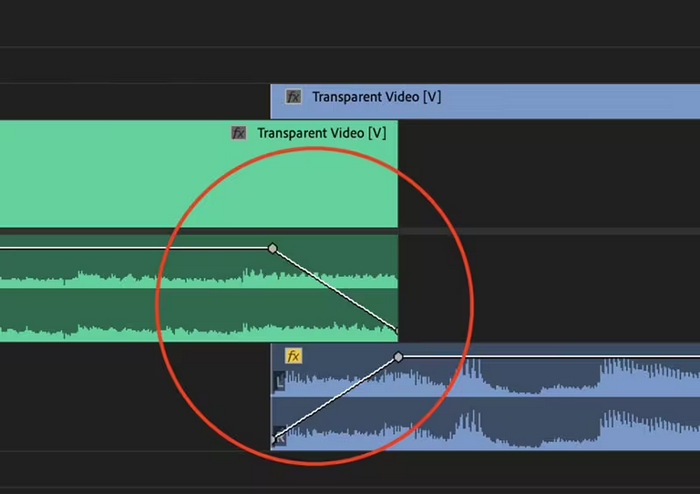
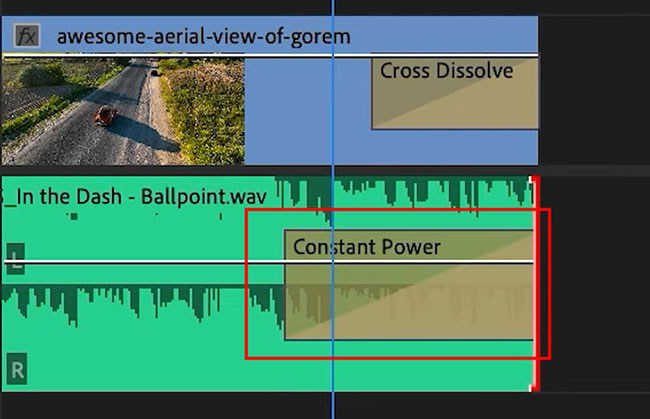
يخلق التلاشي المستمر للقوة تأثير انتقال سلس وتدريجي، يشبه التلاشي المرئي بين المقاطع. تعمل هذه الطريقة في البداية على تلاشي الصوت ثم تتلاشى في نهاية المقطع. وكما هو موضح، تنخفض الإطارات الرئيسية تدريجيًا في المقطع الأول وتزداد بشكل مطرد في المقطع الثاني. وبالمقارنة مع التلاشي المتواصل الآخر، غالبًا ما يُعتبر Constant Power هو الأفضل للانتقالات الصوتية نظرًا لقدرته على توفير تأثير أكثر سلاسة وتحول تدريجي في المكسب بين المقاطع، دون أي تغييرات ملحوظة أثناء الانتقال.
التلاشي الأسّي
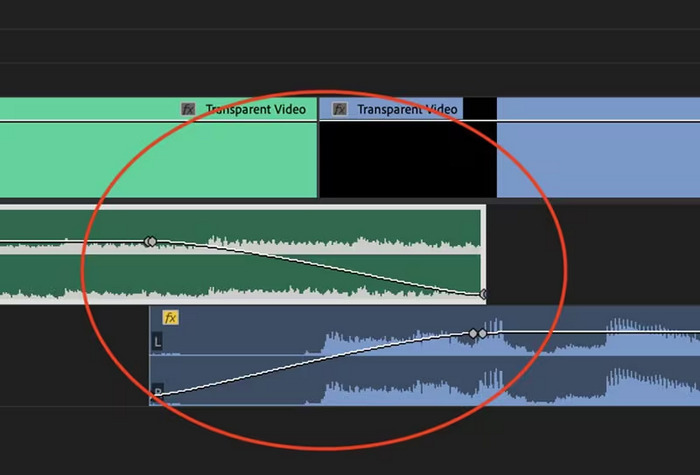
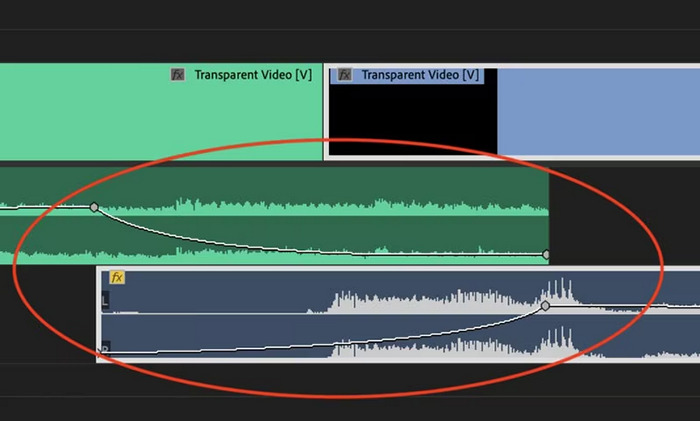
التلاشي الأسّي هو عكس القوة الثابتة. يتلاشى في المقطع الأول ويتلاشى في المقطع الثاني، مما يؤدي إلى إنشاء منحنى لوغاريتمي سلس. يوفر هذا النوع من التلاشي تجربة سمعية مختلفة، مما يجعله مفيدًا للانتقالات الصوتية المختلفة. فهو يوفر تلاشيًا سلسًا وطبيعيًا، وهو فعال بشكل خاص للمسارات الصوتية الأكثر تعقيدًا.
الجزء 2: كيفية إضافة أو إزالة الصوت تدريجيًا في Premiere Pro
الآن، بما أننا فهمنا بالفعل تأثيرات التلاشي المختلفة في Premiere Pro، فلننتقل إلى كيفية الاستفادة منها.
إليك كيفية تلاشي الصوت في Premiere Pro:
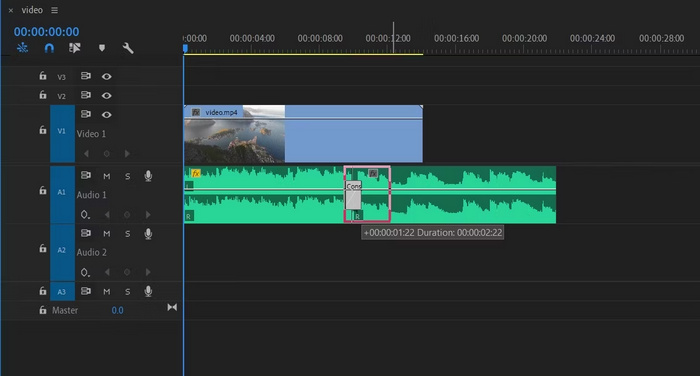
الخطوة 1. لاستيراد مقطع الصوت الذي تريد جعله يتلاشى في المخطط الزمني، انتقل إلى علامة تبويب Import في File Tab أو ببساطة اسحب الملف إلى الواجهة الرئيسية للأداة.
الخطوة 2. انتقل إلى لوحة Effect وقم بتوسيع مجلد انتقالات الصوت لاختيار أحد تأثيرات المزج المتقاطع (Crossfade). يمكنك اختيار Constant Gain أو Constant Power أو Exponential Fade.

الخطوة 3. لتطبيق نوع التلاشي الذي تريده، انقر على النوع الذي اخترته أو اسحبه إلى المخطط الزمني.
الخطوة 4. اكتب مدة التلاشي في نافذة منبثقة ستظهر، ثم انقر فوق OK.
تجعل الخيارات المتنوعة لبرنامج Premiere Pro للتلاشي التدريجي والتلاشي التدريجي في الصوت منه أداة مثالية لأولئك الذين يبحثون عن طريقة احترافية لتجنب التشغيل والتوقف المفاجئ في الصوت. تتيح هذه الميزات انتقالات سلسة، مما يعزز التجربة السمعية الشاملة لأي مشروع. علاوة على ذلك، توفر هذه الأداة المرونة والدقة، مما يجعلها مناسبة للمستخدمين الجدد والمتقدمين. ومع ذلك، قد يتطلب استخدام هذه الأداة تحديدًا تعديلات يدوية تستغرق وقتًا طويلاً، حيث قد يجد المبتدئون بعض التأثيرات معقدة في الاستخدام. ومع ذلك، لا تزال هذه الأداة واحدة من أفضل الأدوات لإضافة التلاشي التدريجي والتلاشي التدريجي بشكل احترافي.
الجزء 3: بديل أسهل لبرنامج Premiere Pro لتلاشي الصوت أو ظهوره
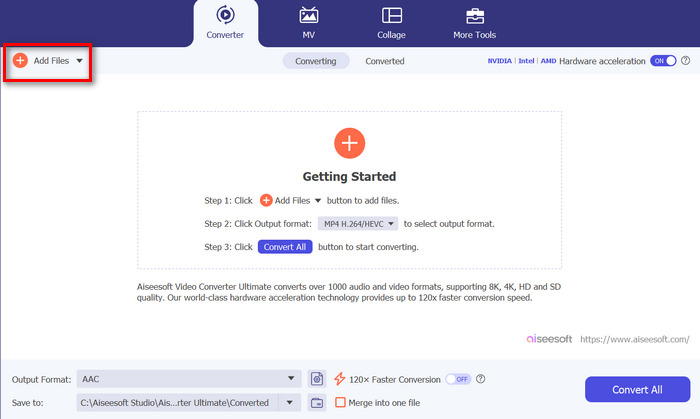
إذا كنت تبحث عن أداة بديلة بسبب واجهة Premiere Pro المعقدة، فإن برنامج Video Converter Ultimate الذي اختاره FVC هو الخيار الأفضل. يعد هذا المحول الشامل للفيديو والصوت ذا واجهة سهلة الاستخدام وبديهية للغاية، مما يجعل من السهل والفعّال على المستخدمين تنفيذ تلاشي دخول أو خروج للصوت. بالإضافة إلى ذلك، تدعم هذه الأداة نطاقًا واسعًا من تنسيقات الصوت، مما يقلل من القلق بشأن مشكلات التوافق.
إليك كيفية تلاشي الصوت باستخدام Video Converter Ultimate:
الخطوة 1. على جهاز الكمبيوتر لديك، ثبّت برنامج Video Converter Ultimate.
تحميل مجانيلنظام Windows 7 أو أحدثتنزيل آمن
تحميل مجانيلنظام MacOS 10.7 أو أحدثتنزيل آمن
الخطوة 2. بعد ذلك، لاستيراد الملف الصوتي الذي تريد تعديله، انقر على زر Add Files.
الخطوة 3. الآن انقر على زر Cut، وهذا سينقلك إلى نافذة أخرى حيث يمكنك ضبط تلاشي الدخول وتلاشي الخروج لملفك الصوتي.
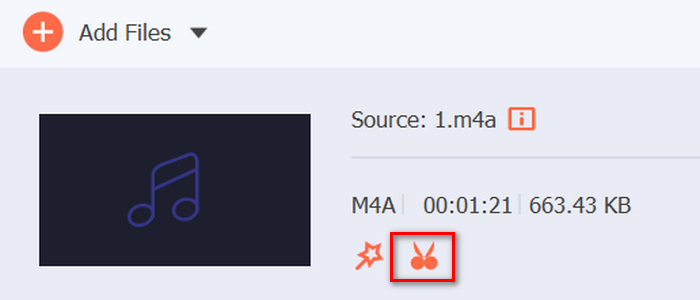
الخطوة 4. انقر في مربعات خيارات Fade In وFade Out وحدِّد مدة كل تأثير وفقًا لتفضيلاتك.
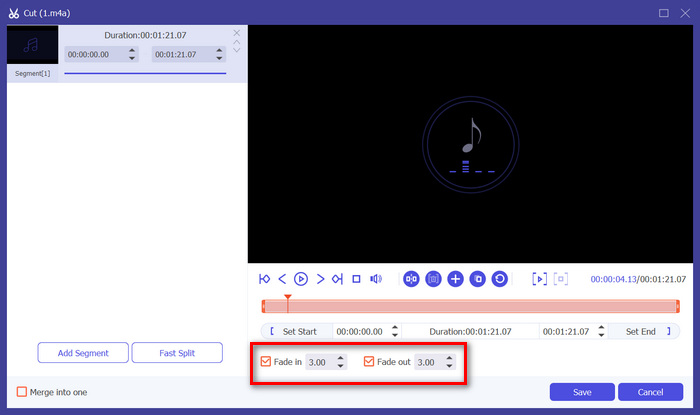
الخطوة 5. بعد الانتهاء، يمكنك معاينة الصوت بتشغيله للتحقق مما إذا كانت التغييرات التي أجريتها دقيقة وصحيحة.
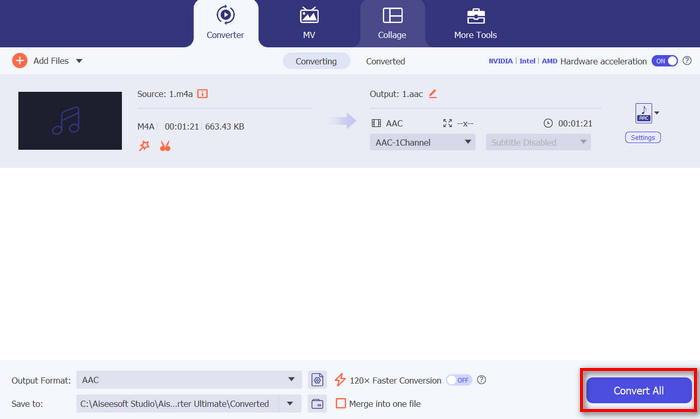
الخطوة 6. أخيرًا، انقر على زر Save. سيعيدك هذا إلى الواجهة الرئيسية، حيث ستنقر على زر Convert All لتصدير الملف الصوتي.
ما يجعل برنامج Video Converter Ultimate أفضل أداة بديلة لعمل تلاشي دخول أو خروج للصوت هو سهولة استخدامه وكفاءته. فهو يتيح للمستخدمين تحقيق انتقالات صوتية سلسة واحترافية بسرعة، دون تعقيدات البرامج المتقدمة الأخرى. وهذا يجعله خيارًا موثوقًا وسهل الاستخدام لأي شخص يرغب في تحسين عملية تحرير الصوت. إلى جانب ذلك، يقدّم أيضًا ميزات أخرى لتحرير الصوت مثل ضغط الصوت، وقص الصوت، وتسريع/إبطاء الصوت، وغير ذلك قبل تصدير ملف الصوت المطلوب.
الجزء 4: الأسئلة الشائعة حول تلاشي الصوت في Premiere Pro
ما هو التلاشي والظهور في الصوت؟
التلاشي التدريجي هو تقنيتان لتحرير الصوت تستخدمان لزيادة أو خفض مستوى الصوت في مسار صوتي للحصول على انتقال سلس. يبدأ تأثير التلاشي التدريجي بالصمت ويزداد تدريجيًا إلى مستوى الصوت الكامل، بينما يبدأ تأثير التلاشي التدريجي بمستوى الصوت الكامل وينخفض تدريجيًا إلى مستوى الصمت.
ما هو اختصار التلاشي في Premiere Pro؟
بالنسبة لنظام التشغيل Mac، اختصار الخروج في Premiere Pro هو Shift+Command+D، بينما في نظام التشغيل Windows، اختصار الخروج هو Shift+Ctrl+D.
كيفية التخلص من الصوت على iPhone؟
لجعل الصوت يتلاشى في iPhone، يمكنك استخدام تطبيق iMovie.
إليك كيفية القيام بذلك:
الخطوة 1. افتح iMovie وحمّل مشروعك.
الخطوة 2. انقر بزر الماوس الأيمن على ملف الصوت في المخطط الزمني.
الخطوة 3. اضغط على زر Audio.
الخطوة 4. اضغط على Fade لإظهار مقابض التلاشي في بداية المقطع ونهايته.
الخطوة 5. اسحب مقبض التلاشي في نهاية المقطع لتعيين مدة تلاشي الصوت للخارج.
خاتمة
يُعد Premiere Pro بالفعل أداة متعددة الاستخدامات، مما يسهل على المستخدمين تعديل ملفاتهم الصوتية. الآن بعد أن عرفت كيفية عمل تلاشي للصوت في Premiere، لا يوجد ما يمنعك من الاستمرار في إنشاء انتقالات سلسة واحترافية لمشاريعك. كما يمكنك تجربة برنامج Video Converter Ultimate كبديل إذا وجدت أن هذا البرنامج صعب الاستخدام وتبحث عن تجربة أكثر سهولة. إليك أطيب التمنيات بانتقالات صوتية سلسة!
-
 أفضل 10 ضواغط GIF لمستخدمي سطح المكتب وعلى الإنترنت
 في هذه التدوينة، ستتعرف على أفضل ضواغط GIF لمساعدتك في حل مشكلتك مع ملفات GIF الكبيرة. التحقق منها والحصول على أفضل الأفكار.
-
 5 تطبيقات لتسجيل الصوت الأكثر اختيارًا على Android و iOS [تم تحديث 2023]
 ألا تعرف ما هو تطبيق مسجل الصوت الذي يجب أن تستخدمه؟ إذا كان الأمر كذلك ، فستساعدك هذه المقالة في اختيار التطبيق الذي سيساعدك في مهمة التسجيل الصوتي.
-
 أدوات تحويل رائعة من MP4 إلى MP3 يجب أن تفكر في استخدامها
 أطلق العنان لقوة تعدد استخدامات الصوت من خلال محولات MP4 إلى MP3 ذات التصنيف الأعلى. جرب التحويل السلس وجودة الصوت الاستثنائية والمعالجة بسرعة البرق.