


كيفية تغيير حجم صورة في PowerPoint دون التقليل من الجودة
في الآونة الأخيرة، أصبح كثير من الأشخاص يعرضون كل شيء رقميًا بدلًا من الطريقة التقليدية، حتى قبل الجائحة. ومع سَعينا نحو المستقبل، يمكن للتكنولوجيا والبرامج أن تجعل كل شيء أسهل في عرض الأعمال، والوسائل البصرية، والأفكار، والمبيعات، وغير ذلك، ويمكنك القيام بكل ذلك على برنامج PowerPoint. يمكنك استخدام هذا البرنامج على جهازك لهذا الغرض. علاوة على ذلك، يبحث العديد من المستخدمين عن طريقة لتغيير حجم الصورة في هذا البرنامج. هل ترغب في تعلّم كيفية تغيير حجم الصورة في PowerPoint؟ واصل قراءة هذه المقالة بينما نغطي المعلومات التي تحتاج إلى معرفتها حول هذا الموضوع.

الجزء 1. كيفية تغيير حجم صورة في PowerPoint باستخدام طريقتين فعالتين يمكنك استخدامهما [إرشاديًا ومتعددًا]
عندما تقوم بضبط طول الصورة وارتفاعها في كل شريحة ، يمكنك إما تعيين بُعد دقيق أو تغيير نسبة العرض إلى الارتفاع عن طريق سحب الإطار. على الرغم من أنه يمكنك القيام بذلك هنا بشكل طبيعي ، إلا أن بعض التشويه يحدث عندما يتغير حجم الصورة. لذلك ، إذا كنت تريد معرفة كيفية تغيير حجم الصور على شرائح متعددة في PowerPoint أو بشكل فردي ، يمكنك اتباع الخطوات التي نضيفها أدناه. اتبعه وفقًا لذلك ، وسوف تقوم بتغيير حجمه في أقل من دقيقة.
3 طرق لتغيير حجم الصورة في PowerPoint [فردي ودفعي]
1. تغيير حجم الصورة بسحب الإطار
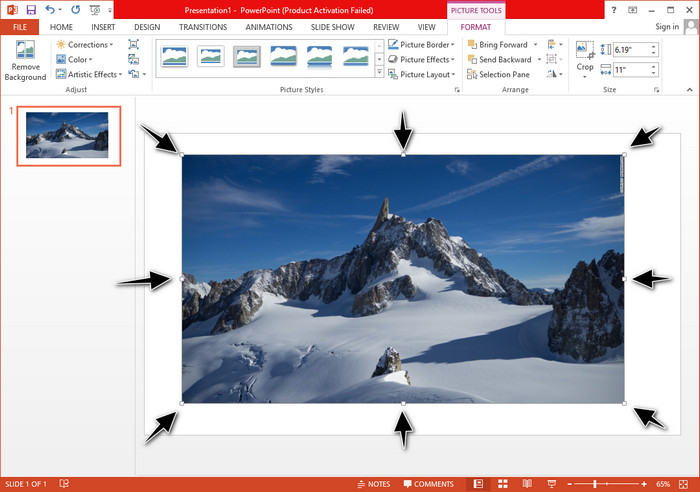
بمجرد تحميل الصورة على PowerPoint ، سترى نقاطًا صغيرة عليها. هذه النقاط على الصورة قابلة للتعديل ، مما يعني أنه يمكنك تغيير حجم الصورة بحرية وفقًا لمواصفاتك. بمجرد تغيير الطول ، لن يتبع الارتفاع نفس طريقة ضبط الحجم.
2. تغيير حجم الصورة بتغيير الارتفاع والعرض
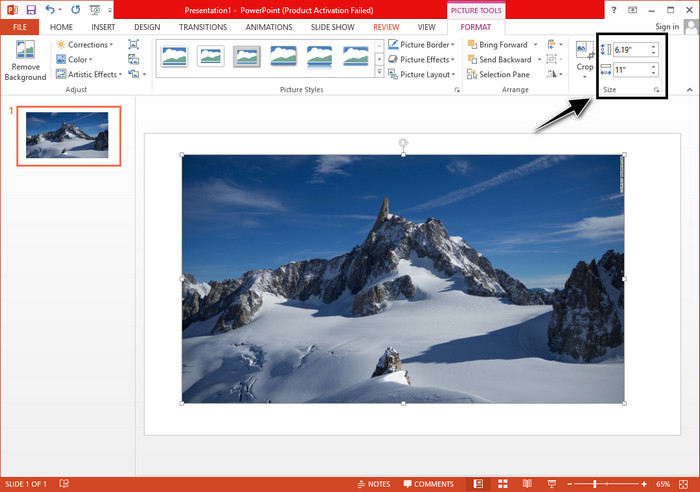
عند تحميل الصورة على PowerPoint ، انقر فوق علامة التبويب تنسيق لتغيير الصورة إلى حجم معين. في الجزء العلوي ، يمكنك إضافة طولها وطولها بالضبط. ومع ذلك ، بمجرد تغيير أحد القياسات ، سيتم تعديل القياس الآخر تلقائيًا لأن نسبة العرض إلى الارتفاع الرئيسية نشطة.
3. تغيير حجم عدة صور دفعة واحدة في PowerPoint
ماذا يجب أن تفعل لتغيير حجم صور متعددة في شريحة واحدة من شرائح PowerPoint؟ للقيام بذلك، ستحتاج أولًا إلى إدراج الصور في الشريحة. بعد إدراج عدة صور على الشريحة، عليك الضغط مع الاستمرار على زر Control ثم تحديد كل صورة تريد تغيير حجمها. بعد ذلك، اتبع خيار تغيير الحجم الذي تريده من الخيارات التي قدّمناها أعلاه، سواء بسحب الإطار أو بتغيير القيمة الرقمية.
الجزء 2. كيفية تغيير حجم صورة في PowerPoint بدون تشويه مجانًا [خدمة ويب]
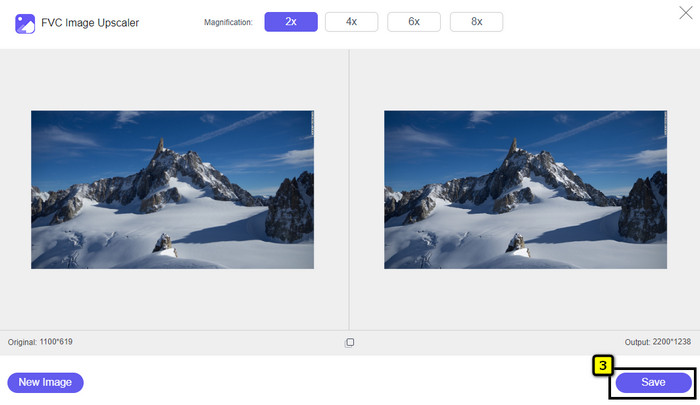
كيف تغيّر حجم صورة في PowerPoint دون تشويهها؟ يمكنك استخدام أداة FVC Free Image Upscaler لتغيير حجم الصورة التي ترفعها تلقائيًا والتي تريد استخدامها في عرض PowerPoint. وعلى الرغم من أنها أداة عبر الإنترنت، إلا أن أدائها أفضل من أداة تغيير الحجم في PowerPoint لأنها تُنشئ قيمة PPI مناسبة لمنع ضبابية الصورة حتى بعد تغيير حجمها. هل تتساءل أو ترغب في استخدام هذه الأداة والبدء في تغيير حجم صورتك؟ في هذه الحالة، اتبع الخطوات التالية التي أدرجناها بينما نعلّمك كيفية استخدام هذه الأداة بأبسط طريقة ممكنة.
مزايا تغيير حجم الصورة باستخدام FVC Free Image Upscaler:
◆ يمكنك استخدام أداة تغيير حجم الصور هذه مجانًا دون فقدان في الجودة.
◆ يدعم مجموعة واسعة من التنسيقات التي يمكنك تحميلها.
◆ يحتوي على تقنية AI قوية يمكنها مساعدتك في تغيير حجم أي صور.
◆ يمكنك الوصول إلى حل الويب هذا على أي محرك بحث لديك على سطح المكتب.
◆ ليس هناك حاجة إلى التثبيت أو التنزيل قبل استخدامه.
خطوات حول كيفية تغيير الحجم دون تشتيت باستخدام FVC Free Image Upscaler:
الخطوة 1. افتح موقع هذه الأداة عن طريق النقر على هذا الرابط.
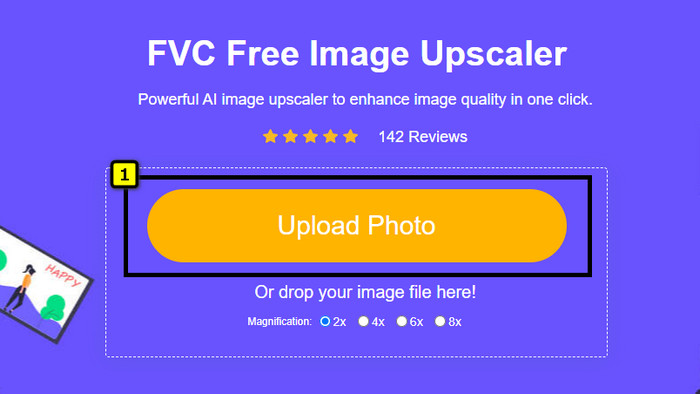
الخطوة 2. عند فتح الموقع، انقر على زر Upload Photo لإضافة الصورة التي تريد تغيير حجمها واستخدامها في عرض PowerPoint الخاص بك.
الخطوة 3. بعد رفع الصورة، انتظر حتى تكتمل عملية التحميل. اختر مستوى التكبير الذي تريد تطبيقه على صورتك من خلال اختيار أحد الخيارات مثل 2x أو 4x أو 6x أو 8x.
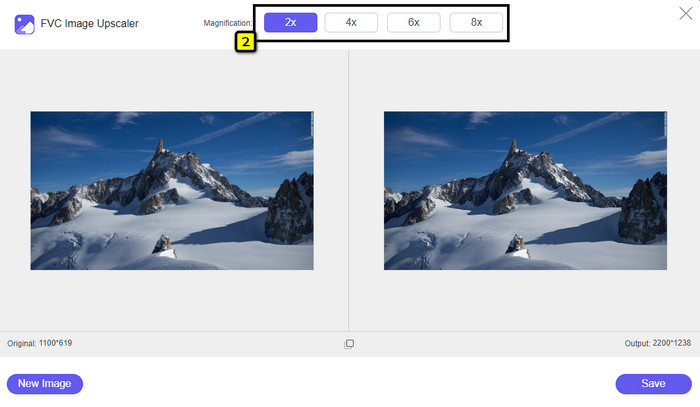
الخطوة 4. انقر على Save لتصدير الصورة بعد تغيير حجمها هنا. بهذه السهولة، ستحصل على الصورة المعاد تحجيمها على جهازك المحلي دون أي تشويه أو ضبابية مضافة.
الجزء 3. الأسئلة الشائعة حول كيفية تغيير حجم صورة في PowerPoint
ما هو الحد الأقصى لطول الصورة وارتفاعها لبرنامج Powerpoint؟
عند تغيير حجم الصورة إلى أقصى بُعد لـ Powerpoint كشاشة عريضة ، يمكنك ضبط البكسل على 1280 × 720 بكسل. ولكن عند عرضها على الشاشة ، ستحتاج إلى اتباع نسبة العرض إلى الارتفاع 16: 9 ، والتي تبلغ 1920 × 1080 بكسل.
هل هناك أي اختصار لتغيير حجم الصورة في PowerPoint؟
لتغيير ارتفاع الصورة ، يجب الضغط مع الاستمرار على مفتاح Shift ، ثم النقر فوق السهم لأعلى لزيادة ارتفاع الصورة والسهم لأسفل لتقليل ارتفاعها. بالنسبة لأولئك الذين يرغبون في تغيير عرض الصورة ، يمكنك الضغط باستمرار على مفتاح Shift مرة أخرى ، ثم الضغط على السهم الأيمن لزيادة العرض والسهم الأيسر لتقليل العرض وفقًا لتفضيلاتك.
لماذا أصبحت صورتي ضبابية بعد تغيير حجمها في PowerPoint؟
عندما تكون على وشك تغيير حجم الصورة في PowerPoint ، تكون الصورة قد تم شدها ، وهناك احتمال أن تصبح الصورة ضبابية. ولكن إذا كنت تريد محرر صور قادرًا على إنشاء وحدات بكسل أثناء إجراء تغييرات في البعد ، فيمكنك تجنب وجود صورة منقطة في PowerPoint.
هل يمكنني استخدام صور GIF لبرنامج Powerpoint؟
نعم ، يمكنك استخدام صور GIF في كل شريحة في PowerPoint. ومع ذلك ، عندما لا يتم تفضيل بُعد GIF بالحجم الذي تريده ، فستحتاج إلى تغيير حجمه. وأصبحت نتيجة GIF التي تم تغيير حجمها ضبابية أو منقطة.
خاتمة
خلاصة القول، يمكنك تعلّم ثلاث تقنيات لتغيير حجم الصورة في PowerPoint من خلال اتباع الشرح الذي أضفناه في هذا المقال. ورغم أنه يمكنك القيام بذلك بسهولة داخل برنامج العرض نفسه، إلا أنه في بعض الأحيان يحدث تشويه عند تغيير أبعاد الصورة. يمكنك حل هذه المشكلة باستخدام الأداة الإلكترونية التي ذكرناها، لأنها لا تُحدِث أي تشويه في الصور المُعاد تغيير حجمها. ومع الخطوات التي أضفناها، يمكنك تعلّم كيفية تغيير حجم الصورة باستخدام FVC Free Image Upscaler.
-
 أفضل تطبيق لتغيير حجم الصور على الإنترنت ، وغير متصل ، وأندرويد ، وآيفون
 ما هي أفضل تطبيقات تغيير حجم الصور؟ انقر فوق الصفحة للتعرف على أقوى خمسة تطبيقات لتغيير حجم الصور يمكنك استخدامها لتحسين ملفك أو تغيير حجمه.
-
 كيفية تغيير حجم الصورة - Adobe Resize Image [متصل وغير متصل]
 إذا كنت تبحث عن Adobe لتغيير حجم الصورة ، فلدينا الحل المناسب لك. شاهد هذا المنشور جيدًا لمعرفة كيفية تغيير حجم الصور باستخدام Adobe على جهاز الكمبيوتر الخاص بك.
-
 كيفية تغيير حجم الصورة على Facebook [خطوات سريعة وسهلة]
 إذا كنت تواجه مشكلة في تحميل صورة كبيرة الحجم على Facebook ، فلدينا حل مناسب لك. قم بإنهاء هذه المقالة لمعرفة كيفية تغيير حجم الصور على Facebook.