


3 måder til nemt at komprimere billeder til e-mail [Guide]
E-mail er en fantastisk platform til at sende beskeder med vedhæftede billeder og andre nødvendige filer. Nogle brugere støder dog på problemer med at sende store filbilleder, da de fører til langsomme uploadtider, mislykkede leveringer eller overskridelse af de vedhæftede filers størrelsesgrænser, der er pålagt af e-mail-udbydere. For at undgå disse problemer er det vigtigt at ændre størrelsen på dine billeder, før du sender dem.
Med det in mente vil vi i denne artikel gennemgå 3 metoder til, hvordan du kan komprimere fotos til e‑mail, så dine foto‑vedhæftninger er nemme at sende og modtage uden at gå på kompromis med kvaliteten.

Del 1. Fordele ved at komprimere billeder til e-mail
Komprimering af billeder har generelt mange fordele, herunder til brug af e-mail. Følgende er de ting, du kan nyde, når du ændrer størrelse på billeder til e-mail:
• Da billedkomprimering betyder at ændre billedet til en mindre størrelse, kan du nemt sende flere foto‑vedhæftninger i én e‑mail sammenlignet med ukomprimerede fotos.
• Ofte har e‑mailudbydere grænser for, hvor store vedhæftede filer du må sende. Ved at komprimere dine fotos til e‑mail kan du holde dig inden for disse grænser og sikre, at din e‑mail bliver leveret uden problemer. Det er nyttigt, når du sender e‑mails til flere modtagere, eller når du vedhæfter andre typer filer sammen med dine fotos.
• Når fotos komprimeres, betyder det blot, at de fylder mindre, så du kan udnytte din e‑mail‑lagerplads bedre.
• Store vedhæftede filer kan nogle gange blive markeret af e‑mailservere, hvilket kan føre til leveringsfejl eller til, at e‑mails bliver markeret som spam. Komprimering af dine fotos til e‑mail hjælper med at undgå disse problemer og sikrer, at dine vedhæftede filer når frem til de tiltænkte modtagere uden problemer.
• I visse situationer, hvor brugere tjekker deres e‑mails på mobilen, er sendte, komprimerede fotos lettere at downloade og se på mobile enheder end ukomprimerede.
Del 2. Komprimer billeder til e-mail ved at konvertere billedformat
Hvis du vil komprimere billeder til e-mail, er den første metode, du kan prøve, ved at bruge et billedkonverteringsværktøj. Med dette vil det konvertere dit billede til et format, som du ønsker, hvor konverteringsprocessen også optimerer dit billede til en ønskelig og mere overskuelig størrelse.
FVC Free Image Converter er et gratis konverteringsværktøj, der giver brugerne mulighed for at konvertere deres fotos til forskellige billedformater som JPG, PNG og GIF. Så hvis du sender en billedfil i en e‑mail i et format, der indeholder flere data og dermed gør filstørrelsen større, kan du med fordel bruge dette værktøj. Derudover er det ideelt, når du vil sende flere store filer, da det kan batchkonvertere op til 40 billeder på én gang. Sådan kan du bruge dette værktøj til at komprimere dine fotos til e‑mail:
Trin 1. Søg først efter FVC Free Image Converter i din browser for at få adgang til onlineværktøjet.
Trin 2. Vælg derefter det outputfilformat, du foretrækker, under Convert to. Klik derefter på knappen Add Images for at importere de billeder, du vil konvertere.
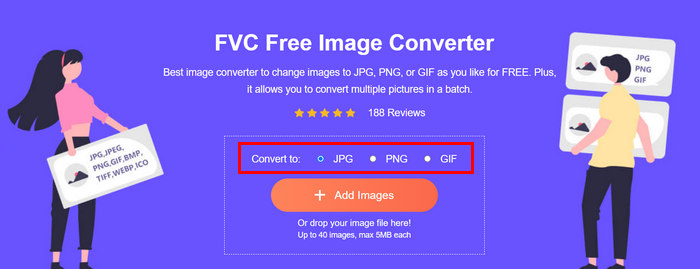
Trin 3. Når du er færdig, skal du klikke på knappen Download All.
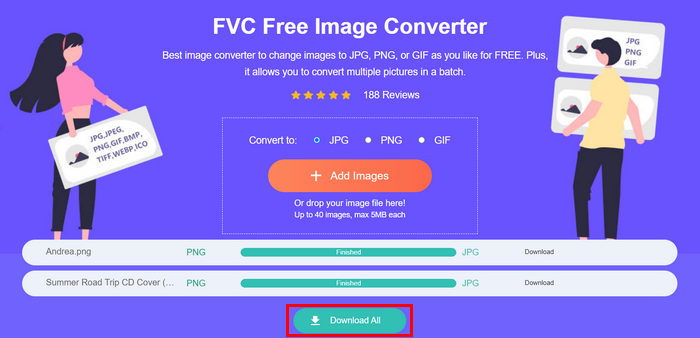 Med FVC Free Image Converter-værktøjet er det garanteret, at dine konverterede billeder nu er komprimeret og har fået deres størrelse reduceret, hvilket er perfekt til e-mailbrug.
 Del 3. Formindsk billeder til e-mail med online komprimeringsværktøj
FVC Free Image Compressor er et gratis online komprimeringsværktøj, der gør det nemt at komprimere fotos til e‑mail. Brugerne skal blot uploade eller importere deres billedfiler og lade værktøjet komprimere dem automatisk. Hvis du er bekymret for kvalitetstab, bruger dette værktøj den bedste optimering og avancerede komprimeringsalgoritmer. Det vil sikre, at billedkvaliteten bevares, når du komprimerer dem til e‑mail.
Hvis du også skal batchkomprimere et billede, giver dette værktøj dig mulighed for samtidig at komprimere 40 billeder på én gang. Endelig understøtter det forskellige populære billedformater som JPEG, PNG, SVG og animerede GIF'er.
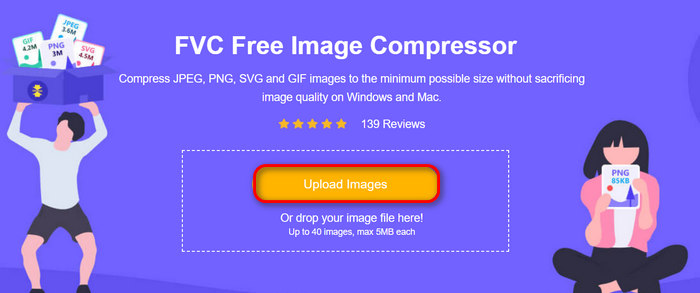
Trin 1. Gå ind på deres officielle hjemmeside i din browser.
Trin 2. Klik derefter på Upload Images for at importere de billeder, du vil komprimere til nettet. Bemærk, at dette værktøj automatisk komprimerer dine fotos, så snart du har valgt dem og klikket på Åbn.
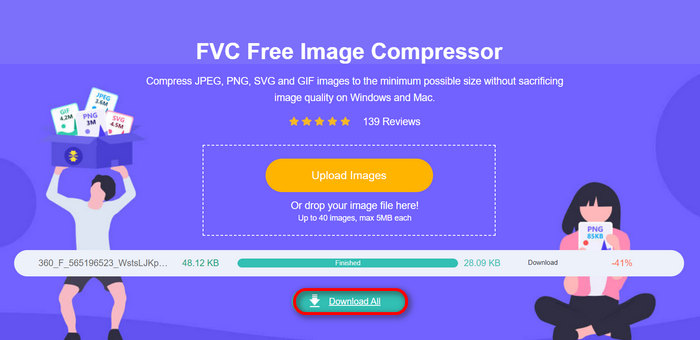
Trin 3. Når dine billeder er blevet komprimeret, kan du forhåndsvise dem ved at tjekke deres nye størrelse efter komprimering. Klik til sidst på Download All for at gemme dine billeder.
Denne metode kan virkelig hjælpe dig med at komprimere billeder til e-mail uden at skulle udholde komplekse trin og abonnementsgebyrer. Desuden gør dens brugervenlige og intuitive grænseflade det til et ideelt værktøj for ethvert brugerniveau. Så hvis du vil optimere dine billeder til e-mailbrug, prøv denne metode nu.
Del 4. Ændr størrelsen på billeder til e-mail til en specificeret størrelse
Hvis du vil ændre størrelsen på billeder til e-mail til en bestemt størrelse, kan du prøve IMGonline-værktøjet. Dette billedkomprimeringsværktøj giver dig mulighed for at ændre størrelsen på dit billede til en størrelse efter eget valg. Sådan gør du:
Trin 1. Klik på deres hjemmeside på knappen Choose File for at tilføje det foto, du vil komprimere.

Trin 2. Indstil derefter indstillingerne for JPEG‑komprimering. Indtast den ønskede størrelse i KB eller MB, alt efter hvad du foretrækker.

Trin 3. Vælg i menuen Size Reducing in Megapixel, hvor meget du vil komprimere dit foto, eller hvordan du vil begrænse komprimeringen af dit foto.
Trin 4. Vælg derefter mellem Standard JPG eller Progressive JPG.
Trin 5. Når du er færdig, skal du blot klikke på knappen OK.
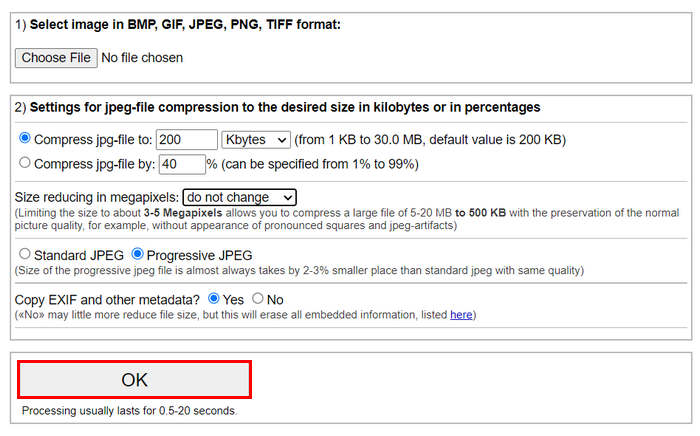
I forhold til at vælge mellem standard JPG og progressiv JPG, skal du huske på, at størrelsen på den progressive jpeg-fil altid tages af 2-3% mindre sted end standard jpeg med samme kvalitet.
Del 5. Ofte stillede spørgsmål om komprimering af billeder til e-mail
Hvilken størrelse skal jeg ændre størrelsen på mine billeder til e-mail?
Når det kommer til den ideelle størrelse til at sende billeder i e-mail, mens der ikke er nogen begrænsning, anbefales det alligevel generelt at ændre størrelsen på dine billeder til et maksimum på 1024x768 pixels. At holde din billedstørrelse under 1 MB hjælper også med at undgå problemer med vedhæftede filer og gør det nemmere for modtagere at downloade og se billederne.
Hvordan komprimerer man billeder til Gmail?
At komprimere billeder til Gmail kan gøres på forskellige måder. En af de nemmeste er at bruge online komprimeringsværktøjer som FVC gratis billedkompressor. For at bruge dette skal du blot uploade dine billedfiler, og så vil værktøjet automatisk komprimere dem.
Hvilken billedtype er bedst til e-mails?
De bedste billedtyper til e‑mails er JPEG og PNG. JPEG bruges bredt på grund af dets gode komprimeringsgrad og balancen mellem filstørrelse og kvalitet, hvilket gør det ideelt til fotos og billeder med mange farver. PNG foretrækkes til billeder, der kræver gennemsigtighed, eller som indeholder tekst, logoer eller grafik med skarpe kanter, fordi det bevarer en højere kvalitet for disse elementer, selvom filstørrelsen kan være større end med JPEG.
Konklusion
Det er virkelig vigtigt at vide, hvordan man komprimerer fotos til e‑mail for at undgå langsomme uploadtider, fejl i leveringen og begrænsninger på vedhæftede filer. Ved at følge de metoder, der er grundigt gennemgået i denne artikel, kan du sikre, at dine foto‑vedhæftninger er håndterbare og hurtige at sende og modtage.
Hvad venter du på? Begynd at optimere dine e-mailvedhæftede filer i dag med disse 3 nemme måder.
-
 Overdrevent komprimeret billede: Sådan reparerer du nemt dem
 Er du i tvivl om, hvad du skal gøre, når dit billede er for komprimeret? Læs denne artikel og lær hvorfor dette billedproblem opstår, og lær 2 metoder til at løse dem.
-
 Tilpas billedstørrelse til 100 KB: 3 bedste måder til effektiv komprimering
 Leder du efter et værktøj til at hjælpe dig med at ændre størrelsen på billedet til 100KB? Læs denne artikel og lær 3 metoder til, hvordan du kan formindske dine billeder til din ønskede filstørrelse.
-
 Sådan komprimeres billeder i Word [Windows og Mac]
 Gad vide, hvordan du kan udnytte dit Word til billedkomprimering? Denne vejledning vil lære dig måder at komprimere billeder i Word for problemfri komprimering.