


 Video Converter Ultimate
 Skærmoptager
 Video reparation
 Sikker download
How to Record Twitch, YouTube, and Webinar Live Streams on PC
Watching a live stream from start to finish is not always possible. Sometimes you may be engaged, your internet connection may be slow, or you just want to have a copy for a re-watch. This has made the idea of how to record a live stream on a PC increasingly popular and interesting.
It is equally important to mention that copying or redistributing live streams may not always be legal or acceptable. To be fair and ethical, you should always respect the creator's rights. Let your recordings be for personal viewing, educational purposes, or taken as instances where local copyright laws and fair use principles allow such activities. This article will not only tell you how to record live streams on a PC in the simplest way, but also share some tips on how to record smooth, high-quality video without lag.
Method 1: Record High-Quality Streams for Free with OBS Studio
Finding how to record a live stream on PC for free, then OBS Studio is one of the best tools for you. It is a free open-source screen recording application that enables users to record high-quality live streams without watermarks or recording time limits.
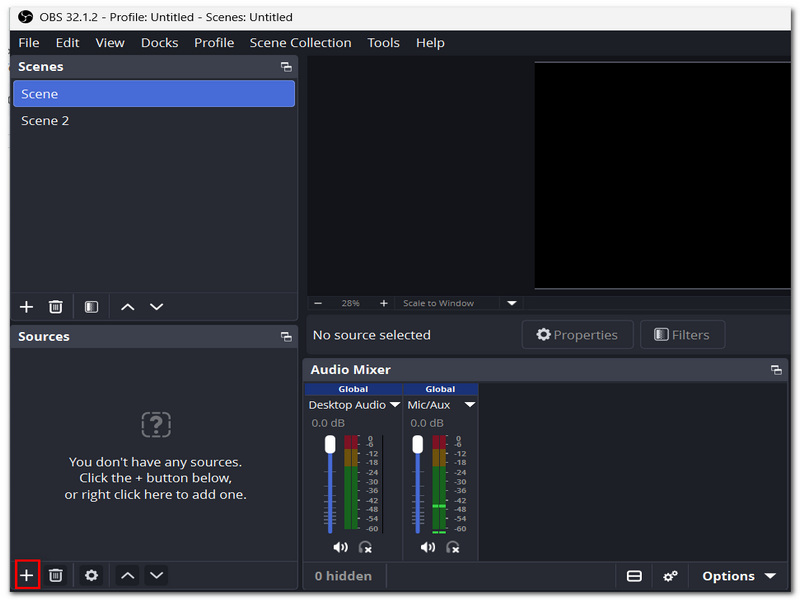
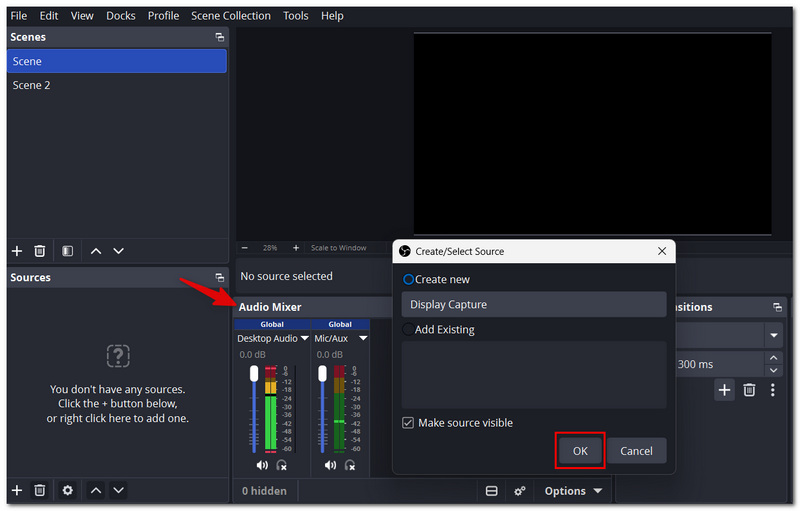
Step 1. To record TikTok Live, you need to begin by downloading and installing the latest version of OBS Studio on your Windows PC. Open OBS Studio, and in the main window, click on the + button below the Sources panel.
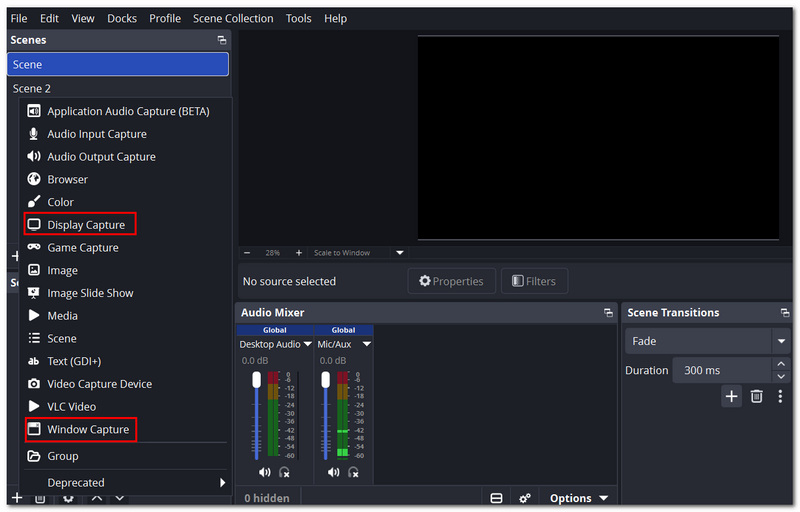
Step 2. You have two options for recording: Select Display Capture if you want to record your whole screen, or Window Capture if you want to record just the browser window.
Step 3. Next, select the screen or window where the live stream is being played, and then hit OK. Make sure that Desktop Audio is enabled in the Audio Mixer so that the sound from the live stream will be recorded as well.
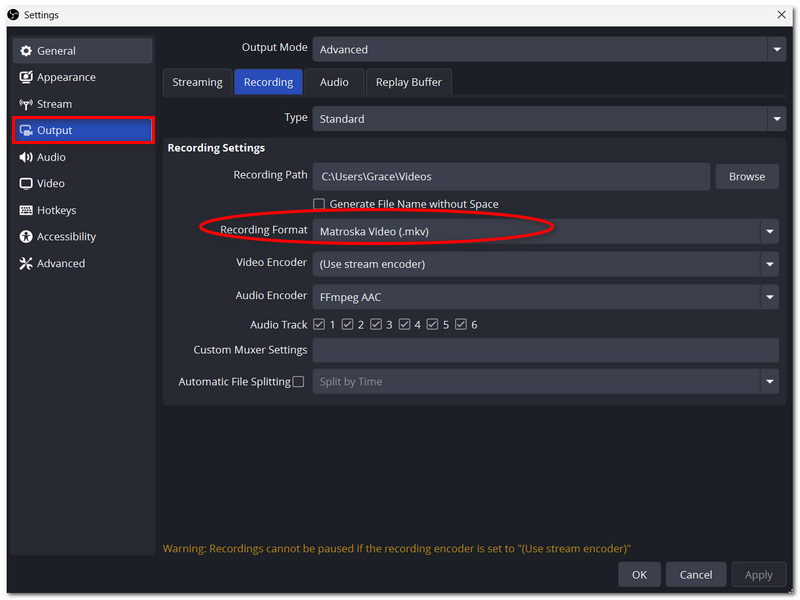
Step 4. Navigate to Settings > Output and select the recording format that you prefer. (MKV is best for avoiding file corruption.)
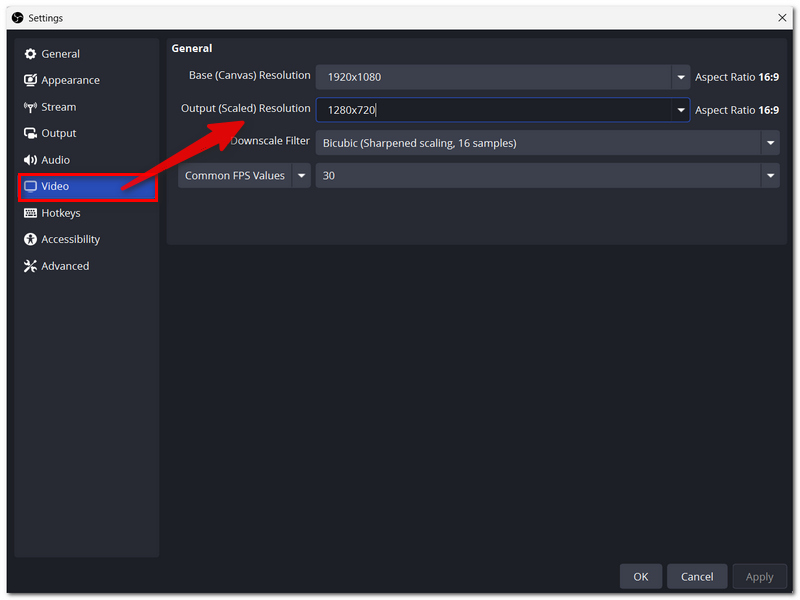
Step 5. Next, head over to Settings > Video to pick the resolution and frame rate that suit you. Then launch the live stream that you want to record.
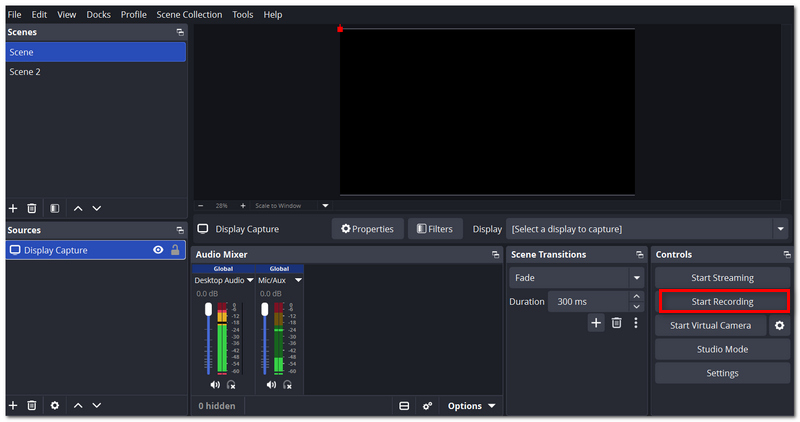
Step 6. Then, go back to OBS and hit the Start Recording button. After the live stream is finished or you've got what you need, click Stop Recording.
Method 2: Schedule a Recording with FVC Screen Recorder
For those who don't want to keep staring at their computer screen waiting for a live stream to start, the FVC Screen Recorder is a perfect choice. It features a Task Schedule option, which can automatically trigger the start and stop of recording at the set time. Because of this, it is very suitable for recording webinars, Twitch streams, or even how to record a YouTube live stream on PC. Apart from scheduled recording, it can also produce excellent quality videos and audio, and its user interface is simple to use.
Hovedtræk
- Du kan indstille timere, så optagelsen starter og stopper automatisk.
- Optag hele skrivebordet, kun ét vindue eller en del af skærmen.
- Optag computersystemlyd og mikrofon samtidig eller hver for sig.
- Optag videoer i højeste kvalitet med op til 4K UHD‑opløsning.
- Tag skærmbilleder under en optagelse.
Gratis downloadTil Windows 7 eller nyereSikker download
Gratis downloadTil macOS 10.7 eller nyereSikker download
Trin til at planlægge en optagelse af en live-stream.
Step 1. Download the updated version of FVC Screen Recorder to your Windows PC and install it. Open the app and pick the Video Recorder option.
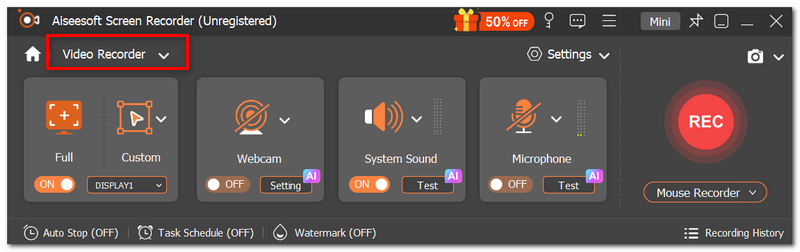
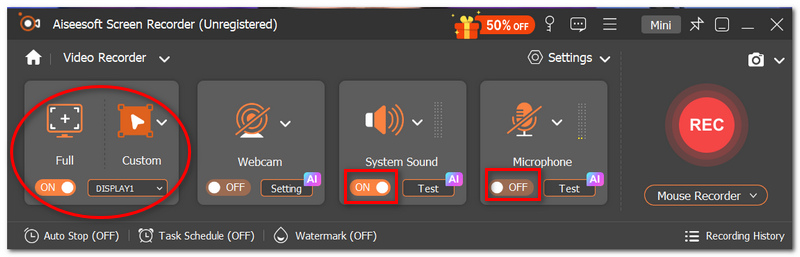
Step 2. Whether you want to capture the entire screen, a selected portion, or a particular application window, make your choice. To record the live stream audio only, switch on System Sound. If you want to include your voice, turn on the microphone as well.
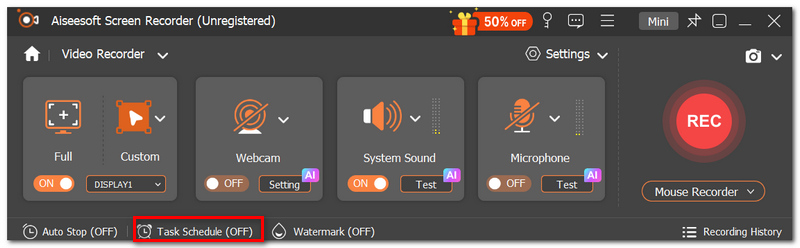
Step 3. Hit the Task Schedule button. Then make a fresh scheduled task and define the Start Time, End Time, and duration of recording.
Step 4. Pick the screen portion for the recorder to capture and set up the recording parameters. Also, keep the scheduled task and continue running the program.

Step 5. FVC Screen Recorder will start the live stream recording by itself at the prearranged time and finish it after the task is done. Check the recording, cut it down if you want, and then hit Save for the ultimate video export.
Thanks to its scheduling capabilities and straightforward installation, FVC Screen Recorder brings an automatic live stream recording, going PM day at the leisure of your home or office.
Method 3: Use the Built-in Windows Game Bar
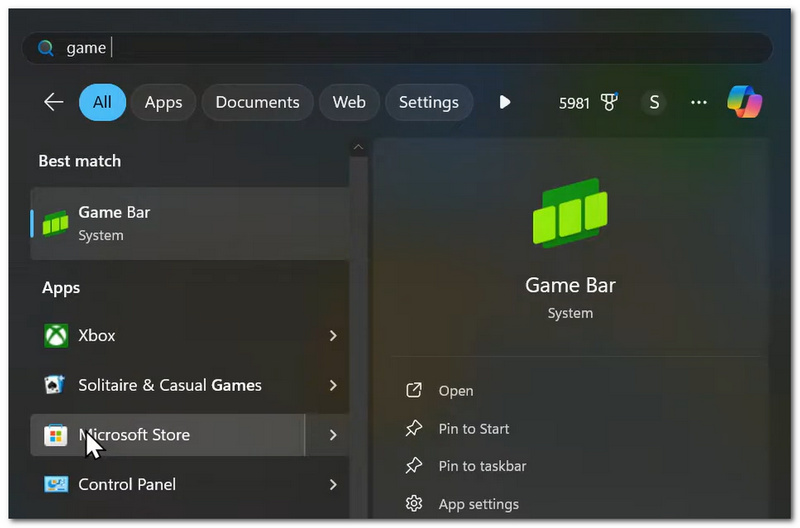
If you don't want to install more software, Windows Game Bar is a handy built-in recorder on both Windows 10 and Windows 11. Even though its main purpose is to record gaming, it can record other applications that are supported too, so it can be a fast way to record a live audio stream on a PC while capturing the screen video.
Step 1. Launch the live stream through your browser or a supported program. Hit Windows + G to launch the Xbox Game Bar.
Step 2. If requested, verify that this window is a game or application. In the Capture widget, verify whether System Audio is available and turn on the Microphone if you want to record your own voice.
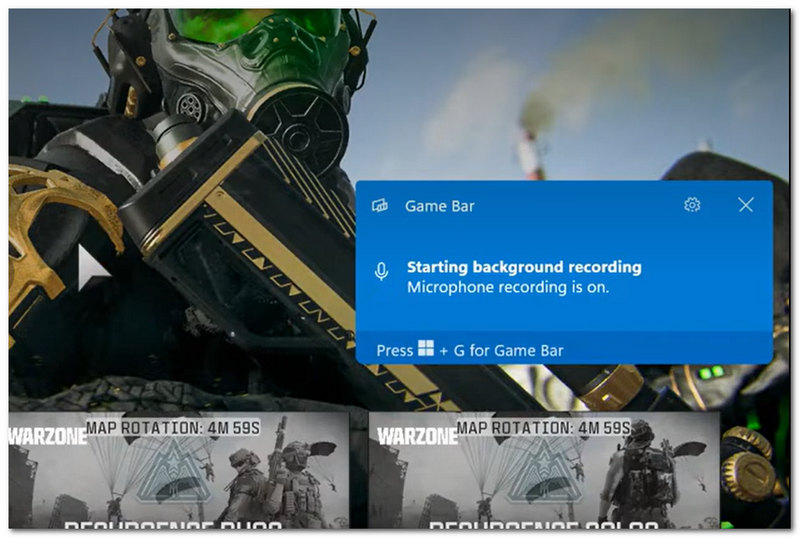
Step 3. Select Start recording or use Windows + Alt + R. Then, allow the live stream to continue playing and the Game Bar to record the chosen application.
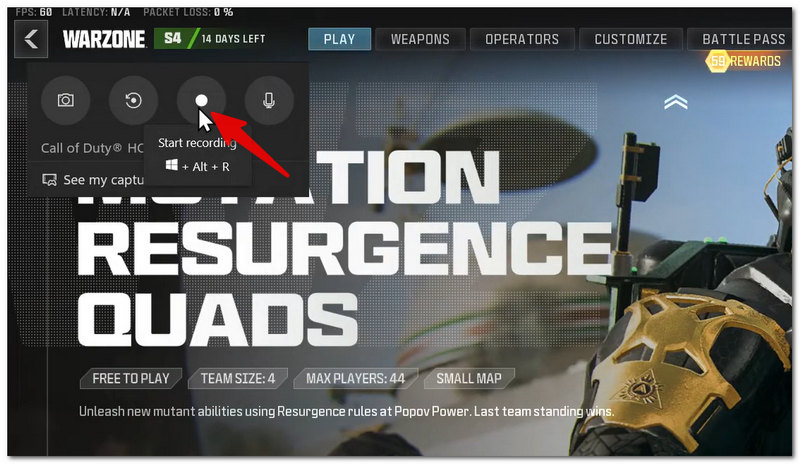
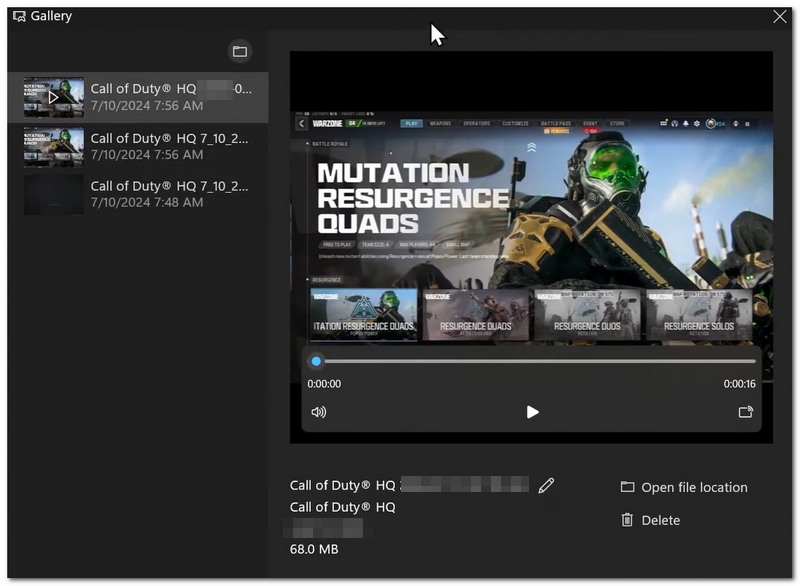
Step 4. When you're done, click Stop Recording or hit Windows + Alt + R once more. Either bring up the Gallery within Xbox Game Bar or navigate to Videos > Captures within File Explorer to find your recording.
Windows Game Bar is also an ideal recording program for users who want a quick and easy way to record without having to get any third-party software, and just for recording supported apps with system sound.
Method 4: Record via Browser Extension (Screencastify)
Screencastify offers a super fast and simple way to record live streams without installing a desktop screen recorder, if you first and foremost watch live streams in a web browser. Being a browser extension, it is quite easy to set up and is a great tool for capturing webinars, online meetings, and browser-based live streaming sessions. Are you curious about how to record live TV streaming on a PC? For your personal use, this can be a helpful tool, as long as you obtain the necessary permissions to record the content.
Step 1. Add the Screencastify extension to your Chrome browser. Register/login to your Screencastify account and allow the requested permissions.
Step 2. Launch the live streaming video that you plan to record via your browser. Then, tap on the Screencastify extension symbol.
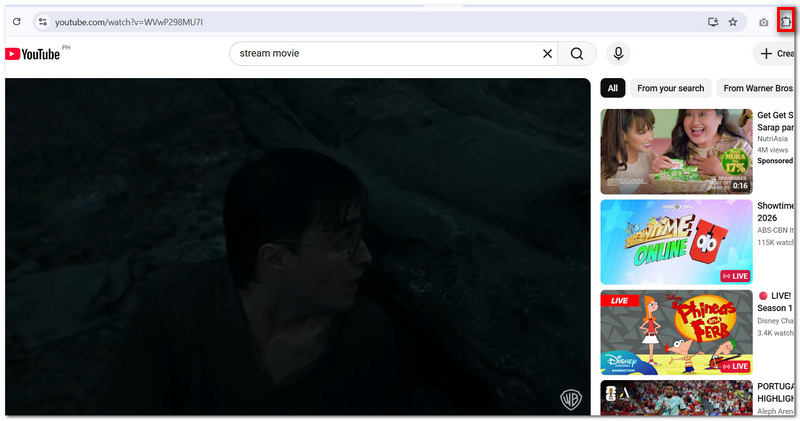
Step 3. Decide if you want to make a video of just the Browser Tab, the entire Desktop, or the Webcam.
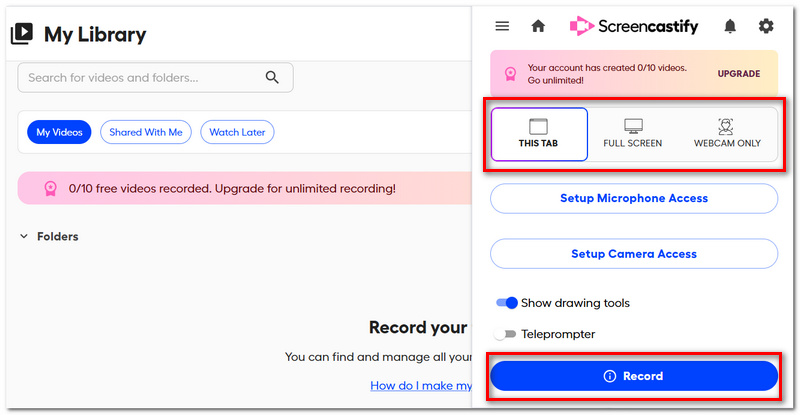
Step 4. Turn on Tab Audio or System Audio if recording the sound of the live stream is a must for you. Then, click Start Recording and select the screen or tab you want to capture before confirming.
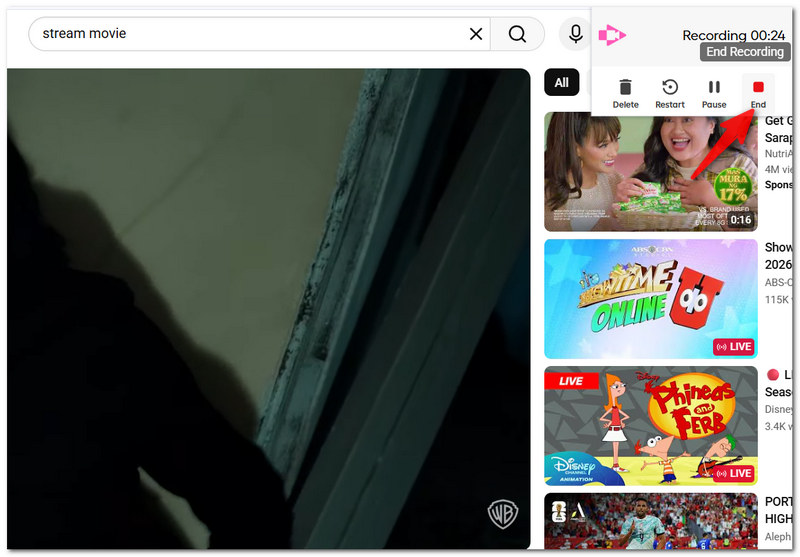
Step 5. While the live stream continues playing, Screencastify will be recording your selected content. Click the Stop command or use the Screencastify button interface to finish the recording session.
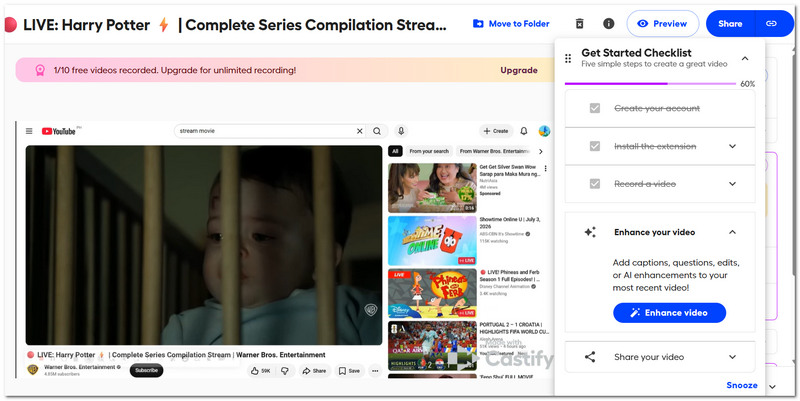
Step 6. View your recording; perform basic editing if necessary, then either save or share the recorded video in a location of your choice.
Note: Ensure you have the legal rights to record the live stream. Recorded videos should be strictly for personal use or other uses as allowed by the applicable copyright laws and the platform's terms of service.
Tips to Prevent Lag While Recording
It takes up a significant chunk of your computer's resources when you record a live stream, Most of all if you are capturing high-resolution video. You should optimize your system beforehand so that you won't experience any issues during your recording session and can prevent dropping frames.
1. Luk unødvendige programmer.
Close applications that you are not using to release CPU, RAM, and disk resources, which will make your recorder more efficient.
2. Sænk optagelsesopløsningen om nødvendigt.
If your computer is experiencing difficulties in 4K recording, then switch to 1080p or 720p. Lower resolution decreases the load on the system while still giving good quality videos.
3. Brug hardwareacceleration.
Hardware acceleration is provided by NVIDIA NVENC, AMD AMF, or Intel Quick Sync. If your recording software supports it, then please turn it on to reduce CPU usage.
4. Brug et dedikeret drev til optagelser.
Storing files on an SSD is better than on a standard HDD. Writing speeds will be faster, and you will be less likely to see lag during extended recordings.
5. Vælg en fornuftig billedfrekvens.
30 FPS recording is okay most of the time for webinars, YouTube Live, and live streams. 60 FPS should be the only option if smooth motion is required.
6. Begræns antallet af åbne faner i browseren.
If you are web browser recording, then close all extra tabs to minimize memory utilization and better browser performance.
7. Brug en stabil internetforbindelse.
Recording does not rely on internet speed. Yet with a stable connection, you won't get buffering or quality degradation issues during the live stream.
8. Test dine indstillinger inden den egentlige live-stream.
Before the live event, record a short clip and ensure that the audio, video quality, and recording region are set up correctly.
9. Sørg for, at der er ledig lagerplads.
Have enough free space for the recording drive. If you run out of space in the middle, it might stop recording or even corrupt your file.
10. Genstart computeren før lange optagesessioner.
Rebooting your system will clear all unnecessary background processes and free system resources, which will be helpful when doing long recordings.
FAQs about Recording a Live Stream on PC
Vil det give en besked til streameren, hvis man optager en livestream?
Nej, hvis du optager en computerskærm lokalt, får personen, der sender live-streamen, ingen besked om det.
Hvorfor er min optagede livestream kortere end den oprindelige udsendelse?
Det kan være tilfældet, hvis du stoppede optagelsen manuelt, blev afbrudt, eller løb tør for lagerplads, før streamen sluttede.
Reducerer optagelse af en livestream den oprindelige streamingkvalitet?
Slet ikke. Optagelsen påvirker ikke selve livestreamen, men videokvaliteten på det, du gemmer, afhænger af de optageindstillinger, du har valgt.
Konklusion
Discovering how to record a live stream on a PC for free can be less complicated than you might imagine. When you are equipped with an effective recording technique and appropriate configurations, it's possible to capture live streams for leisure time without even compromising on the video quality. All you have to do is select the tool that is most appropriate for you and have a nice time recording.
-
 De 4 bedste M3U8-afspillere til Windows og Mac, du ikke bør gå glip af
 Når du vil afspille en fil via M3U8-streamlink, kan du prøve de 4 fremragende M3U8-afspillere til Windows og Mac nedenfor.
-
 Bedste M4V File Video Stream Recorder understøttet af alle platforme
 Find de bedste apps, du kan bruge til at optage M4V -videoer eller livestreaming. Se liste over optagere, der kan fungere på alle enhedsplatforme.
-
 Trin-for-trin-guide til, hvordan du optager ASF-video [online og offline].
 ASF -optaget fil understøtter datalevering over en bred skala af kanaler. Fortsæt med at læse for mere information, du får brug for.
