


Hvordan formindskes videostørrelse i Premiere Pro? Egnede metoder til brug
At komprimere en video har adskillige fordele, som kan forbedre din seeroplevelse markant. Det reducerer og komprimerer størrelsen på videofilen, hvilket gør det hurtigere at uploade, downloade og dele. Denne teknik er medvirkende, hvis du har begrænset lagerplads eller en langsom internetforbindelse. Derudover kan komprimering af en video forbedre kvaliteten ved at fjerne unødvendige data og forbedre dens klarhed. Denne funktion betyder, at du kan nyde en seeroplevelse i højere kvalitet uden at ofre hastighed eller lagerplads.
En af de mest genkendelige videokompressorer er Adobe Premiere Compress Video. Dette værktøj gør det muligt for brugere at komprimere filstørrelsen på deres video på den nemmeste måde. I denne artikel eller dette indlæg gennemgår vi metoderne og alternativerne til dette værktøj, når det handler om at reducere videofiler.

Del 1. Komprimer video med Premiere
Adobe Premiere Pro er en redigeringssoftware, der er tidslinjebaseret og ikke-lineær ved redigering af videofiler. Den har mange videoredigeringsfunktioner, men da vi diskuterer komprimering af en video, vil vi fokusere på disse funktioner og relaterede funktioner. Adobe Premiere Pro har en indbygget Media Encoder, der giver dig mulighed for at komprimere dine videoer uden at ofre kvaliteten. Du kan vælge eller vælge mellem en række forudindstillinger eller tilpasse dine indstillinger. Dens Bitrate-kodningsindstilling lader dig specificere de data, der bruges pr. sekund i din video. Afhængigt af dine behov kan du vælge mellem variabel eller konstant bithastighedskodning. Endelig har Adobe Premiere Pro også en række eksportindstillinger, der giver dig mulighed for at tilpasse din videokomprimering yderligere. Du kan vælge mellem forskellige filformater, opløsninger og mere. Se den enkle vejledning nedenfor for at lære, hvordan du komprimerer en video med denne editor.
Trin 1. Da vi skal tale om at komprimere videofiler i Premiere Pro, springer vi nogle redigeringsdele over i disse trin. Vi antager, at du allerede har redigeret din video og brugt værktøjet til at oprette en fil. Vi vil især fokusere på eksportprocessen i denne gennemgang.
Trin 2. Gå til eksportvinduet ved at klikke på menuen File. Vælg funktionen Export i rullemenuen. Gå derefter til indstillingen Media for at få adgang til Export-indstillingerne.
Trin 3. Her kan du finde forskellige muligheder, der kan reducere videofilens størrelse i Premiere Pro. Du kan bruge effektive codec-formater til at gemme videoen i små filer med bedre videocodecs.
Trin 4. Alternativt kan du bruge eller indstille videoens bitrate til VBR, 2 Pass. Du kan også ændre videoopløsningen og den ønskede bitrate for at sænke din filstørrelse. Til sidst skal du trykke på eller klikke på knappen Export for at gemme videofilen.

Del 2. Bonus: Sådan komprimeres lyd i Premiere
En anden funktion ved Adobe Premiere Pro er at komprimere lydfiler i sit system. Den leveres med et væld af lydmixere, komprimeringsfunktioner og codecs for at mindske filstørrelsen på din lydfil. Du kan tjekke de anførte metoder under denne korte beskrivelse for at lære, hvordan du komprimerer Premiere Pro-lyd.
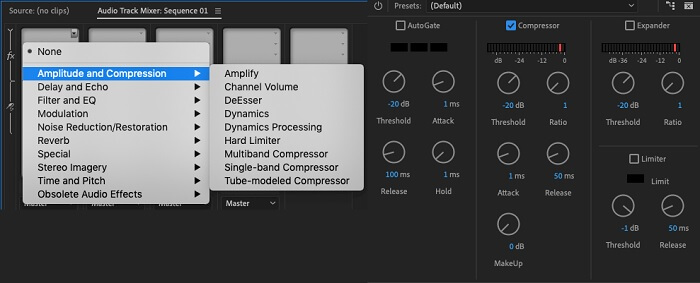
Trin 1. For at komprimere lyd i Premiere-videoredigeringsprogrammet skal du vælge lydklippet i tidslinjepanelet nederst i værktøjet. Gå til fanen eller panelet Effects og søg efter effekten Loudness Radar. Træk og slip effekten over på lydklippet.
Trin 2. I panelet Effect Controls justerer du Target Loudness til det niveau, du ønsker. Denne funktion fastsætter klippets samlede lydstyrke. Et mindre område vil give mere kompression, mens et større område vil give mindre kompression.
Trin 3. For yderligere at finjustere kompressionen skal du bruge kontrollerne Threshold og Ratio. Threshold bestemmer det punkt, hvor lyden bliver komprimeret, mens Ratio bestemmer mængden af kompression, der anvendes.
Trin 4. Når du har justeret indstillingerne, så de passer til dine ønsker, skal du forhåndslytte lydklippet for at sikre, at det lyder afbalanceret og naturligt. Til sidst eksporterer du den komprimerede lyd ved at gå til File-indstillingen og vælge knappen Export. Gå derefter til fanen Media, vælg dine ønskede eksportindstillinger, og klik på Export for at gemme den komprimerede lydfil.
Del 3. Bedste alternativer til premiere til komprimering af video og lyd
1. Video Converter Ultimate
Når Adobe Premiere Pro ikke kan komprimere din video- og lydfil til den ønskede filstørrelse, kan du bruge Video Converter Ultimate. Dette program indeholder en betydelig mængde funktioner, som brugerne kan udnytte til at reducere filstørrelsen på videoklip. På grund af dets avancerede, accelererede algoritme eller teknologi kan dette værktøj komprimere videofiler 30 gange mere end en almindelig videokompressor. Derudover har det en skyder, som brugerne kan bruge til at reducere en vis procentdel af videofilen.
En anden metode til at reducere lyd- og videofiler i denne applikation er at ændre filens kvalitetsformat, opløsning og bitrate. Bonusfunktionen kommer også med en Metadata-editor, hvor brugere kan omdøbe filen bortset fra den originale video. Se venligst brugervejledningen nedenfor.
Trin 1: Download Video Converter Ultimate
Det første trin i at komprimere video med Video Converter Ultimate er at få appen installeret på din pc. Du kan klikke på ikonet Free Download nedenfor for at hente installationsfilen. Kør den derefter på din pc for at installere appen. Start den, når den er installeret.
Free DownloadTil Windows 7 eller nyereSikker download
Free DownloadTil macOS 10.7 eller nyereSikker download
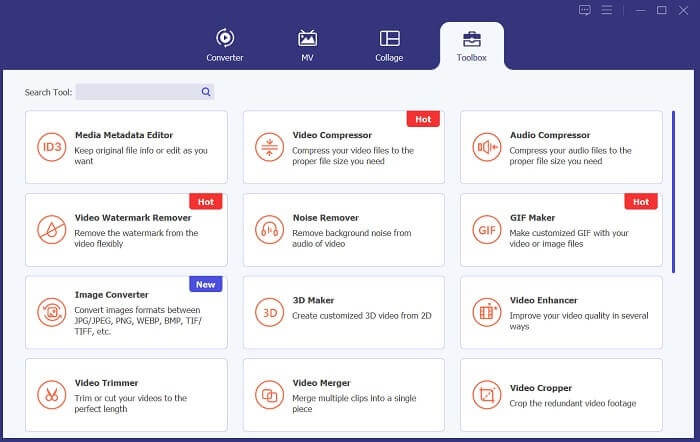
Trin 2: Gå til Video Compressor
Når du har åbnet Video Converter Ultimate på din pc, skal du gå til indstillingen Toolbox. Find indstillingen Video Compressor og start funktionen. Importér dine filer ved at klikke på +-ikonet i grænsefladen.
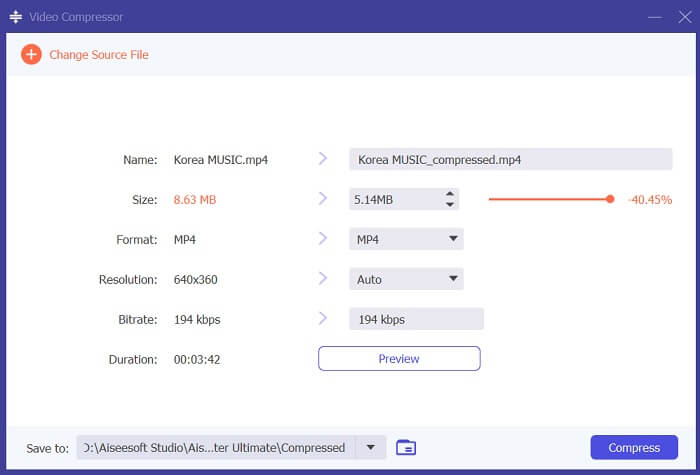
Trin 3: Komprimer videofiler
Til sidst skal du justere og ændre nogle videoparametre for at komprimere din videofil. Træk skyderen på højre side af filstørrelsen, eller brug andre metoder som at ændre opløsning, format og bitrate. Klik på indstillingen Compress for at gemme og reducere videofilens størrelse på din pc.
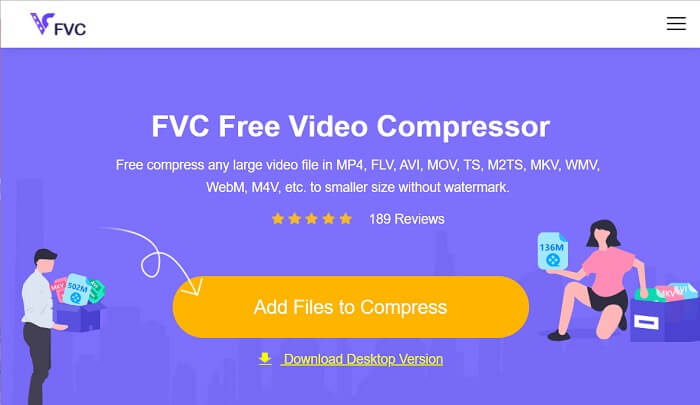
2. FVC Videokompressor Online
Vi forstår det; nogle gange har du ikke brug for omfattende værktøjer til at komprimere en videofil. Det er måske ikke dig at installere forskellig software; derfor anbefaler vi FVC Video Compressor Online. Denne webbaserede applikation er udstyret med en ligetil proces til komprimering af videofiler. Den gør det muligt for brugere at komprimere og reducere videofiler i 4K-kvalitet, HD-opløsning og mere. Desuden går det ikke ud over videofilens kvalitet. Selv hvis den er i 4K, kan du stadig reducere filen. Hvad angår alsidighed, er dette onlineværktøj en mester. Du kan komprimere videofiler i forskellige formater, herunder MP4, FLV, MKV, MOV, AVI, WebM, 3GP, RMVB og mange flere. Se nedenfor for den komplette vejledning i at komprimere videofiler.
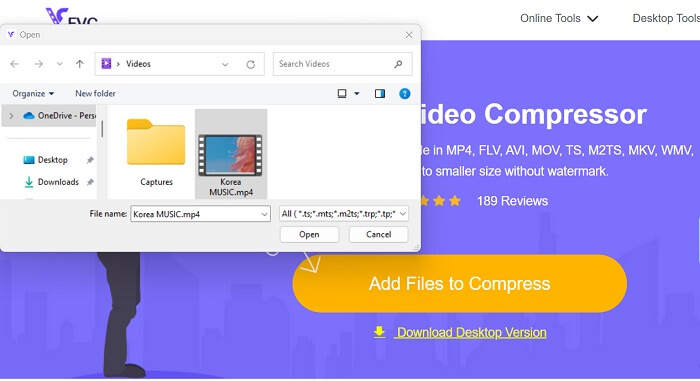
Trin 1: Gå til værktøjet
At få adgang til værktøjet i din webbrowser er det første skridt til at komprimere video online. Du kan bruge Chrome, Firefox, Microsoft Edge, Safari og andre browsere til at finde værktøjet. Åbn værktøjet i din browser, og klik på Add Files to Compress for at installere dets launcher. Denne metode er kun for førstegangsbrugere; hvis du allerede har onlineappens launcher, skal du gå videre til næste trin.
Trin 2: Importér filer i appen
Klik på Add Files to Compress for at få adgang til din enheds mappe. Find den video, du skal komprimere, og klik på Open for at importere eller tilføje den til onlineværktøjet. Vent, indtil det webbaserede værktøj har analyseret dine filer.
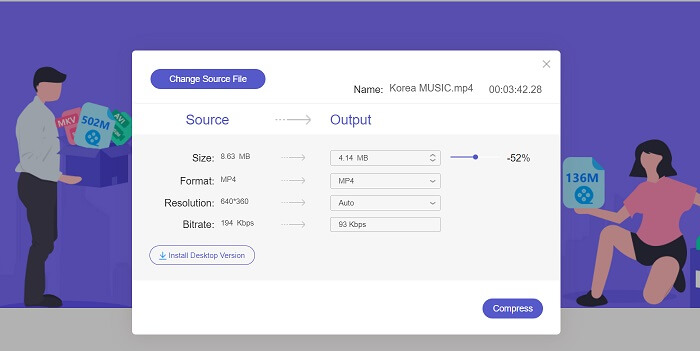
Trin 3: Komprimer og eksporter filer
Til sidst skal du justere, finindstille og ændre forskellige videoparametre for at reducere filstørrelsen på din enhed. Du kan også trække procentindikatoren for at reducere en bestemt procentdel af videostørrelsen. Klik på knappen Compress for at starte processen og eksportere de komprimerede filer.
Yderligere læsning:
2 måder at komprimere video til YouTube på
Gennemprøvede metoder til at skabe slowmotion-videoer i Adobe Premiere
Del 4. Ofte stillede spørgsmål om Adobe Premiere Pro
Hvordan ændrer jeg størrelsen på en video i Premiere Pro?
For at komprimere video i Premiere kan du bruge funktionen Export Settings. Vælg videofilen eller klippet på tidslinjen, og gå derefter til File > Export > Media. Derfra kan du justere indstillingerne for at komprimere videoen og samtidig bevare kvaliteten. Derudover kan du ændre størrelsen på en video i Premiere Pro ved at vælge klippet i tidslinjepanelet og gå til panelet Effect Controls. Derfra kan du justere Scale-parameteren for at øge eller mindske videoens filstørrelse.
Hvad er videokomprimering?
Videokomprimering er processen med at reducere eller begrænse filstørrelsen på en video, mens kvaliteten af output bibeholdes så meget som muligt. Denne proces passer til brugere, der har brug for at dele, downloade, uploade og gemme deres filer hurtigt og bekvemt.
Hvorfor komprimere video?
Komprimering af video kan gøre det nemmere at dele og uploade og spare lagerplads på din enhed. Denne videoredigeringsfunktion er en must-have mulighed, når du downloader videoredigeringssoftware.
Vil komprimering af video påvirke kvaliteten?
Ja, komprimering af en video kan påvirke kvaliteten. Test og forhåndsvisning af ændringerne, før de færdiggøres, er afgørende for at sikre, at videoen stadig ser godt ud efter komprimering.
Konklusion
At komprimere en video er en proces, som de fleste videoentusiaster har brug for at lære. Det kan ikke kun spare dig lagerplads, når du gemmer dine filer, men det gør det også nemmere at dele, uploade og downloade videoen. Der findes forskellige muligheder for at komprimere videofiler. En af de mest kendte apps er Adobe Premiere Pro. De løsninger, vi har samlet om how to compress audio in Premiere, er en stor hjælp til at organisere dine filer. Lad os vide det i kommentarfeltet nedenfor, hvis du har brug for yderligere information om dette emne.
-
 Hurtige og nemme måder til at synkronisere lyd og video i Adobe Premiere Pro
 Vil du vide, hvordan man synkroniserer lyd og video i Premiere Pro? Så passer denne artikel til dine behov. Som vi selv prøver det med rigtige og enkle trin.
-
 Sådan fremskyndes video i Premiere Pro og med dens alternativer
 Vil du vide, hvordan du bruger premiere pro til at fremskynde en video? Så er du i den rigtige artikel, da vi leverer trin og andre overkommelige alternativer.
-
 Hurtigste måde at fjerne logo fra video i Adobe Premiere Pro
 Prøv disse nemme og hurtigste måder at fjerne logoer fra en video i Adobe Premiere Pro. Denne artikel vil give dig de bedste måder, du kan prøve at bruge din enhed på.