


Proceso completo sobre cómo usar GIMP para cambiar el tamaño de las imágenes
Cambiar el tamaño de una imagen es esencial cuando se trata de editar una imagen. A veces, necesita cambiar la altura y el ancho de su imagen para obtener su tamaño preferido. Además, otros editores de fotos realizan el cambio de tamaño de una imagen para reducir el tamaño de su imagen o mejorar la calidad. Por suerte, encontramos una aplicación que te permite cambiar el tamaño de una imagen.
GIMP es un software de manipulación de imágenes en línea con el que puedes editar tus imágenes. Además, GIMP te permite cambiar la altura y la anchura de tu imagen, aumentando la calidad de la misma. Por lo tanto, si quieres usar GIMP para redimensionar una imagen, consulta ahora este artículo.

Parte 1. Cómo usar GIMP para cambiar el tamaño de las imágenes
GIMP es una plataforma de aplicación de manipulación gráfica que permite a los diseñadores gráficos crear resultados excelentes. Permite a los usuarios crear elementos de diseño, imágenes con secuencias de comandos, íconos y más. Además, es una aplicación gratuita de código abierto que puede usar en casi todas las plataformas de medios, como Windows, Mac y Linux. Muchas personas recomiendan esta aplicación cuando buscan una alternativa a Adobe Photoshop.
Y a pesar de que tiene una interfaz más sencilla que Photoshop, algunas personas todavía tienen dificultades para usar GIMP. Lo que es aún más interesante de GIMP es que te permite editar los píxeles de tu imagen. Y si está buscando el mejor redimensionador de imágenes, es posible que desee considerar GIMP como su preferencia.
En esta parte, le presentaremos dos métodos para usar GIMP para cambiar el tamaño de la imagen (dimensiones y tamaño).
Cómo usar GIMP para cambiar el tamaño de las dimensiones de la imagen
Paso 1. Primero, descarga la aplicación GIMP en tu dispositivo e instálala. Después de instalarla, abre la app en tu dispositivo. A continuación, abre la imagen en GIMP.
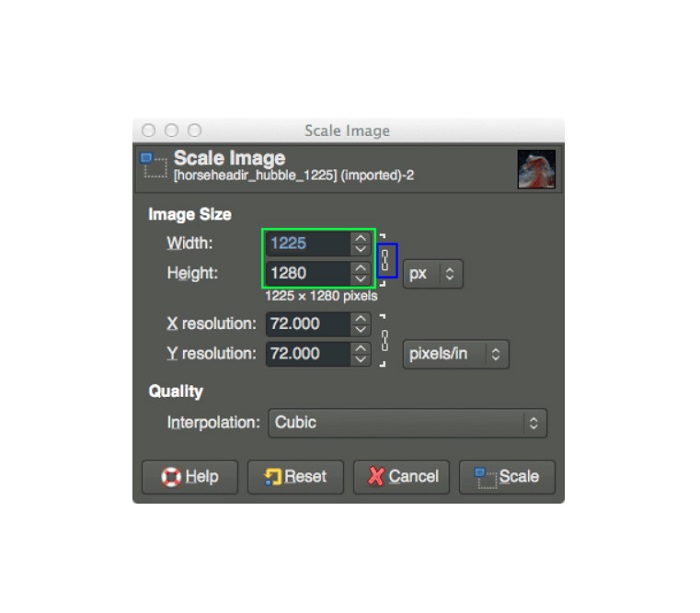
Tenga en cuenta que cuando abra su imagen en GIMP, la imagen se ampliará para que toda la imagen quepa en el lienzo de su imagen. Verá el tamaño actual de su imagen en la esquina superior derecha de su ventana.
Paso 2. Para redimensionar las dimensiones de tu imagen, ve a Imagen y después selecciona el diálogo Escalar imagen. En el diálogo Escalar imagen, puedes cambiar el ancho y alto de tu imagen. Escribe el tamaño de dimensión que prefieras y continúa con el siguiente paso. Además del alto y el ancho de tu imagen, verás una cadena que indica que el alto y el ancho de tu imagen están vinculados entre sí, lo que significa que cuando cambies el alto, el ancho se ajustará en consecuencia.
Paso 3. Una vez que hayas terminado de modificar el tamaño de las dimensiones de tu foto, ya puedes exportar tu imagen. Para exportar tu imagen, ve a Archivo > Exportar. Y para exportar tu resultado con un nombre de archivo nuevo, ve a Archivo > Sobrescribir y luego asigna un nombre a tu archivo.
Cómo usar GIMP para cambiar el tamaño de las imágenes sin perder calidad (tamaño de archivo):
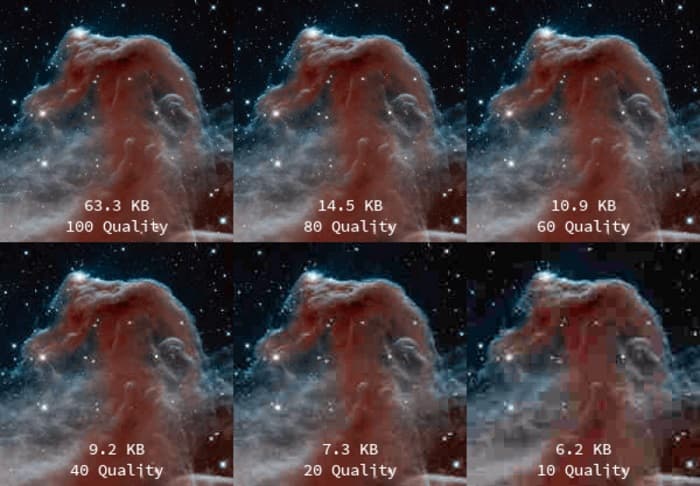
En este tutorial, usaremos una imagen JPEG porque este tipo de formato es una compresión con pérdida, lo que significa que al comprimir el tamaño de esta imagen, sacrificaremos parte de su calidad. Pero al usar GIMP, es posible cambiar el tamaño de su imagen sin afectar su calidad.
Paso 1. Usando la misma imagen anterior, redimensionaremos la imagen a 200 px de ancho y exportaremos el archivo con distintos niveles de compresión JPEG. Observarás en el ejemplo de abajo que, con un ajuste de calidad de 80, el tamaño de archivo de tu imagen es menor que con 100 y mantiene prácticamente la misma calidad.
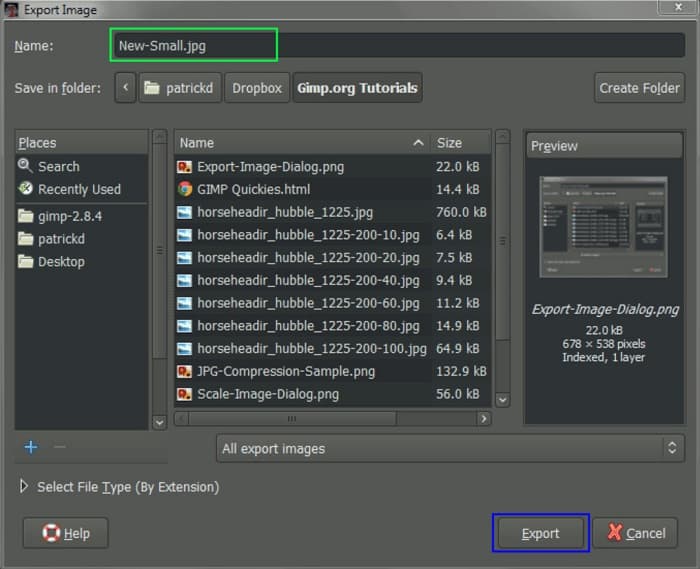
Paso 2. Cuando termines de modificar el tamaño de tu imagen, exportaremos el resultado. Haz clic en el botón Archivo y selecciona Exportar.
Paso 3. En la pestaña Exportar imagen, introduce el nuevo nombre de tu imagen. Si te preocupa en qué formato se guardará tu resultado, GIMP exporta automáticamente en el formato de archivo original. En nuestro ejemplo, verás que el formato de salida sigue siendo .jpg.
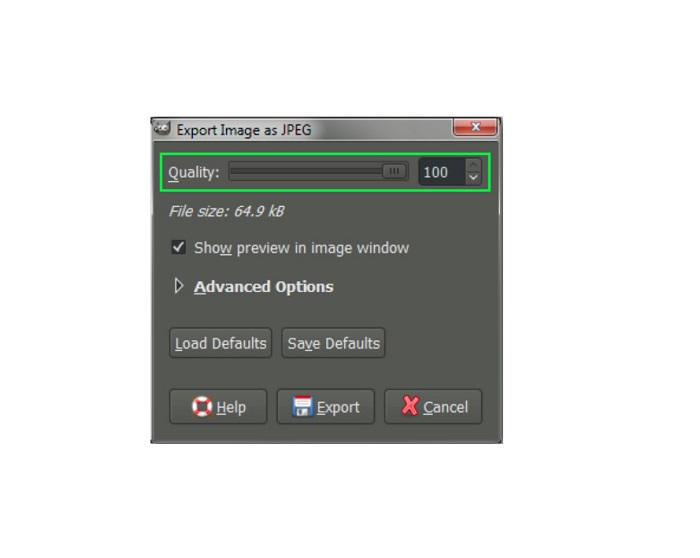
Paso 4. Después de hacer clic en el botón Exportar, aparecerá la pestaña Exportar imagen como JPEG, donde podrás cambiar la calidad de la imagen que estás exportando. Si también tienes la opción Mostrar vista previa en la ventana de la imagen, puedes marcar la casilla y ver la vista previa de tu imagen. También verás la información del Tamaño de archivo para que sepas el tamaño de archivo resultante de tu imagen.
Paso 5. Y, por último, marca el botón Exportar para exportar tu imagen y guardarla en tu dispositivo.
Y así es como usar GIMP para cambiar el tamaño de la dimensión de su imagen y el tamaño del archivo. Puede editar más su imagen, como rotar una imagen, voltear una foto y recortar su imagen. Lea la siguiente parte si aún desea una opción para cambiar el tamaño de su imagen o mejorar la calidad de sus imágenes.
Parte 2. Alternativa a GIMP
GIMP es una de las aplicaciones de edición de fotos más estándar que utilizan muchos profesionales. Sin embargo, algunos usuarios tienen dificultades para usar este software para editar fotos, como cambiar el tamaño de las imágenes. Y si se encuentra entre los usuarios que desean utilizar una aplicación más sencilla, entonces tenemos la solución para usted.
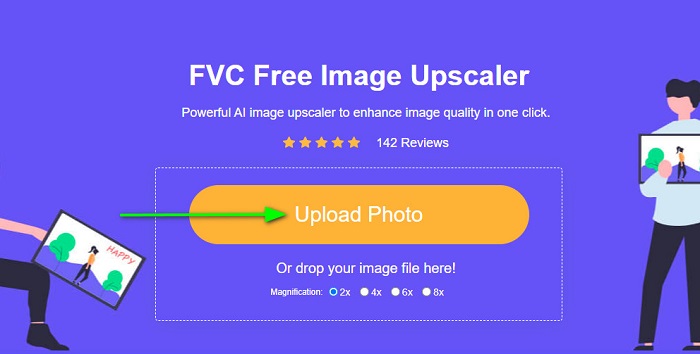
FVC Free Image Upscaler es una aplicación en línea gratuita con una interfaz de usuario sencilla, lo que la convierte en una herramienta fácil de usar para principiantes si estás buscando el mejor optimizador de imágenes para mejorar la calidad de tus fotos. Utiliza un proceso de ampliación mediante IA que detecta automáticamente las partes borrosas de tu imagen y las mejora. Además, puedes mejorar tu foto con hasta 8x de aumento. También es compatible con los formatos de imagen más comunes, como JPEG, JPG, PNG y BMP. Y, a diferencia de otras aplicaciones de edición, FVC Free Image Upscaler puede redimensionar tu imagen sin perder calidad. Así que, si quieres usar esta herramienta para redimensionar y mejorar tu imagen, sigue los sencillos pasos que indicamos a continuación.
Cómo cambiar el tamaño de la imagen sin perder calidad Alternativa GIMP:
Paso 1. Abre tu navegador web y busca FVC Free Image Upscaler en el cuadro de búsqueda. También puedes hacer clic directamente en el enlace a la página principal. En la interfaz principal del software, haz clic en el botón Upload Photo para iniciar la aplicación en tu dispositivo.
Paso 2. Luego, haz clic en el botón Upload Photo en la interfaz principal para añadir la foto que quieres redimensionar/ampliar.
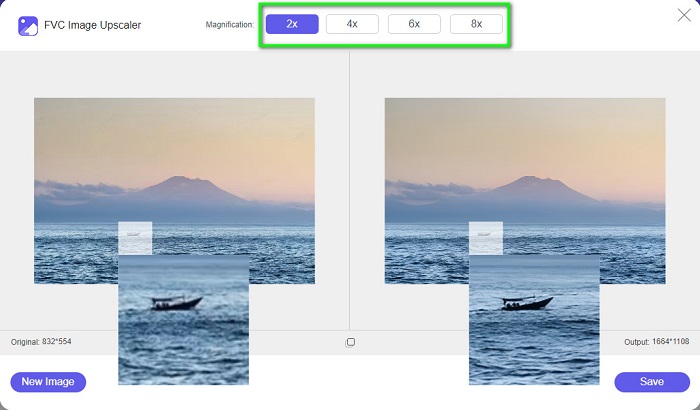
Paso 3. Después de subir tu archivo, selecciona uno de los preajustes de aumento. Puedes elegir entre 2x, 4x, 6x y 8x. Después, puedes comprobar la vista previa de tu resultado deslizando el cursor sobre la imagen.
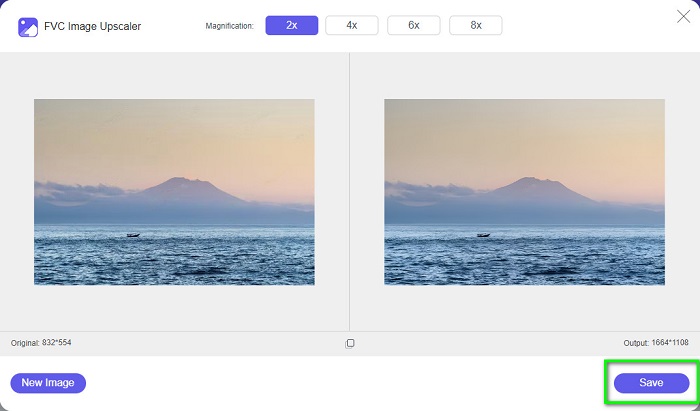
Paso 4. Por último, pulsa el botón Save en la esquina inferior derecha de la interfaz para guardar tu resultado en tu dispositivo.
Relacionado con:
Cómo optimizar imágenes para la web utilizando las mejores soluciones [Rápido]
3 formas de redimensionar una imagen para Twitter sin perder calidad
Parte 3. Preguntas frecuentes sobre cómo usar GIMP para cambiar el tamaño de las imágenes
¿GIMP tiene una versión en línea?
Sí, lo hace. GIMP no es solo una aplicación de edición de fotos sin conexión; también tiene una versión en línea. Sin embargo, GIMP en línea no contiene todas las funciones como la versión de escritorio de GIMP.
¿Es GIMP el mejor Photoshop gratuito?
GIMP no es comparable a Photoshop. Photoshop sigue siendo el software de edición de fotos más excelente para computadoras de escritorio. Sin embargo, GIMP es una de las mejores alternativas para Adobe Photoshop.
¿GIMP admite archivos PNG?
Sí. GIMP le permite guardar sus resultados en JPEG, JPG, PNG y otros formatos.
Conclusión
Y ese es el proceso de cómo usar GIMP para redimensionar imágenes. Aunque GIMP tiene una interfaz compleja, siguiendo los pasos que te hemos proporcionado arriba, puedes cambiar las dimensiones y el tamaño de tu imagen. Pero si prefieres usar un redimensionador de imágenes en línea gratuito que pueda mejorar la calidad de tu imagen, utiliza FVC Free Image Upscaler.
-
 6 formas de cambiar el tamaño de una imagen en la web y sin conexión [funcionamiento 100%]
 Con el tutorial que agregamos aquí, ahora puede cambiar fácilmente el tamaño de una imagen según su tamaño preferido. ¡Aprende cómo hacerlo aquí!
-
 Revisión fáctica de PicResize que debe saber este 2022
 ¿Quieres saber si PicResize es la mejor opción para editar imágenes? Lea este artículo mientras revisamos la herramienta en general.
-
 Todo lo que necesita saber sobre Waifu2x y la alternativa
 ¿Necesita saber más sobre el Waifu2x? Este artículo proporciona la información que debe destacarse en esta aplicación y su alternativa.