


Guía definitiva para usar IA para enfocar imágenes en computadoras y dispositivos móviles
¿Alguna vez has tenido una imagen que se ve apagada y sin vida? Quizá a tu foto le falte nitidez y claridad. Pero ¿lo sabías? Hay muchas aplicaciones para enfocar imágenes que puedes encontrar en internet. No necesitas soluciones de escritorio caras para enfocar tu imagen. Encontrarás muchas aplicaciones que pueden ayudarte a enfocar tu imagen buscando en internet. Pero ya no necesitas seguir buscando porque hemos recopilado las mejores herramientas para aumentar la nitidez de las imágenes y te enseñamos cómo usarlas. Termina de leer este artículo para aprender cómo enfocar imágenes gratis en línea o sin conexión.

Parte 1. Cómo enfocar una imagen gratis en línea sin registro
A pesar de eso, existen muchas aplicaciones para dar nitidez a una imagen; se recomienda que utilice la herramienta más segura y sencilla. Es por eso que buscamos los mejores afiladores de imágenes y los enumeramos solo para usted. Además, le demostraremos cómo usar estas herramientas de enfoque de imagen.
Mejore la nitidez de la imagen con el escalador de imágenes gratuito FVC
FVC Free Image Upscaler es la mejor herramienta para aumentar la nitidez de una imagen. Si estás buscando una herramienta de IA para enfocar imágenes, entonces FVC Free Image Upscaler es la herramienta que necesitas. Además, es compatible con varios formatos de imagen, como PNG, JPG, JPEG y BMP. Y utilizando su tecnología de IA (Inteligencia Artificial), puedes mejorar tu imagen hasta 2x, 4x, 6x y 8x de aumento. Lo fantástico de esta herramienta en línea es que puedes acceder a ella desde todos los navegadores web, incluidos Google, Firefox y Safari.
Además, muchos principiantes prefieren usar esta herramienta porque tiene una interfaz de usuario sencilla. Además, aunque es una aplicación en línea, tiene un proceso de afilado rápido, por lo que es cómodo de usar. También puede obtener una vista previa de su imagen de salida antes de descargarla en su dispositivo. Por lo tanto, si desea utilizar esta herramienta para mejorar su imagen, siga las sencillas instrucciones a continuación.
Cómo enfocar una imagen usando FVC Free Image Upscaler:
Paso 1. Abre tu navegador y busca FVC Free Image Upscaler en la barra de búsqueda. También puedes hacer clic directamente en el enlace para ir a su página principal.
Paso 2. Luego, haz clic en el botón Upload Photo en la interfaz principal para importar la imagen que quieres enfocar.
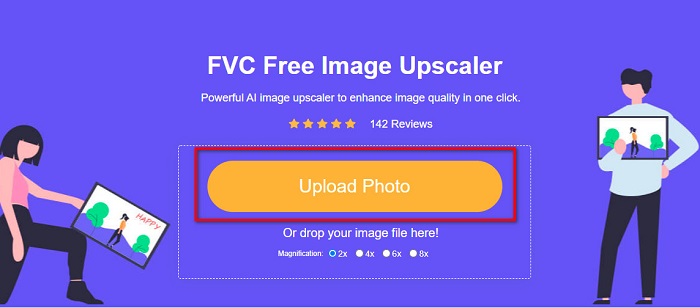
Paso 3. A continuación, elige el ajuste de magnification que deseas para tu imagen. Puedes seleccionar entre aumentos de 2x, 4x, 6x y 8x. Después, verás la vista previa del resultado.

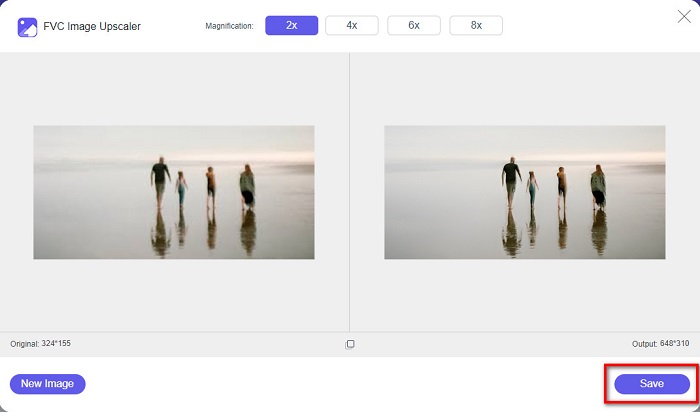
Paso 4. Por último, para guardar el resultado de tu imagen, haz clic en el botón Save. Entonces, la aplicación guardará tu imagen de forma automática y rápida en las carpetas de tu ordenador.
¡Y eso es! Tan simple como eso, puede mejorar fácilmente la parte borrosa de su imagen y agregarle nitidez.
Mejorar la imagen con VanceAI
VanceAI es un editor de nitidez de imágenes en línea que puedes usar si quieres enfocar tu imagen o añadirle definición. En efecto, cuando añades nitidez a tu imagen, esta se ve mejor. Por eso, si quieres enfocar tu imagen rápidamente, VanceAI es la herramienta que debes usar. Además, puedes utilizarla gratis en casi todos los navegadores web, como Google y Safari. También mejora automáticamente las partes borrosas de tu imagen en solo unos clics. Con su interfaz fácil de usar, los principiantes pueden manejar esta aplicación sin problemas. Además, es compatible con los formatos de imagen más comunes, como JPG, JPEG y PNG. Sin embargo, cuando enfoques tu imagen usando VanceAI, dejará una marca de agua en tu imagen.
Cómo enfocar una imagen borrosa usando VanceAI:
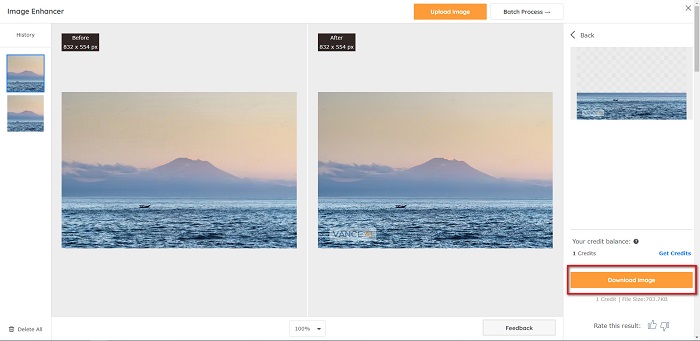
Paso 1. En tu navegador, busca VanceAI y ve a su página principal. Luego, en la interfaz principal, haz clic en el botón Upload Image para subir la imagen que quieres enfocar.
Paso 2. Después de subir tu imagen, haz clic en el botón Start to Process en la esquina inferior derecha de la interfaz.
Paso 3. Finalmente, verás la vista previa del resultado de tu imagen. Después, haz clic en el botón Download Image para descargar tu imagen enfocada.
Enfocar una imagen borrosa con PineTools
PineTools es otra aplicación en línea para enfocar que puedes usar fácilmente. Con su interfaz sencilla, los principiantes también pueden usar esta herramienta para arreglar la calidad de una foto. Puedes ajustar la intensidad o nitidez de tu imagen usando su control deslizante. Además, puedes seleccionar el tamaño de la máscara de convolución de tu imagen entre 3x3 y 5x5. Algo aún mejor de esta aplicación en línea es que puedes acceder a ella en casi todos los navegadores web, incluidos Google y Safari. El inconveniente de PineTools es que contiene muchos anuncios que pueden distraerte mientras enfocas tu imagen. Aun así, muchos principiantes usan esta herramienta porque es muy práctica.
Cómo enfocar una imagen borrosa usando PineTools
Paso 1. Primero, busca PineTools en tu navegador y haz clic en la página que lleva a su sitio web. Luego, haz clic en el botón Choose Files en la primera interfaz para subir la foto que quieres enfocar.

Paso 2. Después, en el panel Sharpen, mueve la mini box hasta la intensidad o nitidez que prefieras para tu imagen.
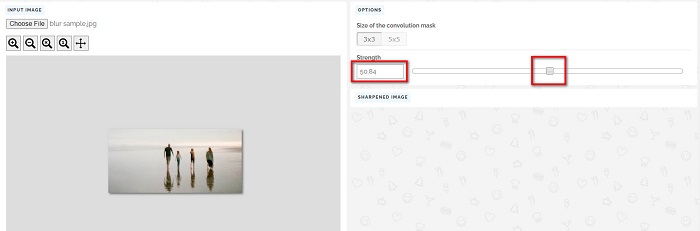
Paso 3. Luego, haz clic en el botón Sharpen que aparece debajo de la interfaz para enfocar tu imagen. Si quieres guardar el resultado, haz clic en el formato de imagen que desees y se guardará en tu dispositivo.
Parte 2. Cómo enfocar una imagen en Windows/Mac
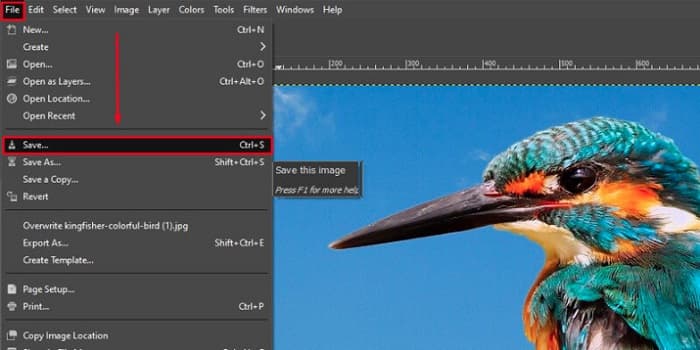
Cómo enfocar una imagen en Photoshop
Adobe Photoshop es un potente y ampliamente utilizado software de edición de imágenes, utilizado por numerosas personas en todo el mundo. Es apto tanto para principiantes como para profesionales, y cuenta con numerosas funciones que permiten editar imágenes con precisión y creatividad. Desde ajustes sencillos hasta diseños complejos, Photoshop te permite dar vida a tus ideas. Sus filtros de enfoque ayudan a que las fotografías se vean más nítidas modificando su contraste y detalles. Ajustar la nitidez de una foto en Photoshop es sencillo y no daña el original gracias a sus sofisticadas capas y filtros, ideal para imágenes de redes sociales, fotografía comercial y diseño gráfico.
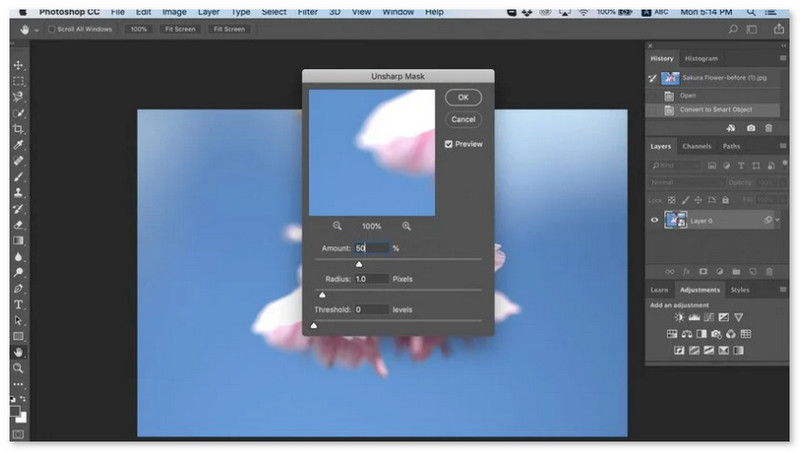
Paso 1. Haz clic en Layers panel > Filter menu > Convert for Smart Filters.

Paso 2. Elige Sharpen > Unsharp Mask under Filter.
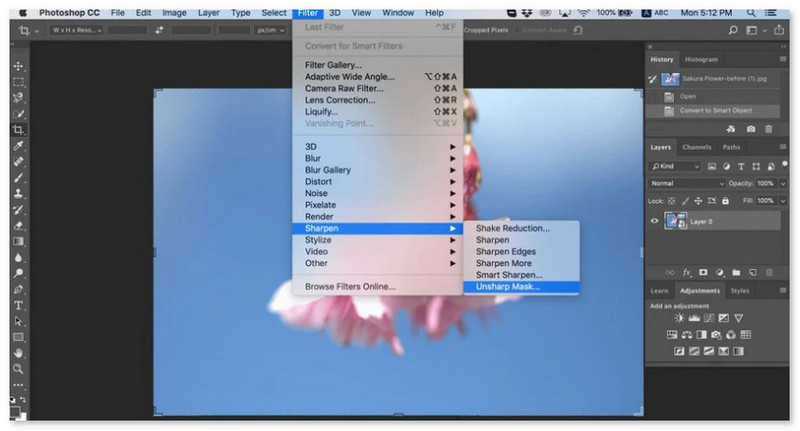
Paso 3. Ajusta la configuración y haz clic en OK.
Cómo enfocar una imagen en GIMP
A diferencia de la aplicación de imagen nítida presentada anteriormente, GIMP es una herramienta fuera de línea que puede usar si desea enfocar su imagen o mejorar su calidad. Además, muchos profesionales utilizan esta herramienta para dar nitidez a las imágenes y mejorarlas. Mucha gente reconoce esta herramienta como una alternativa a Adobe Photoshop. Admite casi todos los formatos de imagen, como PNG, JPG, JPEG, WebP y BMP. Además, tiene muchas funciones de edición que puede usar, incluido el retoque de fotos, el cambio de composiciones y más. Pero la desventaja de esta aplicación es que tiene una interfaz difícil de usar, lo que dificulta su uso para los principiantes.
Sin embargo, si eres un profesional en muchas aplicaciones de edición de fotos, seguramente encontrarás en GIMP una gran herramienta para mejorar la nitidez de una imagen.
Cómo enfocar una imagen en GIMP:
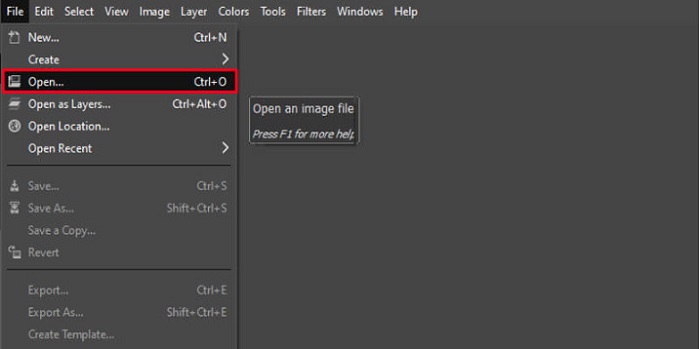
Paso 1. Descarga el potenciador de nitidez de imágenes GIMP en tu dispositivo. Y en la interfaz principal del programa, importa tu imagen haciendo clic en File > Open.
Paso 2. Luego, crea una capa duplicada haciendo clic en el botón Layer > Duplicate. También puedes usar las teclas rápidas para duplicar capas. Pulsa Shift + Ctrl + D y la capa se duplicará.
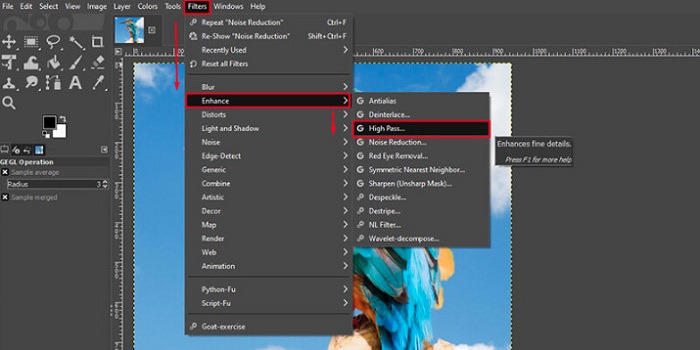
Paso 3. A continuación, reduciremos el ruido yendo a Filter > Enhance > Noise Reduction. Después, usaremos la opción High Pass para aplicar la nitidez que queremos. Ve a Filters > Enhance > y luego selecciona la opción High Pass.
Paso 4. Después, usaremos la opción Vivid Light para aclarar nuestra imagen y añadir detalles. Ve a Option en la sección de modo y cambia de Normal a Vivid Light.
Paso 5. Crea de nuevo una capa duplicada para los toques finales y ve a Filters > Enhance > Sharpen (Unsharp Mask). Después, puedes ajustar el Radius, Amount y Threshold de tu imagen. Luego, pulsa Ctrl + S en tu teclado para guardar el resultado.
¡Y eso es todo! Si eres de los que buscan cómo enfocar imágenes con GIMP, esta es la guía para ti. Solo tienes que seguir estos pasos para mejorar la calidad de tu imagen usando GIMP.
Parte 3. Cómo enfocar la imagen en iPhone/Android
Picwand AI Photo Editor es un potente editor que te ayuda a editar tus imágenes con IA. Puedes editar directamente en el sitio web de Picwand o descargarlo en tu iPhone o Android. Incluye numerosas funciones inteligentes, como ampliar imágenes, recortar fondos, extraer objetos y aclarar imágenes, todo gracias a su avanzada IA. Corrige imágenes borrosas, retoca fotos antiguas o elimina elementos no deseados con Picwand de forma rápida y precisa. Su sencilla interfaz lo hace ideal para cualquier persona, independientemente de su experiencia.
Paso 1. Abre la aplicación y elige AI Image Upscaler.
Paso 2. Sube una imagen y selecciona el factor de aumento deseado.
Paso 3. Toca el icono de descarga para exportar.

Parte 4. Preguntas frecuentes sobre cómo enfocar imágenes borrosas
¿Hay alguna aplicación para arreglar imágenes pixeladas?
Sí. Puedes usar un amplificador de imágenes para ajustar los píxeles de tu imagen. Una de las mejores herramientas para arreglar fotos pixeladas es PIXLR. También es buena para deshacer el desenfoque de tu imagen.
¿GIMP es gratis?
GIMP es una aplicación de edición de imágenes disponible en Windows, Mac y Linux. Es una aplicación de uso gratuito, en la que puede cambiar su código fuente. Sin embargo, debe comprar la aplicación para acceder a sus otras funciones de edición.
¿Puedo enfocar una imagen con Canva?
Afortunadamente, Canva tiene una función en la que puedes agregar nitidez a tu imagen. Entonces, Canva podría ser una herramienta adecuada para ti si tienes una imagen borrosa.
Conclusión
Esperamos haber respondido a tus preguntas sobre cómo enfocar imágenes. Hay 7 maneras de hacerlo bien y rápido, como usar Video Converter Ultimate, Photoshop, VanceAI, etc. Además, si buscas una herramienta totalmente gratuita puedes fijarte en FVC Free Image Upscaler. Es una herramienta en línea 100% gratuita.
-
 Los 4 mejores reductores de calidad de imagen que puede usar en línea y fuera de línea
 Estos reductores de calidad de imagen pueden ayudarlo a reducir la calidad de su imagen por algunas razones. Si necesitabas uno, ¡lees este artículo!
-
 Formas oficiales de mejorar la imagen a 4k con un tutorial práctico
 Para ampliar la imagen a 4k, necesitará un software en su dispositivo. Si no tiene uno, deberá seleccionar la herramienta que incluimos aquí.
-
 Cómo editar la claridad de la foto usando aplicaciones gratuitas y de pago
 ¿Cómo editar la claridad de la foto? ¡Esta pregunta se responderá a medida que lea este artículo y agregaremos consejos que necesitará saber!