


[Resuelto] 4 métodos para tomar capturas de pantalla en Android
Hacer capturas de pantalla es una de las cosas más habituales que podemos hacer hoy en día con nuestros teléfonos. Cuando queremos guardar una imagen, un texto o una publicación que hemos visto en la pantalla mientras desplazamos el contenido, hacemos una captura de pantalla. Ahora bien, si utilizas un dispositivo Android y te preguntas cómo aprovechar sus funciones de captura, ¡te ayudamos! En este artículo aprenderás cómo hacer capturas de pantalla en Android de 4 maneras y sacarle el máximo partido a las funciones de tu dispositivo. Sigue leyendo para guardar el contenido que te importa haciendo una captura de pantalla.

Parte 1: Cómo tomar una captura de pantalla en un teléfono Android
Quizás te preguntes esto, pero tomar capturas de pantalla en Android realmente varía según el fabricante del dispositivo y la versión del sistema operativo. Entonces, si es un usuario de Android y no sabe qué método usar cuando desea tomar una captura de pantalla, consulte los pasos a continuación:
Método 1: usar los botones de hardware
La forma más común de tomar capturas de pantalla en un dispositivo Android es mediante su hardware o botones físicos. Es el método más conocido utilizado para realizar capturas de pantalla en Android debido a su accesibilidad y conveniencia.
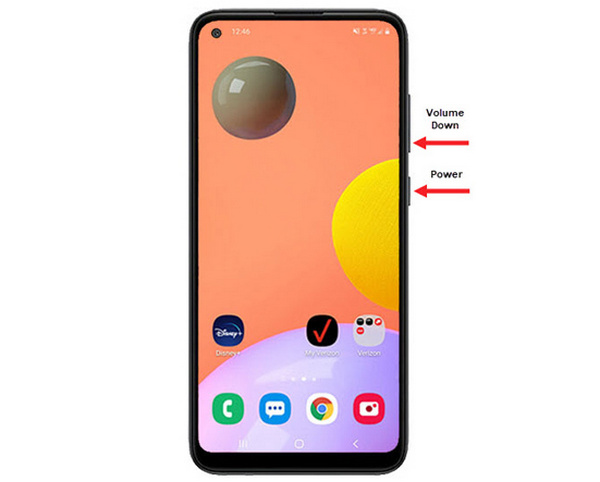
Paso 1. Primero, en tu teléfono Android, pulsa a la vez los botones de Bajar volumen y Encendido. Mantenlos pulsados hasta que se haga la captura de pantalla.
Paso 2. Después, accede a tu captura de pantalla desde la aplicación Galería.
Entonces, si los botones de tu hardware funcionan correctamente, puedes seguir este método para tomar capturas de pantalla en tu Android fácilmente.
Método 2: usar atajos
Hoy en día, algunos dispositivos Android tienen una función de captura de pantalla incorporada en el panel de configuración rápida, que resulta útil para tomar una captura de pantalla rápidamente.
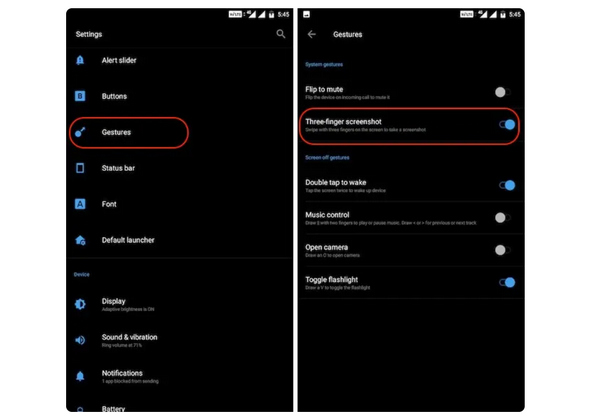
Paso 1. Primero, en tu teléfono Android, ve a Ajustes. Desplázate un poco hacia abajo y selecciona la opción Gestos o Botones.
Paso 2. Desde ahí, busca la opción Captura de pantalla y actívala.
Paso 3. Por último, para hacer una captura de pantalla con este método, solo tienes que deslizar tres dedos hacia abajo sobre la pantalla que quieras capturar.
Este método es mejor cuando no desea presionar los botones para tomar una captura de pantalla. Sin embargo, primero debe configurar esto en su configuración. Entonces, si no estás familiarizado con él, simplemente sigue los pasos anteriores.
Método 3: usar el Asistente de Google
Mientras tanto, si tu teléfono Android tiene un Asistente de Google, puedes usarlo para tomar una captura de pantalla fácilmente.
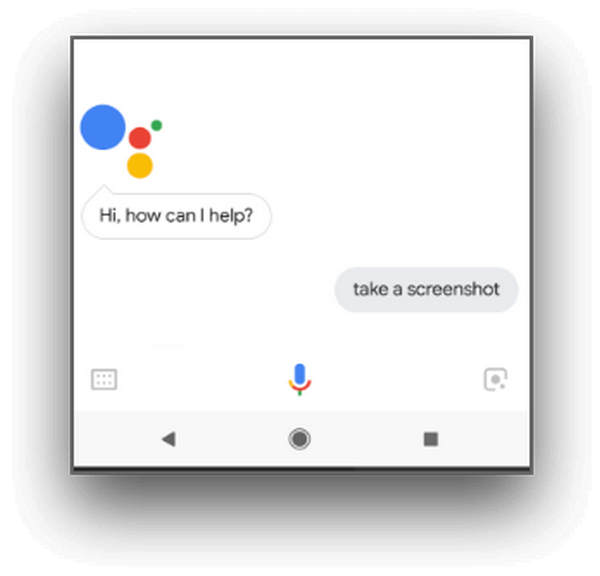
Paso 1. Primero, tienes que activar el Asistente de Google pulsando el botón de inicio o usando un comando de voz diciendo OK, Hola Google.
Paso 2. Cuando esté activado, di Haz una captura de pantalla o Captura de pantalla.
Nota: Debe aparecer una animación o deberías oír un sonido que indique que se ha realizado la captura de pantalla.
Paso 3. Puedes acceder a tu captura de pantalla en la aplicación Galería de tu teléfono, en la carpeta Capturas de pantalla.
Nota: Esto no es aplicable a todos los dispositivos Android. Si tu teléfono tiene Asistente de Google y te permite hacer capturas de pantalla mediante un comando de voz, solo tienes que seguir los pasos indicados aquí.
Parte 2: Cómo tomar capturas de pantalla en una tableta Android
Si tienes una tableta Android y te preguntas cómo tomar una captura de pantalla con ella, aquí te explicamos cómo hacerlo:
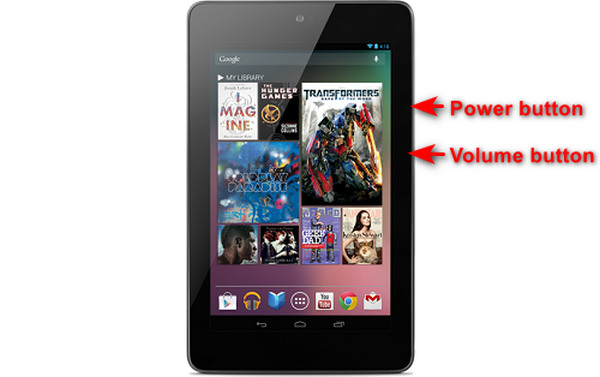
Paso 1. En tu tablet Android, pulsa a la vez el botón de Encendido y el de Bajar volumen y mantenlos pulsados unos segundos.
Nota: Deberías recibir una notificación indicando que se ha realizado la captura de pantalla.
Paso 2. Después, accede a tu captura de pantalla en la Galería de tu tablet, en la carpeta Capturas de pantalla.
Si este método no funciona en su tableta Android, lo siguiente que debe hacer es emplear aplicaciones de terceros de Google Play Store para poder tomar capturas de pantalla.
Parte 3: Cómo tomar capturas de pantalla en Android con una computadora
Ahora bien, si quieres hacer una captura de pantalla en Android usando un ordenador, quizá porque ninguno de esos métodos funciona en tu teléfono, la mejor herramienta que puedes utilizar para ello es FVC Screen Recorder. Esta herramienta está diseñada para hacer capturas de pantalla de cualquier móvil cuya pantalla se refleje en el ordenador, por lo que es perfectamente compatible con dispositivos Android. Así, utilizando su función Phone Recorder, los usuarios pueden hacer capturas de pantalla en Android desde el ordenador sin ninguna complicación. Además, en comparación con cualquier otra herramienta de terceros disponible hoy en día, esta ofrece una interfaz muy intuitiva y fácil de usar que no te supondrá ninguna dificultad.
Paso 1. Primero, descarga y abre FVC Screen Recorder en tu ordenador.
Descarga gratuitaPara Windows 7 o posteriorDescarga segura
Descarga gratuitaPara macOS 10.7 o posteriorDescarga segura
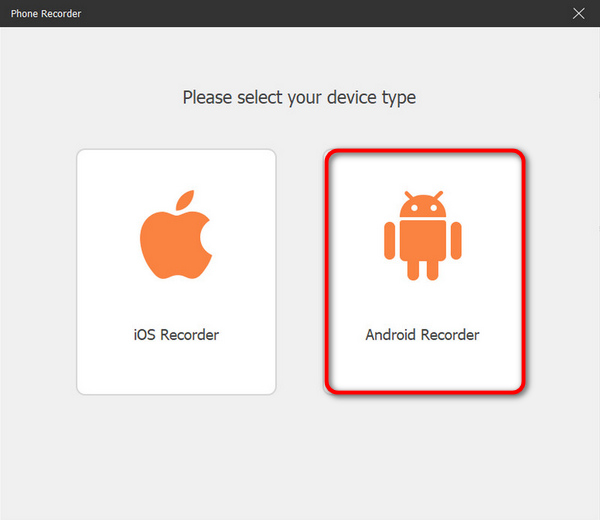
Paso 2. Ahora haz clic en la opción Phone recorder. La encontrarás en el lado derecho de la ventana de la herramienta, junto con las otras 3 opciones.
Paso 3. A continuación, haz clic en Android Recorder.
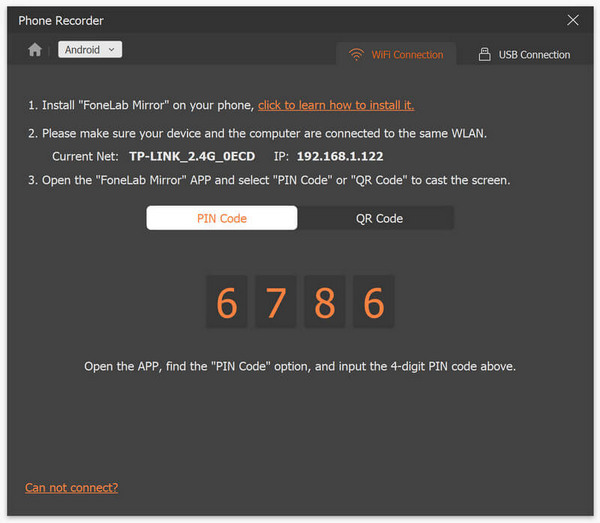
Paso 4. Para proyectar la pantalla de tu móvil, puedes hacerlo mediante Wi‑Fi o USB. Sin embargo, si eliges Wi‑Fi, podrás proyectar fácilmente tu teléfono en la función de grabación de móvil de la herramienta en tu ordenador a través de un código PIN o un código QR.
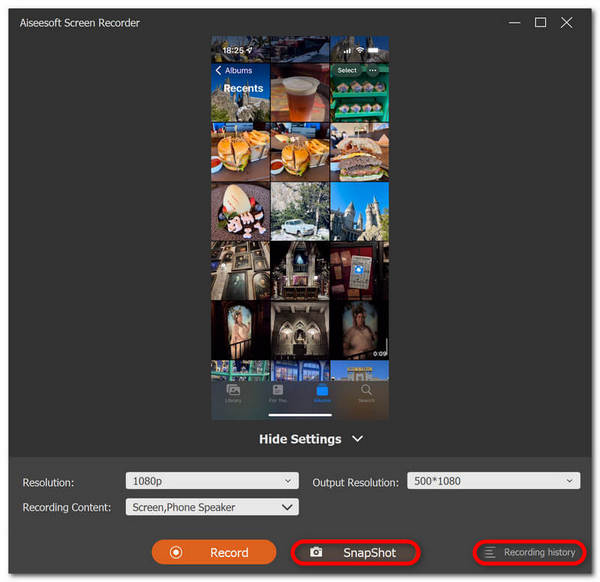
Paso 5. Cuando la duplicación se haya activado, para hacer una captura de pantalla en tu ordenador desde la pantalla de tu Android, solo tienes que hacer clic en el icono de Snapshot.
Paso 6. Por último, accede directamente a tus capturas de pantalla en la carpeta correspondiente de tu ordenador con Windows.
FVC Screen Recorder es una herramienta perfecta cuando quieres tomar una captura de pantalla en Android con una computadora. Al usar su función de grabación del teléfono, todo será fácil para usted, desde configurar ambos dispositivos hasta tomar capturas de pantalla. Esta herramienta tiene todo lo que necesitas.
Parte 4: Cómo tomar capturas de pantalla con desplazamiento en Android
Si desea tomar una captura de pantalla de una página web o una conversación larga en Android de una sola vez, en lugar de tomar varias capturas de pantalla, siga los pasos a continuación:
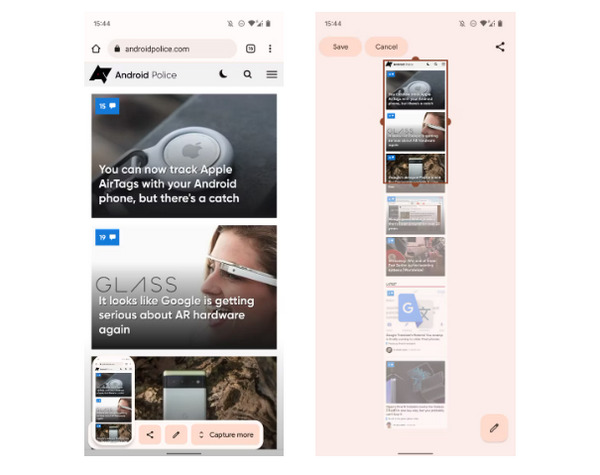
Paso 1. Primero, en tu teléfono Android, haz una captura de pantalla.
Paso 2. Después, toca el botón Capturar más tras pulsar en la vista previa de tu captura de pantalla.
Nota: Cuando uses la ventana para ampliar una captura de pantalla, el sistema muestra una lupa para una mayor precisión.
Paso 3. Por último, toca Guardar para guardar tu captura de pantalla.
Ya no tomará un montón de capturas de pantalla solo para mostrar la página web completa o la conversación de captura de pantalla completa.
Parte 5: Preguntas frecuentes sobre cómo tomar capturas de pantalla en Android
¿Puedo cambiar la carpeta de capturas de pantalla predeterminada en mi dispositivo Android?
Sí. Puede cambiar la carpeta de captura de pantalla predeterminada si lo desea. Todo lo que tienes que hacer es crear una nueva carpeta o seleccionar una carpeta diferente para tus capturas de pantalla en tu teléfono Android.
¿Cómo tomar una captura de pantalla en un teléfono Android si los botones de hardware no funcionan?
Primero, si te preguntas si aún puedes tomar una captura de pantalla si los botones de hardware de tu teléfono Android no funcionan, la respuesta es Sí. Entonces, en casos como este, es mejor utilizar una herramienta de grabación de pantalla de terceros como FVC Screen Recording, que permitirá a los usuarios tomar capturas de pantalla en su teléfono Android simplemente utilizando su función de grabación del teléfono.
¿Puedo anotar o editar capturas de pantalla en mi dispositivo Android?
Sí. Puede anotar o editar sus capturas de pantalla y fotos en su dispositivo Android. Esto se puede hacer directamente después de tomar una captura de pantalla utilizando sus funciones de edición integradas. Puede agregar texto, dibujos, flechas y formas a sus capturas de pantalla, así como recortar, cambiar el tamaño y aplicar filtros.
Conclusión
Y eso es todo. Hacer capturas de pantalla en tu Android ahora es pan comido. Solo tienes que saber qué método se adapta mejor a tu dispositivo y todo funcionará a la perfección. Así que elige tu método y empieza a capturar esos momentos memorables en tu Android hoy mismo.
-
 Cómo tomar capturas de pantalla en Mac fácilmente con esta guía básica
 ¿Quieres tomar una captura de pantalla en tu Mac pero no estás seguro de cómo? ¡Te tenemos! Le mostraremos las formas más sencillas y rápidas de realizar capturas de pantalla y guardar imágenes de su pantalla.
-
 Cómo tomar capturas de pantalla en Mac fácilmente con esta guía básica
 ¿Quieres tomar una captura de pantalla en tu Mac pero no estás seguro de cómo? ¡Te tenemos! Le mostraremos las formas más sencillas y rápidas de realizar capturas de pantalla y guardar imágenes de su pantalla.
-
 Captura de pantalla un vídeo fácilmente con esta guía básica [2024]
 Aprenda a tomar capturas de pantalla de videos con estos sencillos métodos fácilmente. ¡Sigue nuestra guía y comienza a tomar capturas de pantalla de tus videos favoritos ahora!