


Cómo corregir el color con las 5 mejores herramientas imprescindibles
La corrección de color es un proceso fundamental en la edición de vídeo que mejora y armoniza los colores de un vídeo, ofreciendo un resultado visualmente atractivo y llamativo. Consiste en ajustar el contraste, la saturación, el brillo y los tonos de un vídeo para lograr esa vibra visual perfecta. Tanto si eres un videógrafo profesional como si eres un creador de contenido en ciernes, comprender cómo aplicar la corrección de color cambia por completo las reglas del juego a la hora de ofrecer imágenes envolventes. El proceso comienza identificando y analizando el balance de blancos existente, las luces altas, las sombras y los tonos medios del metraje. A partir de ahí, se realizan ajustes con software especializado que permite un control preciso sobre estos elementos de color. Profundicemos en este artículo para aprender cómo arreglar los problemas de color de un vídeo con las mejores herramientas en las que puedes confiar.

Parte 1. Cinco formas de corregir el color de un vídeo
Encontrar varias correcciones de color gratuitas en el editor de video en línea para mejorar el atractivo visual de su video puede ser tan fácil como cree. Sin embargo, buscar otros más avanzados y confiables es un poco complicado para crear el ambiente adecuado para tus videos. Descubra cinco formas efectivas de perfeccionar los colores de su video utilizando varios programas versátiles, mejorando su narración y atrayendo a su audiencia.
1. Video Converter Ultimate
Video Converter Ultimate es una solución de vídeo todo en uno que te permite mejorar la calidad de tus vídeos ajustando parámetros esenciales como el brillo, el contraste y la saturación. Este práctico corrector de color también te permite editar vídeos con funciones como recortar, cortar y unir. Además de esto, ofrece un sinfín de opciones de conversión de vídeo, lo que te permite transformar vídeos a miles de formatos y adaptarlos a varios dispositivos como MP4, MKV, MOV, MP3, AAC, GIF, iPhone, Samsung y Apple TV, garantizando que puedan disfrutarse en diferentes plataformas. Asimismo, los usuarios pueden añadir subtítulos y marcas de agua para personalizar más sus vídeos. Con una interfaz sencilla, esta herramienta es perfecta tanto si eres principiante como si tienes experiencia. Sigue los pasos que encontrarás a continuación para aprender a corregir el color de tu vídeo con éxito usando Video Converter Ultimate.
Paso 1: Descarga e instala el corrector de color
Primero, descarga la herramienta haciendo clic en uno de los botones de Descarga gratuita que verás más abajo. En función del sistema operativo de tu ordenador, asegúrate de descargar la versión de Video Converter Ultimate adecuada para tu equipo. Sigue las instrucciones para instalarla.
Descarga gratuitaPara Windows 7 o posteriorDescarga segura
Descarga gratuitaPara macOS 10.7 o posteriorDescarga segura
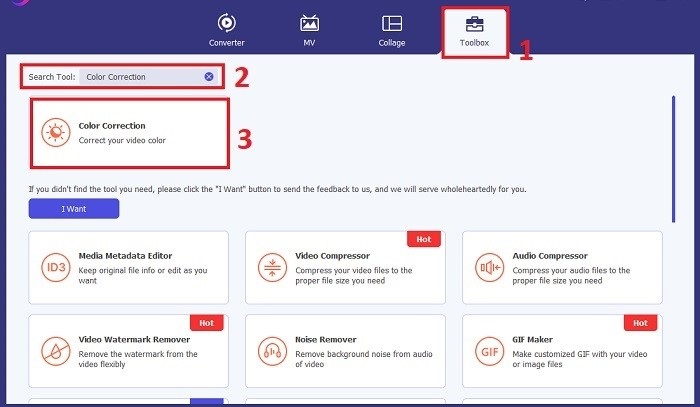
Paso 2: Inicia Video Converter Ultimate
Una vez instalado, abre Video Converter Ultimate. Ve a la sección Toolbox en el menú principal y busca la función Color Correction. Haz clic en ella para continuar.
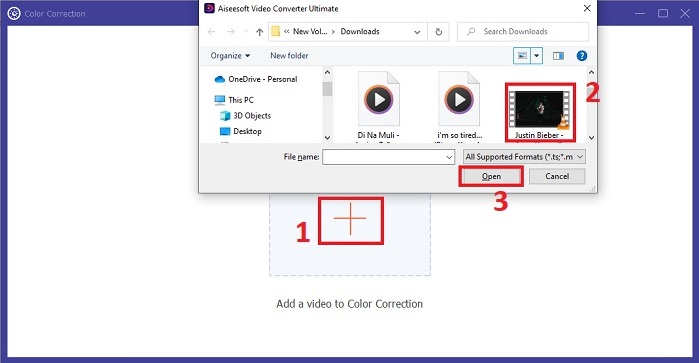
Paso 3: Importa el vídeo para la corrección de color
Ahora, haz clic en el botón con el signo Más para importar el vídeo al que quieres corregir el color. Busca el archivo de vídeo en tu ordenador. Luego selecciona Abrir para añadirlo al software.
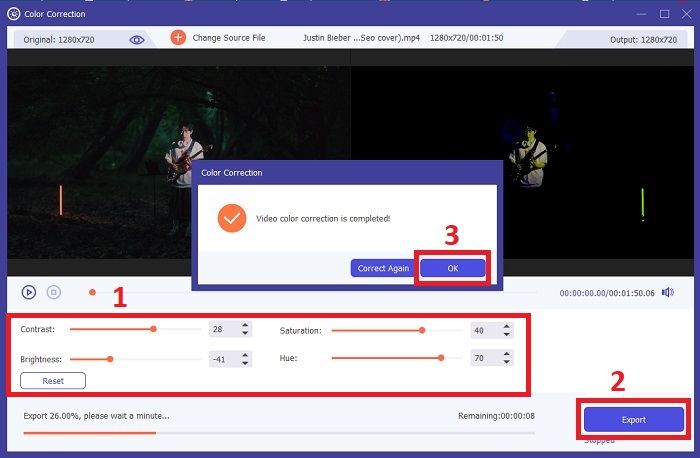
Paso 4: Ajusta la configuración de color del vídeo y guarda
Después de importar el vídeo, ajusta con precisión parámetros de color como brillo, contraste, saturación y tono hasta lograr la corrección de color deseada. Cuando estés satisfecho con los ajustes, haz clic en Export. Deja que la herramienta procese el vídeo y guarde la versión corregida en la ubicación que elijas.
2. Corrección de color Premiere Pro
Premiere Pro es conocido por su software de edición de vídeo de alta calidad y sus completas capacidades de corrección de color. Ofrece diversas herramientas y efectos de gradación de color para realizar ajustes precisos. Corrección de color Premiere Pro le permite ajustar el balance de color y la exposición o aplicar estilos creativos para lograr el estilo visual deseado. También puede elegir entre sus cientos de transiciones y efectos de vídeo integrados o comenzar con plantillas diseñadas profesionalmente y modificarlas para crear el resultado deseado. Además, tiene funciones de colaboración y se integra perfectamente con otro software de Adobe, lo que lo convierte en la mejor opción entre los profesionales.
Paso 1. Empieza abriendo Premiere Pro e importando tu vídeo. Luego ve al Color workspace.
Paso 2. Dentro del Color workspace, utiliza el panel Lumetri Color para ajustar la exposición, el balance de color y los looks creativos.
Paso 3. Usa los scopes para asegurarte de que los ajustes de color se corresponden con el resultado que deseas. Por último, previsualiza y exporta el vídeo corregido.

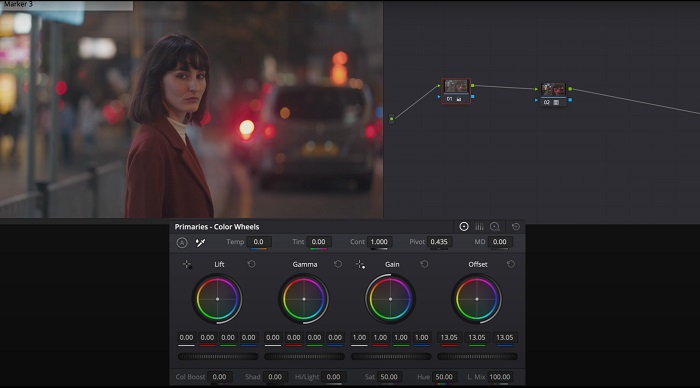
3. Corrección de color Davinci Resolve
Explore las excepcionales capacidades de gradación de color. Este software todo en uno combina edición profesional, corrección de color, efectos visuales y postproducción de audio. Con la interfaz fácil de usar de la herramienta y su completo conjunto de funciones, puede hacer realidad su visión creativa con precisión y estilo. Las herramientas avanzadas de gradación de color de Davinci Resolve Color Correction le permiten hacer que sus videos se destaquen. Ya sea que esté trabajando en películas de Hollywood de vanguardia o en proyectos personales, esta herramienta permite a los profesionales y entusiastas crear narrativas convincentes con una calidad incomparable.
Paso 1. Abre DaVinci Resolve e importa tu vídeo. Una vez importado, ve a la pestaña Color.
Paso 2. Dentro de la pestaña Color, utiliza las ruedas de color, las curvas y los nodos para corregir el color de tu vídeo. Puedes usar los scopes disponibles para realizar ajustes precisos.
Paso 3. Tras realizar los ajustes de color necesarios, previsualiza el vídeo corregido para asegurarte de que cumple tus expectativas. Cuando estés satisfecho, exporta el vídeo corregido para dejarlo listo para su uso.
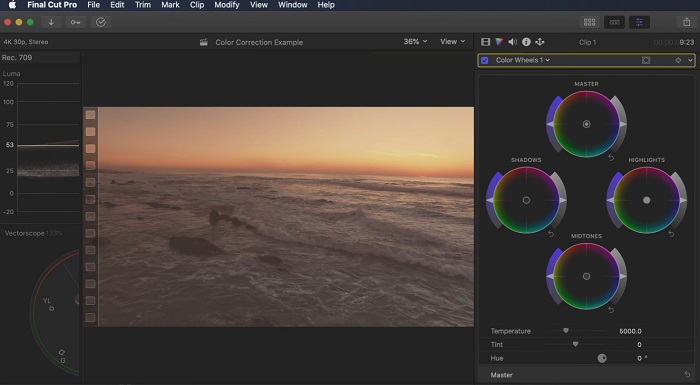
4. Corrección de color de Final Cut Pro
Si eres un usuario de Mac y buscas una aplicación de edición de vídeo de primer nivel, Final Cut Pro es una gran opción. Cuenta con una interfaz fácil de usar y potentes funciones que facilitan la edición. Cuando se trata de corrección de color, Final Cut Pro ofrece una tabla de colores y ruedas de colores para ajustar la exposición, la saturación y el tono. Puede aplicar efectos de color en tiempo real y utilizar herramientas de clasificación avanzadas para mejorar su metraje. Además, exporta sin problemas a dispositivos Apple y plataformas populares en línea. Si eres un profesional que busca eficiencia y creatividad, Final Cut Pro es una opción obvia. Asegúrese de tener macOS 13.4 o posterior y una computadora Mac con Apple Silicon para un rendimiento óptimo.
Paso 1. Puedes empezar importando tu vídeo en Final Cut Pro y, a continuación, ir al Color workspace.
Paso 2. Utiliza el Color Board o las Color Wheels para realizar los ajustes esenciales de exposición, saturación y tono.
Paso 3. Perfecciona aún más el color de tu vídeo usando herramientas adicionales de etalonaje, garantizando los mejores resultados posibles. Cuando termines, previsualiza y exporta el vídeo corregido.
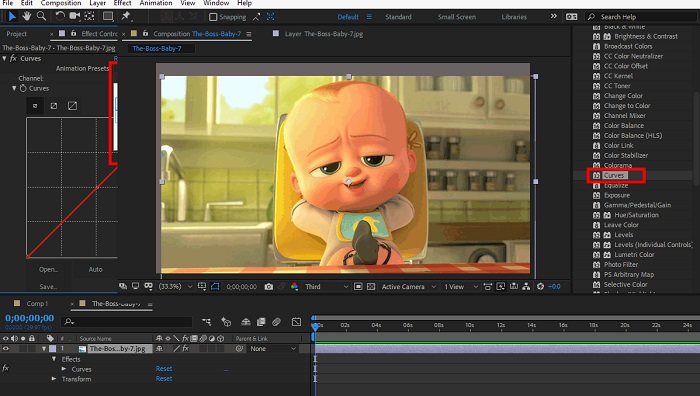
5. Corrección de color After Effects
After Effects es un famoso software de efectos visuales y gráficos en movimiento con sólidas capacidades de corrección de color. Además de sus efectos básicos de corrección de color, proporciona varias capas de ajuste y efectos para mejorar y modificar los colores. Puedes animar rápidamente textos y gráficos, dándoles vida con movimientos cautivadores. Corrección de color After Effects le permite aprovechar niveles, curvas y modos de fusión para lograr la gradación de color deseada. Es una opción de corrección de color versátil gracias a su integración con diferentes productos de Adobe y una gran comunidad que proporciona tutoriales y complementos. Además, el software evoluciona continuamente, introduciendo características como un panel de propiedades intuitivo, control de capas transparente y renderizado eficiente de múltiples fotogramas que agilizan los flujos de trabajo y mantienen las creaciones a la vanguardia de la creatividad.
Paso 1. Importa tu clip de vídeo en el proyecto de la herramienta. Aplica efectos de corrección de color yendo al panel Effects & Presets y seleccionando las herramientas de corrección de color adecuadas, como Curves, Levels o Color Balance.
Paso 2. Haz clic en el efecto de corrección de color aplicado para acceder a sus parámetros. Luego modifica ajustes como exposición, contraste, saturación y tono para corregir y mejorar los colores de tu vídeo.
Paso 3. Previsualiza el vídeo en el panel Composition para ver cómo afectan al metraje las correcciones de color. Ajusta los parámetros en función de la previsualización hasta lograr la corrección de color deseada y, a continuación, procede a renderizar o exportar el vídeo corregido.
Lecturas recomendadas:
Mejores apps gratuitas para realzar el color de tus fotos en Android e iOS
4 increíbles formas de añadir un filtro a un vídeo en Windows y macOS
Parte 2. Preguntas frecuentes sobre correctores de color de vídeo
¿Cómo realizo la corrección de color en un iMovie?
Para corregir colores en iMovie, importa tu clip de vídeo, selecciónalo y haz clic en el botón de Color Correction (icono de varita mágica). Ajusta los deslizadores de exposición, saturación y color hasta lograr el aspecto que prefieras.
¿Cómo puedo acceder a las herramientas de corrección de color en OpenShot?
En la corrección de color de OpenShot Video Editor, selecciona un clip, ve a la pestaña Effects y haz clic en Color Correction. Ajusta los deslizadores de brillo, contraste, tono y saturación para lograr la corrección de color deseada.
¿Cómo accedo a las herramientas de corrección de color en Sony Vegas?
En la corrección de color de Sony Vegas, selecciona el clip al que quieras corregir el color, ve a la pestaña Video FX y busca Color Corrector. Arrástralo y suéltalo sobre el clip y ajusta las propiedades de color en la ventana Effect Controls.
Conclusión
Dominar la corrección de color es esencial para mejorar el atractivo visual de tus vídeos y crear una experiencia de visionado cautivadora. En esta guía, hemos analizado cinco potentes correctores de color para lograr una corrección de color impecable. Si buscas herramientas de edición de vídeo de alta calidad, plantéate usar Video Converter Ultimate, Premiere Pro, Final Cut Pro, DaVinci Resolve o After Effects. Estos programas ofrecen una amplia gama de funciones y capacidades para ayudarte a crear vídeos de aspecto profesional. Cada programa tiene su propio conjunto de características y funciones que se adaptan a diferentes preferencias y niveles de experiencia.
-
 Cómo agregar y hacer un filtro de Instagram antes de publicar imágenes y videos
 ¿Qué son los filtros en Instagram? ¿Cómo aplicarlo? ¿Cómo hacer uno? Estas preguntas tendrán respuestas directas en esta publicación, así que léalas.
-
 Métodos sin problemas para convertir imágenes a blanco y negro
 ¿Quieres que tus fotos se vean nostálgicas? Tenemos una respuesta para ti. Esta publicación ofrecerá formas notables de convertir una imagen en color a blanco y negro.
-
 6 filtros de Snapchat animados de Snapchat de elección favorita en Snapchat
 ¿Quieres saber las mejores formas de agregar filtros en los videos de Snapchat? Bueno, puede hacer clic aquí y aprender los diferentes filtros que puede usar para aplicar en los videos de Snapchat.