


Kuvien koon muuttaminen tietokoneesi Illustratorissa
Monista monimutkaisista muokkauksista on tullut yleisiä, erityisesti ammattimaisten kuvankäsittelysovellusten, kuten Adobe Illustratorin, yleistymisen myötä. Silti näillä tehokkailla muokkausohjelmilla on mahdollista tehdä myös yksinkertaisia muokkauksia. Voit esimerkiksi käyttää yhä Adobe Photoshopia, jos haluat muuttaa kuvasi mittoja. Ja tiesitkö, että voit muuttaa kuvan kokoa Illustratorissa kahdella eri tavalla? Voit joko skaalata kuvaa manuaalisesti tai kirjoittaa itse haluamasi numeeriset arvot kuvan mitoiksi. Tässä oppaassa näytämme sinulle nämä kaksi menetelmää siitä, miten kuvan kokoa muutetaan Illustratorissa.

Osa 1. Kuvien koon muuttaminen Illustratorissa
Adobe Illustrator on ammattilaisten eniten käyttämä kuvankäsittelyohjelmisto. Tämän sovelluksen avulla voit luoda poikkeuksellisia tuloksia käyttämällä kehittyneitä digitaalisia piirustustyökaluja. Se on täydellinen vektoripohjaisten kuvien, kuvakkeiden, typografian, logojen ja muiden luomiseen. Lisäksi siinä on edistyneitä värivaihtoehtoja väripalettien, gradienttivärimallien luomiseen ja eri värien sekoittamiseen hämmästyttävän kuvan tuottamiseksi.
Voit tehdä monia asioita Adobe Illustratorilla. Mainitut ominaisuudet ovat vain osa monista Illustratorin tarjoamista ominaisuuksista. Ja jos kysyt, voiko Adobe Illustrator muuttaa kuvan kokoa, vastaus on kyllä. Lue tämä osa jatkuvasti saadaksesi lisätietoja kuvien koon muuttamisesta Illustratorissa.
Kuvan koon muuttaminen Illustratorissa käyttämällä Image Scaler -ohjelmaa
Vaihe 1. Ensimmäiseksi sinun on ladattava Adobe Illustrator tietokoneellesi. Kun olet ladannut ja asentanut sovelluksen, käynnistä se laitteellasi. Avaa sitten kuvasi Illustratorissa valitsemalla File > Open. Voit myös kopioida ja liittää kuvasi jo avaamallesi piirtoalustalle (artboard).
Vaihe 2. Napsauta sitten Selection Tool -työkalua (Cmd V näppäimistölläsi) ja valitse kuvasi napsauttamalla sitä. Kun olet valinnut kuvan, sen kulmiin ilmestyy kahvoja. Nämä kahvat näyttävät pieniltä valkoisilta neliöiltä, joissa on sininen reunus. Näiden kahvojen avulla voit skaalata/muuttaa kuvan kokoa, kiertää sitä ja vinouttaa sitä (shear).
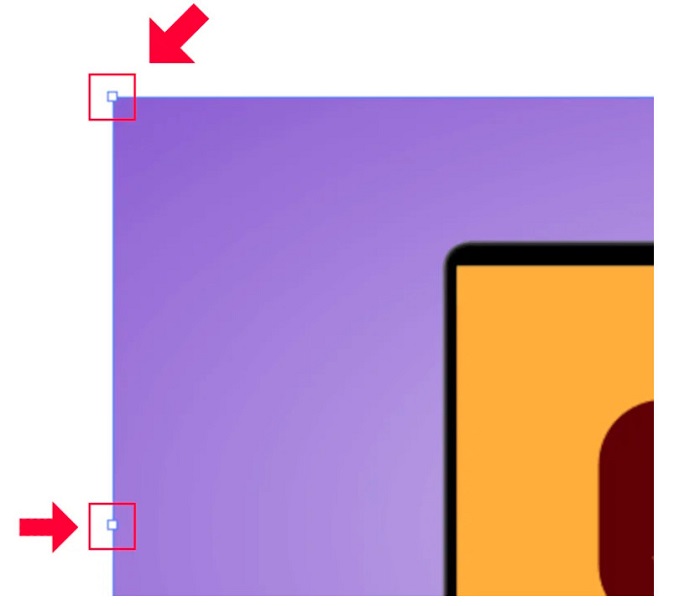
Vaihe 3. Muuttaaksesi kuvan kokoa skaalaamalla pidä painettuna ja vedä mitä tahansa kahvoista haluamaasi kokoon. Voit myös lukita kuvan kuvasuhteen pitämällä Shift-näppäintä painettuna ja liikuttamalla osoitinta.
Kun olet muuttanut kuvan kokoa mieltymystesi mukaan, voit nyt vapauttaa kahvoja napsauttamalla.
Adobe Illustratorin käyttäminen kuvan koon muuttamiseen säätämällä numeerisia arvoja
Nyt opetamme sinulle, kuinka voit muuttaa valokuvasi kokoa syöttämällä numeerisia arvoja Muunna-valikon avulla sen sijaan, että skaalaat kuvasi manuaalisesti valintatyökalulla.
Vaihe 1. Kun Adobe Illustrator on avattuna laitteellasi, avaa Transform-valikko napsauttamalla Windows > Transform. Voit avata tämän valikon myös näppäinyhdistelmällä Shift + F8. Tältä Transform-valikko näyttää.
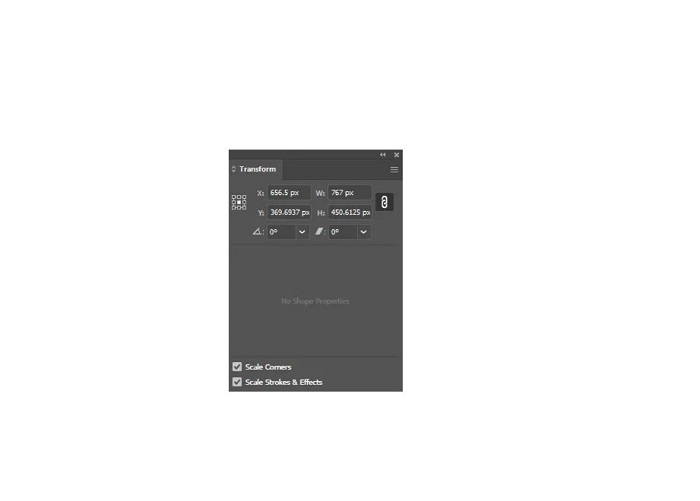
Transform-valikon avulla voit muuttaa objektin sijaintia suhteessa X- ja Y-akseliin. Voit myös käyttää tätä valikkoa kuvan kiertämiseen, vinouttamiseen ja koon muuttamiseen syöttämällä numeerisen arvon.
Vaihe 2. Valitse sitten kuva, jonka kokoa olet muuttamassa, käyttämällä Selection Tool -työkalua. Säädä sen jälkeen kuvan leveyttä ja korkeutta Transform-valikossa muuttamalla numeroita sen mukaan, minkä kokoisen kuvan haluat. Kirjain W tarkoittaa leveyttä (width), ja H tarkoittaa korkeutta (height) kuvassasi.
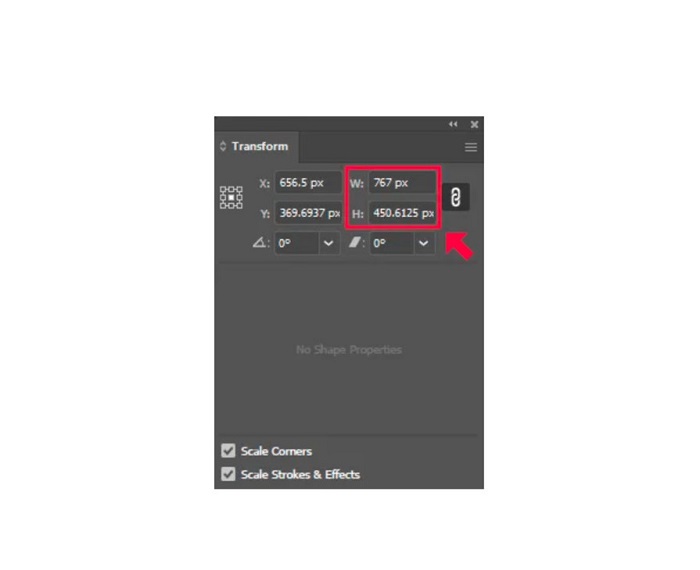
Vaihe 3. On myös hyödyllistä lukita kuvan kuvasuhde napsauttamalla Chain-kuvaketta (ketju) korkeuden ja leveyden vieressä. Kun valitset Chain-vaihtoehdon ja muutat kuvan korkeutta, leveys skaalautuu automaattisesti mukana.
Vinkki. Voit myös muuttaa kuvan oletusarvoisen mittayksikön. Illustrator käyttää oletuksena yksikkönä pikseleitä (px). Voit muuttaa mittayksikköä seuraavasti:
◆ senttimetriä (cm)
◆ millimetriä (mm)
◆ tuumaa (tuumaa)
◆ Prosentit (%)
Muuttaaksesi kuvan mittayksikön kirjoita yksikkö mitan numeron perään. Kun olet muuttanut kuvan numeerisen arvon ja yksikön, paina Enter-näppäintä näppäimistölläsi.
Seuraavaksi viemme (export) kuvan ulos. Valitse kuva Selection Tool -työkalulla, napsauta sitä hiiren oikealla painikkeella ja valitse Export Selection.
Kun olet valinnut Export Selection -vaihtoehdon, avautuu Export for Screens -valikko. Tämän valikon avulla voit tallentaa uudelleen mitoitetun kuvan käyttökelpoisessa tiedostomuodossa.
Esikatselukuvan (thumbnail) alla voit esikatsella tulostasi ja vaihtaa tiedoston nimeksi haluamasi. Napsauta sitten Export to -paneelissa kansiokuvaketta valitaksesi tulosteen tallennussijainnin. Varmista myös, että Scale-kentän arvona on 1x. Valitse lopuksi tiedostomuoto. Suositeltavaa on käyttää PNG- tai JPG-muotoa.
Ja lopuksi, napsauta Export Asset -painiketta tallentaaksesi tulosteen.
Hämmästyttävää, eikö? Adobe Illustratorin avulla voit muokata kuviasi mielesi mukaan. Tämä osa on myös vastaus, jos etsit kuinka muuttaa kuvien kokoa Illustratorissa ilman vääristymiä. Tämä sovellus ei kuitenkaan ole käyttäjäystävällinen työkalu, koska sillä ei ole helppokäyttöistä käyttöliittymää. Siksi, jos haluat muuttaa kuvan kokoa/skaalata sitä helppokäyttöisellä sovelluksella, lue seuraava osa huolellisesti.
Osa 2. Online-vaihtoehto Illustratorille
Adobe Illustrator on offline-työkalu, eikä se ole ilmainen. Joten jos haluat käyttää fantastista kuvan koon muuttajaa, joka on ilmainen ja joka auttaa sinua parantamaan kuvaasi, seuraa alla esittelemäämme opetusohjelmaa.
FVC Free Image Upscaler on verkossa toimiva kuvanlaadun parantaja, joka auttaa sinua parantamaan heikkolaatuisia kuvia. Tämä verkkotyökalu voi suurentaa kuvaa 2x-, 4x-, 6x- ja 8x-kertaiseksi. Lisäksi se käyttää tekoälyä (AI, Artificial Intelligence), joka tunnistaa automaattisesti kuvan heikkolaatuiset kohdat ja parantaa niitä. Työkalu tukee kaikkia kuvamuotoja, kuten JPEG, JPG, PNG ja BMP. Se on myös turvallinen käyttää ja täysin ilmainen. Yksinkertaisen käyttöliittymänsä ansiosta voit helposti muuttaa kuvan kokoa ja suurentaa sitä.
Kuvan koon muuttaminen FVC Free Image Upscaler -työkalulla:
Vaihe 1. Etsi FVC Free Image Upscaler selaimestasi tai napsauta tätä linkkiä siirtyäksesi suoraan heidän etusivulleen. Ohjelmiston pääkäyttöliittymässä napsauta Upload Photo -painiketta käynnistääksesi sovelluksen laitteellasi.
Vaihe 2. Napsauta sitten uudelleen Upload Photo -painiketta tuodaksesi kuvan, jota haluat suurentaa.
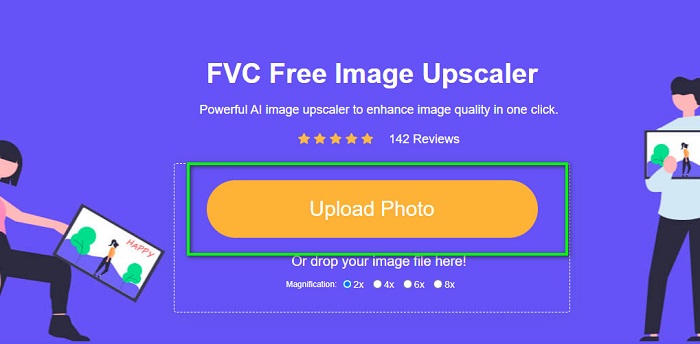
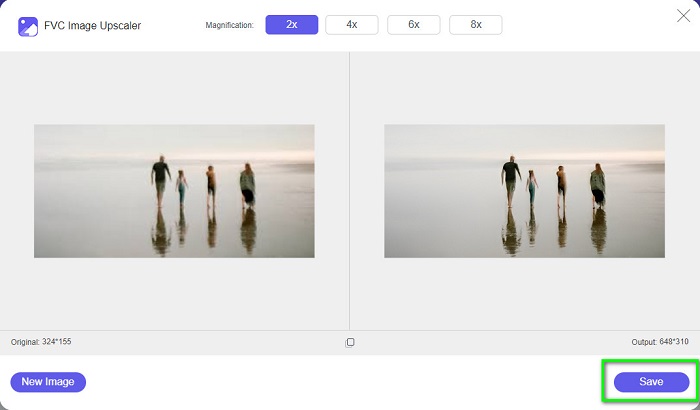
Vaihe 3. Kun kuvasi on ladattu, valitse haluamasi suurennusasetelma. Voit valita välillä 2x, 4x, 6x ja 8x.

Vaihe 4. Lopuksi napsauta Save-painiketta tallentaaksesi tulosteen laitteellesi.
Liittyy aiheeseen:
Kuvien koon muuttaminen GIMPillä: vaiheittainen opas
Miten muutat kuvan koon Facebookia varten [nopeat ja helpot vaiheet]
Osa 3. Usein kysyttyä kuvan koon muuttamisesta Illustratorissa
Miksi Adobe Illustrator ei muuta kuvien kokoa?
Et voi muuttaa kuvan kokoa Illustratorissa, koska rajoitusruutua ei todennäköisesti ole aktivoitu. Ota rajausruutu käyttöön valitsemalla Näytä > Näytä rajoitusruutu. Aktivoimalla sen voit nyt muuttaa kuvan kokoa Illustratorissa.
Voinko muuttaa kuvan kokoa Illustratorissa laadun heikkenemättä?
Joo. Voit muuttaa kuvan kokoa Adobe Illustratorilla. Kuitenkin suurimman osan ajasta, kun muutat kuvan kokoa skaalaimella, kuvan laatu heikkenee.
Onko Adobe Illustrator ilmainen?
Ei. Adobe Illustrator ei ole ilmainen. Ennen kuin käytät tätä tehokasta kuvankäsittelysovellusta, sinun on ostettava se hintaan $20,99 kuukaudessa.
Johtopäätös
Olet oppinut, miten muutat kuvan kokoa Illustratorissa, noudattamalla esittämiämme tapoja. Prosesseja saattaa olla paljon, mutta ohjelmaa kannattaa ehdottomasti käyttää ja kokeilla. Adobe Illustratorin ongelmana on, että se ei ole ilmainen ja sen käyttöliittymä on monimutkainen. Jos siis haluat kätevämmän ja ilmaisen kuvankoonmuuttajan, käytä työkalua FVC Free Image Upscaler.
-
 Kuvan koon muuttaminen – Adobe Muuta kuvan kokoa [online ja offline]
 Jos etsit Adobe-kuvan kokoa, meillä on ratkaisu sinulle. Katso tämä viesti perusteellisesti oppiaksesi kuinka muuttaa kuvien kokoa Adoben avulla tietokoneellasi.
-
 Paras Photo Resizer -sovellus verkossa, offline-tilassa, Androidissa ja iPhonessa
 Mitkä ovat parhaat valokuvien kokoa muuttavat sovellukset? Napsauta sivua saadaksesi tietoa viisi tehokkainta valokuvien koon muuttamissovellusta, joilla voit parantaa tiedostoasi tai muuttaa sen kokoa
-
 7 parasta pikselin tehostajaa kaikille käyttämillesi verkkoselaimille
 Jos haluat tietää parhaat käytettävät pikselien tehostajat, sinun on parasta tarkistaa tämä viesti. Tässä artikkelissa luetellaan seitsemän parasta valokuvapikselin tehostajaa kaikille selaimille.