


Opetat, miten äänität ääntä VLC:llä Windowsilla ja Macilla
Kuuletko suosikkiääniraidan, mutta et koskaan löydä lähdettä? Älä huoli, voit käyttää suoraan äänentallennusohjelmistoa tämän leikkeen tallentamiseen. Jos et tiedä minkälaisen tuotteen valita, tutustu VLC Media Playeriin. Se on täysin ilmainen ja yhteensopiva Windows-, Mac- ja Linux-käyttöjärjestelmien kanssa. Halusitpa sitten kerätä tallennettua ääntä tai materiaalia personoitujen soittoäänien tekemiseen, tämä ohjelmisto on enemmän kuin riittävä tarpeisiisi.
Kuinka saada videot soittava ohjelma tallentamaan ääntä? Ei hätää. Tästä artikkelista löydät etsimäsi vastauksen. Näytämme, miten voit tallentaa ääntä VLC-mediatoistimella. Jos sen ominaisuudet tuntuvat liian rajallisilta, voit kokeilla myös suosittelemiamme vaihtoehtoja.

Osa 1. Äänen tallentaminen VLC:llä Windowsissa
VLC Media Playerissa on sisäänrakennetut video- ja äänitallennusominaisuudet, ja se tarjoaa myös joitakin yksinkertaisia muokkaustoimintoja, jotka auttavat sinua saavuttamaan parhaat tulokset. Sen ominaisuudet eivät koskaan rajoitu tiedostojen toistamiseen eri muodoissa. Katsotaanpa ilman pitkiä puheita, miten VLC:tä käytetään näyttöjen tallentamiseen äänen kanssa. Tämä osa koskee pääasiassa Windows-käyttäjiä.
Tässä on vaiheittainen opas äänen tallentamiseen VLC Media Playerilla Windows-tietokoneella.
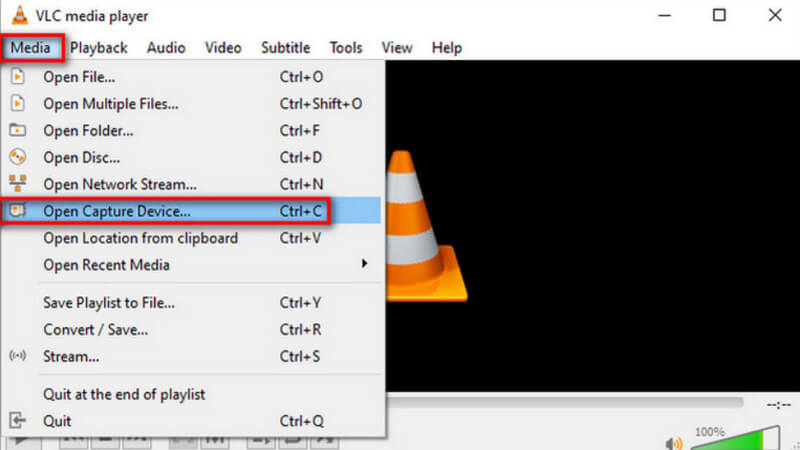
Vaihe 1. Varmista, että sinulla on uusin versio VLC-mediatoistimesta tietokoneellasi. Avaa se ja siirry pääkäyttöliittymään.
Vaihe 2. Napsauta vasemmassa yläkulmassa olevaa Media-valikkoa. Valitse sitten laajennetusta luettelosta Avaa kaappauslaite (Open Capture Device).
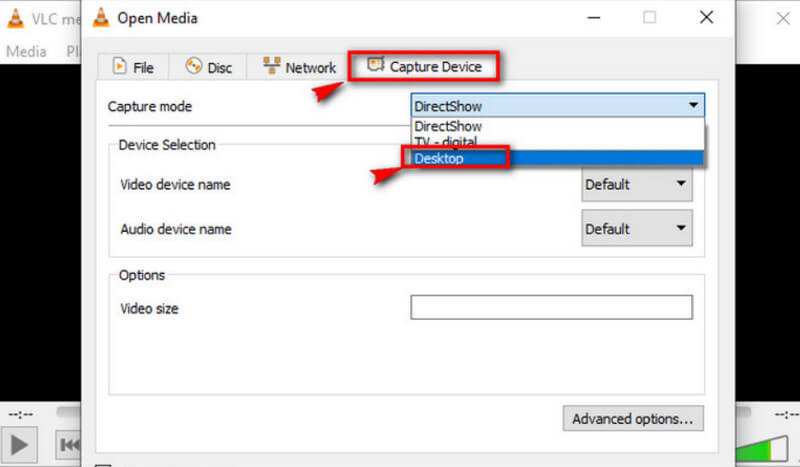
Vaihe 3. Avaa media -ikkuna avautuu. Siirry Kaappauslaite-välilehdelle ja valitse Työpöytä (Desktop).
Vaihe 4. Napsauta sitten Toista (Play) aloittaaksesi tallennuksen.
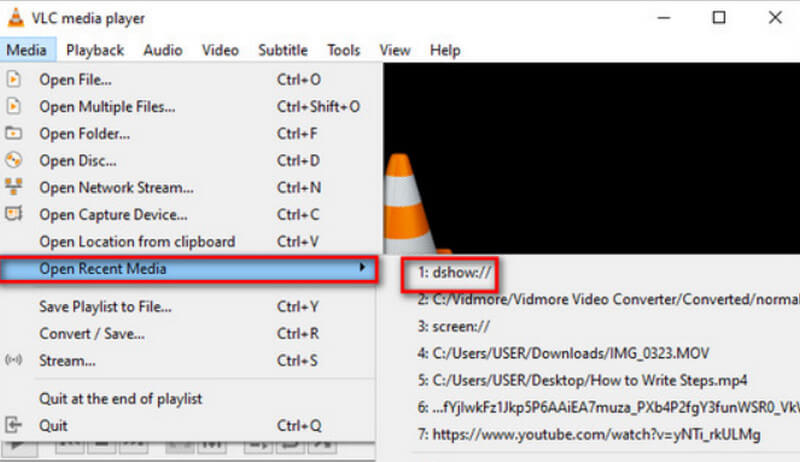
Vaihe 5. Jos haluat tallentaa nauhoitetun videon, valitse Media > Muunna/tallenna (Convert/Save). Löytääksesi tallennetun videon, valitse Media > Avaa viimeisimmät mediat (Open Recent Media).
Osa 2. Opas äänen tallentamiseen VLC Media Playerilla Macilla
Jos olet Mac-tietokoneen käyttäjä, siirry suoraan tähän osioon. Täältä löydät ohjeet suoratoistoäänen tallentamiseen VLC:llä.
Näin nauhoitat ääntä VLC Media Playerilla Mac-laitteella.
Vaihe 1. Lataa VLC-mediatoistin MacBookiisi. Avaa se työpöydältäsi.
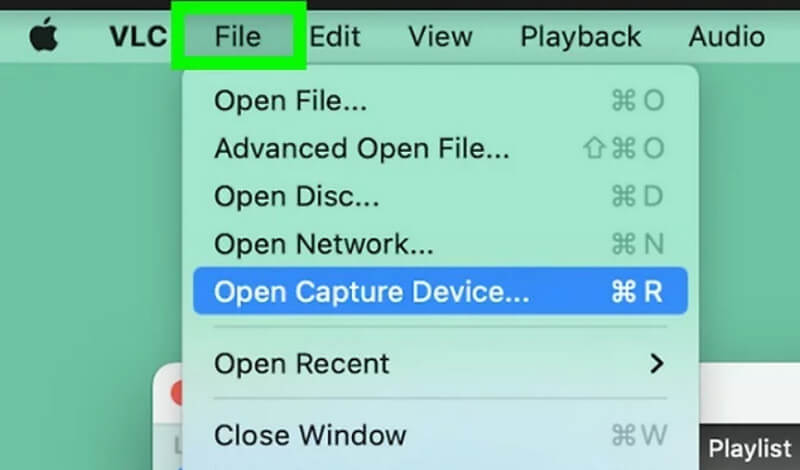
Vaihe 2. Valitse ylävalikosta Tiedosto (File). Valitse sitten pudotusvalikosta Avaa kaappauslaite (Open Capture Device).
Vaihe 3. Näkyviin tulee Avaa lähde (Open Source) -ikkuna. Valitse Kaappaus-välilehti ja rastita Ääni-kohdan vieressä oleva ruutu. Aseta äänilähde Ääni-otsikon alla olevasta kentästä.
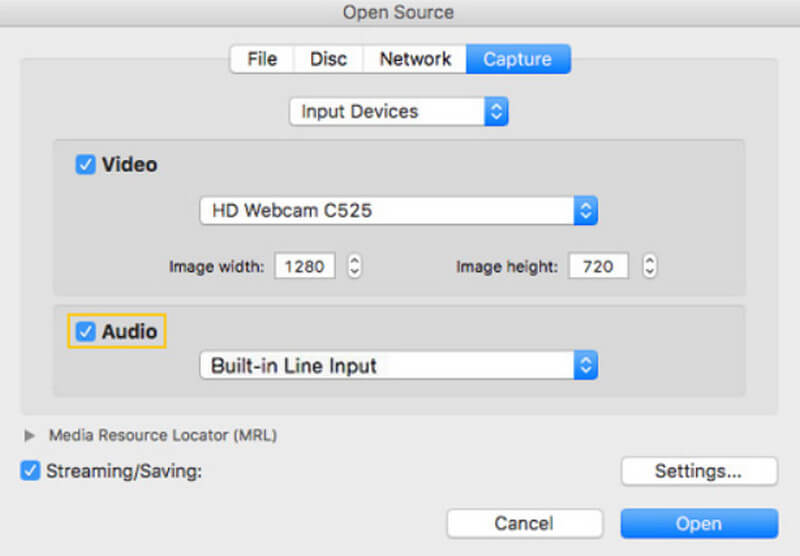
Vaihe 4. Kun asetukset ovat valmiit, napsauta Avaa (Open). Palaa sitten valikkoriville ja valitse Toisto (Playback) > Tallenna (Record).
Nyt olet käynnistänyt VLC-äänitallentimen onnistuneesti.
Jos haluat etsiä tallennetun äänen, valitse Media > Avaa tiedosto (Open File). Siirry tiedostoon, jonka nimenä on vlc-record.
Osa 3. Paras vaihtoehto VLC-äänitallentimelle äänen tallentamiseen
FVC -näytön tallennin
VLC Voice Recorder on täysin ilmainen, mutta sen toiminnot ovat hyvin rajalliset, etkä voi valita kovinkaan monia vientimuotoja. Vaikka siinä on sisäänrakennettu äänieditori, se ei ole kovin helppokäyttöinen. Äänen tallentamiseen sinulla on huomattavasti parempi vaihtoehto, nimittäin FVC Free Screen Recorder.
FVC-näytöntallennin tukee äänen tallentamista mikrofonista tai tietokonejärjestelmästä. Valittavana on tällä hetkellä MP3, WMA, AAC, M4A, FLAC ja muita. Tallennetun äänen laatu on lähes sama kuin alkuperäisen musiikin, eikä viivettä esiinny. Lisäksi FVC tarjoaa täydellisen valikoiman äänen ja videon muokkaustyökaluja, joten jos et ole tyytyväinen työhösi, voit rajata äänen pituutta tai jopa muuntaa tiedostomuodon ennen tulostusta. Se on all-in-one-työkalu, joten jos sinun on tallennettava videota, videoneuvottelua tai peliä, voit etsiä sitä myös.
Ilmainen latausWindows 7 tai uudempiTurvallinen lataus
Ilmainen latausMacOS 10.7 tai uudempiTurvallinen lataus
Tässä on opas siitä, miten VLC Media Playerin parasta vaihtoehtoa käytetään äänen tallentamiseen.
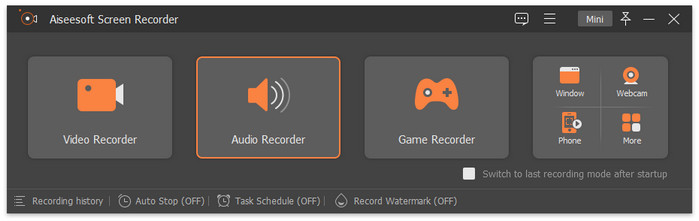
Vaihe 1. Lataa ja asenna FVC Screen Recorder tietokoneellesi. Avaa se työpöydälläsi. Valitse pääkäyttöliittymästä Audio Recorder.
Vaihe 2. Kun siirryt Audio Recorder -sivulle, säädä tallennusvoimakkuus ja valitse äänilähteeksi Järjestelmän ääni (System Sound) tai Mikrofoni.
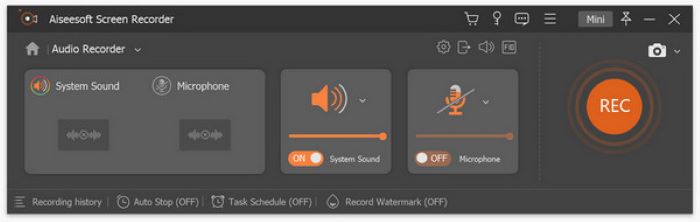
Vaihe 3. Napsauta sitten REC aloittaaksesi äänityksen.
Jos haluat muokata tallennettua MP3-ääntäsi tarkemmin, siirry Tallennushistoria-ikkunaan. Sieltä löydät MP3-leikkurin, tiedostojen yhdistämistyökalun ja tiedostomuunninohjelman.
Osa 4. Usein kysytyt kysymykset äänen tallentamisesta VLC:llä
Voiko VLC tallentaa äänen erikseen näytöstä?
Valitettavasti VLC Media Player ei tue tätä ominaisuutta tällä hetkellä. Mutta löydät tämän kortin FVC-näytöntallenntimesta.
Mikä on paras vaihtoehto VLC:lle työpöydän äänen tallentamiseen?
FVC Screen Recorder on paras vaihtoehto: se ei ainoastaan tue järjestelmän työpöydän äänen tallentamista, vaan kaappaa myös kuvan. Siinä on huomattavasti monipuolisemmat äänieditointiominaisuudet kuin VLC:n MP3-tallentimessa.
Onko VLC turvallinen Macille?
VLC Media Player on jo hyvin klassinen videosoitin ja -editori. Se on täysin ilmainen ja avoimen lähdekoodin Mac-, Windows- ja Linux-käyttäjille. Se ei sisällä viruksia tai haittaohjelmia, ja se myös suojaa käyttäjiensä yksityisyyttä ja turvallisuutta täysin.
Johtopäätös
Jos haluat ymmärtää, miten tallentaa ääntä VLC-mediatoistimella, tämä artikkeli on juuri sinua varten. Olemme kuvanneet tässä, kuinka ohjelmaa käytetään äänen kaappaamiseen Windowsissa ja Macissa, ja tuoneet esiin myös käytännössä ilmeneviä ongelmia. Auttaaksemme sinua välttämään nämä pulmat suosittelemme VLC-mediatoistimen vaihtoehdoksi FVC Screen Recorder -ohjelmaa. Siinä on kattavammat ominaisuudet ja selkeämpi tallennuskäyttöliittymä. Se tukee huomattavasti useampia vientimuotoja sekä monia ääni- ja videoeditointityökaluja.
-
 Korjaa nopeasti VLC Media Player, joka ei toista videota [Opas vuodelle 2025]
 Etsitkö nopeaa ja helppoa tapaa korjata VLC Media Player, joka ei toista videoita? Tässä artikkelissa on kaikki automaattiset ja manuaaliset ratkaisut tämän ongelman ratkaisemiseksi.
-
 Kuvakaappaus VLC: ssä - Kuinka otan tilannekuvan VLC Media Player -sovelluksessa
 Kuinka ottaa tilannekuvia VLC Media Playerissa ja mihin ne tallennetaan? Käy läpi VLC-snapshot-ominaisuus ja sen vaihtoehto artikkelista.
-
 Näytön videon tallentaminen äänellä VLC Media Player -sovelluksella
 Se on vaiheittainen opas VLC-näytön tallennusominaisuudesta. Löydät yksityiskohtaisen prosessin, vianetsinnän ja parhaan vaihtoehdon artikkelista.