


Värin korjaaminen 5 parhaan välttämättömän työkalun avulla
Värikorjaus on videonmuokkauksen perusprosessi, joka parantaa ja tasapainottaa videon värejä, tuottaen visuaalisesti miellyttävän ja katseenvangitsevan lopputuloksen. Siihen kuuluu videon kontrastin, kylläisyyden, kirkkauden ja sävyjen säätäminen täydellisen visuaalisen tunnelman saavuttamiseksi. Olitpa sitten ammattivideokuvaaja tai aloitteleva sisällöntuottaja, värikorjauksen hallitseminen on todellinen pelinmuuttaja vaikuttavien visuaalien tuottamisessa. Prosessi alkaa olemassa olevan väritasapainon, huippuvalojen, varjojen ja keskitonien tunnistamisella ja analysoimisella videomateriaalista. Tämän jälkeen tehdään säädöt erikoisohjelmistolla, joka mahdollistaa tarkan hallinnan näihin värielementteihin. Sukelletaan nyt syvemmälle tähän artikkeliin ja opitaan, kuinka korjata videon väriongelmat parhailla työkaluilla, joihin voit luottaa.

Osa 1. Viisi tapaa korjata videon värit
Erilaisten ilmaisten videoeditorin värikorjausten löytäminen verkosta voi olla yhtä helppoa kuin luuletkin. Edistyksellisempien ja luotettavampien etsiminen on kuitenkin hankalaa luoda oikeaa tunnelmaa videoillesi. Löydä viisi tehokasta tapaa viimeistellä videosi värit käyttämällä erilaisia monipuolisia ohjelmistoja, jotka parantavat tarinankerrontaasi ja houkuttelevat yleisöäsi.
1. Video Converter Ultimate
Video Converter Ultimate on monipuolinen videoratkaisu, jonka avulla voit parantaa videosi laatua säätämällä tärkeitä parametreja, kuten kirkkautta, kontrastia ja kylläisyyttä. Tämä kätevä värinkorjaustyökalu mahdollistaa myös videoiden muokkauksen toiminnoilla, kuten leikkaus, rajaus ja yhdistäminen. Lisäksi se tarjoaa runsaasti vaihtoehtoja videon muuntamiseen, jolloin voit muuntaa videot tuhansiin formaatteihin ja sovittaa ne erilaisille laitteille, kuten MP4, MKV, MOV, MP3, AAC, GIF, iPhone, Samsung ja Apple TV, jotta niistä voi nauttia eri alustoilla. Käyttäjät voivat myös lisätä tekstityksiä ja vesileimoja tehdäkseen videoistaan yksilöllisempiä. Yksinkertaisen käyttöliittymänsä ansiosta työkalu sopii erinomaisesti sekä aloittelijoille että kokeneille käyttäjille. Seuraa alla olevia ohjeita oppiaksesi, miten värinkorjaat videosi onnistuneesti Video Converter Ultimatella.
Vaihe 1: Lataa ja asenna värinkorjausohjelma
Lataa työkalu napsauttamalla jotakin alla olevista Ilmainen lataus -painikkeista. Varmista tietokoneesi käyttöjärjestelmän mukaan, että lataat juuri sinun tietokoneellesi sopivan Video Converter Ultimaten. Seuraa ohjeita asentaaksesi sen.
Ilmainen latausWindows 7 tai uudempiSuojattu lataus
Ilmainen latausMacOS 10.7 tai uudempiSuojattu lataus
Vaihe 2: Käynnistä Video Converter Ultimate
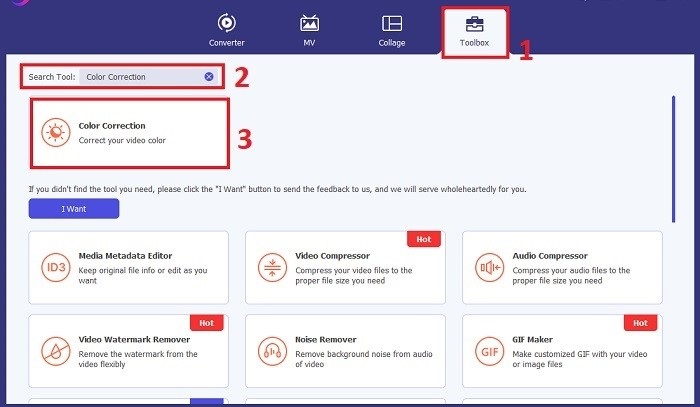
Kun olet asentanut ohjelman, avaa Video Converter Ultimate. Siirry päävalikossa kohtaan Toolbox ja etsi Color Correction -toiminto. Napsauta sitä jatkaaksesi.
Vaihe 3: Tuo video värinkorjausta varten
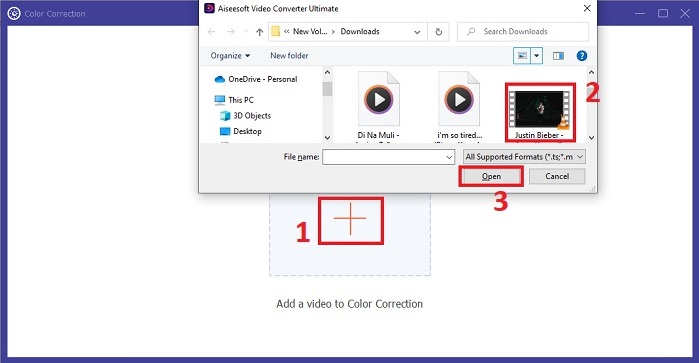
Nyt napsauta Plus-painiketta tuodaksesi videon, jonka haluat värinkorjata. Etsi videotiedosto tietokoneeltasi. Valitse sitten Open tuodaksesi sen ohjelmistoon.
Vaihe 4: Säädä videon väriasetuksia ja tallenna
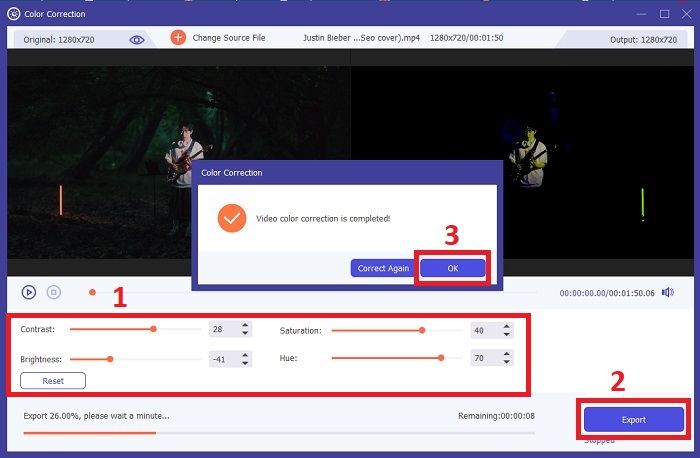
Videon tuonnin jälkeen hienosäädä väriparametreja, kuten kirkkautta, kontrastia, kylläisyyttä ja sävyä, halutun värinkorjauksen saavuttamiseksi. Kun olet tyytyväinen värisäätöihin, napsauta Export. Anna työkalun käsitellä video ja tallenna korjattu versio valitsemaasi sijaintiin.
2. Color Correction Premiere Pro
Premiere Pro tunnetaan korkealaatuisesta videoeditointiohjelmistostaan ja kattavista värinkorjausominaisuuksistaan. Se tarjoaa erilaisia väriluokittelutyökaluja ja tehosteita tarkkojen säätöjen tekemiseen. Color Correction Premiere Pron avulla voit säätää väritasapainoa ja valotusta tai käyttää luovaa ilmettä halutun visuaalisen tyylin saavuttamiseksi. Voit myös valita sen sadoista sisäänrakennetuista videotehosteista ja siirtymistä tai aloittaa ammattimaisesti suunnitelluista malleista ja muokata niitä haluamasi tulosteen luomiseksi. Lisäksi siinä on yhteistyöominaisuuksia ja se integroituu sujuvasti muihin Adobe-ohjelmistoihin, mikä tekee siitä ammattilaisten parhaan valinnan.
Vaihe 1. Avaa ensin Premiere Pro ja tuo videosi. Siirry sitten Color workspace -työtilaan.
Vaihe 2. Color workspace -työtilassa käytä Lumetri Color -paneelia säätääksesi valotusta, väritasapainoa ja luovia ilmeitä.
Vaihe 3. Käytä scope-mittareita varmistaaksesi, että värisäädöt vastaavat haluttua lopputulosta. Esikatsele lopuksi video ja vie korjattu versio.

3. Davinci Resolve Color Correction
Tutustu poikkeuksellisiin väriluokitusominaisuuksiin. Tämä all-in-one-ohjelmisto yhdistää ammattimaisen editoinnin, värinkorjauksen, visuaaliset tehosteet ja äänen jälkituotannon. Työkalun käyttäjäystävällisen käyttöliittymän ja kattavan ominaisuussarjan avulla voit herättää luovan visiosi eloon tarkasti ja tyylikkäästi. Davinci Resolve Color Correctionin edistyneiden väriluokitustyökalujen avulla voit tehdä videoistasi erottuvan. Työskenteletpä sitten huippuluokan Hollywood-elokuvien tai henkilökohtaisten projektien parissa, tämä työkalu antaa ammattilaisille ja harrastajille mahdollisuuden luoda vakuuttavia tarinoita vertaansa vailla laadukkaasti.
Vaihe 1. Avaa Davinci Resolve ja tuo videosi. Kun video on tuotu, siirry Color-välilehteen.
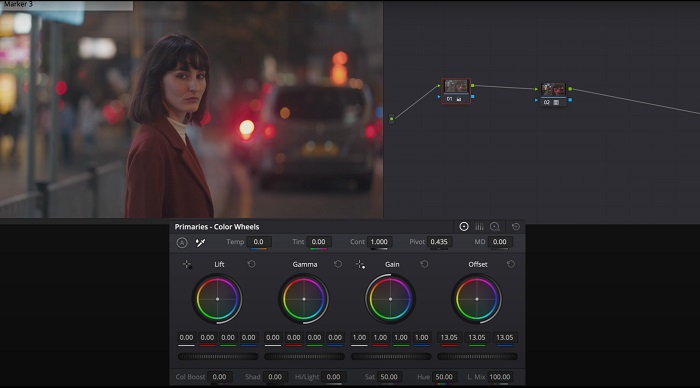
Vaihe 2. Color-välilehdessä hyödynnä color wheels -säätimiä, curve-käyriä ja node-solmuja videon värinkorjaukseen. Voit käyttää käytettävissä olevia scope-mittareita tarkkoihin säätöihin.
Vaihe 3. Kun olet tehnyt tarvittavat värisäädöt, esikatsele korjattu video varmistaaksesi, että se vastaa odotuksiasi. Kun olet tyytyväinen, vie korjattu video käyttökuntoon.
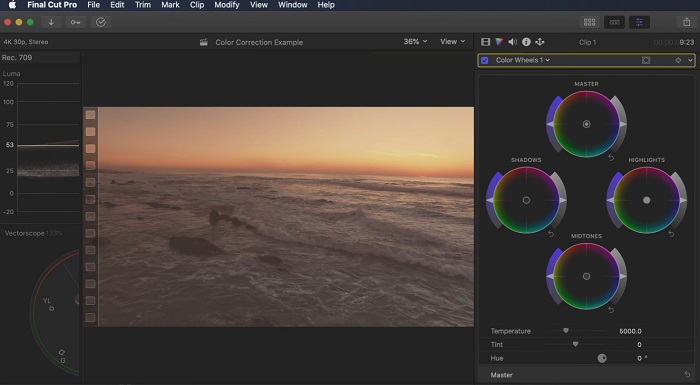
4. Final Cut Pro -värinkorjaus
Jos olet Mac-käyttäjä ja etsit huippuluokan videoeditointisovellusta, Final Cut Pro on loistava vaihtoehto. Siinä on käyttäjäystävällinen käyttöliittymä ja tehokkaat ominaisuudet, jotka tekevät muokkaamisesta helppoa. Mitä tulee värinkorjaukseen, Final Cut Pro tarjoaa väritaulun ja väripyörät valotuksen, kylläisyyden ja sävyn säätämiseen. Voit käyttää reaaliaikaisia väritehosteita ja käyttää kehittyneitä arviointityökaluja parantaaksesi kuvamateriaaliasi. Lisäksi se viedään sujuvasti Apple-laitteille ja suosituille verkkoalustoille. Jos olet ammattilainen, joka tavoittelee tehokkuutta ja luovuutta, Final Cut Pro on huoleton. Varmista optimaalisen suorituskyvyn saavuttamiseksi, että sinulla on macOS 13.4 tai uudempi ja Mac-tietokone Applen silikonilla.
Vaihe 1. Voit aloittaa tuomalla videosi Final Cut Prohon, ja siirtyä sitten Color workspace -värityötilaan.
Vaihe 2. Käytä Color Board -paneelia tai Color Wheels -säätimiä tehdäksesi olennaiset valotus-, kylläisyys- ja sävysäädöt.
Vaihe 3. Hienosäädä videosi värejä edelleen lisävärimäärittelytyökaluilla parhaan mahdollisen lopputuloksen saavuttamiseksi. Esikatsele lopuksi video ja vie korjattu versio.
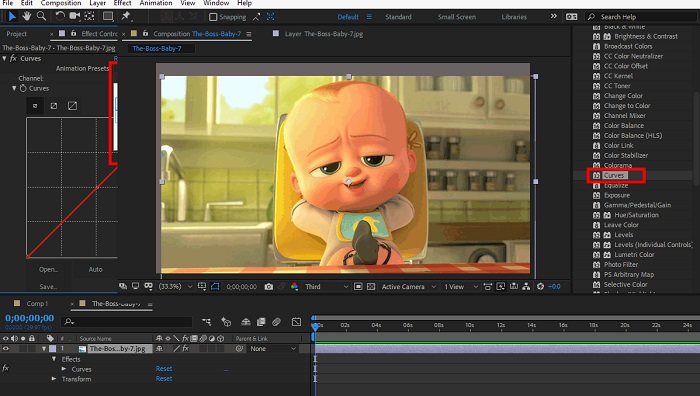
5. Värinkorjaus After Effects
After Effects on kuuluisa liikegrafiikka- ja visuaaliset tehosteet ohjelmisto, jolla on vahvat värinkorjausominaisuudet. Perusvärinkorjaustehosteiden lisäksi se tarjoaa erilaisia säätötasoja ja tehosteita värien parantamiseksi ja muokkaamiseksi. Voit nopeasti animoida tekstiä ja grafiikkaa ja herättää ne eloon kiehtovilla liikkeillä. Color Correction After Effectsin avulla voit hyödyntää tasoja, käyriä ja sekoitustiloja halutun väriluokituksen saavuttamiseksi. Se on monipuolinen värinkorjausvaihtoehto, koska se on integroitu eri Adobe-tuotteisiin ja laajalle yhteisölle, joka tarjoaa opetusohjelmia ja laajennuksia. Lisäksi ohjelmisto kehittyy jatkuvasti ja tuo markkinoille ominaisuuksia, kuten intuitiivisen ominaisuuspaneelin, läpinäkyvän kerroksen ohjauksen ja tehokkaan monikehysten renderöinnin, jotka virtaviivaistavat työnkulkuja ja pitävät luomukset luovuuden kärjessä.
Vaihe 1. Tuo videoleikkeesi ohjelman projektiin. Lisää värinkorjaustehosteet siirtymällä Effects & Presets -paneeliin ja valitsemalla sopivat värinkorjaustyökalut, kuten Curves, Levels tai Color Balance.
Vaihe 2. Napsauta lisättyä värinkorjaustehostetta avataksesi sen parametrit. Muokkaa sitten asetuksia, kuten valotusta, kontrastia, kylläisyyttä ja sävyä, korjataksesi ja parantaaksesi videosi värejä.
Vaihe 3. Esikatsele videota Composition-paneelissa nähdäksesi, miten värikorjaukset vaikuttavat materiaaliin. Hienosäädä asetuksia esikatselun perusteella, kunnes haluttu värinkorjaus on saavutettu, ja jatka sitten videon renderöintiin tai vientiin.
Lisälukemista:
Parhaat ilmaiset valokuvien värinparannussovellukset Androidille ja iOS:lle
4 mahtavaa tapaa lisätä suodatin videoon Windowsissa ja macOS:ssä
Osa 2. Usein kysyttyä videon värinkorjauksista
Kuinka teen värinkorjauksen iMovie-sovelluksessa?
Korjataksesi värejä iMoviessa, tuo videoleikkeesi, valitse se ja napsauta Color Correction -painiketta (taikasauva-kuvake). Säädä liukusäätimiä valotuksen, kylläisyyden ja värin osalta saadaksesi halutun ilmeen.
Kuinka voin käyttää värinkorjaustyökaluja OpenShotissa?
OpenShot Video Editorin värinkorjauksessa valitse leike, siirry Effects-välilehteen ja napsauta Color Correction. Säädä liukusäätimiä kirkkauden, kontrastin, sävyn ja kylläisyyden osalta saavuttaaksesi halutun värinkorjauksen.
Kuinka pääsen Sony Vegasin värinkorjaustyökaluihin?
Sony Vegasin värinkorjauksessa valitse leike, jonka värejä haluat korjata, siirry Video FX -välilehteen ja etsi Color Corrector. Vedä ja pudota se leikkeen päälle ja säädä väriasetuksia Effect Controls -ikkunassa.
Johtopäätös
Värinkorjauksen hallitseminen on olennaista videoidesi visuaalisen vetovoiman parantamiseksi ja mukaansatempaavan katselukokemuksen luomiseksi. Tässä oppaassa kävimme läpi viisi tehokasta värinkorjausohjelmaa virheettömän värinkorjauksen saavuttamiseksi. Jos etsit korkealaatuisia videonmuokkaustyökaluja, harkitse Video Converter Ultimaten, Premiere Pron, Final Cut Pron, DaVinci Resolven tai After Effectsin käyttöä. Nämä ohjelmat tarjoavat laajan valikoiman ominaisuuksia ja mahdollisuuksia, joiden avulla voit luoda ammattimaisen näköisiä videoita. Jokaisella ohjelmalla on omat erityisominaisuutensa ja toimintonsa, jotka puhuttelevat erilaisia mieltymyksiä ja osaamistasoja.
-
 Kuinka lisätä ja tehdä Instagram-suodatin ennen kuvan ja videon lähettämistä
 Mitkä ovat Instagramin suodattimet? Kuinka soveltaa sitä? Kuinka tehdä sellainen? Näihin kysymyksiin on suorat vastaukset tässä viestissä, joten lue ne.
-
 Ongelmattomat menetelmät kuvien muuntamiseksi mustavalkoisiksi
 Haluatko tehdä kuvistasi nostalgisen näköisiä? Meillä on sinulle vastaus. Tämä viesti tarjoaa merkittäviä tapoja muuntaa värikuva mustavalkoiseksi.
-
 6 suosikkivalintaa Snapchat-animoidut Snapchat-suodattimet Snapchatissa
 Haluatko tietää parhaat tavat lisätä suodattimia Snapchat-videoihin? No, voit napsauttaa tätä ja oppia erilaisia suodattimia, joita voit käyttää Snapchat-videoissa.