


כיצד לייעל תמונה עבור האינטרנט באמצעות 4 הפתרונות [מהר]
אופטימיזציה של תמונה ממלאת תפקיד חיוני ברשת, משום שהיא מקצרת את זמן הטעינה של האתר. לפי מחקרים עדכניים, כאשר תמונות אינן מותאמות כראוי, כמעט מחצית מהמבקרים עוזבים את האתר מיד, מה שגורם לירידה בתנועה ובהכנסות. לכן חשוב ללמוד כיצד לעשות זאת אם ברצונך להפחית באפרינג (buffering) ולבנות אתר יציב ואמין שיגדיל את התנועה ויביא ליותר הכנסות. לבצע זאת קל; בעזרת המדריך שהוספנו על כיצד לאופטֵם (למטב) תמונה עבור הרשת בדרך הפשוטה ביותר.

חלק 1. הדרכים הטובות והחינמיות לייעל תמונה מקוונת מבלי לוותר על איכות התמונה
1. FVC Free Image Upscaler
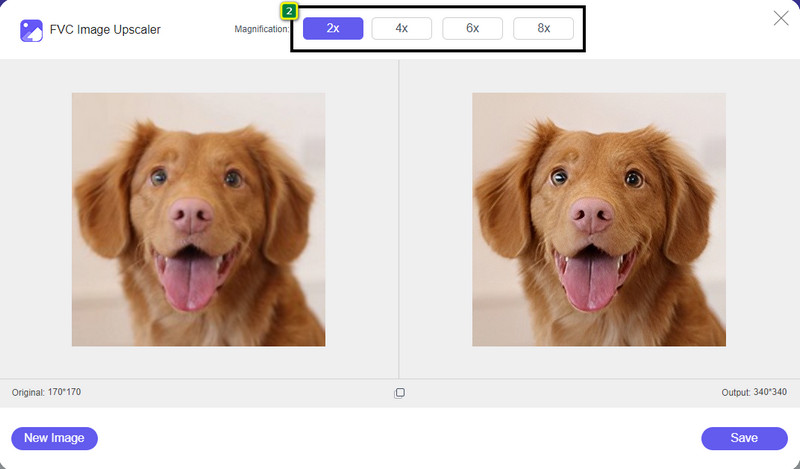
מחפשים דרך להתאים את הממדים ויחס הגובה‑רוחב של התמונה שברצונכם להשתמש בה ברשת? FVC Free Image Upscaler הוא כלי שמסוגל לאופטֵם תמונות בעזרת טכנולוגיית הבינה המלאכותית העוצמתית שלו. מנגנון ההגדלה הזה יכול לשנות את גודל התמונה מבלי לפגוע ב‑PPI המפורט שלה, כך שלא תחוו ירידה באיכות. בנוסף, הכלי המקוון הזה יכול לתקן תמונות מטושטשות או מפוקסלות על‑ידי איתור הפגמים בהן. לפני ייצוא התמונה, יש חלונית תצוגה מקדימה להשוואת המצב לפני ואחרי. לכן, אם עליכם לשנות את גודל התמונה עבור הרשת, תוכלו לעקוב אחר השלבים שהוספנו בהמשך.
שלב 1. פתחו את האתר על‑ידי לחיצה על קישור זה.
שלב 2. לחצו על Upload Image כדי להוסיף לכאן את התמונה שברצונכם לשנות את גודלה.
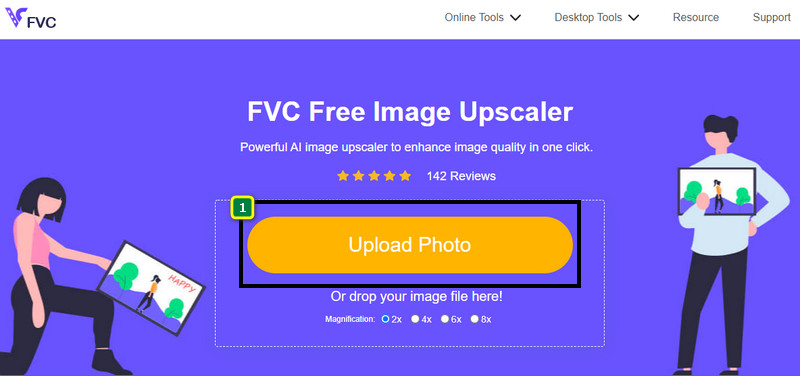
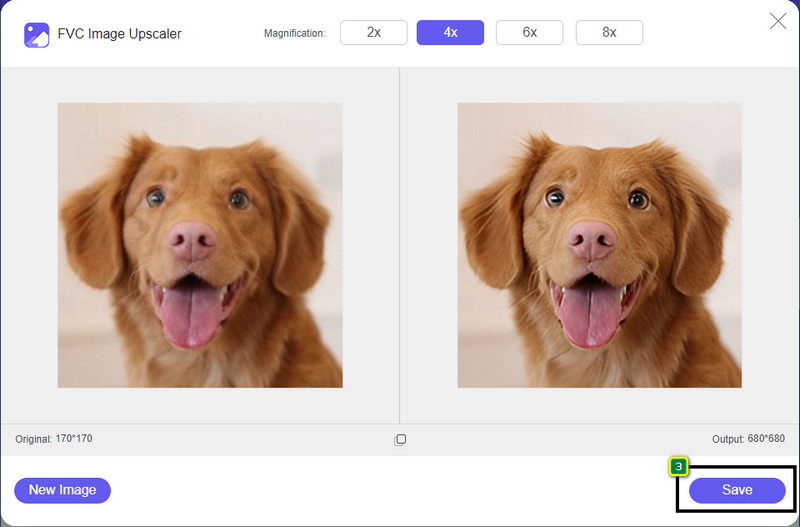
שלב 3. בחרו את האפשרות שברצונכם להחיל על התמונה כדי לשנות את גודלה.
שלב 4. לחצו על Save כדי להוריד לכונן המקומי שלכם את התמונה ששיניתם את גודלה.
2. FVC Free Image Compressor
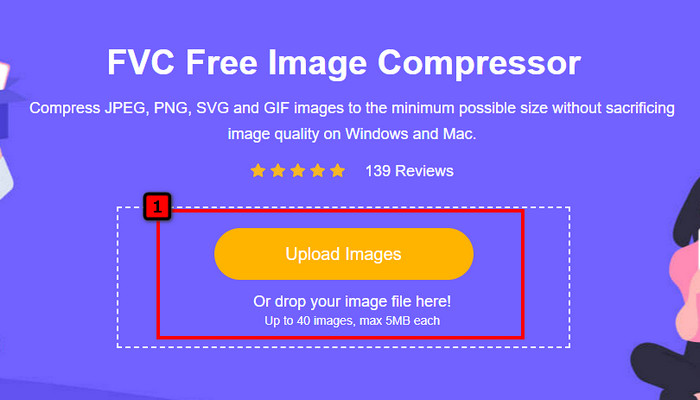
FVC Free Image Compressor מאפשר לכל אחד לאופטֵם תמונה עבור הרשת על‑ידי הקטנת גודל הקובץ שלה. הוא מאפשר לדחוס פורמטים פופולריים המשמשים באתרים שונים, כגון PNG, JPG, SVG, BMP ועוד, עד גודל של פחות מ‑5MB לכל קובץ. בעזרתו תוכלו להשליך (drag & drop) מספר רב של תמונות כדי להקטין אותן לגודל אופטימלי, כך שייטענו מהר יותר ברשת. זהו כלי מבוסס בינה מלאכותית שמספק יחס דחיסה מיטבי שאינכם יכולים להשיג בדוחס מקוון אחר.
שלב 1. בקרו באתר הרשמי של הכלי על‑ידי חיפוש שמו, או לחצו על קישור זה כדי לגשת אליו בדפדפן האינטרנט שלכם.
שלב 2. גררו ושחררו את קובץ התמונה שברצונכם להעלות לכאן, או לחצו על Upload Images; תיקייה תופיע על המסך שלכם, לחצו על הקובץ שברצונכם לדחוס ולאחר מכן לחצו על Open. דוחס זה מסוגל להקטין יותר מ‑40 תמונות בו‑זמנית.
שלב 3. הכלי ידחוס באופן אוטומטי את גודל קובץ התמונה על‑פי האלגוריתם מבוסס הבינה המלאכותית. לאחר מכן לחצו על Download כדי לייצא את הגרסה הדחוסה של התמונה.

3. TinyPNG
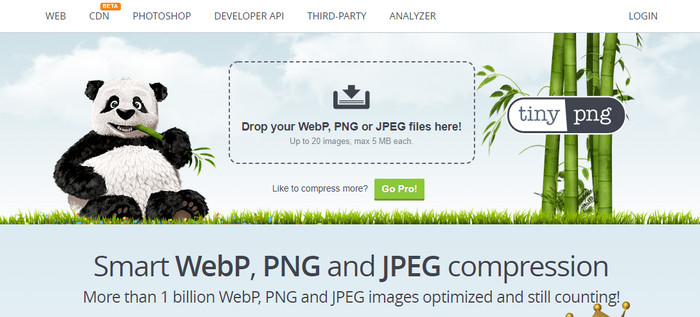
TinyPNG הוא תוכנה מקוונת פופולרית ואמינה לשימוש עבור אופטימיזציה של תמונות. זהו דוחס שמקטין באופן אוטומטי את גודל התמונה עד לכ‑75% מגודל התמונה המקורי. ניתן להעלות את התמונות שלכם אל Dropbox אם הן אינן שמורות בכונן המקומי. לא תתקשו ללמוד כיצד להשתמש בדוחס התמונות הזה בזכות הפשטות שבה פיתח אותו המפתח.
למרות שזה קל לשימוש, הפורמט הנתמך כאן הוא PNG ו-JPG בלבד, ואין שום דבר אחר. לכן, אם אתה רוצה לדחוס את הקבצים BMP, GIF, SVG ועוד שיש לך, אתה לא יכול לעשות את זה כאן כי זה לא תומך בפורמט האמור. עם זאת, זה קל לשימוש; אתה יכול לבצע את השלבים שאנו מוסיפים.
שלב 1. פתחו את מנוע החיפוש שלכם וחפשו את האתר הרשמי של TinyPNG.
שלב 2. לחצו על סמל הייבוא כדי להעלות את התמונה שברצונכם לדחוס; כלי זה מסוגל לעבד 20 תמונות בו‑זמנית.
שלב 3. המתינו לסיום תהליך הדחיסה ולאחר מכן לחצו על כפתור ההורדה (Download) כדי לשמור את הגרסה הדחוסה של התמונה שהעליתם לכאן.
חלק 2. מטב תמונה במצב לא מקוון באמצעות התוכנה המקצועית ב-Windows ו-Mac
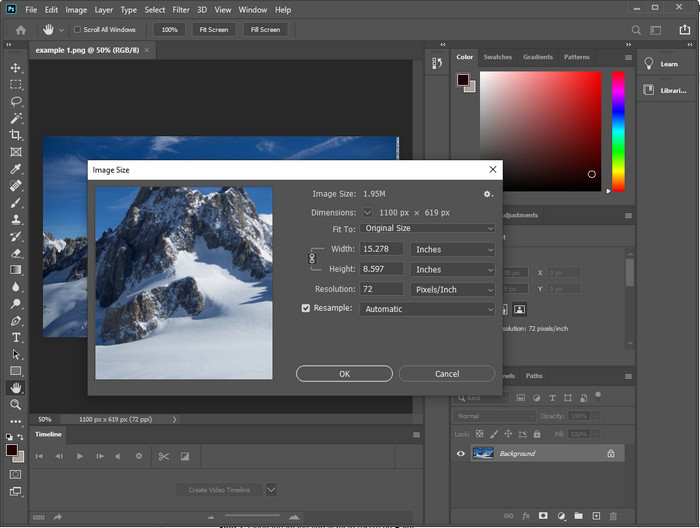
Photoshop מסוגל לבצע את שתי המשימות שהזכרנו בחלק הראשון: שינוי גודל התמונה והקטנתה. אף על פי שהכלי הזה לא נוצר במיוחד עבור משימה זו, הוא עדיין יכול לבצע אותה כחלק מהתכונות המתקדמות הנוספות שלו. בעזרתו תוכלו להתחיל להוסיף פילטרים או לערוך את התמונה לפי הרעיון שלכם. המגבלה היחידה היא הדמיון שלכם ורמת הקושי בשימוש בתוכנה הזו.
שלא כמו הכלי המקוון שהזכרנו, לא תצטרך חיבור לאינטרנט כדי להשתמש בתוכנה זו לאחר שהורדת אותה למכשיר שלך. עם זאת, תצטרכו לרכוש את התוכנה כדי להשתמש בה, כך שאם תרצו לראות כיצד לבצע אופטימיזציה של התמונה לרשת בפוטושופ, ישנה הוראה שאנו מוסיפים למטה, המאפשרת לכם להקטין ולשנות את גודל התמונה.
שלב 1. הורידו והפעילו את התוכנה על שולחן העבודה שלכם כדי להתחיל להשתמש בה.
שלב 2. העלו את התמונה שברצונכם לערוך, ולאחר מכן עברו לתפריט Image ולחצו על Image Size. שנו את המידות לפי המפרט שלכם ואז לחצו על OK כדי לשמור את השינויים. אם אינכם מעוניינים לשנות את יחס הגובה‑רוחב או את ממדי התמונה, עדיף לדלג על שלב 2.
שלב 3. לחצו על תפריט File ובחרו Save as. תיבת דו‑שיח תופיע על המסך. בחרו את גודל הקובץ שברצונכם להשיג, ואז לחצו על OK כדי להתחיל לייצא את התמונה.
חלק 3. שאלות נפוצות בנושא כיצד לייעל את התמונה עבור האינטרנט
מהו פורמט התמונה הטוב ביותר עבור האינטרנט?
כדאי להשתמש בתמונה עם סיומת PNG ו-JPG מכיוון שידוע כי פורמטים אלו עברו אופטימיזציה טובה באתרים שונים. עם זאת, לפעמים תצטרך לייעל אותה על ידי צמצום או שינוי גודל התמונה, וזה המקום שבו הכלי שהוספנו כאן בא לעזור.
מה שמביא פרטים נוספים באינטרנט; PNG או JPG?
שתי תמונות הרסטר מתפקדות היטב באתר; הם נטענים מהר יותר ומייעלים אתרים. עם זאת, עדיין ישנם הבדלים בין שני הפורמטים הללו, כגון כאשר אתה רוצה להשתמש בצילום טהור ללא שקיפות עבור האינטרנט, פורמט הבחירה שלך חייב להיות JPG או JPEG. אבל אם אתה רוצה לקבל שקיפות של 1 סיביות באינטרנט שלך עם פירוט רב, PNG כאן כדי לעזור לך.
האם שינוי גודל התמונה הופך את האיכות לרעה?
אם דוחסים תמונה יותר מדי, ייתכן שתתקבל איכות ירודה, אך ניתן למנוע זאת אם אינכם מגזימים בדחיסה. לאחר דחיסת התמונה, עדיף להקטין אותה בכ‑45% עד 70% כדי להימנע מאובדן איכות. עם זאת, תוכלו להשתמש במעצב/משפר תמונות כדי להעלות את איכות התמונה.
סיכום
עכשיו, כשאתה יודע איך לייעל את התמונה שלך, כדאי שתעשה זאת כדי שתזכה ליותר ביקורים ותמשוך תשומת לב רבה. עם ההדרכה שהוספנו למעלה, אנו בטוחים שתוכלו לעשות זאת בקלות ובמהירות מבלי להשפיע על האיכות. אם אתה צריך לשנות את הגודל או לדחוס, אנו ממליצים להשתמש במוצר FVC שאנו כוללים כאן כדי לפתור את הבעיה מבלי להוריד תוכנית התקנה כלשהי.
-
 צור Photo HD עם הדרכים הטובות ביותר שתוכל למצוא בשוק
 האם אתה תוהה או רוצה לעשות תמונה HD? אתה יכול לעקוב אחר המדריך שאנו מוסיפים למטה עם פתרונות שונים שבהם אתה יכול להשתמש.
-
 4 מפחיתי איכות התמונה המובילים שתוכלו להשתמש בהם באופן מקוון ולא מקוון
 מפחיתי איכות תמונה אלה יכולים לעזור לך להפחית את איכות התמונה שלך מסיבות מסוימות. אם היית צריך אחד, אתה קורא את המאמר הזה!
-
 דרכים רשמיות לשדרג תמונה ל-4k עם הדרכה מעשית
 כדי לשדרג תמונה ל-4k תזדקק לתוכנה במכשיר שלך. אם אין לך כזה, תצטרך לבחור בכלי שאנו כוללים כאן.