


צלם צילומי מסך ב-VLC Media Player ללא מאמץ
צילום צילומי מסך בזמן צפייה בסרטונים הוא דרך נוחה לשמור רגעים בלתי־נשכחים או לחלץ מידע חשוב. זה הופך לאמצעי “לקחת” רגע מסוים מתוך הווידאו כדי לשמר אותו. נגן המדיה VLC הוא נגן וידאו ידידותי למשתמש, הפועל על Windows, macOS או Linux. VLC מספקת אפשרות מובנית ללכידת פריימים בדיוק רב. בשונה מנגני מדיה רבים אחרים, VLC מפשטת את התהליך, ודורשת רק כמה לחיצות או הקשות כדי לתפוס את התמונה הרצויה. כאשר שולטים בפונקציה הזאת, משתמשים יכולים במהירות להרכיב אוסף של תמונות סטילס מהסרטונים האהובים עליהם. במאמר זה נסקור צעד־אחר־צעד כיצד לצלם צילומי מסך ב‑VLC כדי לאפשר למשתמשים לנצל את יכולות צילום המסך של VLC Media Player, ולהעשיר בקלות את חוויית המולטימדיה שלהם. המשיכו לקרוא כדי ללמוד כיצד לצלם צילומי מסך באמצעות קיצורי מקלדת ותפריטים, מהן נקודות החוזק והמגבלות של VLC, ואילו תוכנות חלופיות קיימות.

חלק 1. כיצד לצלם צילום מסך ב-VLC
צילום מסך ב-VLC Media Player מתבצע בקלות באמצעות מקשי קיצור או אפשרויות התפריט. אתה יכול להשתמש בשתי השיטות כדי ללכוד פריימים מהסרטונים שלך ללא מאמץ. עם מספר הקשות בלבד, אתה יכול ללכוד ולשמור תמונות של הרגעים האהובים עליך. תכונת צילום המסך הרב-תכליתית של VLC משפרת את חווית המולטימדיה שלך, ומאפשרת לך לשמר סצנות בלתי נשכחות בקלות.
שלבים לצילום מסך ב-VLC באמצעות מקשי קיצור:
שלב 1. פתחו את הווידאו משולחן העבודה על‑ידי לחיצה ימנית של העכבר ובחירת VLC Media Player.
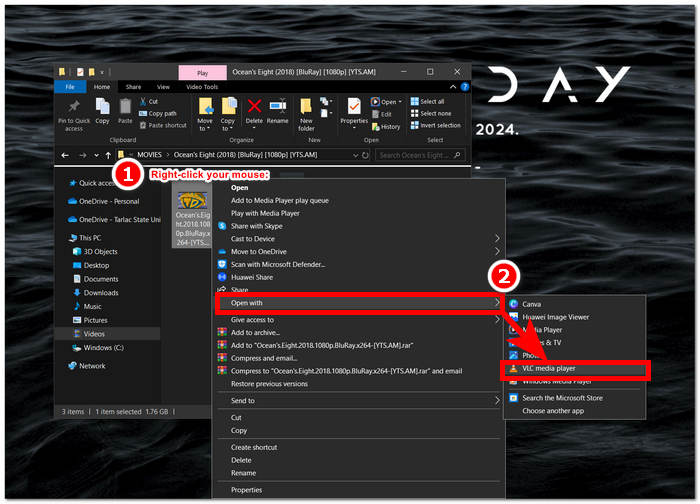
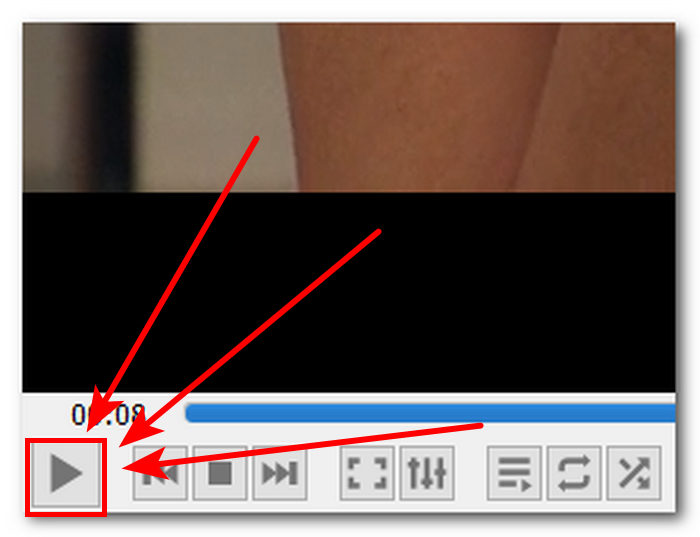
שלב 2. נגנו את הסרטון או עברו לחלק שבו תרצו לצלם צילום מסך ולחצו על כפתור Pause.
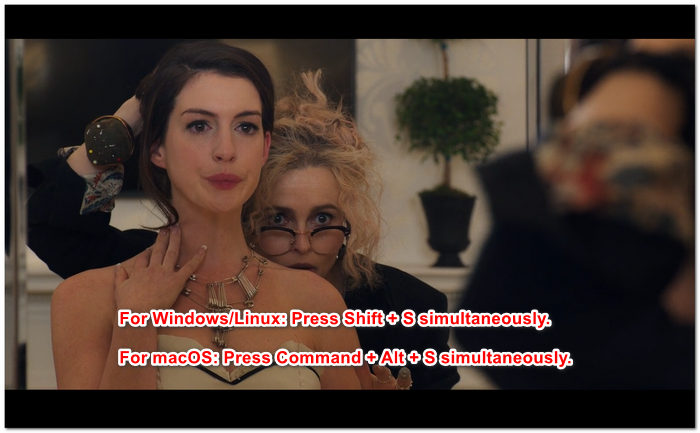
שלב 3. כדי לצלם מסך באמצעות קיצורי מקשים ב‑Windows/Linux, לחצו בו־זמנית על Shift + S, וב‑macOS, לחצו בו־זמנית על Command + Alt + S.
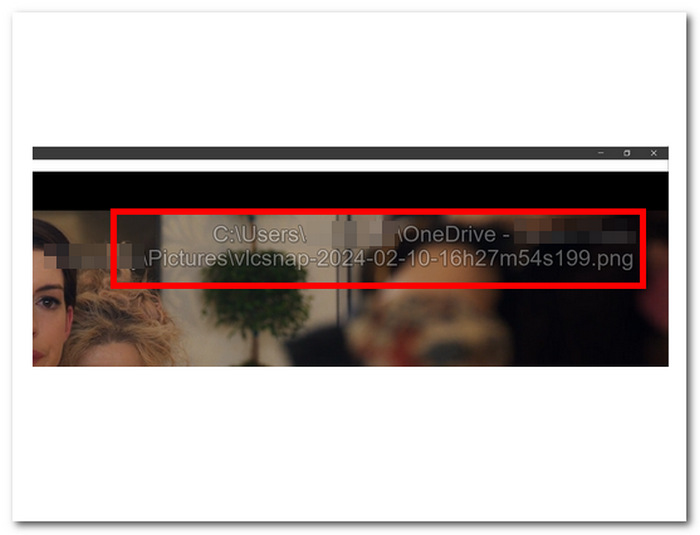
שלב 4. לאחר שתלחצו על קיצורי המקשים, יופיע טקסט בפינה הימנית של המסך שיציין את המיקום של תיקיית צילומי המסך של VLC. פשוט עקבו אחר ההודעה ותוכלו לראות את כל צילומי המסך שלכם.
שלבים לצילום מסך ב-VLC דרך התפריט:
שלב 1. אתרו ופתחו את הווידאו באמצעות VLC Media Player משולחן העבודה.

שלב 2. לחצו על כפתור Pause הממוקם בחלק התחתון‑שמאלי של המסך כדי לעצור בנקודה שבה תרצו לצלם צילום מסך.
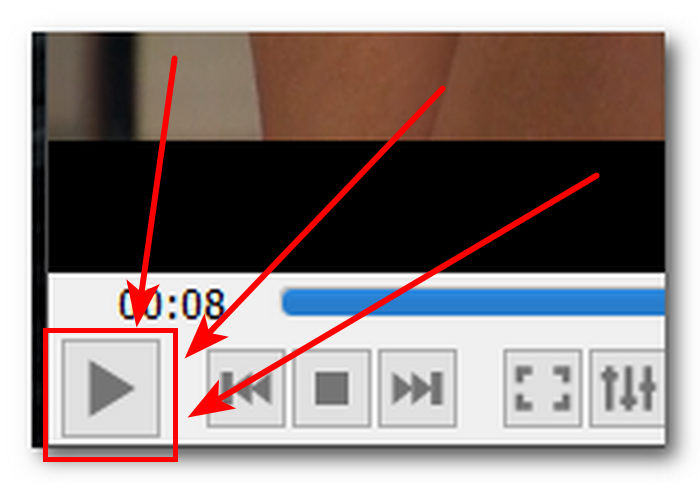
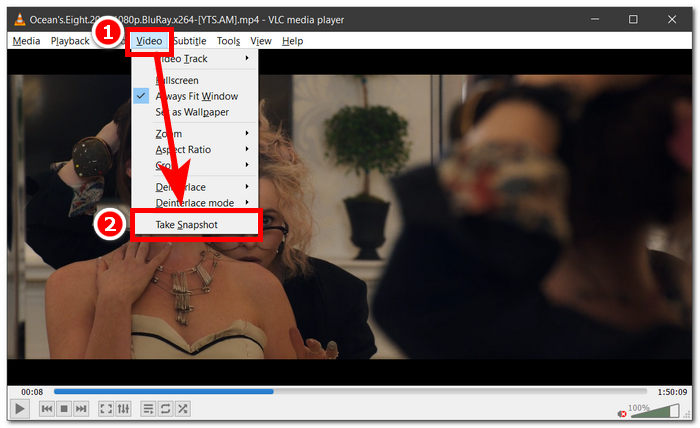
שלב 3. לאחר שהווידאו נעצר, לחצו על Video settings הממוקם בפינה העליונה‑שמאלית של נגן המדיה.
שלב 4. אתרו את האפשרות Take Snapshot בהגדרות ולחצו עליה כדי לצלם צילום מסך של הווידאו.
לא משנה באיזו שיטה תבחרו, VLC מאפשר לכם לצלם צילומי מסך בקלות, ומאפשר למשתמשים לשמור את הרגעים האהובים עליהם מהווידאו במינימום מאמץ. בין אם אתם מעדיפים קיצורי מקשים לצילום מסך ב‑VLC ובין אם שימוש באפשרויות התפריט, VLC מבטיחה חוויה חלקה בעת צילום תמונות סטילס.
חלק 2. החוזקות והגבולות של צילום מסך של VLC
צילומי מסך של VLC מציעים ללא ספק שתי דרכים לצילום מסך של כל סוג של וידאו שמושמע בנגן המדיה של VLC. נגן המדיה של VLC זוהר ביתרונותיו ועלול לגרום למשתמשים לפקפק במגבלותיו. לפיכך, פירטנו להלן כמה מהיתרונות והמגבלות של נגן המדיה של VLC.
יתרונות צילום המסך ב‑VLC:
◆ ממשק קל לשימוש וזמין עבור לכידת תמונות.
◆ שני מקשי הקיצור ואפשרויות התפריט זמינים לנוחות נוספת.
◆ זמינות הגדרות הניתנות להתאמה אישית להתאמת פורמט ואיכות תמונה.
◆ שמור ללא מאמץ את הרגעים האהובים והגבר את חווית המולטימדיה.
מגבלות צילום המסך ב‑VLC:
◆ כלי עריכה מתקדמים לחידוד תמונות שצולמו אינם זמינים.
◆ תוכנת צילום מסך ייעודית עשויה להציע רמת דיוק גבוהה יותר בהשוואה לכלי זה.
◆ לא ניתן לצלם צילומי מסך של תקליטורי DVD או Blu-ray מוצפנים עקב הגנת זכויות יוצרים.
◆ בהשוואה לכלי צילום מסך מיוחדים, יש שליטה והתאמה אישית מוגבלת.
◆ לצרכי עריכה מורכבים יותר, ייתכן שמשתמשים יצטרכו להשתמש בתוכנה חיצונית.
◆ כלי זה מתאים בעיקר לדרישות צילום מסך בסיסיות ולא למשימות עריכה מתקדמות.
ייתכן שצילום מסך של VLC Media Player לקח דרך של צילום מסך בלבד ולא כולל תכונות אחרות שמשתמש עשוי להזדקק לו למטרה אחרת. שימו לב ש-VLC Media Player הוא נגן וידאו ולא כלי תוכנה לצילום מסך. לכן צילום מסך בסיסי הוא מה שהוא עושה.
חלק 3. החלופה הטובה ביותר לצילום מסך של VLC
Screen Recorder היא תוכנה המאפשרת למשתמשים לצלם צילומי מסך של הפריימים האהובים עליהם מתוך וידאו. התוכנה כוללת יכולות מתקדמות וניתן להשתמש בה כמקליט וידאו, מקליט אודיו ומקליט משחקים. לכלי זה יכולות המציעות את אפשרויות ההקלטה וצילומי המסך הטובות ביותר, וזמינות למחשבי Windows ו‑Mac. כתוכנה עוצמתית, היא מציעה תכונות שאינן קיימות ביכולות צילומי המסך של VLC Media Player. תכונות כמו Scrolling Window, המאפשרת לצלם צילום מסך אחד של פוסט ארוך – שימושי במיוחד למי שקורא אתרי אינטרנט ומסמכים – וכן Popup Menu Capture, המאפשרת לצלם בקלות חלונות תפריט מכל סוג.
שלב 1. היכנסו לאתר Screen Recorder כדי להוריד ולהתקין את התוכנה.
הורדה חינמיתעבור Windows 7 או גרסה מאוחרת יותרהורדה מאובטחת
הורדה חינמיתעבור MacOS 10.7 או גרסה מאוחרת יותרהורדה מאובטחת
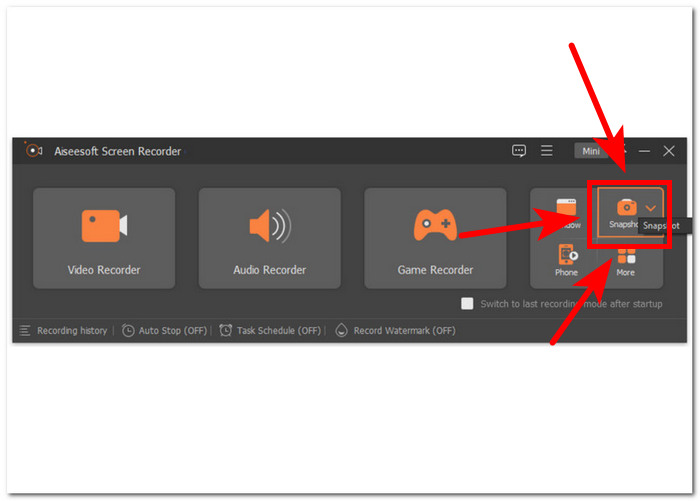
שלב 2. בשולחן העבודה, לאחר שהתוכנה הותקנה, הפעילו את האפליקציה.
שלב 3. בממשק התוכנה, לחצו על כפתור Snapshot כדי לצלם צילום מסך של המסך שלכם.
שלב 4. באפשרותכם לבחור בחופשיות את אזור צילום המסך הרצוי, בין אם זה חלון פעיל או אזור חופשי. לאחר שבחרתם את האזור, ניתן ללחוץ על Save כדי לשמור את צילום המסך בתבנית התמונה המתאימה.

לסיכום, מקליט מסך של Aiseesoft היא תוכנה רב-תכליתית כאשר בוחנים משימות כמו הקלטת מסך וצילומי מסך בו זמנית. VLC Media Player ו-Aiseesoft Screen Recorder מציעים בקרת מקשי קיצור כדי לצלם צילום מסך ללא מאמץ רק באמצעות המקלדת שלך. שניהם מציעים תוצאות מצוינות במונחים של צילום מסך, אבל Aiseesoft Screen Recorder הוא יותר מסתם צילום מסך, כפי שהוא מראה עם התכונות שלו שנמצאות בתוכנה.
חלק 4. שאלות נפוצות על איך לצלם צילומי מסך ב-VLC Media Player
היכן מיקום ברירת המחדל עבור צילומי מסך של VLC?
צילום המסך של VLC שומר את המיקום כברירת מחדל בתיקיית התמונות במחשב שלך. כדי לשנות זאת, נווט אל כלים > העדפות > וידאו ובחר תיקיה חדשה תחת ספריית תמונות Snapshots.
האם אני יכול לצלם מספר צילומי מסך ברצף?
כן, אתה יכול לצלם צילומי מסך מרובים על ידי חזרה על התהליך עבור כל פריים רצוי. עם זאת, אין תכונה מובנית לצילום אוטומטי של צילומי מסך מרובים במרווחי זמן מוגדרים.
האם VLC תומך בלכידת צילומי מסך של סרטונים זורמים?
כן, אתה יכול לצלם צילומי מסך של סרטונים זורמים ב-VLC Media Player באותה שיטה שתוארה לעיל. פשוט השהה את הסרטון ברגע הרצוי וצלם תמונת מצב. עם זאת, זכור שאיכות צילום המסך עשויה להיות תלויה במקור הסטרימינג ובמהירות חיבור האינטרנט שלך.
האם יש מגבלות כלשהן לצילום מסך ב-VLC Media Player?
מגבלה אחת היא שאינך יכול לצלם צילומי מסך של תקליטורי DVD או Blu-ray מוצפנים עקב אמצעי הגנה על זכויות יוצרים. בנוסף, ייתכן שתכונת צילום המסך של VLC לא תעבוד בצורה חלקה עם קודקים מסוימים של וידאו או מקורות סטרימינג, וכתוצאה מכך בעיות תאימות אפשריות.
האם אני יכול לצלם צילומי מסך של סרטונים במצב מסך מלא?
כן, אתה יכול לצלם צילומי מסך של סרטונים בזמן שהם פועלים במצב מסך מלא ב-VLC Media Player. כל שעליך לעשות הוא ללחוץ על Shift + S במקלדת שלך או עבור אל וידאו > צלם תמונת מצב מסרגל התפריטים בזמן שהסרטון נמצא במצב מסך מלא. זה מאפשר לך לצלם צילומי מסך של פריימים ספציפיים מבלי לצאת מהפעלה במסך מלא.
סיכום
לסיכום, צילום צילומי מסך ב‑VLC Media Player מספק דרך פשוטה לשמר רגעים בלתי־נשכחים או לחלץ מידע חשוב מסרטונים. הממשק הידידותי של VLC הופך אותו לבחירה פופולרית עבור משתמשים בפלטפורמות שונות. בין אם משתמשים בקיצורי מקשים ובין אם באפשרויות תפריט, VLC מפשט את התהליך ומאפשר למשתמשים לצלם ולשמור בקלות תמונות סטילס מהסצנות האהובות עליהם. עם זאת, עבור משתמשים הזקוקים לתכונות מתקדמות יותר, כגון עריכה מדויקת או צילום חלונות מתגלגלים, תוכנות חלופיות כמו Aiseesoft Screen Recorder מציעות פתרון מקיף. על‑ידי הבנת היתרונות, המגבלות והחלופות של צילומי המסך ב‑VLC, משתמשים יכולים לשפר את חוויית המולטימדיה שלהם ולנהל ביעילות את צורכי צילום המסך.
-
 כיצד לצלם צילומי מסך גלילה ב-Windows 10/11 בקלות
 שחרר את מלוא הפוטנציאל של לכידת מסך על ידי לימוד צילומי המסך הגלילה ב-Windows 10/11. גלה את התוכנות וההרחבות השימושיות הללו לשימוש.
-
 כיצד לצלם צילומי מסך גלילה ב-Mac תוך דקות
 אל תסתפק בלכידות חלקיות! למד את השלבים הפשוטים לצלם צילומי מסך גלילה ב-Mac. לכוד דפי אינטרנט שלמים או מסמכים בקלות תוך זמן קצר.
-
 כיצד לצלם מסך ב-Windows Media Player ביעילות
 גלה את השיטות הפשוטות ביותר לצלם צילומי מסך ב-Windows Media Player ללא מאמץ. שפר את חווית צילום המסך שלך עם המדריך המקיף שלנו.