


सॉफ्टवेयर टूल्स और टिप्स के साथ WAV फ़ाइलों को सहजता से मर्ज करें
चाहे आप ऑडियो एडिटिंग में नए हों या प्रोफ़ेशनल, WAV फ़ाइलों को जोड़ने के लिए सही टूल और तकनीक का इस्तेमाल करना ज़रूरी है, ताकि दो अलग‑अलग WAV फ़ाइलों को बिना क्वालिटी खोए (लॉसलेस) जोड़ा और एक्सपोर्ट किया जा सके। दूसरी ओर, सही टूल ढूँढने में उपयोगकर्ता का समय और मेहनत लग सकती है। फिर भी, इस लेख की मदद से हम अलग‑अलग टूल्स, उन्हें प्रभावी ढंग से चलाने के चरण, और कुछ शुरुआती सुझावों को देखेंगे, ताकि यह प्रक्रिया और सरल व कुशल हो सके।.

भाग 1. सेकंड में बिना किसी नुकसान के WAV फ़ाइलों को संयोजित करें [GPU त्वरण के साथ]
जब आप दो WAV फ़ाइलों को एक ही फ़ाइल के रूप में जोड़ना चाहते हैं, तो ऐसा करने का सबसे अच्छा और आसान तरीका है FVC-पिक्ड Video Converter Ultimate का प्रयोग। Aiseesoft का यह सॉफ़्टवेयर टूल हर तरह के उपयोगकर्ताओं के लिए सुलभ है, क्योंकि इसे इसकी आधिकारिक वेबसाइट से पूरी तरह मुफ़्त डाउनलोड किया जा सकता है। इस टूल में वीडियो और ऑडियो एडिटिंग की खूबियाँ हैं और यह कई WAV फ़ाइलों को एक ही फ़ाइल में मर्ज करने की क्षमता रखता है। इसके अलावा, सॉफ़्टवेयर में हाई‑स्पीड प्रोसेसिंग टेक्नोलॉजी इंटीग्रेट की गई है, जिससे WAV फ़ाइलों को मर्ज करना और उन्हें एक्सपोर्ट करना उपयोगकर्ता के लिए कहीं अधिक दक्ष हो जाता है। WAV फ़ाइलों को मर्ज करने के काम को आसानी से नेविगेट करने के लिए नीचे दिए गए निर्देशों का पालन करें।.
चरण 1. अपने डेस्कटॉप पर WAV फ़ाइल मर्जर को डाउनलोड और इंस्टॉल करें, फिर इसे खोलें।.
फ्री डाउनलोडWindows 7 या बाद के संस्करण के लिएसुरक्षित डाउनलोड
फ्री डाउनलोडMacOS 10.7 या बाद के संस्करण के लिएसुरक्षित डाउनलोड
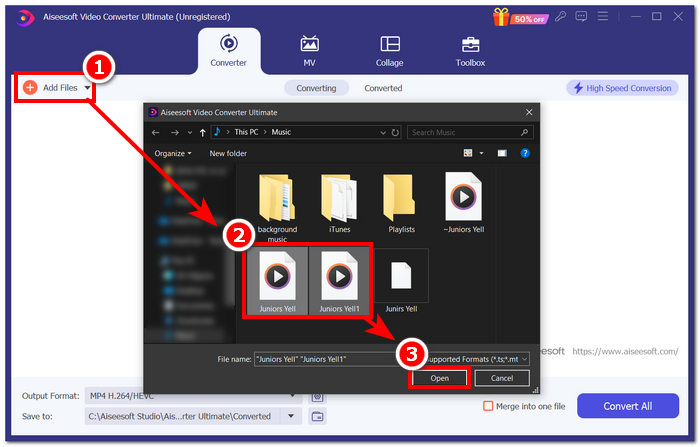
चरण 2. जब आप सॉफ़्टवेयर इंटरफ़ेस में हों, तो ऊपर‑बाएँ कोने पर स्थित Add Files बटन पर क्लिक करें। फिर वे WAV फ़ाइलें चुनें जिन्हें आप एक फ़ाइल के रूप में मर्ज करना चाहते हैं और उसके बाद Open बटन पर क्लिक करें।.
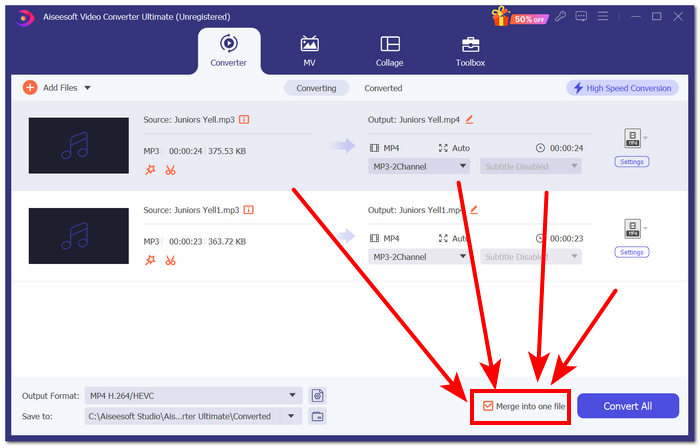
चरण 3. जैसे ही आप WAV फ़ाइलों को मर्ज करने के लिए सॉफ़्टवेयर में अपलोड कर लें, उन्हें जोड़ने के लिए निचले‑दाएँ हिस्से में स्थित Convert All बटन के पास वाले Merge into one file मेनू पर चेकमार्क लगाएँ।.
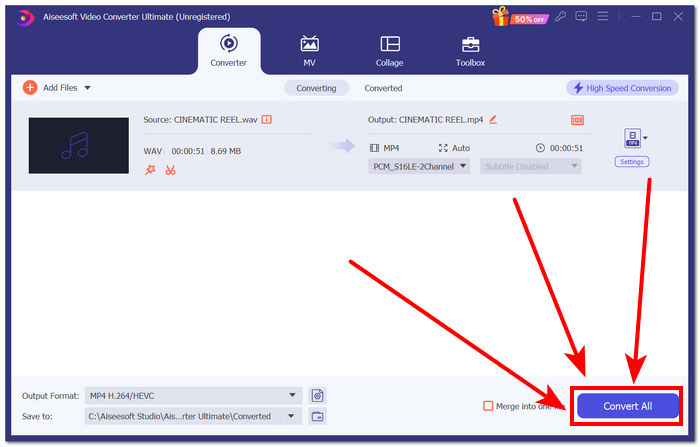
चरण 4. मर्जिंग प्रक्रिया शुरू करने और उन्हें अपने डाउनलोड फ़ोल्डर में अपने‑आप एक्सपोर्ट कराने के लिए Convert All बटन पर क्लिक करें।.
टिप्स
• आप सॉफ्टवेयर टूल में एक साथ कई WAV फ़ाइलों को मर्ज कर सकते हैं।
• सॉफ्टवेयर इंटरफ़ेस के निचले-बाएँ कोने में, आप निर्यात करने से पहले आउटपुट प्रारूप को अपने सबसे वांछित फ़ाइल प्रारूप में नियंत्रित कर सकते हैं।
• आप सॉफ्टवेयर इंटरफ़ेस के निचले-बाएँ कोने में स्थित अपने निर्दिष्ट फ़ोल्डर तक पहुँचकर और उसे चुनकर अपनी मर्ज की गई WAV फ़ाइल का गंतव्य भी बदल सकते हैं।
• अपनी WAV फ़ाइल को मर्ज और निर्यात करते समय उच्च गति प्रसंस्करण तकनीक को अधिकतम करने के लिए, सॉफ़्टवेयर इंटरफ़ेस के शीर्ष-दाएं कोने में स्थित उच्च गति रूपांतरण सेटिंग को सक्षम करें।
• यह टूल कई अलग‑अलग फ़ॉर्मैट्स को सपोर्ट करता है, और आप MP4, MKV, FLV, MP3, FLAC और अन्य कई फ़ॉर्मैट्स को भी एक‑साथ जोड़ सकते हैं।.
भाग 2. WAV फ़ाइलों को ऑनलाइन संयोजित करें
जब आपको सॉफ़्टवेयर-आधारित टूल के ज़रिए अपनी WAV फ़ाइलों को मर्ज करना काफ़ी मुश्किल लगता है, तो आपको ऑनलाइन समाधान की ज़रूरत हो सकती है। डिस्क्रिप्ट एक वेब-आधारित टूल है जो ऑडियो, वीडियो और ट्रांसक्राइबर एडिटर टूल के रूप में एक साथ काम करता है। WAV फ़ाइलों को मर्ज करना अपेक्षाकृत आसान है क्योंकि वेब-आधारित टूल AI का उपयोग करके आपके द्वारा अपलोड किए जाने के तुरंत बाद आपकी इनपुट WAV फ़ाइलों को स्वचालित रूप से मर्ज कर देता है और उपयोगकर्ताओं को उन्हें डाउनलोड करने से पहले उनका पूर्वावलोकन करने देता है।
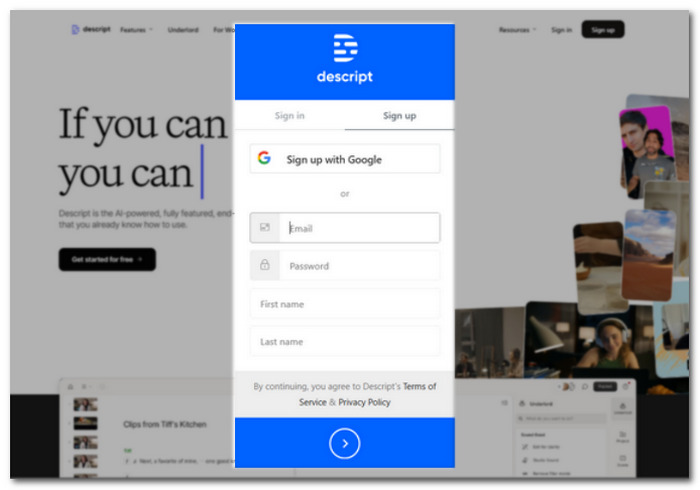
चरण 1. Descript की आधिकारिक वेबसाइट पर जाएँ और एक अकाउंट बनाएँ, ताकि आप इस सॉफ़्टवेयर टूल का उपयोग करके अपनी WAV फ़ाइलों को जोड़ सकें।.
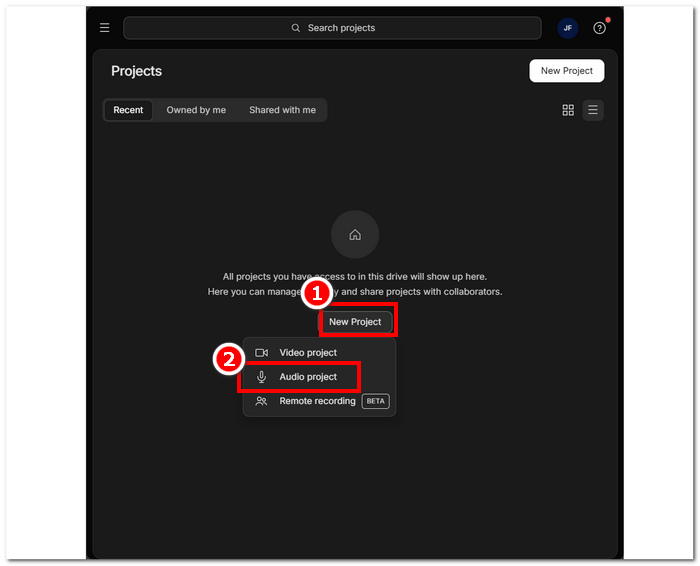
चरण 2. टूल के इंटरफ़ेस में लॉग‑इन करने के बाद, New Project > Audio Project पर क्लिक करें।.
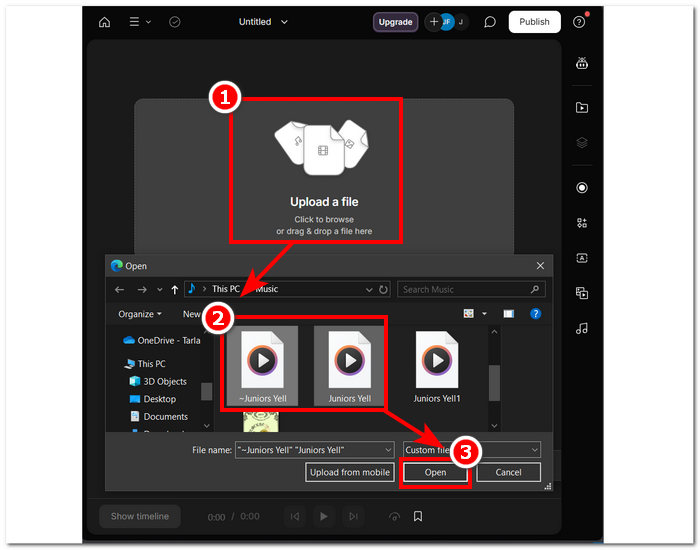
चरण 3. टूल के इंटरफ़ेस में दिए गए Upload a file वाले फ़ील्ड में वे WAV फ़ाइलें अपलोड करें जिन्हें आप एक ही फ़ाइल में जोड़कर मर्ज करना चाहते हैं।.
चरण 4. जब तक आपकी WAV फ़ाइलें टूल के इंटरफ़ेस में अपलोड हो रही हों, एक विंडो दिखाई देगी जो आपसे पूछेगी कि क्या आप उन्हें अपने‑आप (ऑटोमैटिकली) जोड़ना चाहते हैं। AI द्वारा ऑटो‑कम्बाइन की अनुमति देने के लिए बॉक्स पर चेक करें, फिर Done बटन पर क्लिक करें।.

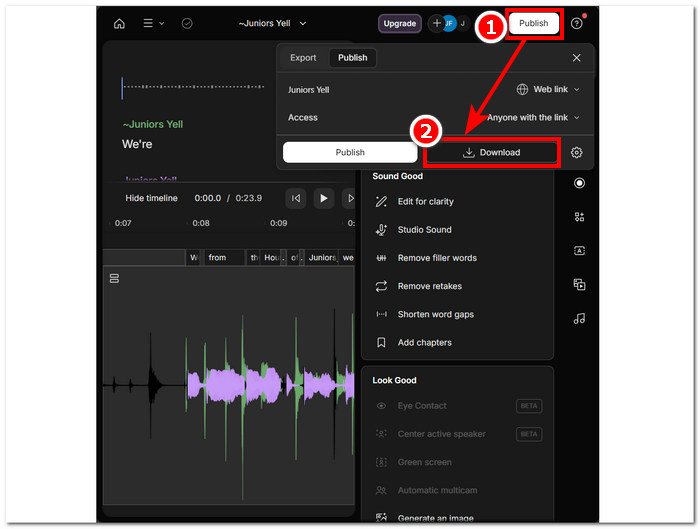
चरण 5. टूल के आपकी WAV फ़ाइलों को मर्ज करने का इंतज़ार करें। प्रक्रिया पूरी होने पर आप तैयार आउटपुट चला कर देख सकते हैं कि AI ने आपकी WAV फ़ाइलों को कितना अच्छी तरह जोड़ा है, और ज़रूरत हो तो समायोजन कर सकते हैं। संतुष्ट होने के बाद Publish > Download बटन पर क्लिक करें, ताकि आपकी मर्ज की हुई WAV फ़ाइलें आपके डेस्कटॉप पर डाउनलोड हो जाएँ।.
टिप्स
• अपनी संयुक्त WAV फ़ाइलों को डाउनलोड करने से पहले, स्लिट अप से बचने के लिए ऑडियो ट्रैक को अच्छी तरह से जांचना सुनिश्चित करें।
• टूल से परिचित होने से आपकी WAV फ़ाइल विलय प्रक्रिया को प्रभावी ढंग से तेज करने में मदद मिल सकती है।
भाग 3. ऑडेसिटी के साथ WAV फ़ाइलों को संयोजित करें
एक ओपन‑सोर्स ऑडियो एडिटर के रूप में, Audacity भी WAV जैसी ट्रैक्स को बिना किसी अतिरिक्त शुल्क के मर्ज कर सकता है। यह मुफ़्त‑में‑डाउनलोड होने वाला सॉफ़्टवेयर लंबे समय से उपयोगकर्ताओं की ऑडियो एडिटिंग संबंधी ज़रूरतों में मदद करता आ रहा है और WAV फ़ाइलों को मर्ज करना काफ़ी आसान बना देता है। Audacity उपयोगकर्ताओं को एक साथ कई WAV फ़ाइलें जोड़ने की सुविधा देता है और साथ ही अलग‑अलग ऑडियो फ़ॉर्मैट्स इम्पोर्ट करने का भी समर्थन करता है। इसके अलावा, इसमें हर ट्रैक को पिछले ट्रैक के अंत से तेज़ी से व्यवस्थित (अरेंज) करने की सुविधा है, जिससे ओवरराइट होने की चिंता के बिना मर्ज करना कहीं आसान हो जाता है। अतः नीचे दिए गए विस्तृत निर्देशों का पालन करके आप इस सॉफ़्टवेयर को बेहतर ढंग से चला पाएँगे।.
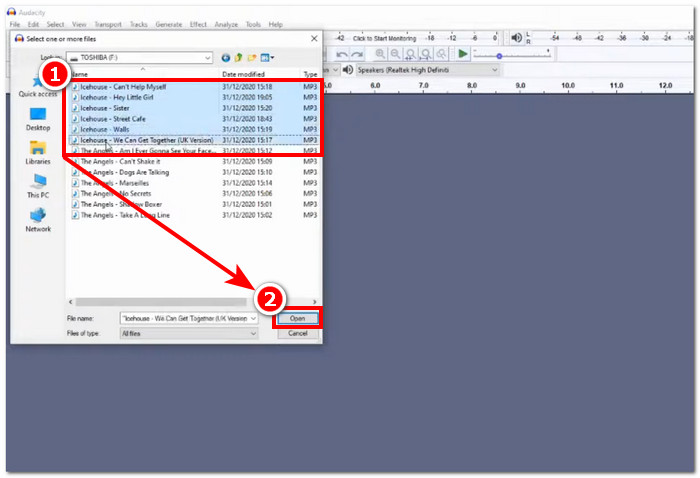
चरण 1. Audacity सॉफ़्टवेयर को अपने डेस्कटॉप पर डाउनलोड करें। डाउनलोड होने के बाद इसे खोलें और वे WAV फ़ाइलें लोड करें जिन्हें आप एक फ़ाइल के रूप में मर्ज करना चाहते हैं।.
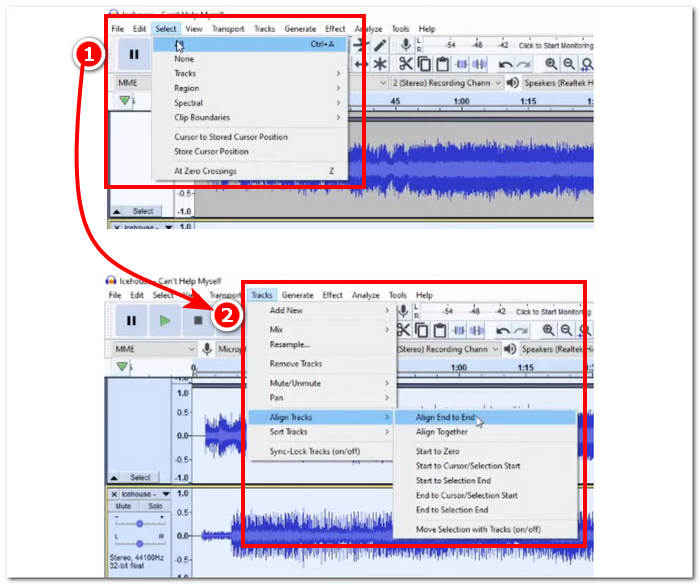
चरण 2. जब आपकी WAV फ़ाइलें टूल के इंटरफ़ेस में लोड हो जाएँ, तो सबसे पहले ऊपर वाले मेनू में स्थित Select > All विकल्प पर क्लिक करके अपनी सभी ट्रैक फ़ाइलों को चुनें। इसके बाद चुने गए WAV ट्रैक को अलाइन करने के लिए Track सेक्शन पर क्लिक करें और Align Tracks के अंतर्गत Align End to End पर क्लिक करें।.
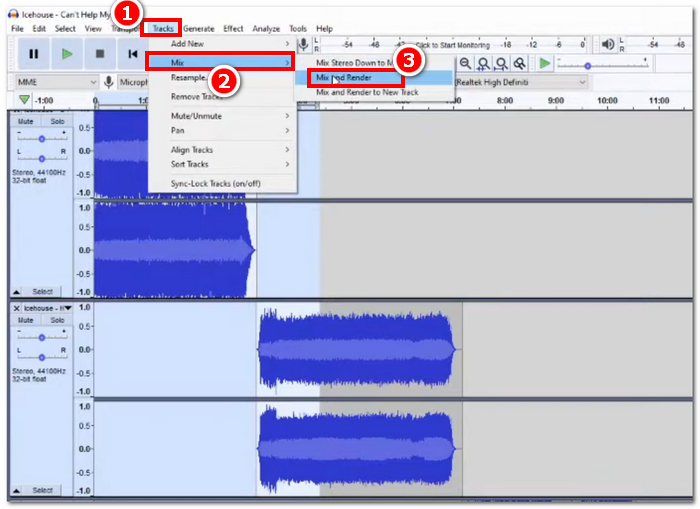
चरण 3. जब आपकी WAV फ़ाइलें हर ट्रैक के अंत से अलाइन हो जाएँ, तो Track सेक्शन पर क्लिक करें और Mix फ़ीचर के अंतर्गत Mix and Render पर क्लिक करके मर्जिंग प्रक्रिया शुरू करें।.
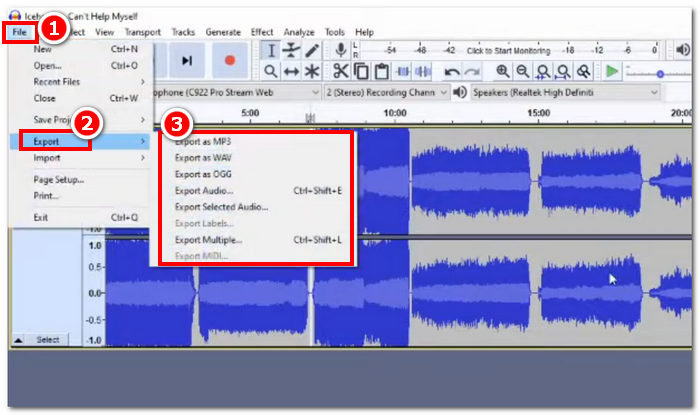
चरण 4. मर्जिंग प्रक्रिया पूरी होने के बाद, आप अब अपनी WAV फ़ाइल को File > Export पर क्लिक करके एक्सपोर्ट कर सकते हैं, और उपलब्ध विकल्पों में से मनचाहा आउटपुट फ़ॉर्मैट चुन सकते हैं।.
टिप्स
• अपनी संयुक्त WAV फ़ाइलों को निर्यात करते समय, WAV के रूप में निर्यात करना चुनें, क्योंकि यह मूल ऑडियो गुणवत्ता को बनाए रखता है।
भाग 4. FFmpeg का उपयोग करके WAV फ़ाइलों को संयोजित करें
ऑडियो और वीडियो हेरफेर के लिए एक और ओपन-सोर्स सॉफ़्टवेयर टूल FFmpeg है। इस शक्तिशाली मल्टीमीडिया फ़्रेमवर्क का उपयोग कनवर्टर के रूप में और मल्टीमीडिया संपादन के लिए किया जा सकता है, जैसे कि वीडियो, ऑडियो और अन्य मीडिया फ़ाइलें। WAV फ़ाइलों को मर्ज करने जैसे कार्यों को संभालने में, सॉफ़्टवेयर कमांड प्रॉम्प्ट में एक विशिष्ट कोड इनपुट करता है, जिससे मर्जिंग प्रक्रिया शुरू होती है जिसे WAV फ़ाइलों को एक एकल आउटपुट फ़ाइल में संयोजित करना कहा जाता है। नीचे WAV फ़ाइल मर्जर के रूप में FFmpeg का उपयोग करने के तरीके के बारे में विस्तृत मार्गदर्शिका दी गई है।
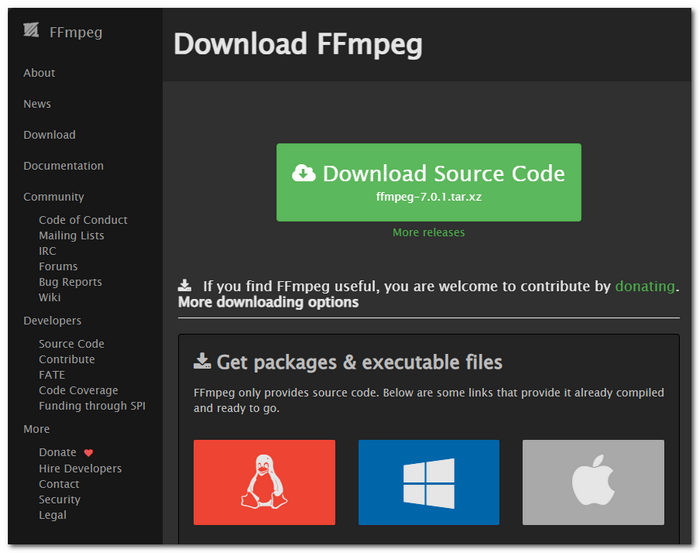
चरण 1. FFmpeg की वेबसाइट पर जाएँ और अपने डिवाइस के अनुसार प्रोग्राम इंस्टॉल करें।.
वेबसाइट से ज़िप फ़ाइल डाउनलोड करें और अपने सिस्टम पथ में एक नया फ़ोल्डर बनाएं जिसमें सभी FFmpeg निष्पादनयोग्य फ़ाइलें संग्रहीत हों, जिसमें ज़िप फ़ाइल को फ़ोल्डर में ले जाना भी शामिल है।
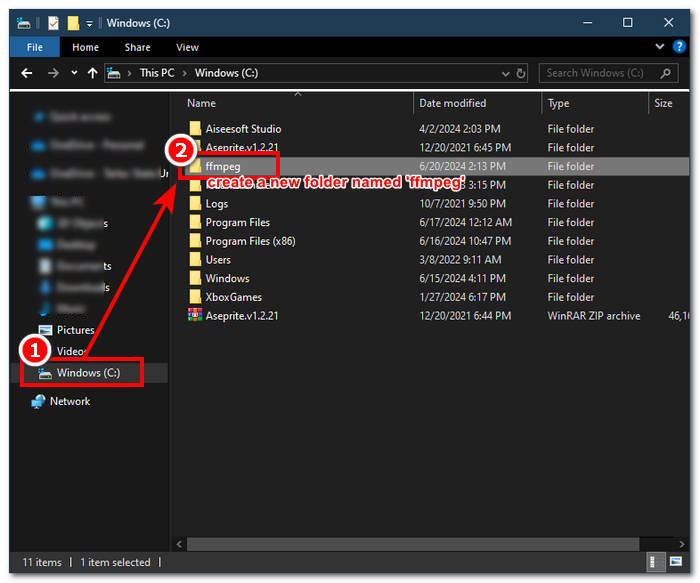
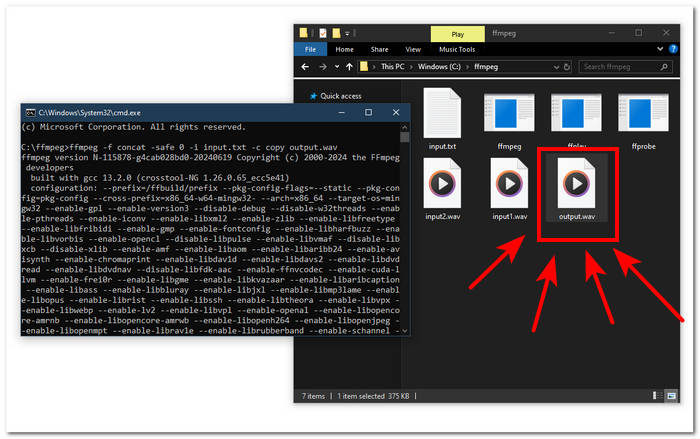
चरण 2. अपनी WAV फ़ाइलों को उस ffmpeg फ़ोल्डर में ले जाएँ जो आपने अभी बनाया है और डायरेक्टरी में उन WAV फ़ाइलों के नाम बदलकर ‘input1.wav’ और ‘input2.wav’ कर दें।.

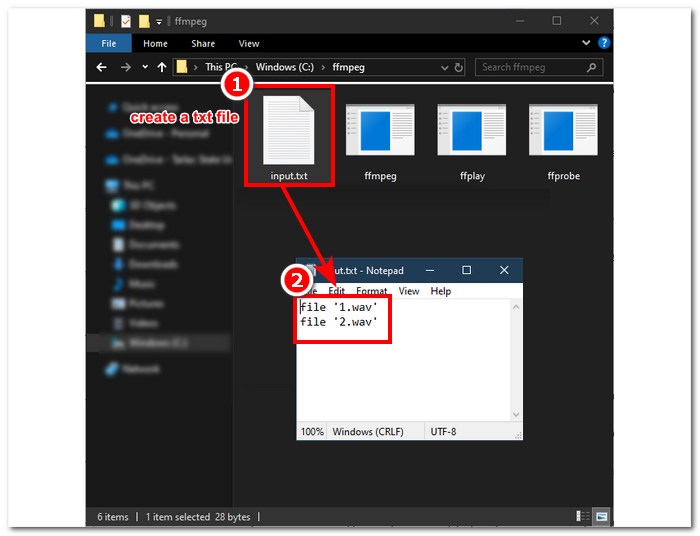
नोट: फिर, उसी फ़ोल्डर में ‘input.txt’ नाम की एक फ़ाइल बनाएँ और उसमें निम्नलिखित कंटेंट लिखें;
file 'input1.wav'
file 'input2.wav'
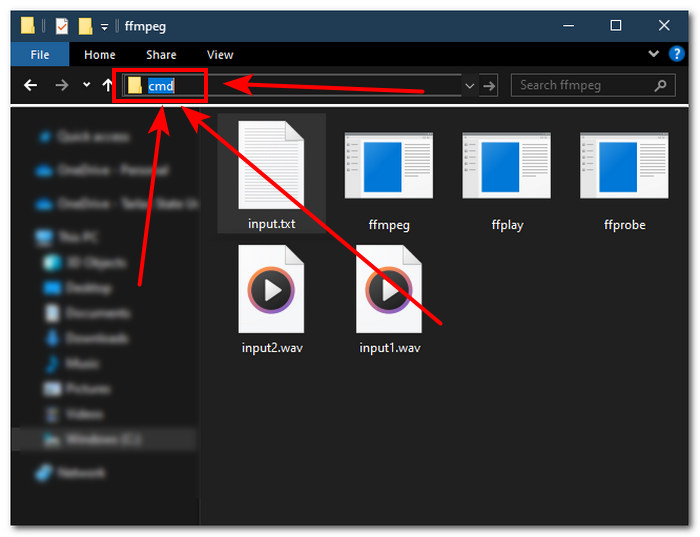
चरण 3. FFmpeg कमांड प्रॉम्प्ट चलाने के लिए, विंडो के ऊपर वाले एड्रेस फ़ील्ड में ‘cmd’ टाइप करें और एंटर दबाएँ।.
चरण 4. FFmpeg के कमांड प्रॉम्प्ट में पहुँचने के बाद, नीचे दिया गया कमांड टाइप करें और एंटर दबाएँ;
ffmpeg -f concat -safe 0 -i input.txt -c copy output.wav
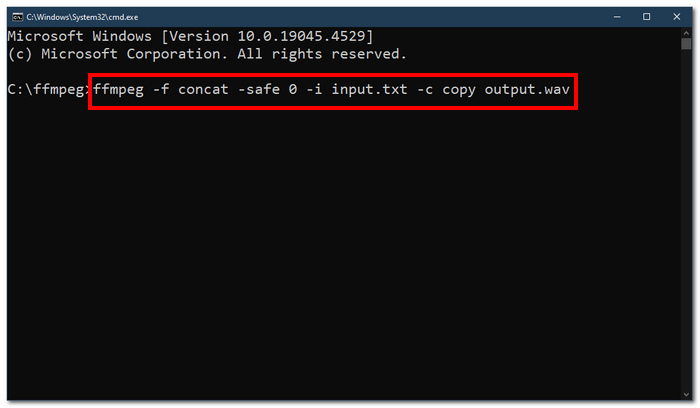
चरण 5. आपके फ़ोल्डर में एक नई WAV फ़ाइल दिखाई देगी, जो यह दर्शाती है कि आपने सफलतापूर्वक अपनी WAV फ़ाइलों को एक ही फ़ाइल में मर्ज कर लिया है।.
टिप्स
• चूंकि यह टूल कमांड-लाइन आधारित है, इसलिए टूल के प्रभावी नेविगेशन के लिए बुनियादी कमांड लाइन से परिचित होना और उसे जानना महत्वपूर्ण है।
• अपने सभी FFmpeg-संबंधित फ़ोल्डरों और फ़ाइलों को व्यवस्थित करने और आसान पहुंच के लिए एक ही फ़ोल्डर में रखें।
• जब आप WAV फ़ाइलों को मर्ज करने के अलावा अन्य कार्य करना चाहते हैं तो इंटरनेट पर ट्यूटोरियल देखें और गाइड पढ़ें।
भाग 5. WAV फ़ाइलों को संयोजित करने के बारे में अक्सर पूछे जाने वाले प्रश्न
क्या आप WAV फ़ाइलें मिश्रित कर सकते हैं?
हां, आप WAV फ़ाइलों को मर्ज करने के लिए बनाए गए तीसरे पक्ष के सॉफ़्टवेयर का उपयोग करके WAV फ़ाइलों को मिश्रित कर सकते हैं, जैसे कि FVC द्वारा चुने गए वीडियो कनवर्टर अल्टीमेट और ऑडेसिटी।
क्या VLC ऑडियो फाइलों को मर्ज कर सकता है?
वीएलसी मीडिया प्लेयर में WAV फ़ाइलों को मर्ज करने की क्षमता नहीं है क्योंकि यह केवल मीडिया स्ट्रीमिंग और मीडिया रूपांतरण के लिए बनाया गया है।
विंडोज मीडिया प्लेयर में वीडियो फ़ाइलों को कैसे मर्ज करें?
विंडोज मीडिया प्लेयर WAV फ़ाइलों के संपादन का समर्थन नहीं करता है, WAV फ़ाइलों को मर्ज करना तो दूर की बात है। विंडोज मीडिया प्लेयर विंडोज डिवाइस के लिए बनाया गया एक सॉफ्टवेयर है जिसे मीडिया सामग्री चलाने के लिए डिज़ाइन किया गया है।
ऑडियो फ़ाइलों को संयोजित करने का सबसे आसान तरीका क्या है?
WAV फ़ाइलों को मर्ज करने का सबसे आसान तरीका FVC द्वारा चुना गया वीडियो कन्वर्टर अल्टीमेट का उपयोग करना है; यह सॉफ्टवेयर उच्च गति प्रसंस्करण प्रौद्योगिकी के साथ डिज़ाइन किया गया है ताकि ऑडियो संपादन कार्यों में कम अनुभव वाले उपयोगकर्ताओं के लिए सुविधाजनक हो, जैसे कि WAV फ़ाइलों को संयोजित करना।
क्या WAV फ़ाइलों को संयोजित करने से ऑडियो की गुणवत्ता प्रभावित हो सकती है?
हां, सॉफ़्टवेयर टूल आपके द्वारा उपयोग किए जा रहे सॉफ़्टवेयर की गुणवत्ता के आधार पर WAV फ़ाइल की गुणवत्ता को बहुत अधिक प्रभावित कर सकते हैं। स्केची टूल का उपयोग करते समय इसकी गुणवत्ता सबसे खराब हो सकती है। जब आप FVC द्वारा चुने गए वीडियो कन्वर्टर अल्टीमेट, ऑडेसिटी और अन्य जैसे विश्वसनीय और भरोसेमंद सॉफ़्टवेयर टूल का उपयोग कर रहे हैं, तो यह मूल गुणवत्ता को बनाए रखने में मदद कर सकता है।
निष्कर्ष
अंत में, दी गई सॉफ़्टवेयर टूल्स की मदद से WAV फ़ाइलों को मर्ज करें, ताकि उन्हें प्रभावी ढंग से जोड़ा जा सके और बिना क्वालिटी खोए एक्सपोर्ट किया जा सके। यह याद रखना ज़रूरी है कि सही टूल चुनना और उसे चलाना सीखना इस पूरी प्रक्रिया का अहम हिस्सा है। इसलिए FVC-पिक्ड Video Converter Ultimate जैसे फ़ुल‑फ़ीचर सॉफ़्टवेयर से लेकर FFmpeg जैसे एडवांस्ड कमांड‑लाइन टूल तक, इस लेख ने चरणबद्ध तरीक़े और उपयोगी सुझाव दिए हैं, ताकि आपको बस इन्हें ठीक‑ठीक फ़ॉलो करना हो और WAV फ़ाइलों को मर्ज करने की प्रक्रिया सीधी व बिना झंझट के पूरी हो सके।.
-
 मैं MP4 को WAV ऑनलाइन में मुफ्त में कैसे बदल सकता हूं
 MP4 को WAV में बदलने की पुरजोर कोशिश? पता नहीं कौन सा कन्वर्टर एक पैसा चुकाए बिना आपकी पूरी मदद कर सकता है? इस पोस्ट को पढ़ें और आपके सभी सवालों का जवाब दिया जाएगा।
-
 10 सर्वश्रेष्ठ मुफ्त एमपी 3 म्यूजिक प्लेयर की समीक्षा
 सबसे अच्छा एमपी 3 संगीत खिलाड़ी क्या है? मैं एक एमपी 3 प्लेयर पर संगीत कैसे डालूं? एमपी 3 म्यूजिक प्लेयर डाउनलोड कैसे करें? यह पोस्ट आपको विंडोज पीसी और मैक के लिए 10 सर्वश्रेष्ठ मुफ्त एमपी 3 खिलाड़ियों की विस्तृत समीक्षा देता है।
-
 पीसी और मैक के लिए 8 सर्वश्रेष्ठ एमओवी प्ले प्ले क्विक एमओवी वीडियो फाइल
 बस विंडोज और मैक दोनों के लिए उपलब्ध 8 सर्वश्रेष्ठ एमओवी खिलाड़ियों के बारे में अधिक जानें। आप मूल गुणवत्ता के साथ MOV फ़ाइलों को चलाने के लिए वांछित और उपयुक्त एक चुन सकते हैं।