


ऑडेसिटी में ट्रैक्स मर्ज करने का सबसे आसान तरीका [2025 गाइड]
ऑडियो प्रोजेक्ट को रचनात्मक और अद्वितीय बनाने के लिए अन्य ध्वनियों, संगीत या ट्रैक जैसे तत्वों को मर्ज करना आवश्यक है। यह प्रक्रिया आम तौर पर एक समर्पित ऑडियो एडिटर ऐप का उपयोग करके की जाती है जिसमें ट्रैक को एक में मर्ज करने की सुविधा होती है। आजकल, एक उपकरण का उपयोग आम तौर पर कई ट्रैक को मर्ज करने के लिए किया जाता है, और वह है ऑडेसिटी।
यह टूल अपनी मुफ़्त और ओपन-सोर्स प्रकृति के कारण बहुतों को जाना‑पहचाना है, लेकिन इसके साथ ही इसके पास संपादन की बेहतरीन सुविधाएँ भी हैं, जिनकी ओर उपयोगकर्ता आकर्षित होते हैं। इसलिए, अगर आप इस बात की गाइड ढूँढ रहे हैं कि Audacity में ट्रैकों को कैसे मर्ज करें या इसे आसान तरीके से करने का कोई वैकल्पिक तरीका जानना चाहते हैं, तो यह लेख आगे पढ़ते रहें।.

भाग 1. ऑडेसिटी में ट्रैक्स को कैसे मर्ज करें
ऑडेसिटी एक व्यापक रूप से प्रयुक्त मुफ्त ऑडियो संपादन सॉफ्टवेयर है जो प्रसिद्ध ऑडेसिटी मर्ज ट्रैक सहित कई संपादन सुविधाएं प्रदान करता है।
इस सुविधा के साथ, उपयोगकर्ता संपादन टाइमलाइन में विभिन्न ध्वनि तत्वों को आसानी से आयात कर सकते हैं। फिर, संपादन टाइमलाइन से, वे मैन्युअल रूप से उन्हें अपने इच्छित क्रम में ले जाकर ट्रैक को एकल ट्रैक में संरेखित कर सकते हैं। इसके अलावा, इस टूल में बेहतरीन संपादन सुविधाएँ हैं जो संयुक्त ट्रैक को चमकाने के लिए आवश्यक हैं। फ़ेड-इन और फ़ेड-आउट सुविधाएँ ट्रैक के बीच एक सहज संक्रमण बना सकती हैं। इस बीच, वॉल्यूम एडजस्टमेंट सुविधा सभी ट्रैक को मर्ज किए जाने पर संतुलित ध्वनि देगी।
अब, ऑडियो एडिटर ट्रैक्स को मर्ज क्यों करते हैं?
सुचारू ट्रांज़िशन बनाने के लिए। कई ट्रैकों को मर्ज करने से उपयोगकर्ता अलग‑अलग ऑडियो ट्रैकों के बीच बिना किसी साफ़ कट या गैप के स्मूद ट्रांज़िशन बना सकते हैं।.
वर्कफ़्लो को सरल बनाने के लिए। कई ट्रैकों को एक साथ मिलाने से कई ऑडियो लेयर्स एक में समा जाती हैं। इस प्रक्रिया से अलग‑अलग फ़ाइलों को संभालने की बजाय ट्रैकों को मैनेज और एडिट करना आसान हो जाता है।.
संतुलित ध्वनि तैयार करने के लिए। अलग‑अलग ऑडियो साउंड एलिमेंट्स को मर्ज करने से ऑडियो एडिटर वॉल्यूम लेवल समायोजित कर सकते हैं, टाइमिंग सिंक्रोनाइज़ कर सकते हैं और विभिन्न ट्रैकों को आपस में मिला सकते हैं।.
ऑडेसिटी पर ट्रैक्स को मर्ज करने का तरीका यहां दिया गया है:
स्टेप 1: सबसे पहले, अपने कंप्यूटर डिवाइस पर Audacity डाउनलोड और इंस्टॉल करें।.
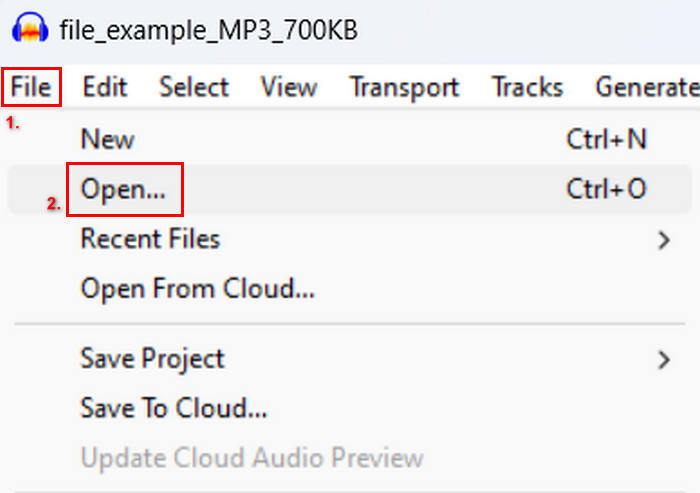
स्टेप 2: टूल खोलें, File टैब में जाएँ, Open पर क्लिक करें और वे ट्रैक इम्पोर्ट करें जिन्हें आप मर्ज करने वाले हैं।.
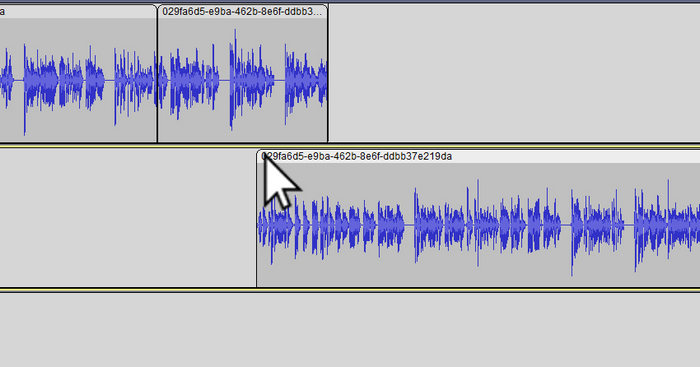
स्टेप 3: अब आपके सभी ट्रैक टाइमलाइन में इम्पोर्ट हो चुके हैं, अगला काम यह है कि ट्रैक के क्लिप हेड पर क्लिक करके उन्हें अपनी पसंद के क्रम में मूव और अरेंज करें।.
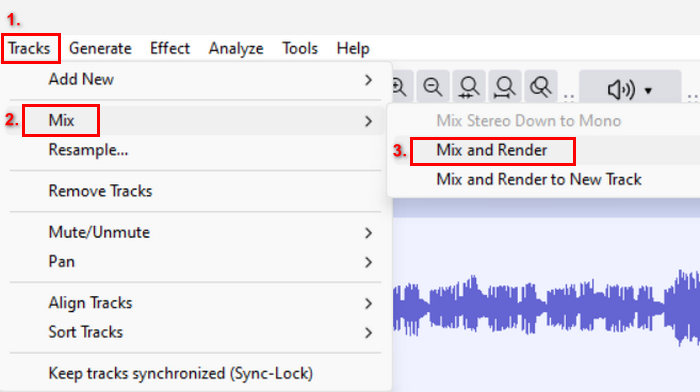
स्टेप 4: जब आप अपने ट्रैकों को लाइन‑अप कर लें, तो उन्हें एक सिंगल कम्पोज़िशन में ब्लेंड कर दें। जिन ट्रैकों को मर्ज करना है उन्हें चुनने के लिए Ctrl दबाकर रखते हुए उन पर क्लिक करें। उसके बाद, चुने गए ट्रैकों को एक ट्रैक में मर्ज करने के लिए Tracks में जाएँ, Mix पर क्लिक करें और Mix and Render चुनें।.
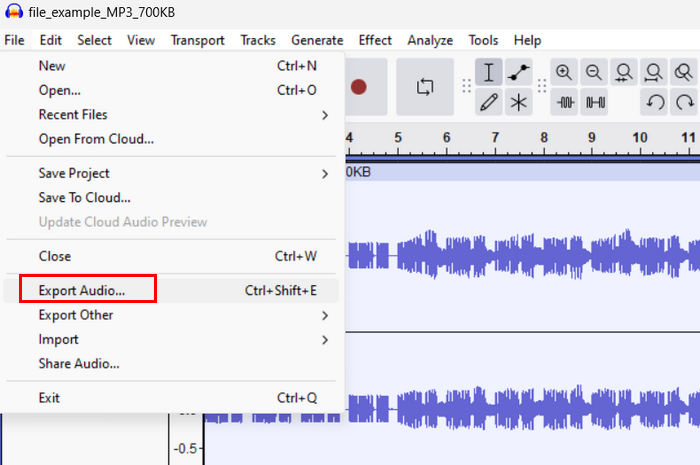
स्टेप 5: फ़ाइल एक्सपोर्ट करने के लिए File टैब में जाएँ और Export Audio चुनें।.
जुड़े हुए ऑडियो ट्रैकों के लिए स्मूद ट्रांज़िशन और संतुलित साउंड सुनिश्चित करने के लिए, टूल के भीतर Amplify या Normalize इफ़ेक्ट का उपयोग करें। इसके अलावा, प्रोफ़ेशनल और पॉलिश्ड साउंड पाने के लिए ट्रैकों के बीच स्मूद ट्रांज़िशन बनाने हेतु फ़ेड‑इन और फ़ेड‑आउट का इस्तेमाल करें। Audacity में ऑडियो को फ़ेड कैसे करें, यह जानने के लिए यहाँ देखें: fade audio in Audacity.
भाग 2. ऑडेसिटी अल्टरनेटिव के साथ ट्रैक मर्ज करें
अगर आप कोई बढ़िया विकल्प ढूँढ रहे हैं क्योंकि आपको Audacity के ट्रैक मर्ज करने वाले फ़ीचर को समझना मुश्किल लग रहा है, तो ऐसे में आप FVC द्वारा चुने गए Video Converter Ultimate का उपयोग कर सकते हैं। यह एक फ़ुल‑फ़ीचर्ड टूल है जो ऑडियो और वीडियो की ज़रूरतों के लिए कई टूल प्रदान करता है, जैसे कि ऑडियो मर्जर। यह टूल इस तरह काम करता है कि जिन ऑडियो फ़ाइलों को आपको मर्ज करना है, उन्हें इम्पोर्ट करने के बाद आप ट्रैकों के क्रम को आसानी से अपनी पसंद के अनुसार बदल सकते हैं और उन्हें मर्ज करने से पहले तुरंत एडिट भी कर सकते हैं, फिर सिर्फ़ एक क्लिक में उन्हें एक साथ मर्ज कर सकते हैं।.
मुख्य फीचर्स:
• यह MP3, AAC, WAV, FLAC, OGG आदि जैसे 1,000 प्रारूपों में एकाधिक ऑडियो फ़ाइलों को मर्ज कर सकता है।
• इसमें ट्रिमिंग, फास्ट स्प्लिट, फेड-इन और फेड-आउट प्रभाव जैसी बुनियादी संपादन सुविधाएँ शामिल हैं।
• एनकोडर, नमूना दर, बिटरेट, चैनल आदि जैसे ऑडियो आउटपुट को संपादित करने की अनुमति देता है।
• तीव्र विलय प्रक्रिया.
• विंडोज़ और मैकओएस दोनों के लिए उपलब्ध है।
FVC द्वारा चुने गए वीडियो कनवर्टर अल्टीमेट के साथ ट्रैक्स को मर्ज करने का तरीका यहां बताया गया है:
स्टेप 1: सबसे पहले, आपको यह टूल अपने डिवाइस पर डाउनलोड और इंस्टॉल करना होगा।.
फ्री डाउनलोडWindows 7 या बाद के संस्करण के लिएसुरक्षित डाउनलोड
फ्री डाउनलोडMacOS 10.7 या बाद के संस्करण के लिएसुरक्षित डाउनलोड
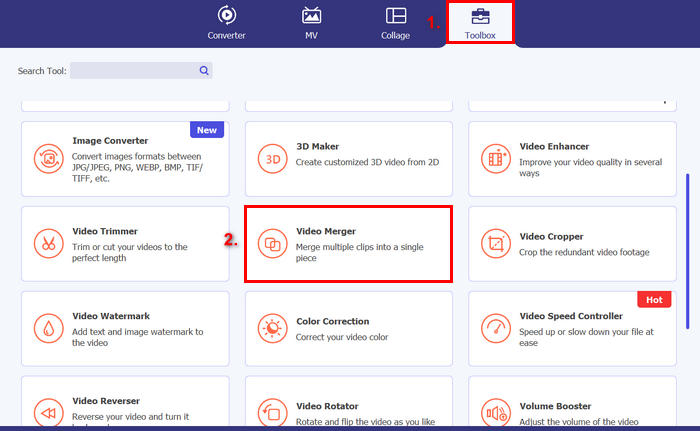
स्टेप 2: टूल खोलें, Toolbox टैब में जाएँ और Video Merger चुनें। उसके बाद, जिन ऑडियो फ़ाइलों को आप मर्ज करने वाले हैं उन्हें आसानी से इम्पोर्ट करने के लिए प्लस आइकन पर क्लिक करें।.
स्टेप 3: अब, आपके द्वारा इम्पोर्ट किए गए सभी ऑडियो ट्रैक नीचे दिखाई देंगे। अगर आपको उनका क्रम बदलना हो, तो बस ऑडियो क्लिप को ड्रैग करके सही जगह ले जाएँ। या फिर क्लिप को चुनें और Forward या Backward बटन पर क्लिक करें। उसके बाद, अपना प्रोजेक्ट सेव करने के लिए Export बटन पर क्लिक करें।.
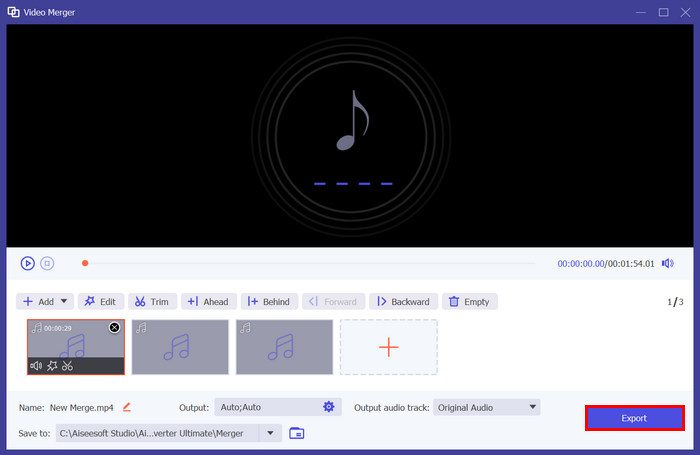
नोट: अगर आपको ऑडियो फ़ॉर्मैट बदलने या कुछ ऑडियो सेटिंग्स कस्टमाइज़ करने की ज़रूरत हो, तो Output सेटिंग में जाएँ। वहाँ से आप अपने ऑडियो ट्रैकों का फ़ॉर्मैट, एन्कोडर, सैंपल रेट, चैनल और बिटरेट बदल सकते हैं। जब आप काम पूरा कर लें, तो Export बटन पर क्लिक करें।.
बस इतना ही। FVC द्वारा चुना गया Video Converter Ultimate वास्तव में Audacity के लिए एक बेहतरीन विकल्प है। इसके बहुत ही उपयोगकर्ता-अनुकूल और सहज इंटरफ़ेस के साथ, यहां तक कि शुरुआती लोग भी कई ट्रैक्स को मर्ज करते समय आसानी से टूल का उपयोग कर सकते हैं।
भाग 3. ऑडेसिटी में ट्रैक्स मर्ज करने के बारे में अक्सर पूछे जाने वाले प्रश्न
मैं ऑडेसिटी में एक ट्रैक में एकाधिक ऑडियो फ़ाइलें कैसे आयात करूं?
Audacity में कई ऑडियो फ़ाइलें इम्पोर्ट करने के लिए File टैब में जाएँ, Open पर क्लिक करें और वे ऑडियो फ़ाइलें चुनें जिन्हें आप मर्ज करना चाहते हैं। हर फ़ाइल टाइमलाइन पर अलग‑अलग ट्रैक में दिखाई देगी। वहाँ से आप Tracks मेनू के अंतर्गत मौजूद Mix and Render विकल्प का उपयोग करके ट्रैकों को मैन्युअली अलाइन और मर्ज कर सकते हैं।.
मैं ऑडेसिटी में ऑडियो को एक ट्रैक से दूसरे ट्रैक पर कैसे ले जाऊं?
ऑडेसिटी में कई ट्रैक मर्ज करते समय ट्रैक को मूव करने के दो तरीके हैं। किसी एक ट्रैक को मूव करने के लिए, ट्रैक के क्लिप हैंडल पर क्लिक करें और उसे खींचें तथा उसे जिस क्रम में आप रखना चाहते हैं, उस क्रम में रखें। इस बीच, कई ट्रैक को मूव करने के लिए, सिलेक्शन टूल का उपयोग करके उन सभी ट्रैक को चुनें जिन्हें आप मूव करना चाहते हैं। फिर, चुने गए सभी क्लिप को एक साथ मूव करने के लिए चयनित क्षेत्र में किसी भी क्लिप हैंडल को खींचें।
ऑडेसिटी में कितने ट्रैक हैं?
ऑडेसिटी में आपके द्वारा संपादित किए जा सकने वाले ट्रैक की संख्या पर कोई निश्चित सीमा नहीं है। इसके साथ, आप जितने चाहें उतने ट्रैक बना और आयात कर सकते हैं। हालाँकि, कई ट्रैक के साथ काम करते समय, आपको अपने कंप्यूटर की क्षमता पर विचार करना चाहिए क्योंकि प्रदर्शन आपके सिस्टम की प्रोसेसिंग पावर और मेमोरी पर निर्भर हो सकता है।
निष्कर्ष
अब जब आप जान चुके हैं कि Audacity में ट्रैकों को कैसे मर्ज करें, तो आप अपने प्रोजेक्ट्स के लिए आसानी से स्मूद ट्रांज़िशन और संतुलित ऑडियो बना सकते हैं। इसके अलावा, बेहतर साउंड के लिए आप इसके अन्य फीचर्स जैसे फ़ेड‑इन, फ़ेड‑आउट और वॉल्यूम एडजस्टमेंट्स भी एक्सप्लोर कर सकते हैं। वहीं, अगर आप कोई सरल या और भी एडवांस विकल्प चाहते हैं, तो FVC द्वारा चुने गए Video Converter Ultimate को ज़रूर आज़माएँ। यह इस्तेमाल में आसान है और आपकी ऑडियो फ़ाइलों के लिए और अधिक कस्टमाइज़ेशन विकल्प प्रदान करता है।.
-
 विंडोज 10/11 पर ऑडियो रिवर्स करने के लिए ऑडेसिटी का उपयोग कैसे करें
 यदि आप ऑडेसिटी में ऑडियो फ़ाइल संपादित कर रहे हैं और सोच रहे हैं कि इसके सभी या उसके किसी भाग को कैसे उलटा करें, तो यहां पढ़ें और जानें कि ऑडेसिटी में ऑडियो को आसानी से कैसे उलटा किया जाए।
-
 ऑडेसिटी में ऑडियो को कैसे फीका करें: 4 अलग-अलग तरीके [2025]
 ऑडेसिटी में ऑडियो को प्रभावी ढंग से फीका करने के तरीके और ऑडेसिटी के फ़ेड-इन/आउट प्रभावों के बारे में कुछ अतिरिक्त जानकारी जानें। अब तैयार हो जाइए, और शुरू करते हैं।
-
 ऑडेसिटी में ऑडियो को बहुत सटीकता से कैसे विभाजित करें [गाइड]
 क्या आप ऑडेसिटी में ट्रैक को विभाजित करना सीखना चाहते हैं? आप सही जगह पर हैं! इस लेख में जानें कि आप एक ट्रैक को बड़ी आसानी से दो भागों में कैसे विभाजित कर सकते हैं।