

पिक्सलर तस्वीरों से वॉटरमार्क कैसे हटाता है, इस पर त्वरित गाइड
ऐसे कई उदाहरण हैं जहाँ वॉटरमार्क हटाना ज़रूरी और उचित है। उदाहरण के लिए, अगर वॉटरमार्क गलत तरीके से लगाया गया हो, बहुत बड़ा या ध्यान भटकाने वाला लग रहा हो, या आपके प्रोजेक्ट की अंतिम गुणवत्ता को प्रभावित कर रहा हो, तो आपको उसे हटाना पड़ सकता है। कॉपीराइट कानूनों का सम्मान करना और केवल उस सामग्री से वॉटरमार्क हटाना ज़रूरी है जिसके आप स्वामी हैं या जिसे संपादित करने के लिए आप अधिकृत हैं।
यदि आप देखते हैं कि आपके द्वारा बनाए गए वॉटरमार्क गलत दिखाई दे रहे हैं या आपकी एक्सपोर्ट की गई इमेज को ख़राब कर रहे हैं, तो यह लेख आपको बताएगा कि Pixlr में वॉटरमार्क कैसे हटाएँ आसानी से। साथ ही, फ़ोटो से वॉटरमार्क हटाने की बात आए तो उसका सबसे अच्छा विकल्प क्या है, यह जानने का मौका भी न गँवाएँ। ज़्यादा देर न करते हुए, चलिए शुरू करते हैं!

भाग 1. पिक्सलर क्या है?
पिक्सलर एक शक्तिशाली ऑनलाइन छवि संपादन उपकरण है जिसे 2008 में लॉन्च किया गया था। प्रारंभ में, इसे बुनियादी फोटो संपादन के लिए एक वेब-आधारित प्लेटफॉर्म के रूप में डिजाइन किया गया था, लेकिन यह अपने उपयोग में आसान इंटरफ़ेस और सुलभ सुविधाओं के लिए जल्दी से लोकप्रिय हो गया, जिससे उपयोगकर्ताओं को फोटो संपादित करने की अनुमति मिली।
मुख्य विशेषताएं:
• पिक्सलर एडिटर में क्लोन स्टैम्प और हीलिंग ब्रश से वॉटरमार्क हटाएं।
• एक साथ कई छवियों को संपादित करें और उनसे वॉटरमार्क हटाएँ।
• रिटच टूल के साथ वॉटरमार्क हटाने के बाद सुचारू संपादन।
• JPG, PNG, WEBP, और PDF आउटपुट प्रारूपों का समर्थन करें।
• विंडोज़ और मैकओएस पर निर्बाध रूप से काम करें।
क्या आप वॉटरमार्क हटाने के लिए पिक्सलर का उपयोग कर सकते हैं?
हाँ, आप Pixlr का इस्तेमाल करके वॉटरमार्क हटा सकते हैं। यह प्लेटफ़ॉर्म Clone Stamp, Healing Brush आदि जैसे कई टूल देता है, जिनकी मदद से आप इमेज से वॉटरमार्क प्रभावी तरीके से मिटा या हटा सकते हैं। इसके अलावा, ये फ़ीचर इस्तेमाल करने में आसान हैं, इसलिए यह फ़ोटो से वॉटरमार्क हटाने के लिए वाकई एक बेहतरीन टूल है।.
भाग 2. Pixlr में वॉटरमार्क कैसे हटाएँ?
अब जब आप Pixlr क्या है और इसके फ़ीचर्स के बारे में जान गए हैं, तो अब समय आ गया है कि आप सीखें कि इसका इस्तेमाल करके फ़ोटो से वॉटरमार्क कैसे हटाएँ। यह टूल इस्तेमाल करने में बहुत आसान है और असल में, शुरुआती लोग भी इसका इस्तेमाल करते हैं। Pixlr में वॉटरमार्क हटाने की चरण-दर-चरण गाइड नीचे दी गई है:
स्टेप 1. सबसे पहले अपने सर्च इंजन पर Pixlr सर्च करें।.
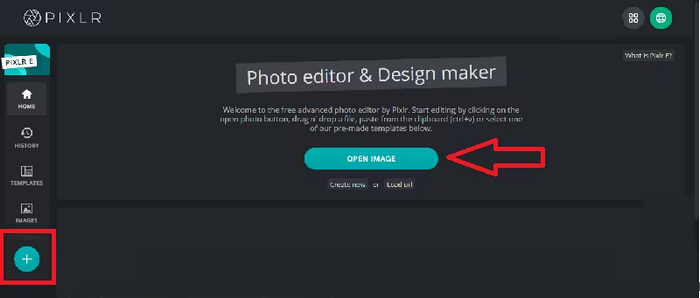
स्टेप 2. जब आपको यह टूल मिल जाए, तो उस पर क्लिक करके उसे खोलें। इसके बाद, Open Image बटन पर क्लिक करके उस फ़ोटो को अपलोड करें जिस पर लगा वॉटरमार्क आपको हटाना है। वैकल्पिक रूप से, आप अपनी स्क्रीन के बाएँ साइड पैनल पर मौजूद + बटन पर क्लिक करके भी फ़ोटो अपलोड कर सकते हैं।.
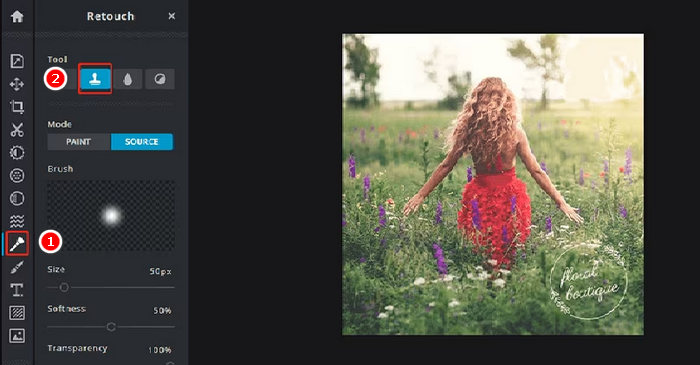
स्टेप 3. फ़ोटो लोड हो जाने के बाद, अपनी स्क्रीन के बाएँ तरफ़ से Retouch बटन पर क्लिक करें, और एक पैनल दिखाई देगा। उसके बाद, टूल मेन्यू में से Clone Stamp चुनें।.
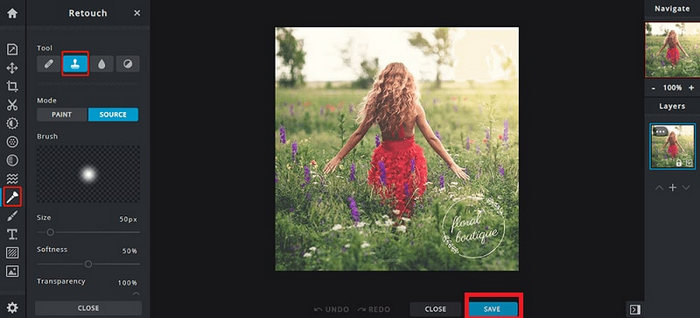
स्टेप 4. अब माउस को दबाए रखें और कर्सर को सीधे उस वॉटरमार्क पर ले जाएँ जिसे आप हटाना चाहते हैं। Pixlr से वॉटरमार्क हटाने का काम पूरा हो जाने पर Save बटन पर क्लिक करें।.
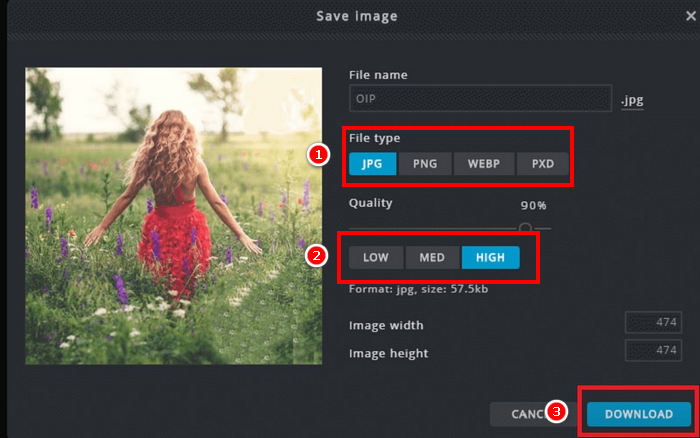
स्टेप 5. इमेज फ़ाइल डाउनलोड करने से पहले, रेज़ोल्यूशन और इमेज का प्रकार चुनें। जब यह पूरा हो जाए, तो Download बटन पर क्लिक करें।.
पिक्सलर में वॉटरमार्क हटाते समय हमेशा ज़ूम इन करें। छोटी-छोटी बारीकियों पर बारीकी से काम करने से आपको संपादित क्षेत्र को ज़्यादा स्वाभाविक रूप से मिलाने में मदद मिलती है और अंतिम छवि में खुरदुरे या असमान धब्बों से बचने में मदद मिलती है।
भाग 3. फ़ोटो से वॉटरमार्क हटाने का मुफ़्त विकल्प
इसी बीच, यदि आप फ़ोटो से Pixlr के अलावा किसी मुफ़्त विकल्प से वॉटरमार्क हटाने की तलाश कर रहे हैं, तो आपको FVC Free Watermark Remover ज़रूर आज़माना चाहिए। यह एक वेब-आधारित टूल है, जो उपयोगकर्ताओं को उनकी फ़ोटो से वॉटरमार्क हटाने की सुविधा देता है। FVC JPG/JPEG, PNG, BMP आदि जैसे आम तौर पर इस्तेमाल होने वाले इमेज फ़ॉर्मेट को सपोर्ट करता है, जिससे अलग‑अलग तरह की इमेज से वॉटरमार्क हटाने में आपको अच्छी लचीलापन मिलती है। साथ ही, यह वॉटरमार्क को चुनने और मिटाने के लिए कई लचीले तरीके प्रदान करता है। आप बहुभुज (polygonal) आउटलाइन बना सकते हैं, लासो टूल का उपयोग कर सकते हैं, या वॉटरमार्क वाले हिस्से पर ब्रश चला सकते हैं। इससे आप वॉटरमार्क के आकार और साइज़ के अनुसार चयन को आसानी से एडजस्ट कर सकते हैं।.
मुख्य विशेषताएं:
• फ़ोटो से टेक्स्ट, छवि और लोगो वॉटरमार्क हटाएँ।
• JPG, JPEG, PNG और BMP फ़ॉर्मेट को सपोर्ट करता है।.
• वॉटरमार्क हटाने के बाद मूल छवि गुणवत्ता बनाए रखें।
• वॉटरमार्क क्षेत्र का चयन करने के लिए ब्रश, लैस्सो या बहुभुज रूपरेखा का उपयोग करें।
• वॉटरमार्क हटाने से पहले या बाद में छवियों को क्रॉप करें।
• इरेज़र टूल से क्षेत्रों को मिटाएँ और पुनः चुनें।
• विंडोज़ और मैकओएस के साथ संगत।
यहाँ FVC का उपयोग करके फ़ोटो से वॉटरमार्क हटाने की चरण-दर-चरण गाइड दी गई है:
स्टेप 1. सबसे पहले आपको इस टूल की आधिकारिक वेबसाइट पर जाना होगा। इसलिए अपने सर्च इंजन पर FVC Free Watermark Remover सर्च करें।.
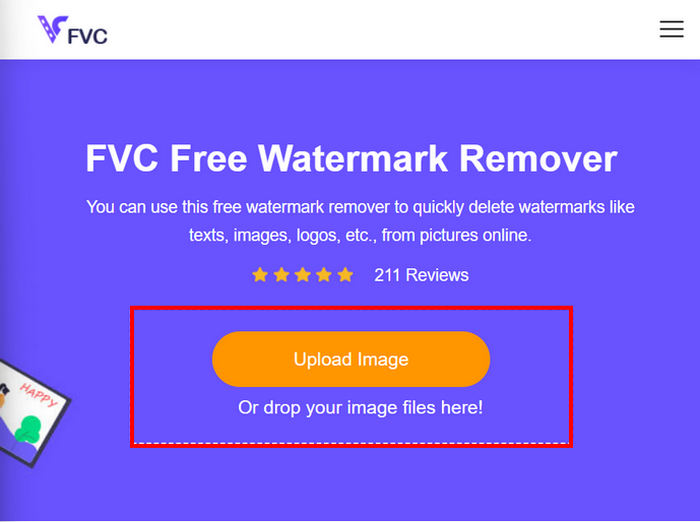
स्टेप 2. मिलने के बाद, Upload Image बटन पर क्लिक करके उस फ़ोटो को इम्पोर्ट करें जिस पर लगा वॉटरमार्क आपको हटाना है।.
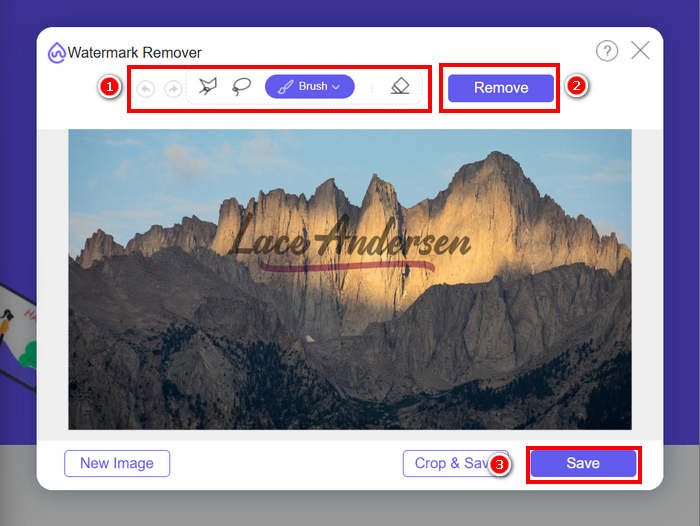
स्टेप 3. अब, ऊपर मौजूद मेन्यू में से अपनी पसंद के अनुसार कोई भी टूल चुनें ताकि आप फ़ोटो से वॉटरमार्क हटा सकें। इस उदाहरण में, हमने Brush टूल का इस्तेमाल किया और कर्सर को वॉटरमार्क की ओर ले जाते हुए उस पर ब्रश चलाया। जब पूरा वॉटरमार्क कवर हो जाए, तो ऊपर दिए गए Remove बटन पर क्लिक करें और फिर फ़ोटो डाउनलोड करने के लिए Save पर क्लिक करें।.
वॉटरमार्क हटाते समय, उस टूल का चयन करें जो वॉटरमार्क के आकार के लिए सबसे उपयुक्त हो। छोटे या अनियमित वॉटरमार्क के लिए ब्रश, घुमावदार या मुक्त आकृतियों के लिए लैस्सो और सीधे किनारों वाले या कोणीय वॉटरमार्क के लिए पॉलीगोनल आउटलाइन का उपयोग करें। सही टूल चुनने से आपको साफ़ और सटीक परिणाम प्राप्त करने में मदद मिलती है।
भाग 4. Pixlr से वॉटरमार्क हटाने के बारे में अक्सर पूछे जाने वाले प्रश्न
क्या Pixlr वॉटरमार्क रिमूवर सुरक्षित है?
हाँ। तस्वीरों से वॉटरमार्क हटाने के लिए Pixlr का इस्तेमाल सुरक्षित है। यह एक विश्वसनीय ऑनलाइन इमेज एडिटर है जो उपयोगकर्ता डेटा की सुरक्षा के लिए सुरक्षित सर्वर का इस्तेमाल करता है। बस यह सुनिश्चित करें कि आप संभावित जोखिमों से बचने के लिए आधिकारिक Pixlr वेबसाइट ही इस्तेमाल करें।
Pixlr में पृष्ठभूमि को पारदर्शी कैसे बनाएं?
Pixlr में पारदर्शी पृष्ठभूमि बनाने के लिए, अपने Pixlr संपादक में, "नई छवि बनाएँ" चुनें, अपनी फ़ाइल के लिए एक नाम लिखें, "पारदर्शी" बॉक्स चुनें और "ठीक है" पर क्लिक करें। इसके बाद, शीर्ष मेनू में "परतें" पर क्लिक करें और उस छवि को अपलोड करने के लिए "छवि को परत के रूप में खोलें" चुनें जिसे आप संपादित करना चाहते हैं। टूलबार से "वैंड" टूल का उपयोग करें, फिर उस पृष्ठभूमि क्षेत्र पर क्लिक करें जिसे आप हटाना चाहते हैं। चयन को बेहतर बनाने के लिए, यदि आवश्यक हो, तो "सहनशीलता" सेटिंग को समायोजित करें। पृष्ठभूमि हटाने के लिए "हटाएँ" दबाएँ। यदि कोई पृष्ठभूमि बची है, तो उसे मैन्युअल रूप से मिटाने के लिए "इरेज़र" टूल का उपयोग करें। समाप्त होने पर, "फ़ाइल" पर क्लिक करें, फिर "सहेजें" पर। एक फ़ाइल नाम दर्ज करें, पारदर्शिता बनाए रखने के लिए फ़ाइल प्रारूप के रूप में PNG चुनें, और "ठीक है" पर क्लिक करें। अपनी छवि सहेजने के लिए एक स्थान चुनें और "सहेजें" पर क्लिक करें।
क्या Pixlr वॉटरमार्क रिमूवर अब मुफ़्त नहीं है?
पिक्सलर मुफ़्त और प्रीमियम दोनों संस्करण प्रदान करता है। क्लोन स्टैम्प और हीलिंग ब्रश जैसे बुनियादी वॉटरमार्क हटाने वाले टूल मुफ़्त उपयोगकर्ताओं के लिए उपलब्ध हैं। हालाँकि, कुछ उन्नत सुविधाओं और उच्च-गुणवत्ता वाले निर्यात विकल्पों के लिए पिक्सलर प्रीमियम सदस्यता की आवश्यकता हो सकती है।
निष्कर्ष
सही टूल्स के साथ फ़ोटो से वॉटरमार्क हटाना सरल और प्रभावी हो सकता है। अब जब आप जान चुके हैं कि Pixlr के साथ वॉटरमार्क कैसे हटाएँ, तो आप इसके उपयोगकर्ता‑अनुकूल प्लेटफ़ॉर्म का पूरा फ़ायदा उठा सकते हैं, जो वॉटरमार्क को आसानी से हटाने की सुविधा देता है। वास्तव में, Pixlr शुरुआती और अनुभवी दोनों तरह के उपयोगकर्ताओं के लिए सुविधाजनक विकल्प प्रदान करता है। इसके अलावा, अगर आप किसी मुफ़्त विकल्प की तलाश में हैं, तो FVC Free Watermark Remover लचीले टूल्स देता है और अलग‑अलग इमेज फ़ॉर्मेट को सपोर्ट करता है, जिससे एडिटिंग सहज हो जाती है। हमेशा याद रखें कि फ़ोटो एडिट करते समय स्वामित्व अधिकारों का सम्मान करें, और साफ़-सुथरे व प्रोफ़ेशनल नतीजों के लिए अपनी ज़रूरत के हिसाब से सबसे उपयुक्त टूल चुनें।.
-
 DeviantArt वॉटरमार्क ऑनलाइन कैसे हटाएँ [5 समाधान]
 अपनी छवियों पर DeviantArt वॉटरमार्क हटाने का तरीका सीखना चाहते हैं? सबसे उत्कृष्ट DeviantArt वॉटरमार्क रिमूवर का उपयोग करके, आप उन अजीब वॉटरमार्क को आसानी से हटा सकते हैं।
-
 शूटप्रूफ वॉटरमार्क हटाने के आसान तरीके
 इन आसान तरीकों को अपनाकर शूटप्रूफ वॉटरमार्क हटाएं। अपनी छवि से शूटप्रूफ वॉटरमार्क को आसानी से हटाने के लिए इन अद्भुत वॉटरमार्क रिमूवर का उपयोग करें।
-
 सर्वोत्तम टूल का उपयोग करके B612 वॉटरमार्क निकालने के 5 तरीके
 जानना चाहते हैं कि अपनी तस्वीरों से B612 वॉटरमार्क कैसे हटाएं? आप इन उत्कृष्ट उपकरणों का उपयोग करके आसानी से अपनी छवियों से B612 वॉटरमार्क हटा सकते हैं।