


फेसटाइम स्क्रीनशॉट लेने के तरीके पर अंतिम गाइड [2025]
FaceTime एक व्यापक रूप से उपयोग किया जाने वाला वीडियो चैट एप्लिकेशन है जिसे Apple ने अपने उपयोगकर्ताओं के लिए iPhone, iPad या Mac पर रियल‑टाइम वीडियो बातचीत करने के लिए विकसित किया है। अब, FaceTime कॉल के दौरान स्क्रीनशॉट लेना उन पलों को सहेजने का एक बेहतरीन तरीका है जो हम जिस व्यक्ति से बात कर रहे हैं, उसके साथ बिता रहे होते हैं, खासकर जब वह व्यक्ति लंबे समय से हमसे दूर रहा हो। इसलिए, अगर आप इन कॉल्स के दौरान कीमती पलों को सुरक्षित रखना चाहते हैं, तो यह लेख आपके लिए है। कुछ समय निकालकर पढ़ें और जानें कि आप आसानी से FaceTime स्क्रीनशॉट लेने के 3 तरीके कैसे अपना सकते हैं। आइए शुरू करें!

भाग 1: iPhone/iPad/Mac पर फेसटाइम स्क्रीनशॉट लेने का सबसे बढ़िया तरीका
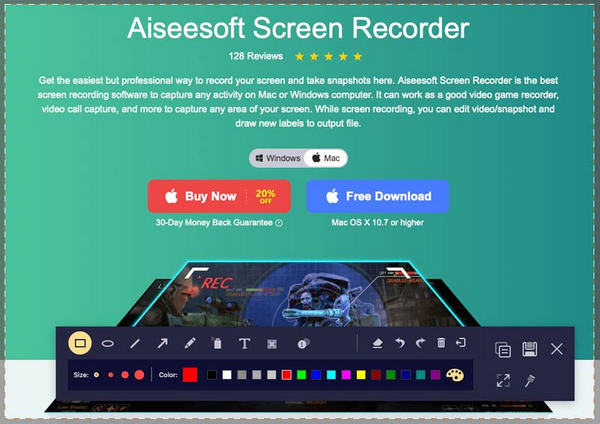
Apple डिवाइस पर आसानी से FaceTime स्क्रीनशॉट लेने का सबसे अच्छा तरीका है FVC Screen Recorder का उपयोग करना। यह थर्ड‑पार्टी स्क्रीन रिकॉर्डिंग टूल iPhone, iPad या Mac पर स्क्रीनशॉट लेने के लिए बिल्कुल उपयुक्त रूप से डिज़ाइन किया गया है। तो, यदि आप इनमें से किसी भी डिवाइस का उपयोग कर रहे हैं और परिवार, दोस्तों और प्रियजनों के साथ FaceTime वीडियो कॉल के दौरान स्क्रीनशॉट लेना चाहते हैं, तो इसके स्नैपशॉट और फोन रिकॉर्डर फ़ीचर्स से आपको काफ़ी लाभ होगा। इसके अलावा, इसका यूज़र‑फ्रेंडली इंटरफ़ेस होने के कारण कोई भी उपयोगकर्ता इसे आसानी से नेविगेट कर सकता है। अंत में, अगर आप अपने FaceTime स्क्रीनशॉट के साथ रचनात्मक होना चाहते हैं, तो आप निश्चित रूप से इसके कस्टमाइज़ किए जा सकने वाले एडिटिंग फीचर्स का आनंद लेंगे।.
विधि 1: मैक के लिए
चरण 1. सबसे पहले, अपने Mac पर FVC Screen Recorder डाउनलोड और इंस्टॉल करें। यह सॉफ्टवेयर लगभग सभी macOS वर्ज़न को सपोर्ट करता है, जिसमें नवीनतम macOS 14 Sonoma भी शामिल है।.
मुफ़्त डाउनलोडWindows 7 या उससे बाद के लिएसुरक्षित डाउनलोड
मुफ़्त डाउनलोडMacOS 10.7 या उससे बाद के लिएसुरक्षित डाउनलोड
चरण 2. अगला, टूल को लॉन्च करें।.
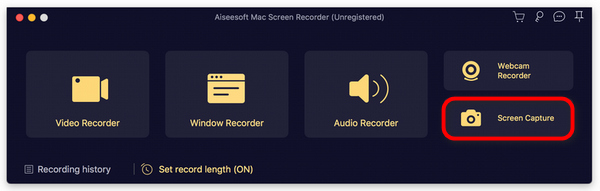
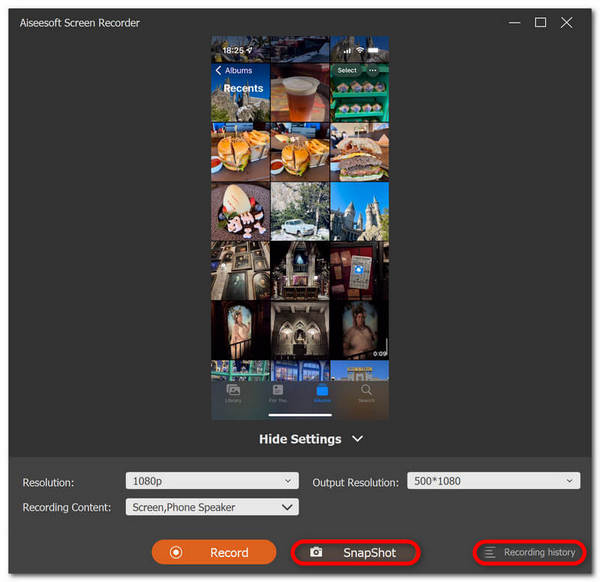
चरण 3. अब, जब आप अपने Mac पर FaceTime वीडियो कॉल कर रहे हों, तो टूल के इंटरफ़ेस की फ्लोटिंग विंडो पर मौजूद Screen Capture बटन पर क्लिक करें।.
चरण 4. यह वैकल्पिक है, लेकिन आप नीचे मौजूद कई एडिटिंग टूल्स का उपयोग करके अपने FaceTime स्क्रीनशॉट इमेज को संपादित कर सकते हैं।.
चरण 5. अंत में, तस्वीर को अपने Mac पर सेव करने के लिए Save पर क्लिक करें।.
विधि 2: iPhone और iPad के लिए
चरण 1. FVC Screen Recorder डाउनलोड करें और खोलें, लेकिन इस बार अपने Windows कंप्यूटर पर।.
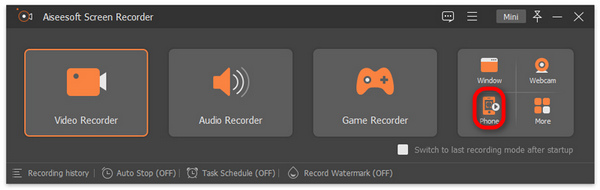
चरण 2. अब, टूल इंस्टॉल करने के बाद, इसे खोलें और टूल की फ्लोटिंग विंडो इंटरफ़ेस के दाईं ओर, अन्य 3 विकल्पों के साथ, Phone विकल्प पर क्लिक करें।.
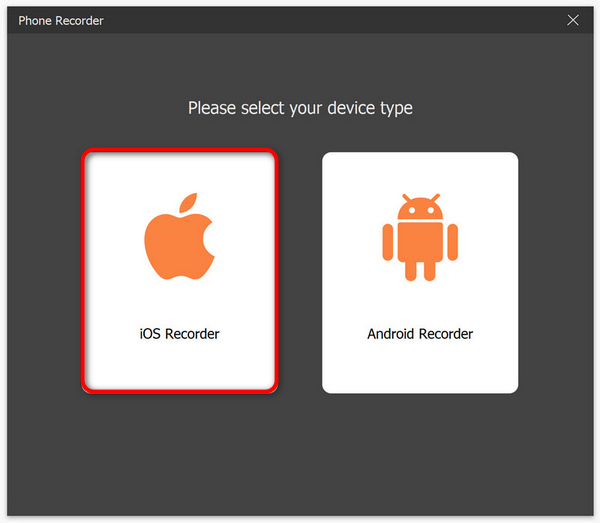
चरण 3. इसके बाद, iOS Recorder विकल्प पर क्लिक करें।.
चरण 4. अब, एक नई विंडो दिखाई देगी जिसमें ऑन‑स्क्रीन निर्देश होंगे, जहां आपसे Screen Mirroring या Audio Mirroring में से चुनने के लिए भी कहा जाएगा। आपके मामले में, Screen Mirroring चुनें।.
चरण 5. अब, अपने iPhone या iPad पर Control Center खोलें और Screen Mirroring पर टैप करें। फिर अपने iPhone या iPad को कंप्यूटर से कनेक्ट करने के लिए Aiseesoft Screen Recorder पर टैप करें।.
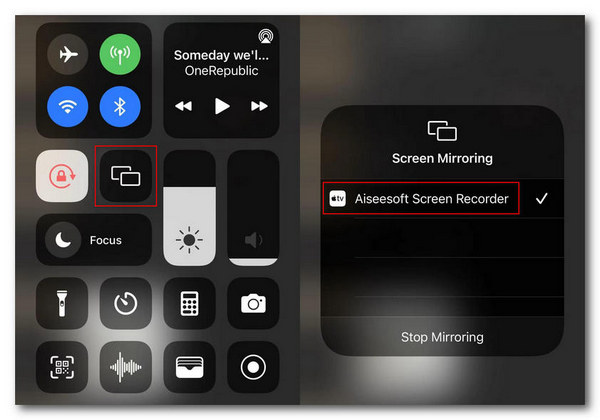
चरण 6. अंत में, अपने iPhone या iPad पर स्क्रीनशॉट लेने के लिए, बस Snapshot आइकन पर क्लिक करें।.
FVC स्क्रीन रिकॉर्डर वास्तव में स्क्रीनशॉट लेने के लिए एक बहुमुखी उपकरण है। कल्पना कीजिए कि एक ऐसा उपकरण जो कई iOS डिवाइस को सपोर्ट कर सकता है। यह सच होने के लिए बहुत अच्छा है, लेकिन यह सच है। इसलिए, चाहे आप कोई भी iOS डिवाइस इस्तेमाल कर रहे हों, इस स्क्रीन रिकॉर्डिंग टूल से वीडियो कॉल के दौरान फेसटाइम स्क्रीनशॉट लेना संभव है।
भाग 2: iPhone/iPad पर फेसटाइम स्क्रीनशॉट कैसे लें
आईफोन या आईपैड पर फेसटाइम स्क्रीनशॉट लेना उनके अंतर्निहित स्क्रीनशॉट सुविधाओं का उपयोग करके आसानी से किया जा सकता है।
चरण 1. FaceTime वीडियो कॉल के दौरान आप जिस iOS या iPadOS डिवाइस का उपयोग कर रहे हैं, उसे जांचें।.
चरण 2. अगर उसमें Touch ID है, तो FaceTime वीडियो कॉल का स्क्रीनशॉट लेने के लिए आपको Home और Power बटन को एक साथ दबाना होगा। वहीं, अगर आपके iPhone या iPad में Face ID है, तो आप Volume Up और Power बटन को एक साथ दबाकर FaceTime कॉल का स्क्रीनशॉट ले सकते हैं।.
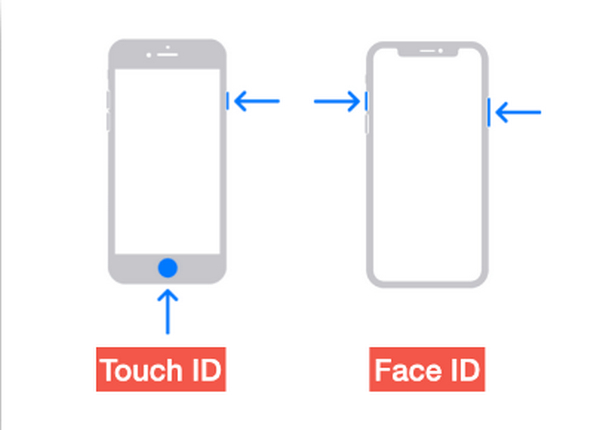
चरण 3. अपने स्क्रीनशॉट को Photos ऐप में Screenshot फ़ोल्डर में एक्सेस करें।,
iPhone या iPad पर FaceTime स्क्रीनशॉट लेना बहुत आसान है, क्योंकि इसमें स्क्रीनशॉट लेने के लिए बिल्ट-इन फ़ीचर हैं। हालाँकि, सक्रिय FaceTime कॉल के दौरान ज़रूरी बटन दबाने में सावधानी बरतनी चाहिए, क्योंकि इससे कॉल के बीच में अचानक रुकावट आने का जोखिम हो सकता है, जैसे कॉल खत्म हो जाना या अनजाने में वॉल्यूम बंद हो जाना।
भाग 3: मैक पर फेसटाइम स्क्रीनशॉट कैसे लें
जब आप अपने मैक पर फेसटाइम वीडियो कॉल कर रहे हों, तो ऐसा करने का सबसे आसान तरीका है कि आप हॉटकीज़ का उपयोग करके फेसटाइम स्क्रीनशॉट ले लें।
चरण 1. सबसे पहले अपने Mac पर FaceTime वीडियो कॉल खोलें।.
चरण 2. अब, वीडियो कॉल के दौरान हॉटकीज़ का उपयोग करके FaceTime स्क्रीनशॉट लें।.
नोट: FaceTime वीडियो कॉल की पूरी स्क्रीन का स्क्रीनशॉट लेने के लिए, Command, Shift, और 3 keys को एक साथ दबाकर रखें। वहीं, यदि आप केवल स्क्रीन के किसी हिस्से को कैप्चर करना चाहते हैं, तो Command, Shift, और 4 keys को एक साथ दबाकर रखें। अंत में, यदि आप सिर्फ FaceTime विंडो को कैप्चर करना चाहते हैं, तो Command, Shift, 4, और Space bar keys को एक साथ दबाएं।.
चरण 3. स्क्रीनशॉट सीधे आपके डेस्कटॉप पर सेव हो जाएगा।.
मैक पर फेसटाइम स्क्रीनशॉट के दौरान हॉटकीज़ का उपयोग करने के बारे में एकमात्र बात यह है कि यदि आप अपनी स्क्रीनशॉट छवियों को कस्टमाइज़ करना चाहते हैं तो आप इसे संपादित नहीं कर सकते। फिर भी, यदि आप केवल स्क्रीनशॉट लेना चाहते हैं, तो यह ठीक है, लेकिन यदि आप रचनात्मक होना चाहते हैं, तो आप FVC स्क्रीन रिकॉर्डर जैसे तृतीय-पक्ष टूल का उपयोग कर सकते हैं।
भाग 4: फेसटाइम स्क्रीनशॉट लेने के बारे में अक्सर पूछे जाने वाले प्रश्न
फेसटाइम स्क्रीनशॉट कहां जाते हैं?
आप अपने डिवाइस के फ़ोटो ऐप पर अपने फेसटाइम स्क्रीनशॉट एक्सेस कर सकते हैं। आम तौर पर, फेसटाइम कॉल के दौरान स्क्रीनशॉट लेने के बाद, इसे सीधे उस ऐप के स्क्रीनशॉट फ़ोल्डर में सहेजा जाएगा।
क्या फेसटाइम आपको बताता है कि कोई व्यक्ति स्क्रीनशॉट ले रहा है?
नहीं। FaceTime में ऐसा कोई फीचर नहीं है जो FaceTime वीडियो कॉल के दौरान स्क्रीनशॉट लेने वाले व्यक्ति को सूचित करता हो। इसलिए, अगर कोई आपके FaceTime कॉल के दौरान स्क्रीनशॉट लेता है, तो आपको कोई सूचना नहीं मिलेगी।
फेसटाइम स्क्रीनशॉट सेव नहीं हो रहे?
अगर आपको FaceTime स्क्रीनशॉट अपने iOS डिवाइस पर सेव नहीं होने की समस्या आ रही है, तो इसके कई कारण हो सकते हैं। सबसे पहले, आपको यह सुनिश्चित करना होगा कि आपके डिवाइस का स्टोरेज भरा हुआ न हो, क्योंकि यह FaceTime स्क्रीनशॉट सेव न होने का एक मुख्य कारण हो सकता है। मूल रूप से, यह नए स्क्रीनशॉट को सेव होने से रोकता है। इसके अतिरिक्त, अपने डिवाइस की गोपनीयता सेटिंग की जाँच करें, शायद इसलिए क्योंकि फ़ोटो ऐप को स्क्रीनशॉट सेव करने की अनुमति नहीं है। अगर समस्या बनी रहती है, तो अपने डिवाइस को रीस्टार्ट करने या अपने सॉफ़्टवेयर को अपडेट करने से समस्या हल हो सकती है।
निष्कर्ष
अंत में, वीडियो कॉल के दौरान FaceTime स्क्रीनशॉट लेना लाइन पर मौजूद प्रियजनों के साथ बिताए यादगार पलों को सहेजने और कैप्चर करने का सबसे आसान तरीका है। फिर चाहे आप iOS डिवाइस की बिल्ट‑इन सुविधाओं का उपयोग करें या FVC Screen Recorder जैसे थर्ड‑पार्टी टूल का, इन पलों को आसानी से कैप्चर करने के कई तरीके उपलब्ध हैं। इसलिए, इन टूल्स और फीचर्स का उपयोग करने से हिचकिचाएं नहीं और अपने FaceTime अनुभवों का पूरा लाभ उठाएं। अभी अपने प्रियजनों को FaceTime कॉल करें और उसका स्क्रीनशॉट लेकर उस पल को सहेज लें।.
-
 iPhone पर स्क्रीनशॉट काम न करने की समस्या को कैसे ठीक करें [2025]
 क्या आपको अपने iPhone पर स्क्रीनशॉट लेने में परेशानी हो रही है? हम आपकी मदद कर सकते हैं! iPhone पर स्क्रीनशॉट काम न करने की समस्या को जल्दी और आसानी से ठीक करने में आपकी मदद करने के लिए हमारी विस्तृत गाइड पढ़ें।
-
 प्रिंट स्क्रीन के बिना विंडोज़ पर स्क्रीनशॉट [2025 गाइड]
 प्रिंट स्क्रीन के बिना विंडोज पर स्क्रीनशॉट लेने के तरीके खोज रहे हैं। इस लेख ने आपके लिए यह आसान बना दिया है। इसे अभी पढ़ें और आसानी से अपनी स्क्रीन कैप्चर करें!
-
 स्नैपचैट पर बिना किसी की जानकारी के स्क्रीनशॉट लेने के 4 तरीके
 क्या आप स्नैपचैट पर स्क्रीनशॉट लेना चाहते हैं, बिना उन्हें पता चले? इस लेख में आपके लिए खास तौर पर बनाए गए 4 कारगर तरीके दिए गए हैं। अभी देखें और खुद भी आजमाएँ!