


स्क्रीनशॉट को JPG में सेव करने के 4 सरल तरीके [2025 गाइड]
स्क्रीनशॉट इमेज आमतौर पर PNG फ़ॉर्मेट में सेव होती हैं। इसलिए, जब इन्हें किसी दूसरे पसंदीदा फ़ॉर्मेट में बदलना हो, तो खासकर पहले से सेव हो जाने के बाद, इसमें थोड़ा समय लग सकता है। अगर आपके साथ भी ऐसा होता है और आप अपने स्क्रीनशॉट्स को JPG में सेव करना चाहते हैं, तो यह लेख आपके लिए है। इस लेख में हम अलग‑अलग तरीके और टूल समझाएँगे, जिन्हें आप थर्ड‑पार्टी सॉफ़्टवेयर से लेकर अपने डिवाइस के बिल्ट‑इन विकल्पों तक इस्तेमाल कर सकते हैं। इस तरह आप अपने लिए सबसे उपयुक्त तरीका चुन सकते हैं। आइए शुरू करते हैं!

भाग 1: विंडोज़ और मैक पर स्क्रीनशॉट को JPG में सेव करने का सबसे आसान तरीका
अगर आप Windows और Mac दोनों पर स्क्रीनशॉट्स को आसानी से JPG में सेव करने का तरीका ढूँढ रहे हैं, तो FVC Screen Recorder आपके लिए एक बेहतरीन समाधान है। यह स्क्रीन रिकॉर्डिंग टूल इस तरह बनाया गया है कि आप जो भी स्क्रीनशॉट लें, उसे आपकी पसंद के किसी भी फ़ॉर्मेट में आसानी से सेव कर सकें। इसके सहज इंटरफ़ेस की मदद से आप Mac या Windows पर पूरी स्क्रीन, किसी विशेष विंडो या किसी कस्टम क्षेत्र के स्क्रीनशॉट ले सकते हैं और कुछ ही क्लिक में उन्हें JPG या अपनी पसंद के अन्य फ़ॉर्मेट में सेव कर सकते हैं। इसके अलावा, अगर आप अपने स्क्रीनशॉट को बेहतर बनाना या कस्टमाइज़ करना चाहते हैं, तो इसमें कई उन्नत सुविधाएँ हैं, जिनकी मदद से आप स्क्रीनशॉट को JPG के रूप में सेव करने से पहले एडिट कर सकते हैं।.
स्टेप 1. सबसे पहले, अपने Windows या Mac कंप्यूटर पर FVC Screen Recorder डाउनलोड करके इंस्टॉल करें।.
मुफ़्त डाउनलोडWindows 7 या उससे बाद के लिएसुरक्षित डाउनलोड
मुफ़्त डाउनलोडMacOS 10.7 या उससे बाद के लिएसुरक्षित डाउनलोड
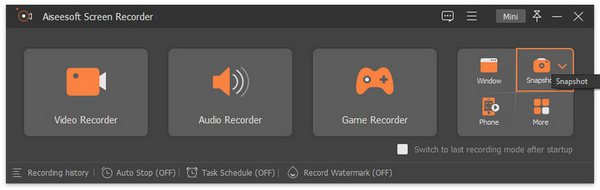
स्टेप 2. अब, जब आप इस टूल को चलाएँ, तो दाहिने कोने में दिए गए Snapshot आइकन पर क्लिक करें।.
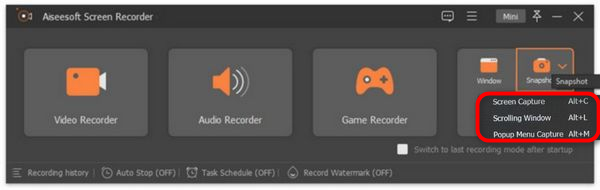
स्टेप 3. Snapshot आइकन पर क्लिक करने के बाद, आपके पास स्क्रीनशॉट लेने के तीन विकल्प होंगे। आप Screen Capture, Scrolling Window या Pop-up Menu Capture में से किसी एक को चुन सकते हैं।.
स्टेप 4. अब अपने Windows डिवाइस की स्क्रीन पर कर्सर को खींचकर उस हिस्से का चयन करें जिसका आप स्क्रीनशॉट लेना चाहते हैं।.
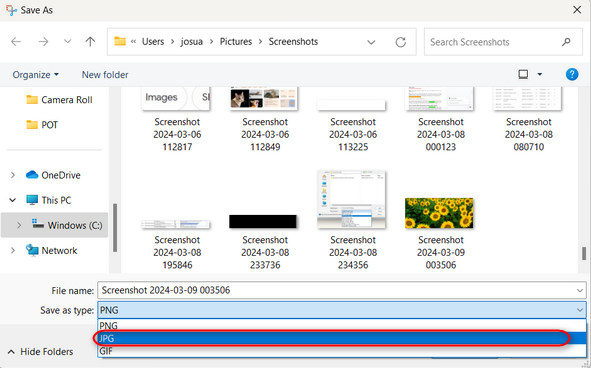
स्टेप 5. इसके बाद, Save बटन पर क्लिक करें, फिर Save as Type विकल्प पर जाएँ और ड्रॉप‑डाउन मेनू से JPG चुनें।.

स्क्रीनशॉट लेने और उन्हें JPG या अपनी पसंद के किसी भी प्रारूप फ़ाइल में सहेजने के लिए अपने उपयोगकर्ता के अनुकूल इंटरफेस के साथ, FVC स्क्रीन रिकॉर्डर वास्तव में उन लोगों के लिए सबसे अच्छा विकल्प है जो विंडोज और मैक दोनों प्लेटफार्मों पर स्क्रीनशॉट को JPG प्रारूप में कैप्चर करने और सहेजने का परेशानी मुक्त तरीका चाहते हैं।
भाग 2: स्निपिंग टूल के साथ विंडोज़ पर स्क्रीनशॉट को JPG के रूप में सहेजें
स्निपिंग टूल आज विंडोज ऑपरेटिंग सिस्टम पर उपलब्ध सबसे आम बिल्ट-इन एप्लिकेशन में से एक है जिसे स्क्रीनशॉट लेने के लिए डिज़ाइन किया गया है। स्निपिंग टूल के इस्तेमाल से, उपयोगकर्ता स्क्रीनशॉट कैप्चर करने के बाद उन्हें JPG में सेव कर सकते हैं।
स्टेप 1. सबसे पहले, आपको Windows में Start पर जाना होगा।.
स्टेप 2. इसके बाद, सर्च बार में जाएँ और वहाँ Snipping Tool खोजें। .
स्टेप 3. अब आपको New बटन दिखाई देगा। स्क्रीनशॉट लेना शुरू करने के लिए इस पर क्लिक करें।.
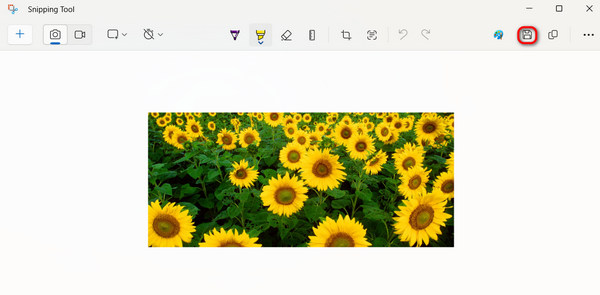
स्टेप 4. अंत में, स्क्रीनशॉट इमेज को सेव करने और उसे JPG में कन्वर्ट करने के लिए Save बटन पर क्लिक करें और Save as Type ड्रॉप‑डाउन मेनू में से JPG चुनें।.
इसलिए, यदि आप विंडोज उपयोगकर्ता हैं और स्क्रीनशॉट को JPG में सहेजना चाहते हैं, तो स्निपिंग टूल का उपयोग करना निश्चित रूप से एक सुविधाजनक विकल्प है। हालाँकि, ध्यान रखें कि इसमें थर्ड-पार्टी टूल में मिलने वाली उन्नत सुविधाएँ नहीं हैं और कुछ उपयोगकर्ताओं को यह पुराना लग सकता है।
भाग 3: पूर्वावलोकन का उपयोग करके मैक पर स्क्रीनशॉट को JPG के रूप में सहेजें
वहीं, अगर आप Mac उपयोगकर्ता हैं, तो आप Preview टूल का उपयोग करके स्क्रीनशॉट्स को JPG के रूप में सेव कर सकते हैं और Mac पर स्क्रीनशॉट ले सकते हैं। यह टूल Mac में पहले से बिल्ट‑इन होता है, इसलिए इसे इस्तेमाल करने के लिए किसी इंस्टॉलेशन की ज़रूरत नहीं है। आपको बस अपने स्क्रीनशॉट इमेज को इस ऐप से खोलना है और फिर उसे JPG के रूप में सेव कर देना है।.
स्टेप 1. सबसे पहले, अपने Mac पर बिल्ट‑इन स्क्रीनशॉट शॉर्टकट्स का इस्तेमाल करके स्क्रीनशॉट लें।
पूरी स्क्रीन का स्क्रीनशॉट: Command + Shift + 3 दबाएँ।.
स्क्रीन के चुने हुए हिस्से का स्क्रीनशॉट: Command + Shift + 4 दबाएँ।.
किसी विशेष विंडो का स्क्रीनशॉट: Command + Shift + 4 दबाएँ, फिर Spacebar दबाएँ।.
स्टेप 2. जैसे ही आप स्क्रीनशॉट लेते हैं, स्क्रीन के निचले दाएँ कोने में दिखाई देने वाले थंबनेल पर क्लिक करें ताकि वह Preview में खुले।.
स्टेप 3. अब Preview में आपको File मेनू पर जाना है।.
स्टेप 4. File मेनू से Export चुनें या Command + Shift + S दबाएँ।.
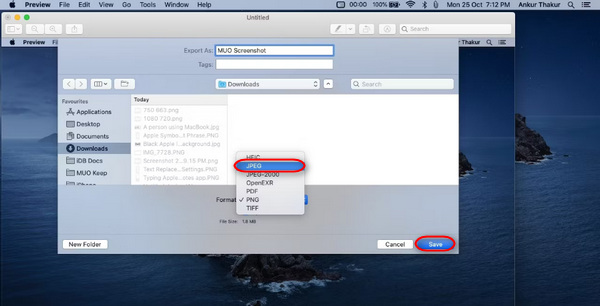
स्टेप 5. अंत में, ड्रॉप‑डाउन मेनू से फ़ाइल फ़ॉर्मेट के रूप में JPG चुनें, और फिर Save पर क्लिक करें।.
हालांकि यह करना आसान और त्वरित लग सकता है, लेकिन स्क्रीनशॉट लेना और प्रीव्यू में मैन्युअल रूप से उसका फ़ॉर्मेट JPG में बदलना अभी भी असुविधाजनक है और इसमें आपको कुछ समय लगेगा। हालाँकि, अगर यह आपके लिए कोई समस्या नहीं है, तो आप अपने मैक पर स्क्रीनशॉट को JPG में सहेजने के लिए इस विधि का उपयोग कर सकते हैं।
भाग 4: टिप: स्क्रीनशॉट को ऑनलाइन JPG में कैसे बदलें
अगर आप ऑनलाइन कोई ऐसा कन्वर्टर टूल ढूँढ रहे हैं जो स्क्रीनशॉट्स को JPG में बदल सके, तो FVC Free Image Converter आपके लिए सबसे उपयुक्त है। यह टूल JPG, JPEG, PNG, GIF, BMP, TIFF, WEBP, ICO और SVG जैसी इमेज फ़ॉर्मेट्स को JPG, PNG और GIF में कन्वर्ट करने की सुविधा देता है। साथ ही, इसका इस्तेमाल तेज़ और आसान है, और इसका यूज़र‑फ्रेंडली इंटरफ़ेस इसे हर तरह के उपयोगकर्ताओं के लिए सुगम बनाता है।.
स्टेप 1. FVC Free Image Converter की आधिकारिक वेबसाइट पर जाएँ।.
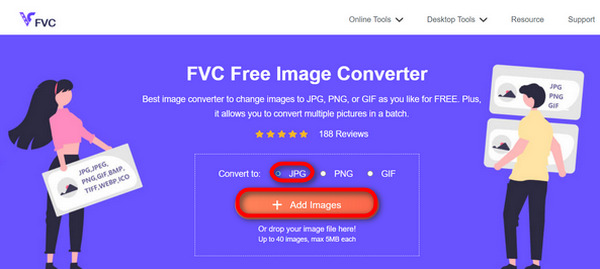
स्टेप 2. Add Images पर क्लिक करें, और Convert To विकल्प में JPG चुनें।.
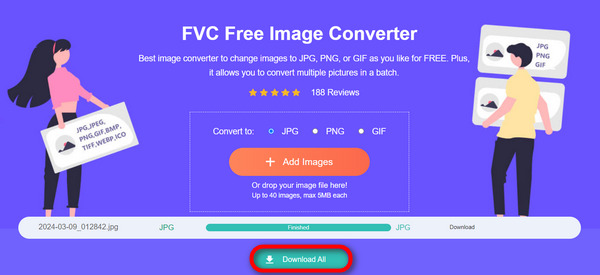
स्टेप 3. प्रक्रिया पूरी हो जाने के बाद, अपने कन्वर्ट हुए स्क्रीनशॉट को JPG के रूप में सेव करने के लिए बस Download All बटन पर क्लिक करें।.
FVC फ्री इमेज कन्वर्टर के साथ, स्क्रीनशॉट को JPG में बदलना तेज़ और आसान है। जब आपको ऊपर बताए गए अन्य तरीकों से परेशानी हो रही हो तो यह सबसे अच्छा विकल्प है।
भाग 5: स्क्रीनशॉट को JPG में बदलने के बारे में अक्सर पूछे जाने वाले प्रश्न
क्या मैं एक साथ कई स्क्रीनशॉट को JPG प्रारूप में परिवर्तित कर सकता हूँ?
हाँ। आप FVC Free Image Converter जैसे बैच कन्वर्जन फीचर वाले कन्वर्टर टूल का उपयोग करके एक साथ कई स्क्रीनशॉट को JPG फॉर्मेट में बदल सकते हैं। यह टूल आपको कई स्क्रीनशॉट चुनने और उन्हें एक बार में JPG फॉर्मेट में बदलने की सुविधा देता है, जिससे आपका समय और मेहनत बचती है।
क्या स्क्रीनशॉट छवियों को JPG में परिवर्तित करने से उनकी गुणवत्ता प्रभावित होती है?
हां, लेकिन इतना नहीं। स्क्रीनशॉट को JPG में बदलने से गुणवत्ता में केवल थोड़ी गिरावट आएगी, लेकिन यह सहनीय है। JPG कम्प्रेशन चुनते समय, संतोषजनक परिणाम प्राप्त करने के लिए फ़ाइल आकार और छवि गुणवत्ता सेटिंग्स को संतुलित करना सुनिश्चित करें।
क्या मैं स्क्रीनशॉट को JPG में सेव करते समय छवि गुणवत्ता समायोजित कर सकता हूँ?
हां। ऐसे कई इमेज एडिटिंग सॉफ्टवेयर और ऑनलाइन कन्वर्टर हैं जिनमें स्क्रीनशॉट को JPG में सेव करते समय इमेज क्वालिटी सेटिंग को एडजस्ट करने की सुविधा होती है। इससे उन्हें इमेज पर लागू किए जाने वाले कम्प्रेशन के स्तर को नियंत्रित करने की सुविधा मिलती है।
निष्कर्ष
तो अब आपके पास यह जानकारी है। चाहे आप Windows का इस्तेमाल कर रहे हों या Mac का, स्क्रीनशॉट्स को JPG फ़ॉर्मेट में बदलने के कई आसान तरीके मौजूद हैं। इन तरीकों की मदद से आप अब अपने स्क्रीनशॉट्स को आसानी से मैनेज कर सकते हैं और JPG फ़ॉर्मेट में सेव कर सकते हैं। अगली बार जब भी आपको कोई स्क्रीनशॉट सेव करना हो, इन आसान तरीकों को याद रखें, खासकर जब आप अपना स्क्रीनशॉट JPG में सेव करना चाहें।.
-
 पीएनजी को जेपीजी में तेजी से बदलने के लिए शीर्ष 5 प्रमुख ट्यूटोरियल
 अगर आपको अपनी पीएनजी फ़ाइल को जेपीजी प्रारूप में कनवर्ट करने की ज़रूरत है, तो आप यहां सबसे अच्छे तरीके सीख सकते हैं। आप पीएनजी और जेपीजी फ़ाइल स्वरूपों के बीच अंतर भी जानेंगे।
-
 iPhone पर स्क्रीनशॉट काम न करने की समस्या को कैसे ठीक करें [2025]
 क्या आपको अपने iPhone पर स्क्रीनशॉट लेने में परेशानी हो रही है? हम आपकी मदद कर सकते हैं! iPhone पर स्क्रीनशॉट काम न करने की समस्या को जल्दी और आसानी से ठीक करने में आपकी मदद करने के लिए हमारी विस्तृत गाइड पढ़ें।
-
 एसवीजी को जेपीजी प्रारूप में कैसे परिवर्तित करें, इस पर सरल तरीके
 एसवीजी को जेपीजी में बदलने का सबसे अच्छा तरीका खोज रहे हैं? यह पोस्ट कुछ अचूक ट्यूटोरियल देगी जिन्हें आप आजमा सकते हैं। आप अपने लिए SVG से JPG कन्वर्टर की खोज भी करेंगे।