


विंडोज़ और मैक पर प्रभावी ढंग से लाइटरूम में एचईआईसी फ़ाइल कैसे आयात करें
मान लीजिए कि आप HEIC छवि को बेहतर बनाना या उसे व्यवस्थित करना चाहते हैं। ऐसे में आप आसानी से HEIC को Lightroom में इम्पोर्ट कर सकते हैं और बिना किसी परेशानी के सारी व्यवस्था व संपादन कर सकते हैं। आप इस सॉफ़्टवेयर के साथ HEIC फ़ाइल देखने या संपादित करने के लिए कोई अतिरिक्त कोडेक डाउनलोड किए बिना ही यहाँ इसे आसानी से अपलोड कर सकते हैं। तो यदि आपको ऐसा मार्गदर्शक चाहिए जो आपको बताए कि इस सॉफ़्टवेयर में HEIC फ़ाइल कैसे इम्पोर्ट करें, तो आप इस लेख में शामिल Windows और Mac वाले तरीकों को पढ़कर उनके अनुसार चल सकते हैं।.
आगे की हलचल के बिना, यह कैसे करना है, यह जानने के लिए निम्नलिखित विवरण पढ़ें, और यदि लाइटरूम HEIC को आयात करने में विफल रहता है, तो एक तरीका है कि हम इसे यहां भी जोड़ सकते हैं। लेकिन कुछ और करने से पहले, आपको निम्नलिखित विवरण पढ़ने से पहले अपने विंडोज या मैक पर सॉफ्टवेयर डाउनलोड करना होगा।

भाग 1. अपने विंडोज 10/11 या अपडेट पर लाइटरूम में एचईआईसी कैसे आयात करें?
लाइटरूम एक अद्यतन विंडोज संस्करण का समर्थन करता है; यदि आप अपने विंडोज ओएस पर सॉफ्टवेयर डाउनलोड करते हैं तो यह हिस्सा आपके लिए है। आपको चिंता करने की आवश्यकता नहीं होगी क्योंकि लाइटरूम नीचे दिए गए ट्यूटोरियल का अनुसरण करके आसानी से HEIC फाइलें खोल सकता है।
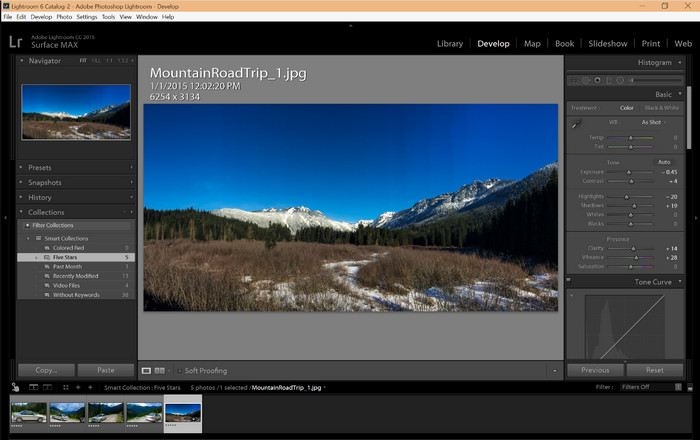
चरण 1. अपने Windows 10/11 पर सॉफ़्टवेयर डाउनलोड करें, फिर उसे इंस्टॉल करें और आगे बढ़ने के लिए खोलें।.
चरण 2. जब सॉफ़्टवेयर आपके सिस्टम पर चल रहा हो, तो + बटन पर क्लिक करें, Browse दबाएँ और वह HEIC फ़ाइल चुनें जिसे आप यहाँ इम्पोर्ट करना चाहते हैं।.
चरण 3. उन्हें चुनने के बाद, अब आप Windows 10/11 पर Lightroom का उपयोग करके HEIC फ़ाइलें देख सकते हैं।.
भाग 2. अपने मैक 10.13 या ऊपर के लाइटरूम में HEIC फोटो कैसे खोलें
लाइटरूम के बिना भी, आप आसानी से एचईआईसी फ़ाइल देख सकते हैं, खासकर यदि आपका मैक संस्करण हाई सिएरा 10.13 या पूर्वावलोकन पर नया है। हालांकि पूर्वावलोकन संपादन सुविधाओं का समर्थन करता है, यह जटिल संपादन के लिए उपयोग करने के लिए पर्याप्त नहीं है, जैसे कि लाइटरूम आपको क्या प्रदान कर सकता है। इसके अलावा, आपको इसके बारे में चिंता करने की आवश्यकता नहीं होगी क्योंकि लाइटरूम एचईआईसी फाइलों को आपके मैक पर संपादित या व्यवस्थित करने के लिए समर्थन करता है।
चरण 1. अपने macOS 10.13 या उससे ऊँचे संस्करण पर सॉफ़्टवेयर इंस्टॉल करें; यदि आपके ऑपरेटिंग सिस्टम का संस्करण इससे कम है, तो यह उम्मीद रखें कि सॉफ़्टवेयर नहीं खुलेगा। जब आप अपने डेस्कटॉप पर Lightroom डाउनलोड कर लें, तो अब आपको उसे खोलना होगा।.
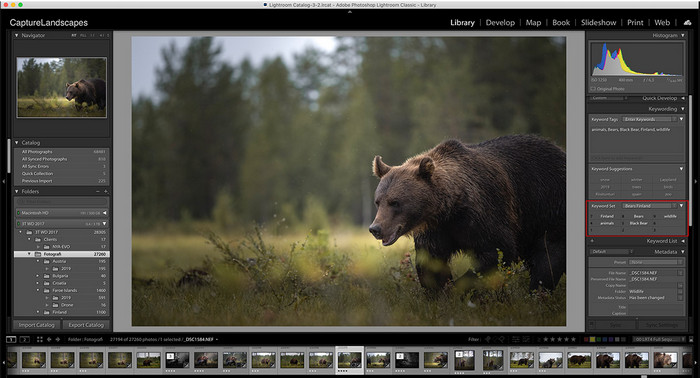
चरण 2. ऊपरी हिस्से में, आपको विभिन्न मेनू और बाएँ ऊपरी कोने में Lightroom का नाम दिखाई देगा, जिसका मतलब है कि सॉफ़्टवेयर पहले से ही खुला है। File मेनू दबाएँ और Add Photos पर जाएँ, या आप कीबोर्ड पर Command + Shift + I दबाकर हॉटकी का उपयोग भी कर सकते हैं।
चरण 3. आपकी स्क्रीन पर एक फ़ोल्डर दिखाई देगा; वह इमेज चुनें जिसे आप इम्पोर्ट करना चाहते हैं और Review for Import पर क्लिक करें।.
भाग 3. लाइटरूम HEIC फ़ाइल आयात करने में विफल | असमर्थित HEIC समस्या को हल करने का सबसे अच्छा समाधान
विंडोज़ और मैक पर लाइटरूम जैसे सॉफ़्टवेयर के साथ संगतता के कारण कई उपयोगकर्ताओं को एचईआईसी फ़ाइल अपलोड करने में परेशानी हुई; उपरोक्त विधियों की सहायता से भी, यह अभी भी असंभव है। लेकिन दुखी होने की जरूरत नहीं है क्योंकि वेब पर सबसे अच्छे टूल की मदद से HEIC को JPG में कनवर्ट करके लाइटरूम पर अपनी HEIC फ़ाइल आयात करने का एक तरीका है।
FVC Free HEIC to JPG Converter वह समाधान है जिसका उपयोग आप Windows और Mac पर बिना कोई सॉफ़्टवेयर डाउनलोड किए HEIC फ़ाइल को कनवर्ट करने के लिए कर सकते हैं। इस तरह का वेब टूल आपके असमर्थित फॉर्मैट को JPEG जैसे मानक फॉर्मैट में बदल सकता है। आप इमेज को Lightroom पर आसानी से अपलोड कर पाएँगे, बिना असमर्थित फॉर्मैट की दिक्कत के। HEIC को JPG में बदलने के अलावा, आप यहाँ कई HEIC इमेज भी अपलोड कर सकते हैं और उन्हें एक साथ कनवर्ट कर सकते हैं, यानी बैच कनवर्ज़न को सपोर्ट करता है। कमाल है, है न? क्या आप जानना चाहते हैं कि हमें और क्या ज़्यादा प्रभावित करता है? यह कि आप तेज़ी से कनवर्ज़न बिल्कुल मुफ़्त में कर सकते हैं। यदि आप HEIC पर आने वाली असमर्थित फॉर्मैट की समस्या को ठीक करना चाहते हैं, तो नीचे दिए गए चरणों का पालन करें और जानें कि इस फॉर्मैट को कैसे कनवर्ट किया जाए।.
वेब टूल का उपयोग करके HEIC फॉर्मेट को JPG में कैसे बदलें, इस पर आसान कदम:
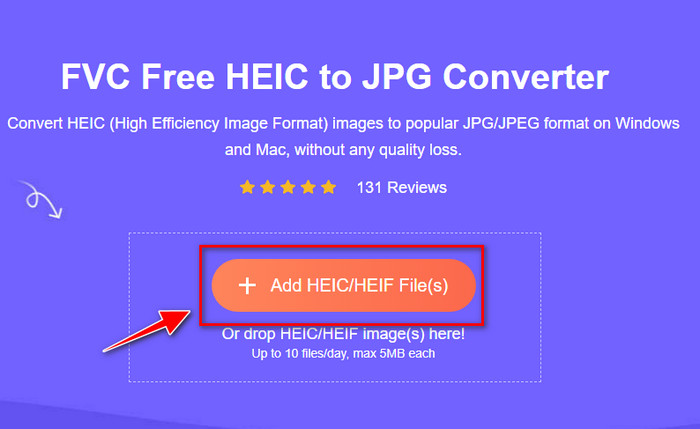
चरण 1. FVC Free HEIC to JPG Converter पर क्लिक करके, आप अपने पसंदीदा सर्च इंजन पर कनवर्टर की मुख्य वेबसाइट खोल सकते हैं। चिंता की कोई बात नहीं, इसे इस्तेमाल करना सुरक्षित है और वेब इंटरफेस पर कोई परेशान करने वाले विज्ञापन नहीं हैं।.
चरण 2. Add HEIC/HEIF Files पर क्लिक करें ताकि आप वह HEIC इमेज अपलोड कर सकें जिसे Lightroom नहीं खोल पा रहा है। विकल्प के तौर पर, आप फ़ाइल को फ़ोल्डर से चुनने के बजाय यहाँ drag and drop भी कर सकते हैं।.
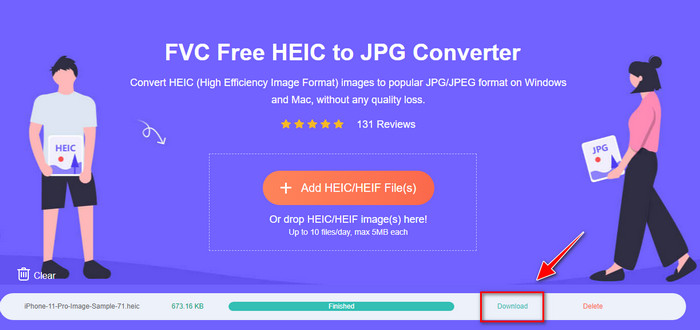
चरण 3. जब प्रोग्रेस बार पूरा हो जाएगा, तो एक Download बटन दिखाई देगा; उस पर क्लिक करके नई कनवर्ट की गई HEIC फ़ाइल को अपने डेस्कटॉप पर सेव करें। उसके बाद, आप फ़ाइल को Lightroom में इम्पोर्ट कर सकते हैं, और अब आपको असमर्थित या करप्टेड होने वाला डायलॉग बॉक्स नहीं मिलेगा।.
भाग 4. लाइटरूम में HEIC आयात करने पर अक्सर पूछे जाने वाले प्रश्न
क्या लाइटरूम पर HEIC फ़ाइलें आयात करने की कोई सीमाएँ हैं?
इस बिंदु तक, आप लाइटरूम पर जितनी चाहें उतनी HEIC फाइलें आयात कर सकते हैं। लाइटरूम पर इस प्रकार के प्रारूप को अपलोड करने की इसकी कोई सीमा नहीं है।
क्या विंडोज़ और मैक पर लाइटरूम मुफ़्त है?
दुर्भाग्य से, विंडोज़ और मैक पर लाइटरूम मुफ़्त नहीं है, लेकिन आप इसे अपने विंडोज़ और मैक पर मुफ्त में डाउनलोड कर सकते हैं। हालाँकि यह सॉफ़्टवेयर मुफ़्त नहीं है, फिर भी आप इसके द्वारा 7-दिनों के लिए समर्थित मुफ़्त परीक्षण का उपयोग करने का लाभ उठा सकते हैं। यदि आपको लगता है कि आपको लंबे समय तक सॉफ़्टवेयर की आवश्यकता होगी, तो आप परीक्षण अवधि के बाद सदस्यता ले सकते हैं।
क्या लाइटरूम पर HEIC फ़ाइल निर्यात करने से वॉटरमार्क निकल जाएगा?
अच्छी बात यह है कि Lightroom यहाँ अपलोड की गई इमेज पर कोई वॉटरमार्क नहीं जोड़ता। लेकिन यदि आप चाहें तो आप खुद वॉटरमार्क जोड़ सकते हैं। इसलिए, अगर आप तस्वीर को इंटरनेट पर पोस्ट करने जा रहे हैं, तो हम सलाह देते हैं कि आप उस पर वॉटरमार्क जोड़ें ताकि वह उन लोगों से सुरक्षित रहे जो उसे चुराने की कोशिश कर सकते हैं।.
इमेज एडिटिंग के लिए कौन सा बेहतर है? फोटोशॉप या लाइटरूम?
यह आपकी मांगों पर निर्भर करता है; एडोब एडिटर फोटोशॉप और लाइटरूम की मदद से आप आसानी से अपनी इमेज को लुक्स में बेहतर बना सकते हैं। मान लीजिए कि आप एक आसान-से-संभालने वाला छवि संपादक चाहते हैं। उस स्थिति में, लाइटरूम एक विकल्प है जिसे आपको चुनना चाहिए, यह आपके पास मौजूद छवि को बढ़ाने के लिए सबसे अच्छा छवि संपादक है। लेकिन अगर आप अधिक विस्तृत छवि संपादन करना चाहते हैं, तो फोटोशॉप आपका संपादक है जो हर पेशेवर संपादक की जरूरतों को पूरा करता है।
निष्कर्ष
लाइटरूम की मदद से, आप अपनी छवि को आसानी से संपादित कर सकते हैं या उन्हें साफ-सुथरा दिखाने के लिए तदनुसार व्यवस्थित कर सकते हैं। इसलिए, यदि आप लाइटरूम पर HEIC फ़ाइल आयात करना चाहते हैं, तो आप हमारे द्वारा जोड़े गए चरणों का पालन कर सकते हैं, चाहे आप Windows या Mac उपयोगकर्ता हों। लेकिन अगर आपको HEIC फ़ाइल आयात करने में समस्या आती है, तो भाग तीन पढ़ें क्योंकि हम इसे लाइटरूम के साथ संगत बनाने के लिए हल करते हैं। अब आप इसे संपादित करने के लिए आगे बढ़ सकते हैं। हम आशा करते हैं कि यह आलेख आपको फ़ाइल को आयात करने के तरीके के बारे में एक विचार देता है; यदि आपके पास अन्य सुझाव या सिफारिशें हैं, तो आप हमें एक संदेश छोड़ सकते हैं।
-
 iMazing HEIC कन्वर्टर | कार्य, पेशेवरों और विपक्ष, और इसका उपयोग कैसे करें
 यह लेख iMazing HEIC कनवर्टर क्षमता और इसके विकल्पों की समीक्षा करेगा, इसलिए यदि आप इसके बारे में अधिक जानना चाहते हैं तो इसे सावधानी से पढ़ें
-
 एक विशेषज्ञ की तरह iPhone पर HEIC को JPG में बदलने के 3 सबसे आसान तरीके
 आईफोन पर एचईआईसी को जेपीजी में बदलने का कोई विचार नहीं है? यदि आप उन उपयोगकर्ताओं में से हैं जिन्हें HEIC से समस्या हो रही है तो इसे पढ़ें।
-
 मेरे iPhone तस्वीरें HEIC प्रारूप पर क्यों हैं [कारण और कैसे हल करें]
 क्या आप जानना चाहते हैं कि मेरी iPhone तस्वीरें HEIC प्रारूप में क्यों हैं? यह लेख इस बात का विश्वसनीय प्रमाण प्रदान करता है कि HEIC को सबसे अच्छा क्या बनाता है।