

एक मिनट से भी कम समय में वीडियो में छवियों को त्वरित रूप से कैसे जोड़ें
कई कारण हैं कि आपको वीडियो में छवियों को जोड़ने की आवश्यकता क्यों है। उदाहरण के लिए, कुछ संपादकों ने पाया कि उनके वीडियो में चित्र जोड़ने से अन्य उपयोगकर्ताओं के लिए एक नया इंटरैक्शन बनता है। इस तरह, आप इसका उपयोग अपनी ब्रांडिंग का प्रतिनिधित्व करने के लिए कर सकते हैं या एक उत्कृष्ट दृश्य प्रस्तुतिकरण कर सकते हैं और अपने वीडियो को उपयोगकर्ताओं को सही संदेश देने में मदद कर सकते हैं। लेकिन क्या आप जानते हैं कि कई टूल्स एक ही काम करते हैं। हम जानते हैं कि यह चुनना कठिन है कि कौन सा टूल आपको सबसे अच्छा लगेगा। इसलिए आज, हमने उन तीन टूल को पहले ही निकाल दिया है जो हमने पाया है कि अच्छा प्रदर्शन करते हैं। एक बार जब आप इस लेख को पढ़ लेंगे, तो आप अपने वीडियो में चित्र जोड़ना सीखेंगे।

भाग 1. वीडियो कनवर्टर अल्टीमेट के साथ वीडियो में छवि जोड़ने पर चरण-दर-चरण मार्गदर्शिका
Want to add a picture to the video with the ultimate tool? In that case, use the Video Converter Ultimate. With the help of this ultimate tool, you can easily overlay the image to the video even though you aren't a pro in this area of editing. Besides its overlaying on video ability, you can easily use this tool to add music as a background, add subtitles, and do more. It is known for being the one-stop solution for most of the problems in regards to the video. Want to know what are the advantages of using this? If so, you can read the provided details below.

FVC वीडियो कन्वर्टर अंतिम
5,689,200+ डाउनलोड- रूपांतरण और संपादन पर उत्कृष्ट प्रदर्शन प्रदान करता है।
- संपादित करें और कुछ ही क्लिक में एक शानदार वीडियो बनाएं।
- यह 200+ प्रारूपों का समर्थन करता है, जैसे MP4, MOV, FLV, WMV, AVI, MTV, आदि।
- डाउनलोड करने के लिए सभी क्रॉस-प्लेटफ़ॉर्म में उपलब्ध है, जैसे कि विंडोज और मैक।
फ्री डाउनलोडWindows 7 या बाद के संस्करण के लिएसुरक्षित डाउनलोड
फ्री डाउनलोडMacOS 10.7 या बाद के संस्करण के लिएसुरक्षित डाउनलोड
क्या यह आश्चर्यजनक नहीं है कि आप उपकरण के साथ क्या-क्या कर सकते हैं? हां, हम जानते हैं कि यह टूल कई मायनों में प्रभावशाली है। यदि इस टूल ने आपका ध्यान खींचा और आप सीखना चाहते हैं कि इस टूल से वीडियो में चित्र कैसे जोड़ें, तो आप नीचे दिए गए ट्यूटोरियल को पढ़ सकते हैं।
Step 1. Click the download button below to directly download it on your drive, follow the installation promptly, and launch it. Before anything else, we would appreciate it if you got familiarized with the tool's interface to distinguish the proceeding steps easily.
फ्री डाउनलोडWindows 7 या बाद के संस्करण के लिएसुरक्षित डाउनलोड
फ्री डाउनलोडMacOS 10.7 या बाद के संस्करण के लिएसुरक्षित डाउनलोड
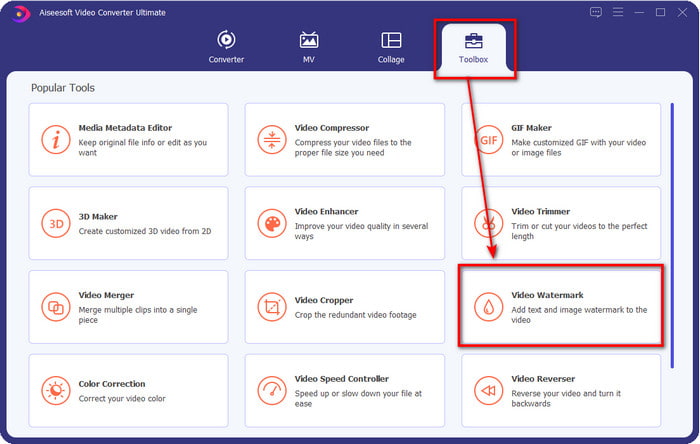
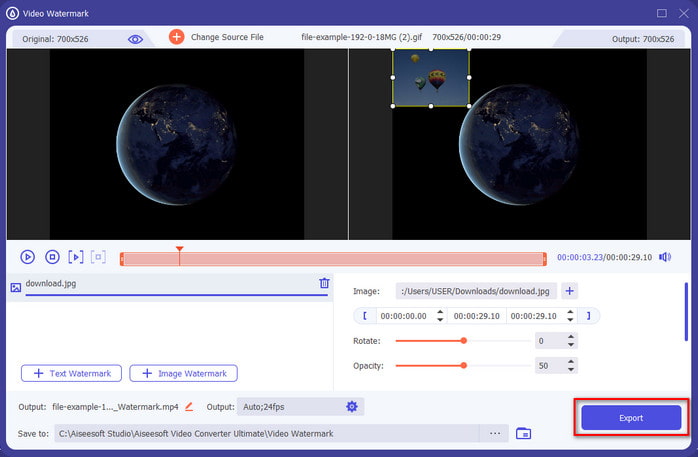
Step 2. Once the tool is running on the system, click Toolbox; under it, locate the Video Watermark and open it.
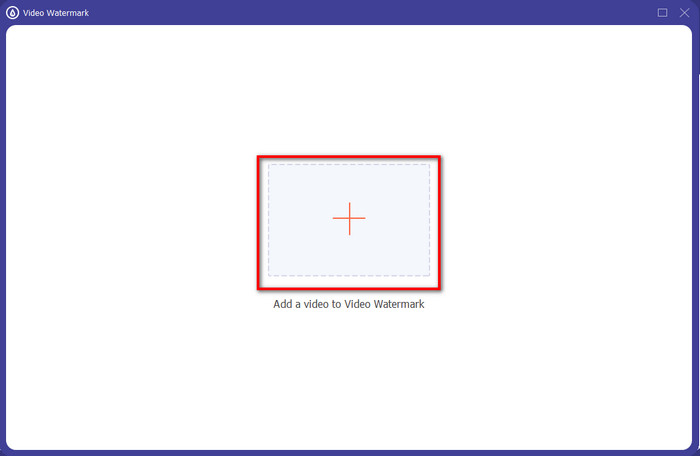
Step 3. Once you've ticked the + button, a file folder will show on your display; locate the file and hit Open if that is the video file.
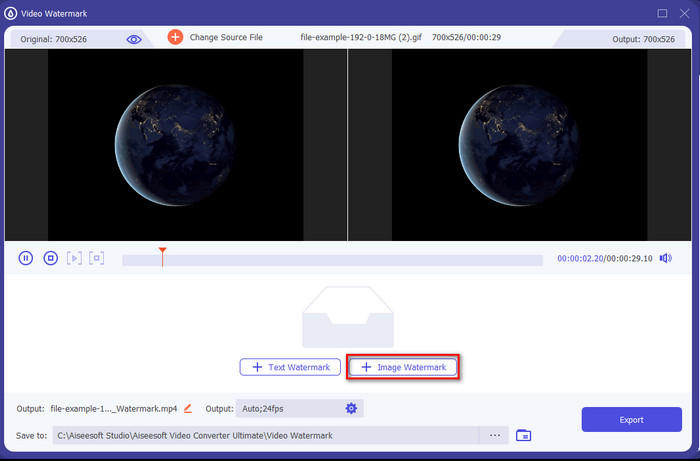
Step 4. A new window will show, click Image Watermark, then a folder will show again, but this time you'll insert the image you want to add to your video and press Open.
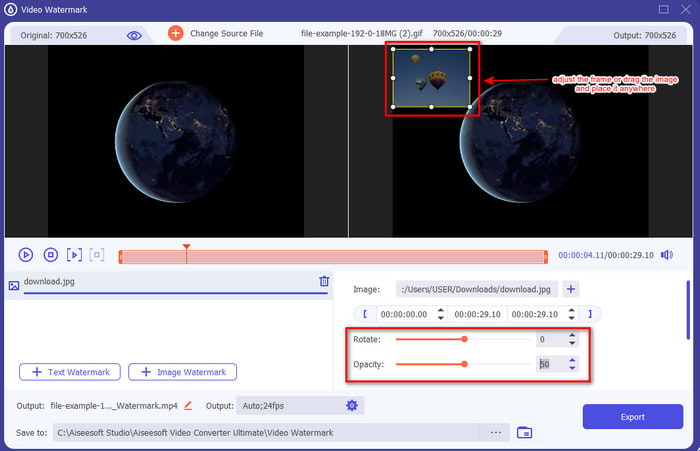
Step 5. Adjust the image size you've inserted on the video and its position by dragging the frame of the photo. You can place it anywhere you want by holding and dragging the image. What's more, you can also adjust the picture's visibility by adjusting the Opacity. Also, you can rotate the image by dragging the slider of Rotate.
Step 6. If you've edited the photo, it is now the time to click Export.
संबंधित:
वीडियो में सबटाइटल्स कैसे जोड़ें
भाग 2। इंटरनेट पर वीडियो के लिए छवियों को मुफ्त में कैसे ओवरले करें
ऑनलाइन वीडियो कटर - एक वीडियो में छवि जोड़ें
If you want to overlay images online, you can use the Online Video Cutter – Add Image to a Video. This web tool provides a simple yet effective way of adding photos to any video. Although the tool is excellent to use, it is still a bit hassle to upload the video because it depends on your internet connection. Also, you can't add two images here because it is unsupported. But if you want to use the tool, you can follow the steps below.
Step 1. Open your browser and search the web tool on the search tab, then open it.
Step 2. Click Open File to upload the video, then click Add Image to upload the image you've inserted.
Step 3. Drag the image to change its position, click Save to encode, and save it on your computer.
पेशेवरों
- उपयोग करने के लिए नि: शुल्क, और आपको इसे डाउनलोड करने की आवश्यकता नहीं होगी।
- यह उपयोगकर्ताओं के लिए बुनियादी संपादन सुविधाओं का समर्थन करता है।
- अंतिम आउटपुट पर इसका वॉटरमार्क नहीं है।
विपक्ष
- यह वीडियो पर अधिकतम 2 या अधिक चित्र नहीं जोड़ सकता है।
- छवि और वीडियो अपलोड करने में लोड होने में समय लगता है।
फ़्लिक्सियर
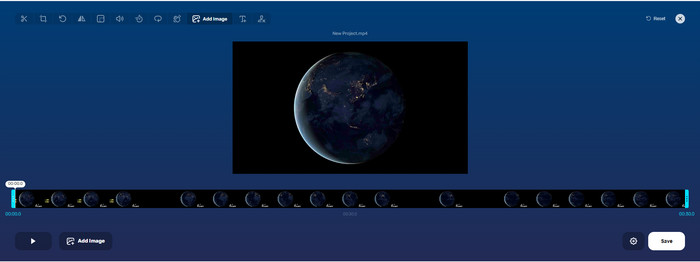
You can use Flixier to add an image to a video online for free. Also, you can edit your video template with this online tool, including adding pictures. This tool provides exceptional built-in editing features you can use to make your video look better. Although the web tool offers you this unique feature, when the time you export it, there will be a watermark on the final output because it is free. But you can purchase the premium tool to remove this watermark.
Step 1. Open your search engine, search the tool's name, and click Choose File.
Step 2. Click Import to upload the video and images, drag the video and the image to the Timeline, make sure that the image is at the top of the video. Change the position of the picture by dragging it inside the video.
Step 3. Click Export, then Export and Download to save it on your desktop drive.
पेशेवरों
- वेब पर लागत-मुक्त और सुलभ।
- यह पहले ऑनलाइन टूल की तुलना में अधिक संपादन सुविधाएँ प्रदान करता है।
- यह आपके वीडियो में कई छवियों को जोड़ने का समर्थन करता है।
विपक्ष
- अंतिम आउटपुट में अंत में वॉटरमार्क होता है क्योंकि यह मुफ़्त है।
- वीडियो आउटपुट पर वॉटरमार्क हटाने के लिए इसे वीआईपी संस्करण खरीदना होगा।
भाग 3. वीडियो में छवियाँ जोड़ने के बारे में अक्सर पूछे जाने वाले प्रश्न
क्या वीडियो में इमेज जोड़ने से गुणवत्ता प्रभावित होती है?
वीडियो की गुणवत्ता आपके द्वारा जोड़ी गई छवि को प्रभावित नहीं करेगी। सरल बनाने के लिए, छवियों को जोड़ने से कोई महत्वपूर्ण वीडियो गुणवत्ता नहीं होती है, भले ही आप कई फ़ोटो जोड़ते हों। हालाँकि, यदि आप अपने द्वारा उपयोग किए गए संपादक पर वीडियो निर्यात करते हैं और इसे निम्न गुणवत्ता पर सेट करते हैं, तो नीचे दिए गए वीडियो आउटपुट की अपेक्षा करें।
मेरे द्वारा वीडियो में जोड़ी जाने वाली छवियां धुंधली क्यों हो जाती हैं?
इसका मुख्य कारण यह है कि छवि शुरू से ही धुंधली है। इस समस्या से बचने के लिए, आपको पहले तस्वीर की जांच करनी चाहिए और यह सुनिश्चित करना चाहिए कि यह आपके वीडियो पर उपयोग करने से पहले धुंधली न हो।
क्या मैं वीडियो पर छवि में संक्रमण जोड़ सकता हूं?
कुछ संपादकों के साथ, आपकी छवि में संक्रमण जोड़ना संभव है। हालांकि कई अलग-अलग एनिमेटेड ट्रांज़िशन हैं, कट, फ़ेड, वाइप और डिसॉल्व सबसे अधिक उपलब्ध हैं। हालांकि ये सबसे आम हैं, फिर भी यह वीडियो को अधिक पेशेवर और रोमांचक बनाने के लिए छवि में बदलाव जोड़ने के लिए आदर्श है।
निष्कर्ष
After you’ve read this blog, learning how to add photos in a video became easier to understand if you read this article's full scope with the different tools online and offline. Even though we present different sets of tools, we still recommend that any users use the ultimate tool to take up this task. Video Converter Ultimate provides an easy-to-understand interface to help the users do the job efficiently. Still not sure if it fits you? Well, downloading the tool is the only way to prove that it suits you.
-
 आपकी ओजीवी फाइलों को परिवर्तित करने के लिए 5 फायदेमंद ओजीवी से डब्लूएमवी कन्वर्टर्स
 डब्ल्यूएमवी कन्वर्टर्स के लिए 5 अलग-अलग ओजीवी हैं जिनका उपयोग आप ओजीवी फाइलों को कन्वर्ट करने के लिए कर सकते हैं। यह लेख उपलब्ध 5 ogv कन्वर्टर्स के बारे में एक मजबूत तथ्य प्रदान करता है।
-
 WMV कनवर्टर सॉफ्टवेयर के लिए 2 सर्वश्रेष्ठ AMV के लिए पूर्वाभ्यास [2022]
 क्या आप AMV को WMV में बदलना चाहते हैं? यदि हां, तो एएमवी क्या है और फ़ाइल को डब्लूएमवी प्रारूप में कैसे परिवर्तित किया जाए, इसका अंदाजा लगाने के लिए आपको यह लेख पढ़ना चाहिए।
-
 SWF को WMV में बदलने के लिए सबसे उपयोगी उपकरण (ऑनलाइन और ऑफलाइन)
 क्या आप अपनी एसडब्ल्यूएफ फाइलों के लिए खिलाड़ी खोजने के लिए संघर्ष करते हैं? आपको चिंता करने की आवश्यकता नहीं है क्योंकि आप बेहतर वीडियो-उपभोग अनुभव के लिए इसे केवल WMV प्रारूप में परिवर्तित कर सकते हैं। इस रूपांतरण प्रक्रिया के बारे में अधिक जानने के लिए इस लेख को पढ़ें।