


[Terpecahkan] 4 Metode Mengambil Screenshot di Android
Mengambil tangkapan layar (screenshot) adalah salah satu hal paling umum yang bisa kita lakukan dengan ponsel saat ini. Ketika kita ingin menyimpan gambar, teks, atau postingan yang kita lihat di layar saat sedang menggulir, kita mengambil screenshot dari tampilan tersebut. Nah, jika Anda menggunakan perangkat Android dan ingin tahu cara memanfaatkan fitur screenshot‑nya, kami siap membantu! Dalam artikel ini, pelajari cara mengambil screenshot di Android dengan 4 metode dan maksimalkan kemampuan perangkat Anda. Teruskan membaca untuk menyimpan konten penting bagi Anda dengan mengambil screenshot!

Bagian 1: Cara Mengambil Screenshot di Ponsel Android
Anda mungkin bertanya-tanya, tetapi mengambil tangkapan layar di Android sangat bervariasi tergantung pada produsen perangkat dan versi sistem operasi. Jadi, jika Anda pengguna Android dan tidak tahu cara apa yang harus digunakan saat ingin mengambil screenshot, maka simak langkah-langkah di bawah ini:
Metode 1: Menggunakan Tombol Perangkat Keras
Cara paling umum untuk mengambil tangkapan layar di perangkat Android adalah dengan menggunakan tombol perangkat keras atau fisik. Ini adalah metode paling terkenal yang digunakan dalam mengambil tangkapan layar di Android karena aksesibilitas dan kenyamanannya.
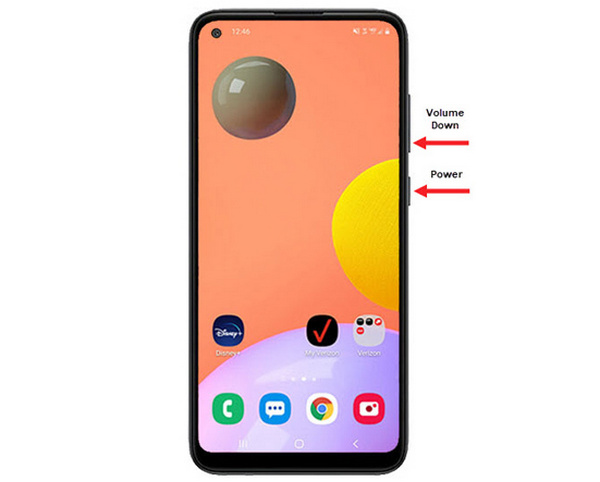
Langkah 1. Pertama, pada ponsel Android Anda, tekan tombol Volume Turun dan Daya secara bersamaan. Tahan sampai screenshot berhasil diambil.
Langkah 2. Setelah itu, akses screenshot Anda di aplikasi Galeri.
Jadi, jika tombol perangkat keras Anda berfungsi dengan baik, Anda dapat mengikuti metode ini untuk mengambil screenshot di Android Anda dengan mudah.
Metode 2: Menggunakan Pintasan
Saat ini, beberapa perangkat Android memiliki fitur tangkapan layar bawaan di panel pengaturan cepat, yang berguna untuk mengambil tangkapan layar dengan cepat.
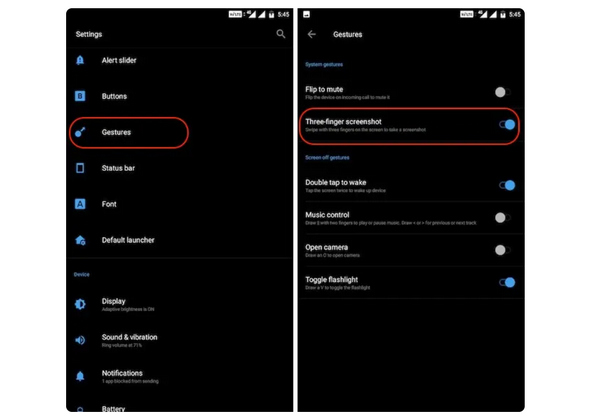
Langkah 1. Pertama, pada ponsel Android Anda, buka Pengaturan. Gulir sedikit ke bawah dan pilih opsi Gerakan atau Tombol.
Langkah 2. Dari sana, cari opsi Screenshot lalu aktifkan tombolnya.
Langkah 3. Terakhir, agar Anda dapat mengambil screenshot menggunakan fitur ini, cukup usapkan tiga jari ke bawah pada layar yang ingin Anda tangkap.
Metode ini paling baik digunakan jika Anda tidak ingin menekan tombol untuk mengambil tangkapan layar. Namun, Anda perlu mengaturnya terlebih dahulu di pengaturan Anda. Jadi, jika Anda belum mengetahuinya, ikuti saja langkah-langkah di atas.
Metode 3: Menggunakan Asisten Google
Sedangkan jika ponsel Android Anda memiliki Google Assistant, Anda bisa menggunakannya untuk mengambil screenshot dengan mudah.
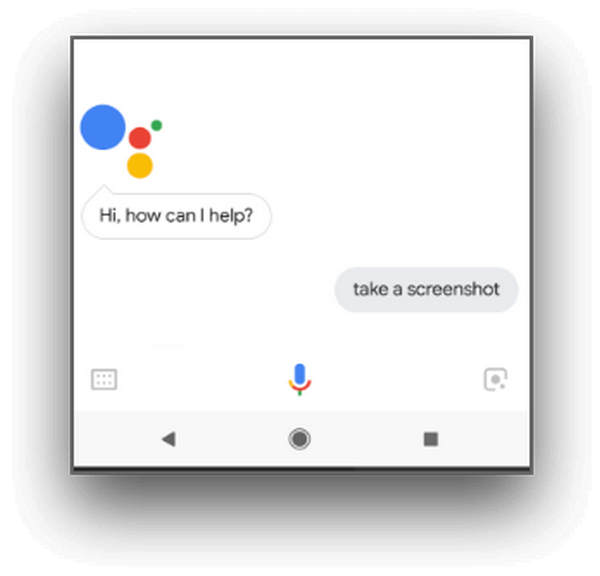
Langkah 1. Pertama, Anda perlu mengaktifkan Google Assistant dengan menekan tombol beranda atau dengan perintah suara, ucapkan OK, Halo Google.
Langkah 2. Setelah aktif, ucapkan, Take a screenshot atau Screenshot.
Catatan: Akan muncul animasi atau Anda akan mendengar suara yang menandakan screenshot telah diambil.
Langkah 3. Anda dapat mengakses screenshot di aplikasi Galeri ponsel Anda pada folder Screenshots.
Catatan: Fitur ini tidak berlaku untuk semua perangkat Android. Jadi, jika kebetulan ponsel Anda memiliki Google Assistant yang memungkinkan Anda mengambil screenshot dengan perintah suara, cukup ikuti langkah‑langkah di sini.
Bagian 2: Cara Mengambil Screenshot di Tablet Android
Jika Anda memiliki tablet Android dan bertanya-tanya bagaimana cara mengambil tangkapan layar menggunakan tablet tersebut, berikut caranya:
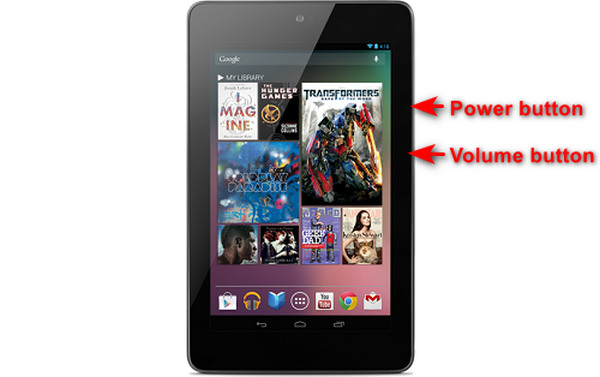
Langkah 1. Pada tablet Android Anda, tekan secara bersamaan tombol Daya dan Volume Turun lalu tahan selama beberapa detik.
Catatan: Anda akan mendapat notifikasi jika screenshot telah diambil.
Langkah 2. Setelah itu, akses screenshot di Galeri tablet Anda pada folder Screenshots.
Jika metode ini tidak berhasil pada tablet Android Anda, hal berikutnya yang perlu Anda lakukan adalah menggunakan aplikasi pihak ketiga dari Google Play Store agar Anda dapat mengambil tangkapan layar.
Part 3: Cara Mengambil Screenshot di Android Dengan Komputer
Sekarang, jika Anda ingin mengambil screenshot di Android menggunakan komputer, mungkin karena beberapa metode di atas tidak berfungsi di ponsel Anda, alat terbaik yang dapat Anda gunakan adalah FVC Screen Recorder. Alat ini dirancang untuk mengambil screenshot dari layar ponsel apa pun yang dicerminkan ke komputer, sehingga sangat kompatibel dengan perangkat Android. Dengan menggunakan fitur Phone Recorder‑nya, pengguna dapat mengambil screenshot di Android melalui komputer tanpa kesulitan. Selain itu, dibandingkan alat pihak ketiga lain yang tersedia saat ini, alat ini memiliki antarmuka yang sangat intuitif dan ramah pengguna sehingga tidak akan merepotkan Anda saat menggunakannya.
Langkah 1. Pertama, unduh dan buka FVC Screen Recorder di komputer Anda.
Unduh GratisUntuk Windows 7 atau yang lebih baruUnduhan Aman
Unduh GratisUntuk MacOS 10.7 atau yang lebih baruUnduhan Aman
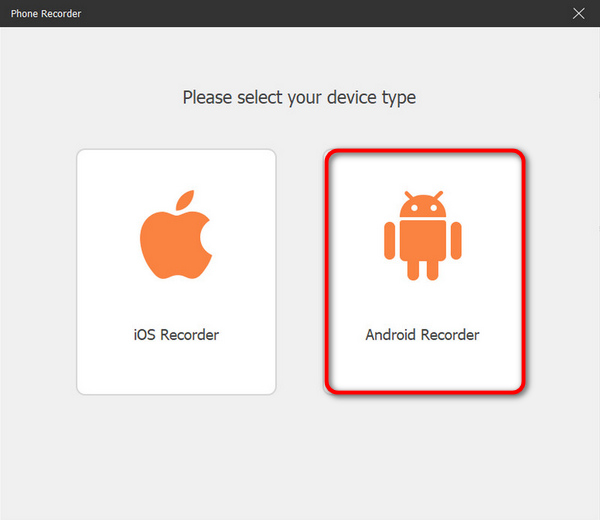
Langkah 2. Sekarang, klik opsi Phone recorder. Anda akan menemukannya di sisi kanan jendela alat, bersama dengan 3 opsi lainnya.
Langkah 3. Selanjutnya, klik Android Recorder.
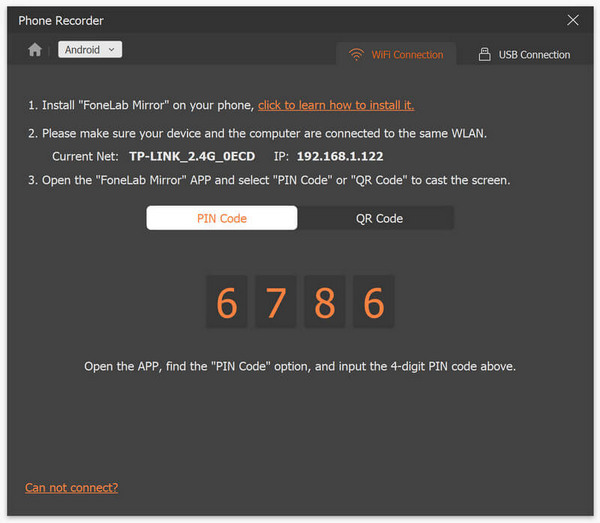
Langkah 4. Untuk mencerminkan (cast) layar ponsel Anda, Anda dapat melakukannya melalui WiFi atau USB. Namun, jika Anda memilih WiFi, Anda dapat dengan mudah mencerminkan ponsel ke fitur phone recorder di komputer melalui Kode PIN atau Kode QR.
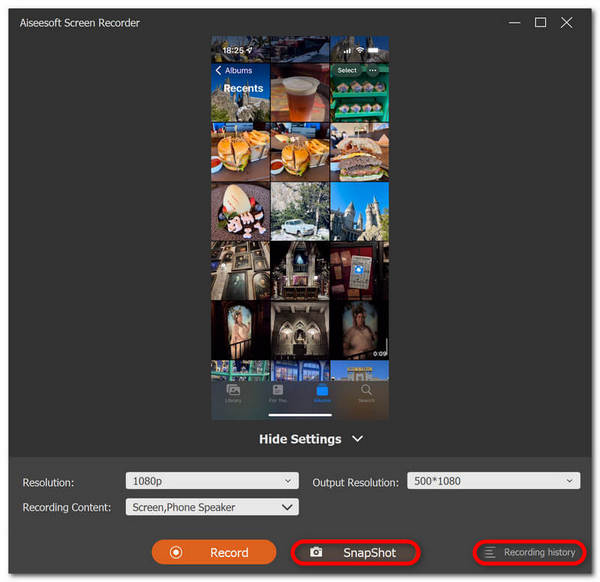
Langkah 5. Ketika proses mirroring sudah aktif, untuk mengambil screenshot di komputer dari layar Android Anda, cukup klik ikon Snapshot.
Langkah 6. Terakhir, akses gambar screenshot Anda langsung di folder yang telah ditentukan pada komputer Windows Anda.
FVC Screen Recorder adalah alat yang sempurna ketika Anda ingin mengambil tangkapan layar di Android dengan komputer. Dengan menggunakan fitur perekaman ponsel, segalanya akan mudah bagi Anda, mulai dari mengatur kedua perangkat hingga mengambil tangkapan layar. Alat ini memiliki semua yang Anda butuhkan.
Bagian 4: Cara Mengambil Screenshot Bergulir di Android
Jika Anda ingin mengambil tangkapan layar halaman web atau percakapan panjang di Android dalam satu kesempatan, daripada mengambil banyak tangkapan layar, ikuti langkah-langkah di bawah ini:
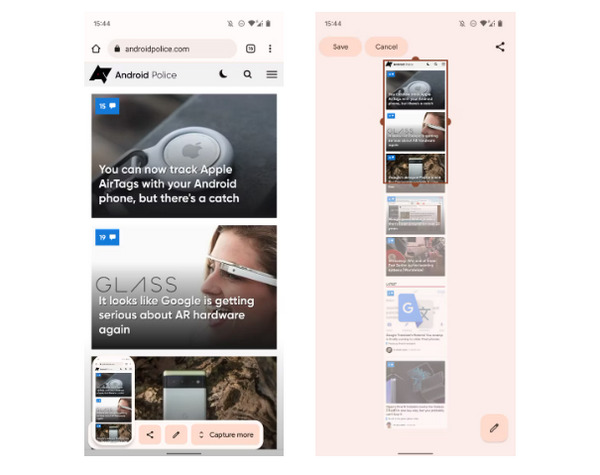
Langkah 1. Pertama, di ponsel Android Anda, ambil screenshot.
Langkah 2. Selanjutnya, ketuk tombol Capture More setelah mengetuk pratinjau screenshot Anda.
Catatan: Saat Anda menggunakan jendela untuk memperluas screenshot, sistem akan menampilkan kaca pembesar demi ketepatan yang lebih baik.
Langkah 3. Terakhir, ketuk Simpan untuk menyimpan screenshot Anda.
Anda tidak akan lagi mengambil banyak tangkapan layar hanya untuk menampilkan seluruh halaman web atau seluruh percakapan tangkapan layar lagi.
Bagian 5: FAQ tentang Mengambil Screenshot di Android
Bisakah saya mengubah folder tangkapan layar default di perangkat Android saya?
Ya. Anda dapat mengubah folder tangkapan layar default jika Anda mau. Yang perlu Anda lakukan hanyalah membuat folder baru atau memilih folder lain untuk tangkapan layar di ponsel Android Anda.
Bagaimana cara mengambil screenshot di ponsel Android jika tombol perangkat kerasnya tidak berfungsi?
Pertama, jika Anda bertanya-tanya apakah Anda masih dapat mengambil tangkapan layar jika tombol perangkat keras ponsel Android Anda tidak berfungsi, jawabannya adalah Ya. Jadi dalam kasus seperti ini, yang terbaik adalah menggunakan alat perekam layar pihak ketiga seperti Perekaman Layar FVC, yang memungkinkan pengguna mengambil tangkapan layar di ponsel Android mereka hanya dengan memanfaatkan fitur perekam teleponnya.
Bisakah saya membuat anotasi atau mengedit tangkapan layar di perangkat Android saya?
Ya. Anda dapat membuat anotasi atau mengedit tangkapan layar dan foto di perangkat Android Anda. Ini dapat dilakukan langsung setelah Anda mengambil tangkapan layar menggunakan fitur pengeditan bawaannya. Anda dapat menambahkan teks, gambar, panah, dan bentuk ke tangkapan layar, serta memotong, mengubah ukuran, dan menerapkan filter.
Kesimpulan
Demikianlah. Mengambil screenshot di Android sekarang menjadi sangat mudah. Anda hanya perlu mengetahui metode mana yang paling cocok untuk perangkat Anda, dan semuanya akan berjalan dengan baik. Jadi, pilih metode Anda dan mulailah menangkap momen‑momen berharga di Android Anda sekarang juga!
-
 Cara Mengambil Screenshot di Mac dengan Mudah Dengan Panduan Dasar Ini
 Ingin mengambil tangkapan layar di Mac Anda tetapi tidak yakin bagaimana caranya? Kami menangkapmu! Kami akan menunjukkan cara termudah dan tercepat untuk mengambil tangkapan layar dan menyimpan gambar layar Anda.
-
 Cara Mengambil Screenshot di Mac dengan Mudah Dengan Panduan Dasar Ini
 Ingin mengambil tangkapan layar di Mac Anda tetapi tidak yakin bagaimana caranya? Kami menangkapmu! Kami akan menunjukkan cara termudah dan tercepat untuk mengambil tangkapan layar dan menyimpan gambar layar Anda.
-
 Tangkapan Layar Video dengan Mudah Dengan Panduan Dasar Ini [2024]
 Pelajari cara mengambil tangkapan layar dari video dengan metode sederhana ini dengan mudah. Ikuti panduan kami dan mulailah mengambil tangkapan layar dari video favorit Anda sekarang!