

Cara Mengonversi dan Mengunggah File Video FLV ke YouTube
“Saya baru saja mengunggah sebuah file video dengan ekstensi .flv, tetapi saya mendapat pesan peringatan bahwa format file tidak valid. Bagaimana cara mengunggah FLV ke YouTube?” FLV bukan hanya sebuah ekstensi file, tetapi juga sebuah kontainer video. Artinya, sebuah file video FLV dapat menyimpan beragam codec video dan audio, dan beberapa di antaranya tidak didukung oleh YouTube. Artikel ini akan menjelaskan semua yang perlu Anda ketahui tentang cara mengunggah FLV ke YouTube dengan lancar.

Bagian 1: Codec Video dan Audio yang Didukung YouTube
Menurut Google, YouTube lebih memilih format siaran serta streaming MPEG-2 yang sesuai dengan DVD dengan ekstensi .mpg. Codec yang didukung oleh YouTube meliputi:
- MPEG-2
- Codec audio: MPEG Layer II atau Dolby AC-3
- Kecepatan bit audio: 128 kbps atau lebih baik
- MPEG-4
- Codec video: H.264
- Codec audio: AAC
- Kecepatan bit audio: 128 kbps atau lebih baik
Apalagi YouTube hanya mendukung wadah WAV dengan audio MP3 atau PCM, MOV dengan audio AAC dan audio FLAC. YouTube mendukung WMV, AVI, MOV, MP4, dan FLV dengan codec yang tepat.
Ketika datang ke FLV, YouTube mengakses video yang dikodekan dengan codec video Adobe-FLV1 bersama dengan audio MP3 dan AAC. Jika video FLV Anda berisi audio yang tidak terkompresi atau audio ADPCM, YouTube tidak akan menerimanya.
Selain itu, ada lebih banyak aturan untuk mengupload FLV ke YouTube:
- Rekomendasikan frekuensi gambar: 24 hingga 60
- Merekomendasikan resolusi: 1080p
- Durasi Minimum: 33 detik
Bagian 2: Cara termudah untuk Mengkonversi FLV ke YouTube
Cara 1: Ubah FLV ke YouTube di Desktop
Jika Anda menemui error saat mengunggah FLV ke YouTube, hal pertama yang perlu dilakukan adalah mencari konverter FLV, seperti FVC Free FLV Converter. Perangkat ini memungkinkan Anda menyesuaikan codec video dan audio serta parameter lainnya, sehingga Anda dapat menyesuaikan file FLV dengan aturan YouTube. Selain itu, ia memanfaatkan akselerasi perangkat keras dan multi-thread untuk meningkatkan kinerja.
Fitur Utama dari Konverter FLV Terbaik untuk YouTube
- 1. Sesuaikan codec video dan audio FLV dengan mudah.
- 2. Proses batch video FLV tak terbatas pada satu waktu.
- 3. Lindungi kualitas video secara otomatis saat melakukan konversi.
Unduh GratisUntuk Windows 7 atau yang lebih baruUnduhan Aman
Unduh GratisUntuk MacOS 10.7 atau yang lebih baruUnduhan Aman
Cara Mengonversi FLV untuk YouTube di Desktop
Langkah 1: Tambahkan file FLV
Luncurkan pengonversi FLV terbaik setelah Anda menginstalnya di komputer Anda. Klik menu Add File (s) di kiri atas dan tambahkan file FLV yang ingin Anda upload ke YouTube.
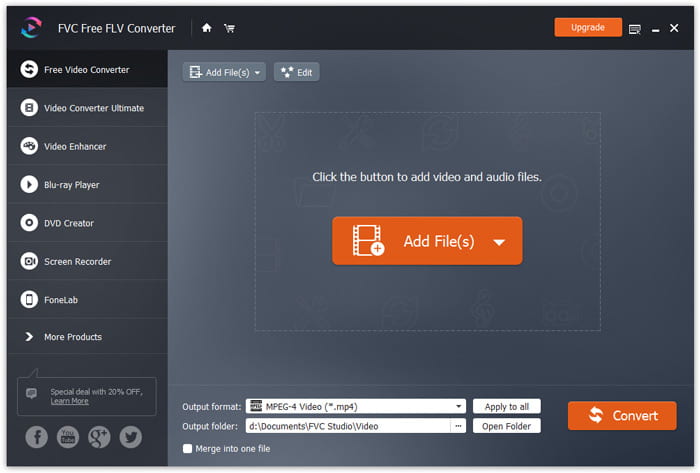
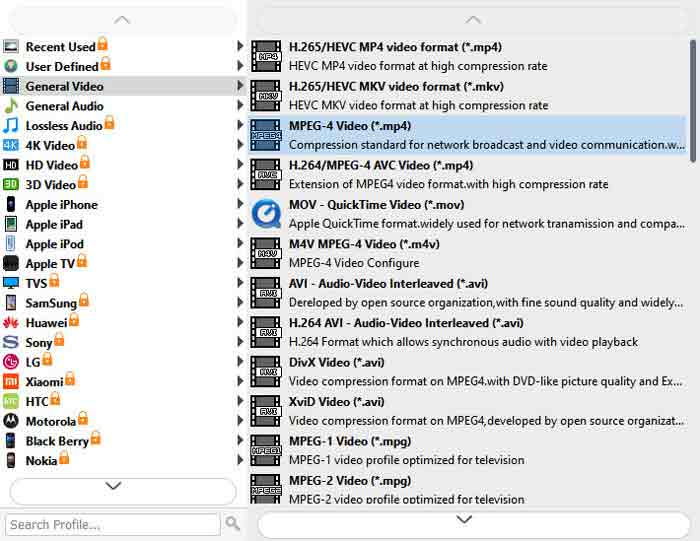
Langkah 2: Ubah codec
Klik menu tarik-turun di sebelah Output format di bagian bawah untuk membuka dialog profil. Ketik FLV di kotak Search Profile dan tekan tombol Enter pada keyboard Anda. Lalu pilih format FLV dengan codec video dan audio yang sesuai.
Jika video FLV Anda terlalu panjang, sebaiknya potong menjadi beberapa klip lalu unggah ke YouTube. Anda dapat mengklik menu Edit untuk membuka jendela editor video.
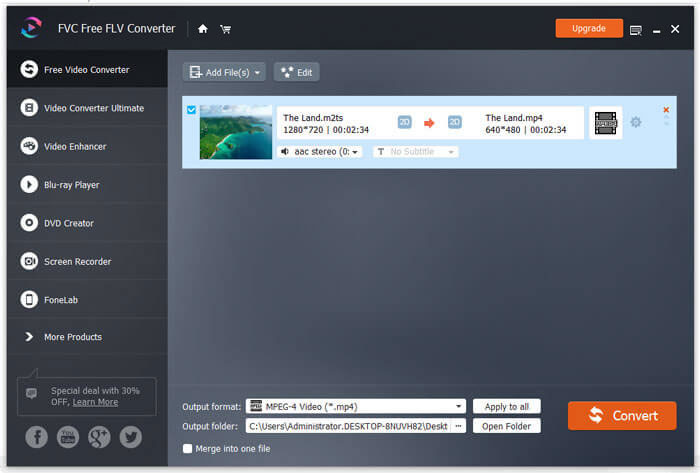
Langkah 3: Konversi FLV untuk YouTube
Selanjutnya, gulir ke bagian bawah dan klik tombol Open Folder. Pilih folder tertentu untuk menyimpan video keluaran. Terakhir, klik tombol Convert untuk mulai mengonversi FLV untuk YouTube segera.
Cara 2: Ubah FLV ke YouTube Online
Jika Anda tidak ingin memasang perangkat lunak konverter video di hard disk, FVC Free Online Video Converter adalah solusi alternatif yang bagus. Layanan ini gratis tanpa batasan, seperti watermark. Selain itu, tidak ada batasan ukuran file. Berikut langkah-langkahnya:
Langkah 1: Kunjungi https://www.free-videoconverter.net/free-online-video-converter/ di peramban Anda dan klik tombol Add Files to Convert untuk mendapatkan peluncur (launcher).

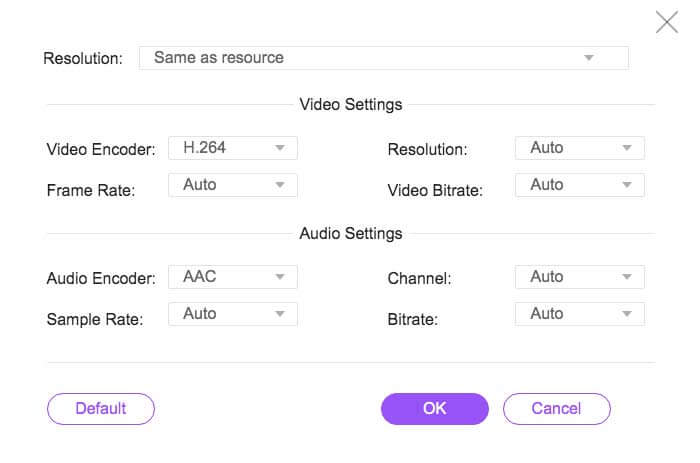
Langkah 2: Klik tombol Add File untuk mengunggah beberapa file FLV. Lalu tekan ikon Gear untuk membuka dialog profil. Di sini Anda dapat menyesuaikan Video Encoder dan Audio Encoder. Tekan OK untuk mengonfirmasinya.
Langkah 3: Pilih format yang didukung YouTube di bagian bawah dan klik tombol Convert untuk mulai mengonversi FLV untuk YouTube. Setelah selesai, unduh file keluarannya.
Jangan Lewatkan:
Bagian 3: Cara Mengunggah FLV ke YouTube
Setelah mengonversi, Anda dapat mengunggah file FLV ke YouTube di komputer Anda sekarang. Kami bagikan langkah-langkahnya di sini, agar Anda tidak tersesat.
Langkah 1: Buka beranda YouTube, lalu masuk ke akun Anda.
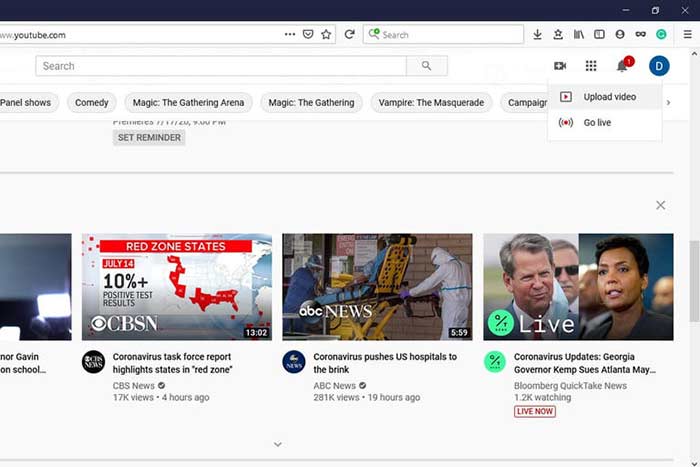
Langkah 2: Klik ikon Camcorder dan pilih Upload video untuk masuk ke halaman upload.
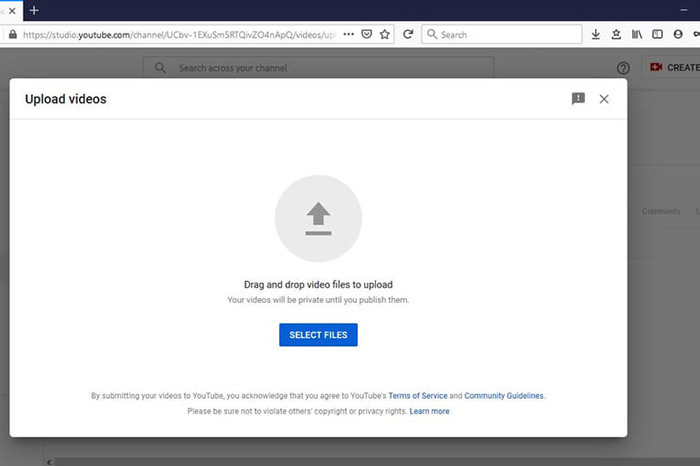
Langkah 3: Tekan tombol besar Select Files di halaman tersebut, lalu buka file FLV yang telah dikonversi untuk YouTube. Atau seret dan jatuhkan file FLV ke halaman untuk mengunggahnya.
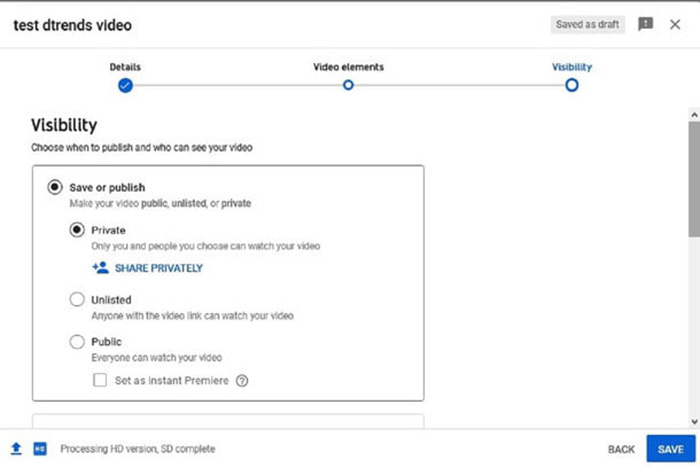
Langkah 4: Kemudian tentukan pengaturan privasi. Secara default, pengaturannya adalah Public, tetapi Anda dapat mengubahnya menjadi Private, Schedule, atau Unlisted.
Langkah 5: Klik tombol Save atau Publish setelah pengaturan selesai. Lalu Anda akan dibawa ke halaman Dashboard. Di sini Anda dapat melihat FLV yang telah diunggah ke akun YouTube Anda.

Bagian 4: FAQ tentang FLV ke YouTube
Bisakah Anda mengunggah FLV ke YouTube?
Iya dan tidak. YouTube mendukung format video FLV, tetapi sebagai wadah video, Anda hanya dapat mengunggah file FLV dengan codec video dan audio yang didukung; jika tidak, itu akan gagal.
Bisakah saya mengunduh video YouTube dalam FLV?
Jika video YouTube menawarkan tombol unduh, Anda dapat mengkliknya dan memilih FLV sebagai format keluaran.
Format video mana yang terbaik untuk YouTube?
MP4 adalah format video terbaik untuk YouTube. Google merekomendasikan penggunaan MP4 dengan codec video H.256 dan codec audio AAC. Itu karena menghasilkan kualitas yang tinggi dengan ukuran file yang lebih kecil. Selain itu, MOV, WMV, AVI, FLV, dan 3GPP juga didukung di YouTube.
Kesimpulan
Panduan ini telah memberi tahu Anda format video apa yang diterima YouTube dan cara mengunggah FLV ke YouTube tanpa kegagalan. FVC Free FLV Converter dapat membantu Anda mengonversi FLV untuk YouTube dan memungkinkan Anda menyesuaikan codec video dan audio dengan mudah. Bahkan tidak memerlukan keahlian teknis apa pun, jadi pemula bisa menguasai dengan cepat. Jika Anda mengalami masalah lain saat mengupload video ke YouTube, tinggalkan pesan di bawah postingan ini.
-
 Cara Mengkonversi File Video FLV Anda ke MP4 tanpa Membayar sepeser pun
 Panduan ini membagikan empat metode gratis untuk mengonversi file video FLV Anda ke format MP4 di Windows 10/8/7 / XP dan Mac OS X, sehingga Anda dapat menikmati video di perangkat apa pun.
-
 Cara Mengkonversi Video FLV Anda ke File Audio MP3 di Desktop dan Online
 Bagaimana cara mengonversi FLV ke file MP3? Yang perlu Anda lakukan adalah membaca artikel ini dengan cermat, temukan metode favorit Anda, dan ikuti panduan langkah demi langkah kami untuk mendapatkan yang Anda inginkan.
-
 3 Cara Gratis untuk Mengonversi FLV ke WAV
 Bagaimana cara mengonversi file FLV? Bisakah VLC mengonversi YouTube FLV ke WAV? Posting ini menjelaskan 3 cara gratis untuk mengonversi FLV ke WAV tanpa kehilangan kualitas.