3 Metode Efektif untuk Mengambil Screenshot di Dell
Apakah Anda ingin mengambil tangkapan layar pada komputer Dell Anda secara efisien? Baik untuk keperluan bekerja, belajar, atau sekadar berbagi momen, mengetahui cara mengambil tangkapan layar bisa sangat berguna. Dalam panduan ini, kami akan menunjukkan tiga metode mudah yang dirancang khusus bagi pengguna Dell untuk menyederhanakan proses pengambilan gambar pada layar Anda. Tangkapan layar sangat berguna untuk menyimpan informasi penting, mengatasi masalah teknis, atau bahkan sekadar berbagi meme lucu dengan teman. Dengan petunjuk langkah demi langkah kami, Anda akan dapat dengan mudah mengambil gambar apa pun yang Anda lihat di layar Dell, baik Anda lebih suka menggunakan pintasan keyboard, menjelajahi opsi lanjutan, atau tetap menggunakan alat pemotong gambar bawaan. Di akhir panduan ini, Anda akan memiliki keyakinan untuk mengambil tangkapan layar secara efisien, meningkatkan produktivitas Anda, dan membuat tugas digital Anda mudah. Mari kita mulai!

Bagian 1: Cara Mengambil Screenshot di Dell Menggunakan Pintasan
Mengambil tangkapan layar pada komputer Dell menggunakan pintasan sering dianggap sebagai metode yang paling efisien karena beberapa alasan. Pintasan menyediakan cara yang cepat dan mudah untuk mengambil tangkapan layar tanpa memerlukan perangkat lunak atau alat tambahan. Metode ini sangat menguntungkan bagi pengguna yang sering mengambil tangkapan layar dan lebih menyukai pendekatan yang efisien untuk alur kerja mereka. Selain itu, pintasan memungkinkan kontrol yang tepat atas bagian layar mana yang akan diambil, sehingga meningkatkan fleksibilitas dan kenyamanan.
Berikut ini adalah jalan pintas yang dapat Anda gunakan untuk mengambil tangkapan layar di Dell dengan mudah:
Mengklik Tombol Print Screen (PrtScn)
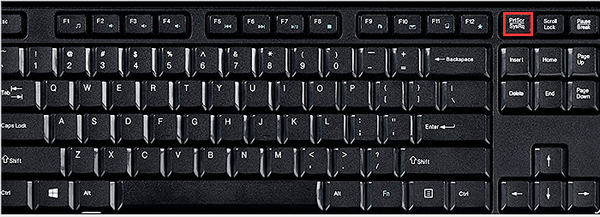
• Pintasan klasik ini menangkap seluruh layar dan menyalinnya ke papan klip.
• Ideal untuk menangkap seluruh layar dengan satu penekanan tombol.
Mengklik Tombol Alt + Print Screen
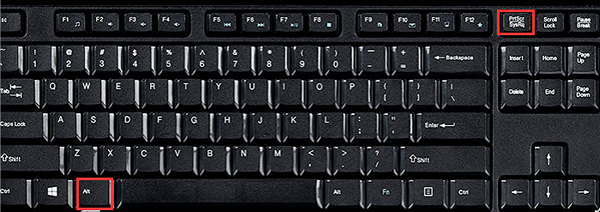
• Menekan Alt + PrtScn hanya akan menangkap jendela yang aktif, tidak termasuk bagian layar lainnya.
• Sempurna untuk menangkap jendela atau aplikasi tertentu tanpa kekacauan.
Mengklik Tombol Windows + Shift + Tombol S (Windows 10 dan yang lebih baru)
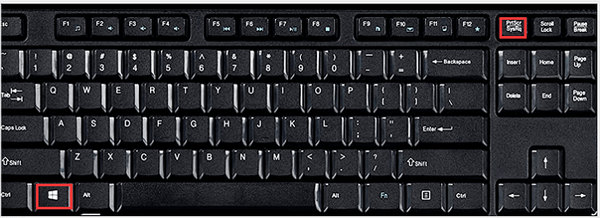
• Setelah menekan pintasan, gunakan kursor untuk menyeret dan memilih area yang diinginkan.
• Cocok untuk menangkap area khusus pada layar dengan presisi.
Dengan memanfaatkan pintasan ini, Anda dapat mengambil tangkapan layar di komputer Dell Anda dengan mudah dan efisien dengan mudah dan tepat, meningkatkan produktivitas dan menyederhanakan alur kerja Anda.
Bagian 2: Cara Mengambil Screenshot di Dell dengan Opsi Lanjutan
Memanfaatkan perangkat lunak tangkapan layar sebagai opsi lanjutan menawarkan sejumlah manfaat saat mengambil tangkapan layar di komputer Dell. Tidak seperti metode bawaan dasar, perangkat lunak tangkapan layar sering kali menyediakan fitur dan fungsi tambahan, yang memungkinkan fleksibilitas dan penyesuaian lebih dalam proses tangkapan layar. Salah satu alat canggih tersebut adalah Perekam Layar FVC.
Perekam Layar FVC adalah perangkat lunak serbaguna yang dirancang untuk menyederhanakan proses pengambilan gambar pada Windows 11/10/8/7 untuk semua model Dell. Perangkat lunak ini menawarkan opsi lanjutan untuk mengedit gambar seperti menggambar bentuk, menambahkan teks atau gambar, dan banyak lagi.
Untuk menggunakannya, ikuti langkah sederhana di bawah ini:
Langkah 1. Unduh dan instal Perekam Layar FVC di komputer Dell Anda.
Download GratisUntuk Windows 7 atau lebih baruDownload Aman
Download GratisUntuk MacOS 10.7 atau lebih baruDownload Aman
Langkah 2. Sekarang jalankan alat tersebut dan klik Foto tombol di sudut kanan. Selanjutnya, pilih Cuplikan Layar.

LANGKAH 3. Sekarang, saat video diputar pada perangkat Dell Anda, Anda dapat dengan bebas menyeret kursor untuk memilih area video yang ingin Anda tangkap layarnya.
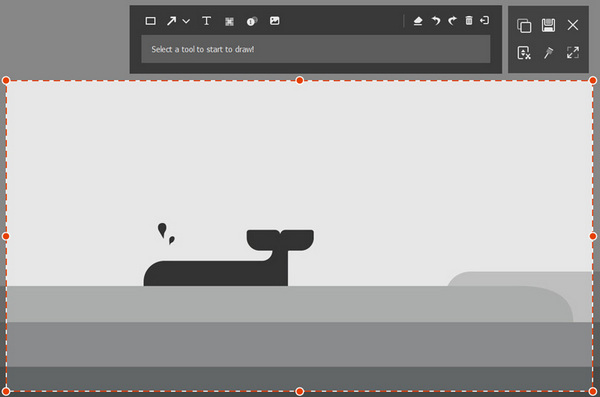
LANGKAH 4. Jika sudah selesai, klik Menyimpan tombol.
Dengan antarmuka yang mudah digunakan dan fitur-fitur yang luar biasa, Perekam Layar FVC terbukti menjadi pilihan yang sangat baik bagi mereka yang mencari kemampuan tangkapan layar tingkat lanjut pada sistem Dell.
Bagian 3: Cara Mengambil Screenshot di Dell dengan Snipping Tool Default
Menggunakan Snipping Tool bawaan yang disediakan oleh Dell juga merupakan cara yang bagus untuk mengambil tangkapan layar di komputer Dell Anda. Alat bawaan ini menawarkan antarmuka yang lugas dan mudah diikuti, sehingga dapat diakses oleh pengguna dari semua tingkat keahlian. Dengan Snipping Tool, Anda dapat dengan cepat mengambil tangkapan layar dari wilayah tertentu, tangkapan layar layar penuh, atau bahkan tangkapan layar bentuk bebas, yang memberikan fleksibilitas sesuai dengan kebutuhan Anda.
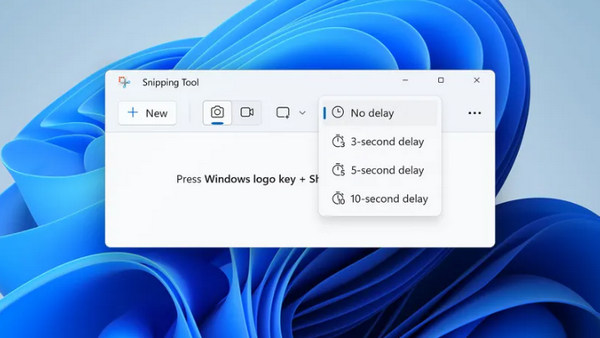
Langkah 1. Klik Baru atau tekan Ctrl + N secara bersamaan. Pilih bentuk yang diinginkan untuk mengambil tangkapan layar. Secara default, potongan persegi panjang dipilih. Atau, Anda dapat memilih salah satu dari tiga bentuk lainnya:
• Potongan Bentuk Bebas: Pilihan ini memungkinkan Anda untuk menangkap layar dalam bentuk apa pun yang diinginkan.
• Gunting Jendela: Tangkap jendela aktif Anda dengan satu klik menggunakan fitur ini.
• Potongan Layar Penuh: Tangkap seluruh layar sekaligus, yang terbukti sangat berguna saat bekerja dengan beberapa monitor.
Langkah 2. Setelah mengambil tangkapan layar Anda, tekan Ctrl + S untuk menyimpan gambar ke lokasi pilihan Anda.
Dengan hanya mengikuti langkah-langkah cepat ini, Anda dapat secara efektif memanfaatkan Snipping Tool bawaan untuk mengambil tangkapan layar di komputer Dell Anda dengan mudah dan nyaman, menjadikannya pilihan hebat untuk semua kebutuhan pengambilan layar Anda.
Bagian 4: Tanya Jawab tentang Screenshot di Dell
Bisakah saya mengambil tangkapan layar di komputer Dell saya tanpa menggunakan perangkat lunak tambahan?
Ya, Anda dapat mengambil tangkapan layar pada komputer Dell Anda tanpa perangkat lunak tambahan dengan memanfaatkan metode bawaan seperti pintasan keyboard atau Snipping Tool bawaan.
Apakah ada cara untuk menangkap area tertentu pada layar komputer Dell saya menggunakan pintasan?
Tentu saja. Komputer Dell menawarkan pintasan praktis seperti Print Screen, Alt + Print Screen, atau Tombol Windows + Shift + S untuk menangkap area tertentu di layar dengan presisi.
Bagaimana cara memberi anotasi atau mengedit tangkapan layar pada komputer Dell setelah mengambilnya?
Setelah mengambil tangkapan layar di komputer Dell Anda, Anda dapat menggunakan alat pengeditan lain yang disediakan oleh perangkat lunak tangkapan layar atau bahkan Alat Pemotong bawaan untuk memberi anotasi, menggambar, menambahkan teks, atau memotong tangkapan layar sesuai kebutuhan.
Dapatkah saya menggunakan perangkat lunak tangkapan layar canggih seperti Aiseesoft Screenshot Recorder di komputer Dell saya?
Ya. Aiseesoft Screenshot Recorder dan perangkat lunak sejenisnya sering kali hadir dengan antarmuka yang mudah digunakan, sehingga benar-benar dapat diakses oleh semua jenis pengguna. Cukup ikuti petunjuk langkah demi langkah yang diberikan untuk mengambil tangkapan layar dengan mudah.
Kesimpulannya, mempelajari cara mengambil tangkapan layar di komputer Dell dapat meningkatkan produktivitas Anda secara signifikan. Baik Anda lebih suka menggunakan pintasan, perangkat lunak tingkat lanjut, atau alat snipping bawaan, kini Anda memiliki keterampilan untuk mengambil gambar apa pun di layar dengan mudah. Jadi, bersiaplah untuk menghemat waktu dan menyederhanakan tugas digital Anda dengan metode sederhana ini hari ini!


 Video Converter Ultimate
 Perekam Layar


