


Panduan Lengkap untuk Mengekspor iMovie ke MP4
iMovie adalah salah satu alat pengeditan video paling banyak digunakan dan populer yang dikembangkan oleh Apple untuk pengguna Mac, iPhone, dan iPad. Alat ini memiliki seperangkat fitur pengeditan yang bagus yang akan disukai oleh siapa pun yang mengedit video. Namun di sisi lain, ada satu hal yang cukup menyulitkan para pengguna. Video dari alat ini diekspor dalam format MOV. Format bawaan ini dapat menimbulkan keterbatasan dalam hal kompatibilitas dengan perangkat dan platform lain. Karena itu, sebagian besar pengguna harus mengonversi file MOV ke format lain yang diakui secara global seperti MP4 agar dapat memutarnya di pemutar video lain. Jadi, jika Anda juga mencari cara untuk mengekspor iMovie ke MP4, bacalah seluruh artikel ini.

Bagian 1: Cara Mengekspor iMovie ke MP4 di Mac
Saat mengekspor video dari iMovie, ada banyak format output yang dapat dipilih. Hanya saja, kita terbiasa dengan format MOV bawaannya. Dengan demikian, kita biasanya mengalami masalah kompatibilitas saat memutar video yang diekspor darinya. Jadi, mempelajari cara mengekspor iMovie ke MP4 menjadi hal yang penting karena format ini banyak digunakan dan sebagian besar didukung oleh semua perangkat digital dan pemutar media. Untuk mengekspor iMovie ke MP4 di Mac, ikuti langkah-langkah berikut:
Langkah 1. Pertama, luncurkan iMovie di Mac Anda.
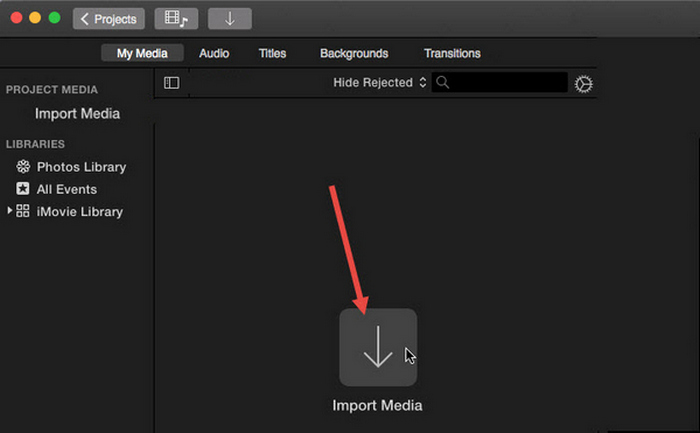
Langkah 2. Selanjutnya, impor video Anda ke dalam perangkat lunak dengan mengklik tombol Import Media.
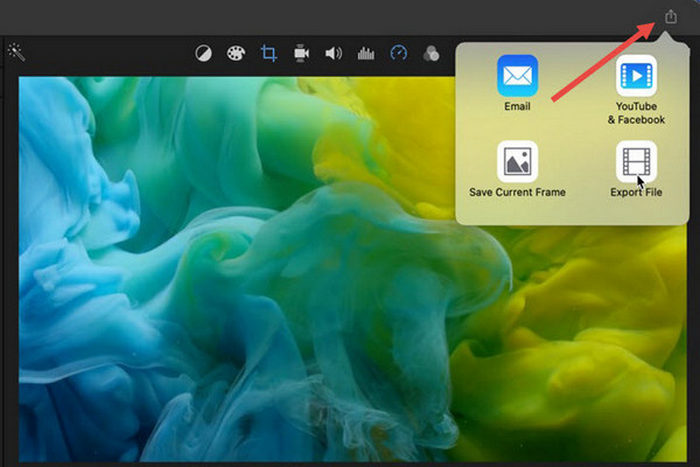
Langkah 3. Sekarang, pada bilah alat di bagian atas, klik tombol File, masuk ke Share, lalu ke File, atau pada jendela pratinjau, klik ikon Share dan kemudian pilih opsi File di dialog pop-up.
Langkah 4. Pilih Video and Audio di jendela file pop-up baru sebagai format keluaran, dan sesuaikan resolusi, kualitas, dan parameter lainnya sesuai kebutuhan Anda.
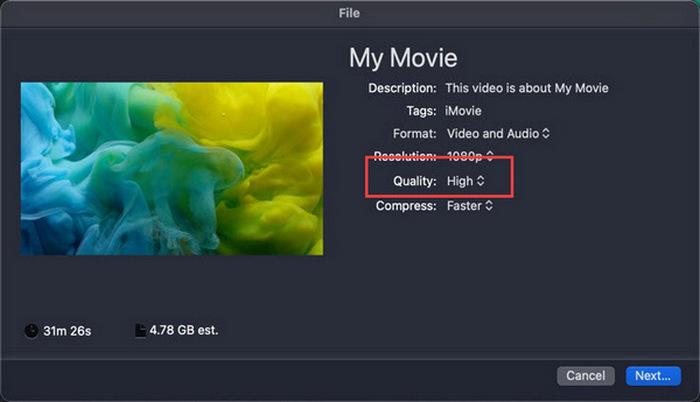
Catatan: Jangan pilih opsi kualitas ProRes jika Anda ingin mengekspor file video dalam format MP4 karena file akan disimpan dalam format MOV.
Langkah 5. Terakhir, klik tombol Next dan beri nama file iMovie MP4 yang akan Anda ekspor. Jangan lupa memilih direktori keluaran dan klik Next untuk menyimpannya sebagai MP4.
Sebenarnya ada cara untuk mengekspor iMovie ke MP4 langsung dari Mac. Namun, prosesnya mungkin tampak agak rumit, terutama saat menangani format file default saat menyimpan video.
Jika Anda ingin menggunakan iMovie di Windows, jangan lewatkan postingan ini.
Bagian 2: Cara Memperbaiki Ekspor iMovie Tidak Berfungsi [Solusi Umum]
Ada beberapa alasan mengapa ekspor iMovie mungkin tidak berfungsi dengan baik. Berikut ini adalah beberapa solusi dan alternatif untuk mengatasi masalah ekspor iMovie yang tidak berfungsi:
Solusi 1: Memeriksa Ruang Penyimpanan
Salah satu penyebab umum masalah ekspor iMovie adalah ruang disk yang tidak mencukupi di Mac Anda. Jika Anda mengalami masalah saat mengekspor video, mulailah dengan memeriksa ketersediaan penyimpanan Anda.
Untuk macOS Ventura atau yang lebih baru: Arahkan ke logo menu Apple, pilih System Preferences, klik General, lalu pilih Storage di sisi kanan.
Untuk versi macOS yang lebih lama: Akses logo menu Apple, lalu klik About This Mac dan masuk ke Storage.
Kemudian, jika Mac Anda kehabisan ruang penyimpanan, pertimbangkan untuk menghapus file atau aplikasi yang tidak diperlukan untuk mengosongkan ruang. Setelah Anda melakukannya, kembali ke iMovie dan coba ekspor lagi.
Solusi 2: Periksa Ulang Nama File
Jika iMovie gagal mengekspor video setelah mencoba mengekspor beberapa kali, maka penting untuk meninjau nama file dalam pengaturan output untuk memastikan tidak ada karakter khusus seperti tanda hubung, garis miring, koma, dll. Biasanya, iMovie tidak mendukung karakter khusus dalam penamaan file.
Solusi 3: Mulai ulang iMovie
Sekarang, jika masalah masih berlanjut, coba mulai ulang aplikasinya dan ekspor videonya lagi. Namun jangan lupa untuk menyimpan proyek Anda saat ini terlebih dahulu. Untuk menutup iMovie sepenuhnya, klik ikon aplikasi dan pilih opsi Quit. Setelah itu, luncurkan iMovie lagi, buka sebuah proyek, dan periksa apakah sekarang bisa mengekspor video. Juga, coba mulai ulang Mac untuk memperbaiki masalah.
Solusi 4: Perbarui iMovie
Versi iMovie yang kedaluwarsa biasanya menyebabkan kegagalan ekspor karena bug dan masalah sistem yang belum diperbarui. Untuk memperbarui iMovie, buka App Store, klik Updates di sisi kiri, dan periksa pembaruan yang tersedia untuk iMovie, lalu klik pembaruan tersebut.
Solusi 5: Instal ulang iMovie
Jika solusi lain gagal mengatasi masalah ekspor, pertimbangkan untuk memasang ulang iMovie. Untuk menghapus instalan iMovie dari Mac, buka Launchpad dan tekan tombol Option, klik dan tahan iMovie, lalu klik tombol X di sebelah aplikasi, dan klik Delete untuk mengonfirmasi. Setelah itu, buka App Store untuk mengunduh dan memasang iMovie kembali.
Bonus: Cara Memperbaiki Ekspor iMovie yang Tidak Berfungsi [Cara Alternatif]
Jika tidak satu pun solusi yang berhasil di sisi Anda, maka sudah saatnya Anda mencoba cara alternatif ini untuk mengatasi masalah iMovie tidak bisa mengekspor. FVC Video Converter Ultimate dikenal karena kemampuan konversinya yang komprehensif, yang memberi pengguna kemampuan untuk mengonversi video ke format apa pun yang mereka inginkan. Namun lebih dari itu, alat ini memiliki fitur lain seperti MV yang dirancang untuk pengguna yang ingin mengedit video. Seperti di iMovie, Anda hanya perlu mengimpor file yang ingin Anda edit, kemudian menggunakan fitur pengeditan seperti memotong dan memutar klip, menambahkan efek dan filter, serta menambahkan musik latar agar lebih menarik, dan lain-lain. Setelah itu, ekspor file ke MP4.
Selain itu, alat ini mendukung resolusi HD/4K/8K, yang menjamin kualitas output terbaik. Dan bagian terbaiknya? Alat ini beroperasi dengan kecepatan sangat tinggi, menyelesaikan konversi 120 kali lebih cepat daripada metode lain.
Langkah 1. Pertama, di komputer Windows atau Mac Anda, unduh dan pasang FVC Video Converter Ultimate.
Unduh GratisUntuk Windows 7 atau yang lebih baruUnduhan Aman
Unduh GratisUntuk MacOS 10.7 atau yang lebih baruUnduhan Aman
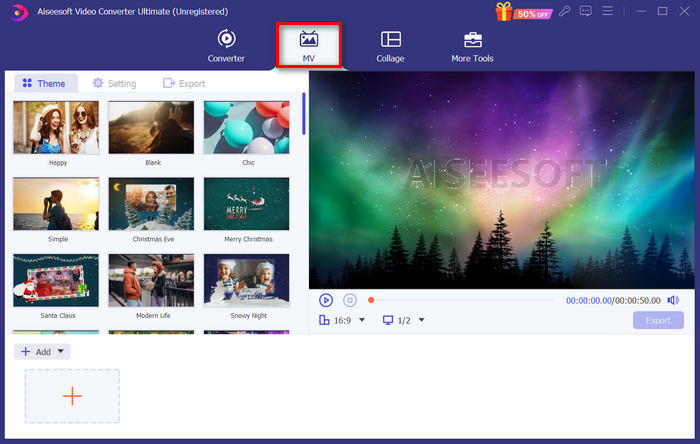
Langkah 2. Setelah itu, ketika Anda berada di antarmuka alat, buka tab MV.
Langkah 3. Sekarang, klik tombol Add File untuk menambahkan file yang ingin Anda konversi ke MP4.
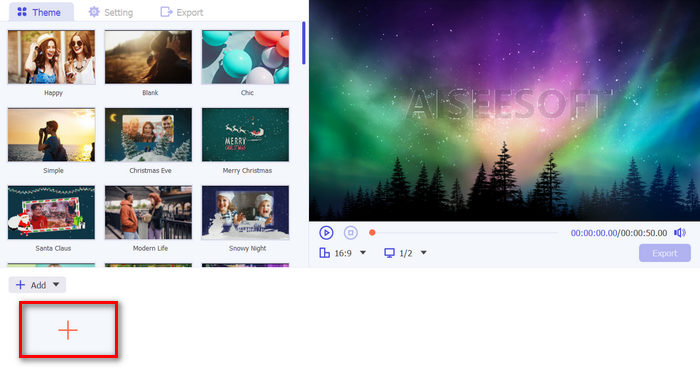
Langkah 4. Untuk menambah, mengedit, dan memotong video MP4 Anda, klik tombol di bagian atas tombol Add File. Selain itu, Anda dapat menambahkan tema untuk video Anda dengan memilih dari daftar tema preset di tab Theme di atas.
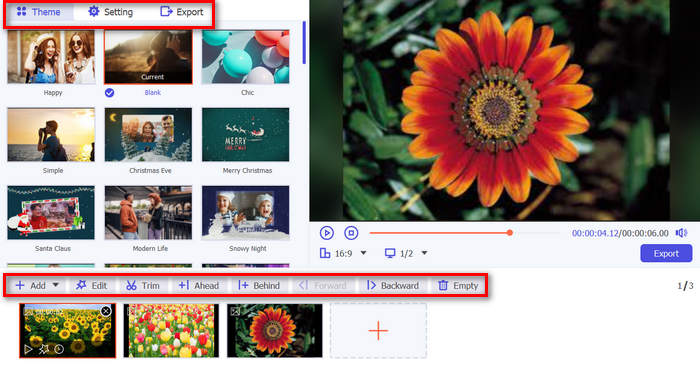
Langkah 5. Untuk semakin menyempurnakan file MP4 yang sedang Anda edit, Anda dapat menambahkan filter dan efek dengan mengklik ikon Edit di bawah. Anda juga dapat menambahkan watermark agar file menjadi lebih personal.

Langkah 6. Setelah selesai, klik tombol Export, tempat Anda dapat mengubah format ke MP4 dan mengubah frame rate, resolusi, dan kualitas.
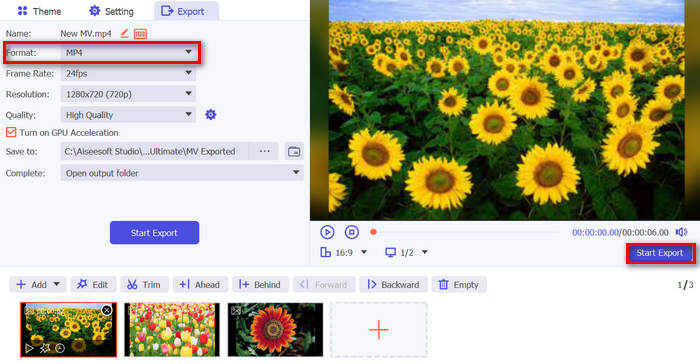
Langkah 7. Terakhir, untuk menyimpan file Anda, klik tombol Start Export.
Dengan FVC Video Converter Ultimate, Anda tidak perlu khawatir tentang cara mengonversi iMovie ke berkas MP4 saat diekspor dalam format MOV. Selain itu, ini merupakan alternatif yang bagus setiap kali Anda mengalami masalah ekspor dengan iMovie, karena ini adalah alat berfitur lengkap. Anda dapat memiliki semua yang Anda butuhkan, terutama tentang mengonversi berkas dari satu format ke format lainnya.
Bagian 3: Cara Mengekspor iMovie ke MP4 di iPad/iPhone
Bagi mereka yang menggunakan iOS atau iPadOS dan ingin mengekspor dan mengonversi iMovie ke MP4 di iPhone atau iPad mereka, berikut cara mengekspor iMovie ke MP4 di iPad/iPhone.
Langkah 1. Pertama, di iPhone atau iPad Anda, buka aplikasi iMovie.
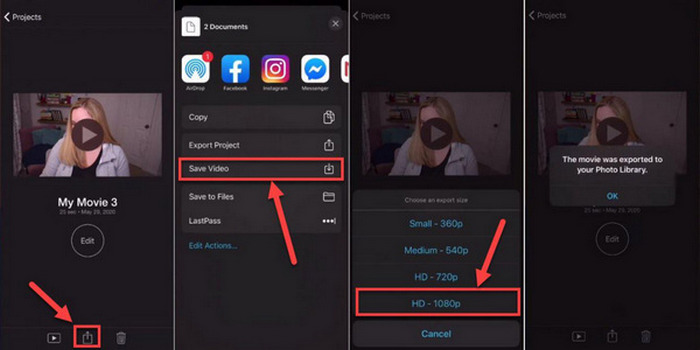
Langkah 2. Setelah itu, dari tab Projects, pilih proyek yang ingin Anda ekspor ke MP4.
Langkah 3. Selanjutnya, ketuk tombol Share dan pilih Export Project.
Langkah 4. Terakhir, pilih Save Video, lalu pilih ukuran ekspor dan konversi serta simpan iMovie ke MP4 di iPhone atau iPad Anda.
Saat mengekspor dan mengonversi iMovie ke MP4 langsung di iPhone atau iPad Anda, ingatlah untuk memastikan bahwa Anda memiliki cukup ruang penyimpanan yang tersedia di perangkat Anda untuk menampung file MP4 yang diekspor, karena hal ini menyebabkan masalah dan kendala ekspor.
Bagian 4: Tanya Jawab tentang Mengekspor iMovie ke MP4
Mengapa berkas video iMovie saya tidak kompatibel dengan QuickTime?
File iMovie mungkin tidak kompatibel dengan QuickTime karena perbedaan codec atau format file. QuickTime mendukung sejumlah codec video dan jenis file yang terbatas, jadi jika file iMovie Anda menggunakan codec atau format yang tidak didukung oleh QuickTime, masalah kompatibilitas mungkin muncul. Untuk mengatasinya, coba ekspor proyek iMovie Anda dalam format atau codec lain yang kompatibel dengan QuickTime.
Berapa lama waktu yang dibutuhkan untuk mengekspor iMovie?
Biasanya dibutuhkan waktu 1,5 hingga 2 kali waktu pemutaran proyek untuk dirender dan dikodekan selama proses ekspor. Faktor-faktor seperti kompleksitas proyek, resolusi video, dan daya pemrosesan perangkat Anda dapat memengaruhi waktu ekspor. Selain itu, mengekspor proyek yang lebih besar atau lebih kompleks mungkin memerlukan waktu lebih lama daripada yang lebih kecil atau lebih sederhana.
Apakah mengekspor iMovie ke MP4 memengaruhi kualitas video saya?
Mengekspor iMovie ke MP4 tidak akan memengaruhi kualitas video Anda secara signifikan selama Anda memilih pengaturan ekspor yang tepat. Namun, penting untuk memastikan bahwa Anda memilih resolusi, bitrate, dan pengaturan kompresi yang diinginkan untuk mempertahankan kualitas video yang ingin Anda ekspor.
Kesimpulan
Mempelajari cara mengekspor iMovie ke MP4 penting untuk memastikan kompatibilitas dan fleksibilitas saat membagikan proyek video Anda di berbagai perangkat dan platform. Jadi, jika Anda mengalami masalah selama proses ekspor di iMovie, pastikan untuk menelusuri solusi umum yang diuraikan di sini. Mulailah mengekspor proyek iMovie Anda ke MP4 hari ini dengan panduan ini.
-
 Cara Terbaik Menggunakan iMovie dalam Membuat Video Gerakan Lambat [Terpecahkan]
 Pernahkah Anda menggunakan iMovie untuk mengonversi video kecepatan normal menjadi gerakan lambat? Ini adalah kesempatan untuk mengetahui lebih banyak tentangnya.
-
 Cara Menyinkronkan Audio dan Video di iMovie di iPhone & Mac
 Mengalami masalah karena audio dan video tidak sinkron di iPhone dan Mac? Jadi sekarang, mari kita lanjutkan cara menggunakan iMovie dengan membaca artikel ini.
-
 Cara Menambahkan Tanda Air ke Video di iMovie di Mac [Semua Merangkul]
 Ingin tahu rahasia menambahkan tanda air ke video di iMovie? Jangan menumpahkan teh pada siapa pun, dan pelajari dengan membaca artikel ini.