


Cara Mengoreksi Warna Dengan 5 Alat Terbaik yang Harus Dimiliki
Koreksi warna adalah proses mendasar dalam pengeditan video yang memperbaiki dan memadukan warna dalam sebuah video, sehingga menghasilkan tampilan yang menarik dan memikat mata. Proses ini melibatkan penyesuaian kontras, saturasi, kecerahan, dan rona (hue) video untuk mendapatkan nuansa visual yang tepat. Baik Anda seorang videografer profesional maupun kreator konten pemula, memahami cara melakukan koreksi warna akan menjadi pembeda besar dalam menghadirkan visual yang menyeluruh. Prosesnya dimulai dengan mengidentifikasi dan menganalisis keseimbangan warna yang sudah ada, highlight, bayangan, dan mid-tone dalam rekaman video. Setelah itu, penyesuaian dilakukan dengan menggunakan perangkat lunak khusus yang memungkinkan kontrol akurat atas elemen-elemen warna tersebut. Mari kita telusuri lebih dalam artikel ini untuk mempelajari cara memperbaiki masalah warna video dengan alat terbaik yang bisa Anda andalkan.

Part 1. Lima Cara Mewarnai Video yang Benar
Menemukan berbagai koreksi warna editor video gratis secara online untuk meningkatkan daya tarik visual video Anda mungkin semudah yang Anda bayangkan. Namun, mencari yang lebih canggih dan andal agak sulit untuk menciptakan suasana yang tepat untuk video Anda. Temukan lima cara efektif untuk menyempurnakan warna video Anda menggunakan berbagai perangkat lunak serbaguna, meningkatkan penceritaan Anda, dan melibatkan pemirsa.
1. Video Converter Ultimate
Video Converter Ultimate adalah solusi video serbaguna yang memungkinkan Anda meningkatkan kualitas video dengan menyesuaikan parameter penting seperti kecerahan, kontras, dan saturasi. Korektor warna praktis ini juga memungkinkan Anda mengedit video dengan fitur seperti pemotongan (trim), pemangkasan (crop), dan penggabungan (merge). Selain itu, ia menawarkan beragam opsi konversi video, sehingga Anda dapat mengubah video ke ribuan format dan menyesuaikannya untuk berbagai perangkat seperti MP4, MKV, MOV, MP3, AAC, GIF, iPhone, Samsung, dan Apple TV, memastikan video dapat dinikmati di berbagai platform. Selain itu, pengguna dapat menambahkan subtitle dan watermark agar video lebih personal. Dengan antarmuka yang sederhana, alat ini cocok baik untuk pemula maupun pengguna berpengalaman. Ikuti langkah-langkah di bawah ini untuk mempelajari cara melakukan koreksi warna video Anda dengan sukses menggunakan Video Converter Ultimate.
Langkah 1: Unduh dan Instal Korektor Warna
Pertama, dapatkan alat ini dengan mengklik salah satu tombol Free Download di bawah. Sesuaikan dengan sistem operasi komputer Anda, pastikan mengunduh Video Converter Ultimate yang tepat untuk komputer Anda. Ikuti petunjuk untuk memasangnya.
Free DownloadUntuk Windows 7 atau yang lebih baruUnduhan Aman
Unduh GratisUntuk MacOS 10.7 atau yang lebih baruUnduhan Aman
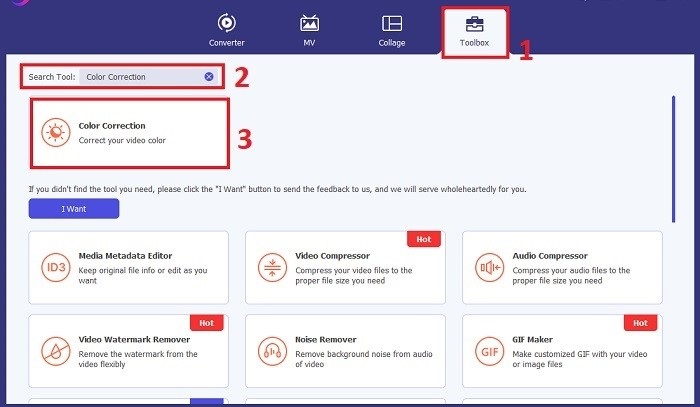
Langkah 2: Luncurkan Video Converter Ultimate
Setelah terpasang, buka Video Converter Ultimate. Arahkan ke menu utama Toolbox dan cari fitur Color Correction. Klik fitur tersebut untuk melanjutkan.
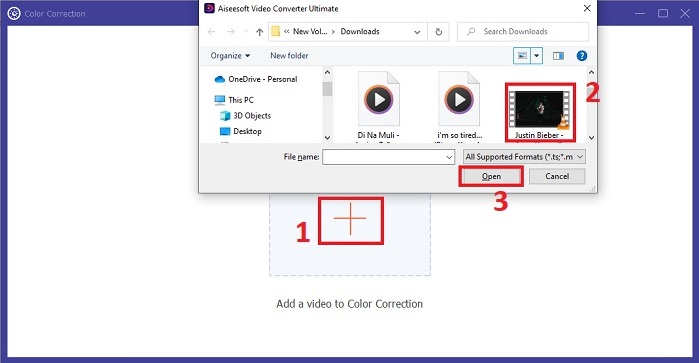
Langkah 3: Impor Video untuk Koreksi Warna
Sekarang, klik tombol Plus untuk mengimpor video yang ingin Anda koreksi warnanya. Cari file video di komputer Anda. Lalu pilih Open untuk memasukkannya ke dalam perangkat lunak.
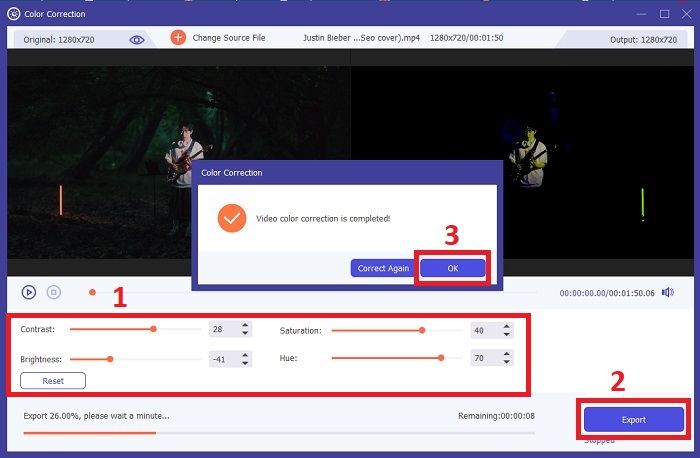
Langkah 4: Sesuaikan Pengaturan Warna Video dan Simpan
Setelah mengimpor video, sesuaikan parameter warna seperti kecerahan, kontras, saturasi, dan rona (hue) untuk mencapai koreksi warna yang Anda inginkan. Jika sudah puas dengan penyesuaian warna, klik Export. Biarkan alat memproses video dan menyimpan versi yang sudah dikoreksi ke lokasi yang Anda pilih.
2. Koreksi Warna Premiere Pro
Premiere Pro dikenal dengan perangkat lunak pengeditan video berkualitas tinggi dan kemampuan koreksi warna yang komprehensif. Ia menawarkan beragam alat dan efek penilaian warna untuk membuat penyesuaian yang tepat. Koreksi Warna Premiere Pro memungkinkan Anda menyesuaikan keseimbangan warna dan eksposur atau menerapkan tampilan kreatif untuk mencapai gaya visual yang diinginkan. Anda juga dapat memilih dari ratusan efek dan transisi video bawaannya atau memulai dengan templat yang dirancang secara profesional dan memodifikasinya untuk menghasilkan keluaran yang Anda inginkan. Selain itu, ia memiliki fitur kolaborasi dan terintegrasi dengan lancar dengan perangkat lunak Adobe lainnya, menjadikannya pilihan utama di kalangan profesional.
Langkah 1. Mulailah dengan membuka Premiere Pro dan mengimpor video Anda. Kemudian, masuk ke Color workspace.
Langkah 2. Di dalam Color workspace, gunakan panel Lumetri Color untuk menyesuaikan eksposur, keseimbangan warna, dan tampilan kreatif (creative looks).
Langkah 3. Gunakan scopes untuk memastikan penyesuaian warna yang akurat sesuai dengan hasil yang Anda inginkan. Terakhir, pratinjau dan ekspor video yang sudah dikoreksi.

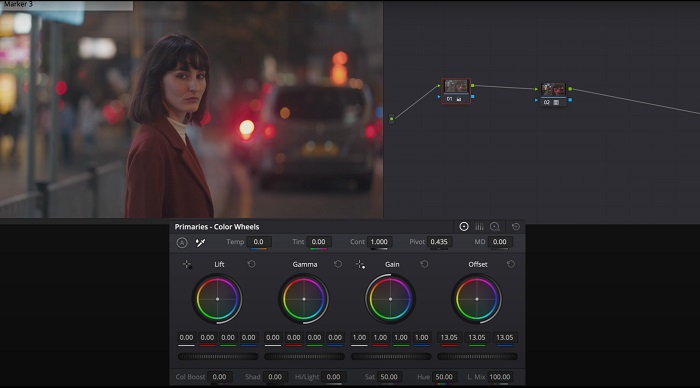
3. Koreksi Warna Resolusi Davinci
Jelajahi kapasitas penilaian warna yang luar biasa. Perangkat lunak lengkap ini menggabungkan pengeditan profesional, koreksi warna, efek visual, dan pascaproduksi audio. Dengan antarmuka alat yang mudah digunakan dan rangkaian fitur yang komprehensif, Anda dapat mewujudkan visi kreatif Anda dengan presisi dan gaya. Alat penilaian warna canggih Davinci Resolve Color Correction memungkinkan Anda membuat video Anda menonjol. Baik Anda sedang mengerjakan film-film Hollywood terkini atau proyek pribadi, alat ini memberdayakan para profesional dan penggemar untuk menciptakan narasi yang menarik dengan kualitas yang tak tertandingi.
Langkah 1. Buka Davinci Resolve dan impor video Anda. Setelah diimpor, arahkan ke tab Color.
Langkah 2. Di dalam tab Color, gunakan color wheels, curves, dan nodes untuk mengoreksi warna video Anda. Anda dapat menggunakan scopes yang tersedia untuk penyesuaian yang presisi.
Langkah 3. Setelah melakukan penyesuaian warna yang diperlukan, pratinjau video yang sudah dikoreksi untuk memastikan hasilnya sesuai harapan. Jika sudah puas, ekspor video yang telah dikoreksi agar siap digunakan.
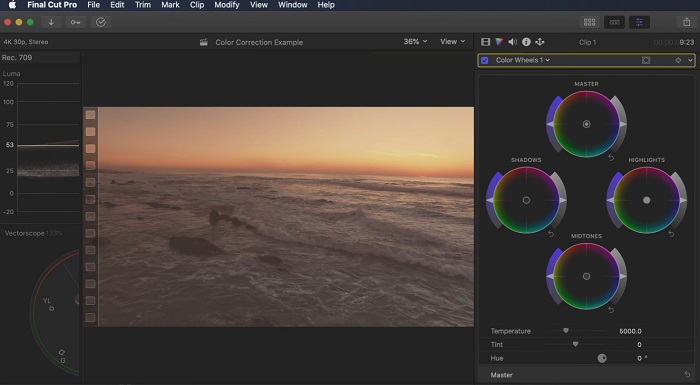
4. Koreksi Warna Final Cut Pro
Jika Anda pengguna Mac yang mencari aplikasi pengeditan video terbaik, Final Cut Pro adalah pilihan yang bagus. Ini membanggakan antarmuka yang ramah pengguna dan fitur canggih yang membuat pengeditan menjadi mudah. Dalam hal koreksi warna, Final Cut Pro menawarkan Papan Warna dan Roda Warna untuk menyesuaikan eksposur, saturasi, dan rona. Anda dapat menerapkan efek warna real-time dan menggunakan alat penilaian tingkat lanjut untuk menyempurnakan rekaman Anda. Selain itu, ia mengekspor dengan lancar ke perangkat Apple dan platform online populer. Jika Anda seorang profesional yang mencari efisiensi dan kreativitas, Final Cut Pro adalah solusi yang tepat. Pastikan Anda memiliki macOS 13.4 atau lebih baru dan komputer Mac dengan silikon Apple untuk performa optimal.
Langkah 1. Anda dapat mulai dengan mengimpor video ke Final Cut Pro, lalu menuju ke Color workspace.
Langkah 2. Gunakan Color Board atau Color Wheels untuk melakukan penyesuaian penting pada eksposur, saturasi, dan rona (hue).
Langkah 3. Sempurnakan kembali warna video Anda dengan alat color grading tambahan, untuk memastikan hasil sebaik mungkin. Setelah selesai, pratinjau dan ekspor video yang sudah dikoreksi.
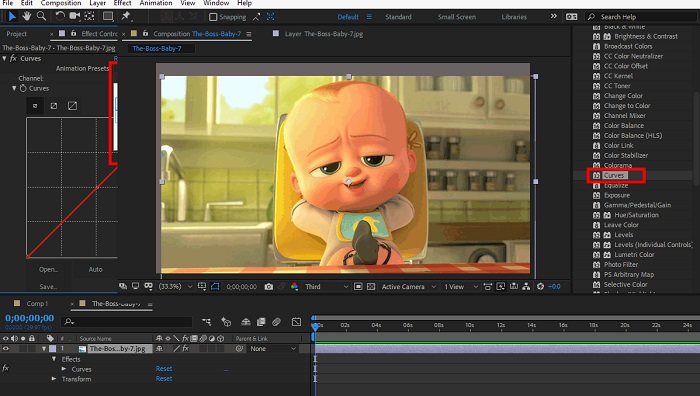
5. Koreksi Warna After Effects
After Effects adalah perangkat lunak grafis gerak dan efek visual terkenal dengan kemampuan koreksi warna yang kuat. Selain efek koreksi warna dasar, ini menyediakan berbagai lapisan penyesuaian dan efek untuk menyempurnakan dan memodifikasi warna. Anda dapat dengan cepat menganimasikan teks dan grafik, menjadikannya hidup dengan gerakan menawan. Koreksi Warna After Effects memungkinkan Anda memanfaatkan level, kurva, dan mode pencampuran untuk mencapai gradasi warna yang diinginkan. Ini adalah opsi koreksi warna serbaguna berkat integrasinya dengan berbagai produk Adobe dan komunitas besar yang menyediakan tutorial dan plugin. Selain itu, perangkat lunak ini terus berkembang, memperkenalkan fitur-fitur seperti panel properti intuitif, kontrol lapisan transparan, dan rendering multi-frame efisien yang menyederhanakan alur kerja dan menjaga kreativitas tetap terdepan.
Langkah 1. Impor klip video Anda ke dalam proyek di alat tersebut. Terapkan efek koreksi warna dengan menavigasi ke panel Effects & Presets dan memilih alat koreksi warna yang sesuai seperti Curves, Levels, atau Color Balance.
Langkah 2. Klik efek koreksi warna yang telah diterapkan untuk mengakses parameternya. Lalu, ubah pengaturan seperti eksposur, kontras, saturasi, dan rona (hue) untuk mengoreksi dan meningkatkan warna dalam video Anda.
Langkah 3. Pratinjau video di panel Composition untuk melihat bagaimana koreksi warna memengaruhi footage. Sempurnakan penyesuaian berdasarkan pratinjau tersebut hingga koreksi warna yang diinginkan tercapai, lalu lanjutkan untuk merender atau mengekspor video yang sudah dikoreksi.
Bacaan Lanjutan:
Aplikasi Peningkat Warna Foto Teratas di Android & iOS Secara Gratis
4 Cara Luar Biasa untuk Menambahkan Filter ke Video di Windows & macOS
Bagian 2. FAQ Tentang Korektor Warna Video
Bagaimana cara melakukan koreksi warna pada iMovie?
Untuk mengoreksi warna di iMovie, impor klip video Anda, pilih klip tersebut, lalu klik tombol Color Correction (ikon tongkat sihir). Sesuaikan slider untuk eksposur, saturasi, dan warna hingga mendapatkan tampilan yang Anda inginkan.
Bagaimana cara mengakses alat koreksi warna di OpenShot?
Dalam koreksi warna di OpenShot Video Editor, pilih klip, buka tab Effects, lalu klik Color Correction. Sesuaikan slider untuk kecerahan, kontras, rona (hue), dan saturasi untuk mencapai koreksi warna yang diinginkan.
Bagaimana cara mengakses alat koreksi warna di Sony Vegas?
Dalam koreksi warna di Sony Vegas, pilih klip yang ingin Anda koreksi warnanya, buka tab Video FX, lalu cari Color Corrector. Seret dan jatuhkan efek tersebut ke klip dan sesuaikan properti warna di jendela Effect Controls.
Kesimpulan
Menguasai koreksi warna sangat penting untuk meningkatkan daya tarik visual video Anda dan menciptakan pengalaman menonton yang memikat. Dalam panduan ini, kita telah membahas lima korektor warna yang ampuh untuk mencapai koreksi warna yang prima. Jika Anda mencari alat pengeditan video berkualitas tinggi, pertimbangkan untuk menggunakan Video Converter Ultimate, Premiere Pro, Final Cut Pro, DaVinci Resolve, atau After Effects. Program-program ini menawarkan beragam fitur dan kemampuan untuk membantu Anda membuat video yang tampak profesional. Setiap program memiliki serangkaian fitur dan fungsinya sendiri yang menarik bagi preferensi dan tingkat keahlian yang berbeda.
-
 Cara Menambahkan dan Membuat Filter Instagram Sebelum Memposting Gambar & Video
 Apa saja filter di Instagram? Bagaimana cara menerapkannya? Bagaimana cara membuatnya? Pertanyaan-pertanyaan ini akan memiliki jawaban langsung di posting ini, jadi bacalah.
-
 Metode Bebas Masalah untuk Mengubah Gambar menjadi Hitam Putih
 Apakah Anda ingin membuat foto Anda terlihat nostalgia? Kami punya jawaban untuk Anda. Posting ini akan menawarkan cara-cara penting untuk mengonversi gambar berwarna menjadi hitam putih.
-
 6 Filter Snapchat Animasi Snapchat Pilihan Favorit di Snapchat
 Ingin tahu cara terbaik untuk menambahkan filter pada video Snapchat? Nah, Anda dapat mengklik ini dan mempelajari berbagai filter yang dapat Anda gunakan untuk diterapkan pada video Snapchat.