


Cara Menajamkan Imej dengan Pantas dalam Photoshop - Panduan Lengkap Yang Mesti Anda Tahu
Dengan penyunting imej pilihan pakar yang terbaik, anda boleh memproses setiap imej yang anda miliki ke tahap yang lebih tinggi. Adobe Photoshop telah lama menjadi perisian yang paling boleh dipercayai yang boleh anda muat turun pada Windows, Mac, iOS dan Android. Terima kasih kepada pembangunnya, Adobe, ia telah memperkenalkan dan merevolusikan kerja penyuntingan sehingga ke tahap maksimum. Disebabkan fungsinya yang canggih, penyunting baharu menjadi gentar dengannya kerana antara muka pengguna (UI) dan fungsi keseluruhannya. Ia mungkin kelihatan sukar digunakan, tetapi sebenarnya tidak, khususnya untuk menajamkan imej anda. Di sini, kami akan menyediakan tutorial lengkap tentang cara menajamkan imej dengan cepat dalam Photoshop.

Bahagian 1. Tutorial Lengkap Cara Menajamkan Imej dalam Photoshop [3 Cara Mengasah Berkesan]
Menajamkan imej Photoshop boleh mengatasi mereka yang tidak menggunakan program ini. Tetapi sebelum kami meneruskan ke tutorial, anda perlu memuat turun perisian rasmi pada Adobe. Sila pilih butang muat turun yang betul untuk meletakkannya pada desktop anda. Jika anda belum memuat turun program ini pada desktop anda, anda boleh menggunakan percubaan percumanya, tetapi jika anda telah menamatkan percubaan, anda perlu membeli pelan bulanan atau tahunan. Selepas semua perkara berikut, teruskan ke langkah-langkah pilihan anda yang kami sertakan di bawah.
Cara Pertama. Cara Membuat Imej Tajam pada Photoshop Menggunakan High Pass:
Laluan tinggi membolehkan anda menyerlahkan imej dan menggunakan penapis pada imej yang boleh membantu anda menajamkan tepi foto yang anda muat naik di Photoshop. Anda boleh mengikuti tutorial yang kami tambahkan di bawah untuk mengetahui cara menggunakan dan menggunakan laluan tinggi pada imej yang anda miliki.
Langkah 1. Lancarkan perisian, klik File, dan tekan Open untuk memuat naik imej dan mula menambah penajaman.
Langkah 2. Gandakan lapisan imej yang anda muat naik ke Photoshop.
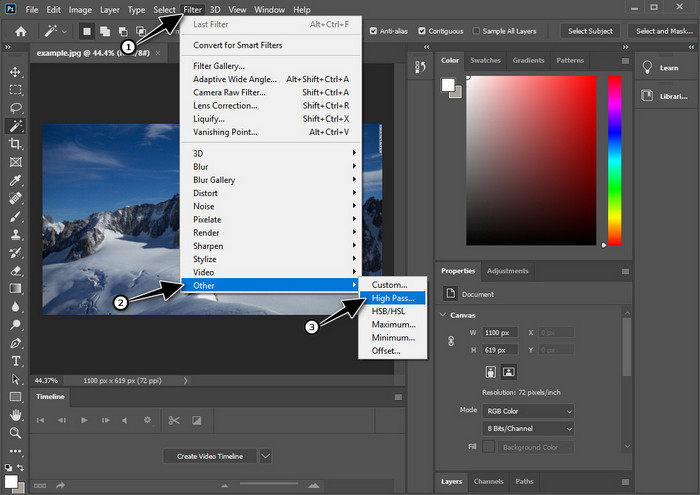
Langkah 3. Pada bahagian atas, klik menu Filter, tekan Other, dan High Pass. Jangan risau jika imej anda menjadi kelabu kerana itu memang akan berlaku apabila anda menambah High Pass padanya.
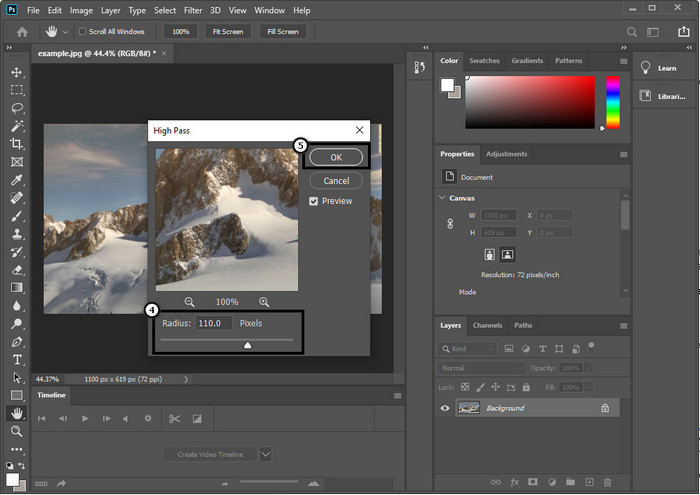
Langkah 4. Satu tetingkap timbul akan muncul pada skrin anda, di mana anda boleh mula menyeret slider untuk meningkatkan radius dan mendapatkan butiran yang baik pada imej anda. Kemudian tekan OK untuk menyimpannya.
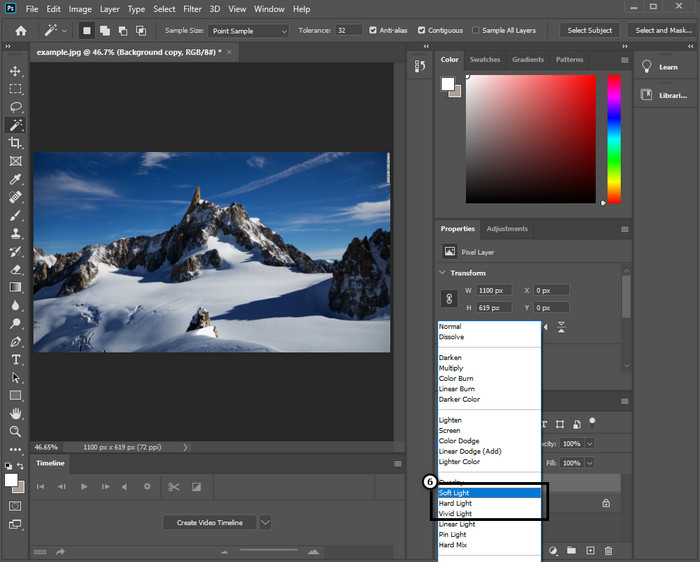
Langkah 5. Kembali ke lapisan, klik butang drop-down, dan pilih jenis cahaya yang anda ingin gunakan pada imej anda, daripada soft, hard dan vivid light untuk menajamkan. Ulangi langkah 3 hingga langkah ini untuk melakukan penajaman semula pada imej anda.
Cara ke-2. Cara Menjadikan Imej Lebih Tajam pada Photoshop dengan Smart Sharper:
Smart Sharper ialah ciri berkesan yang boleh anda akses pada Adobe Photoshop untuk menajamkan segala-galanya pada imej anda. Ciri ini bukan penyelesaian automatik; anda perlu melaraskan beberapa parameter agar semuanya kelihatan tajam. Jadi, jika anda mahu menggunakan ciri ini pada Adobe, anda boleh ikut langkah seterusnya yang kami sertakan.
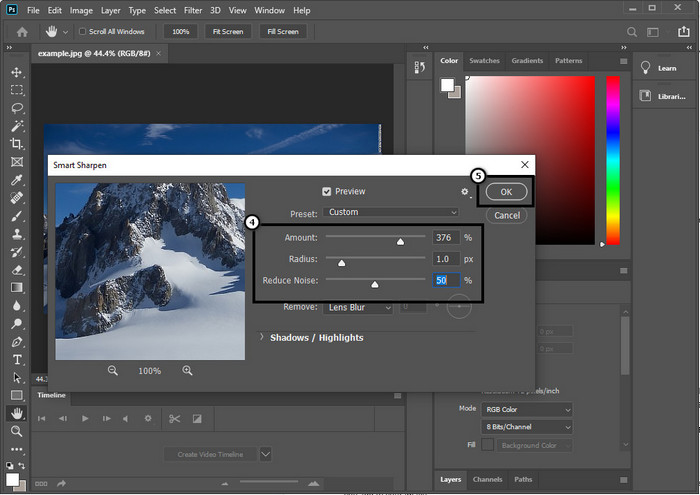
Langkah 1. Setelah anda menambah imej yang anda mahu tajamkan, klik menu Filter.
Langkah 2. Pada pilihan yang akan dipaparkan, klik Sharpen, kemudian tekan Smart Sharpen.
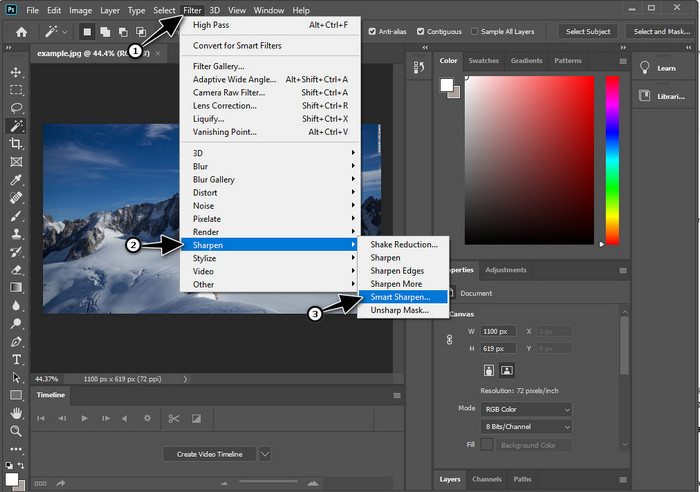
Langkah 3. Laraskan nilai amount dan radius ketajaman mengikut keutamaan anda dan klik OK untuk menyimpan perubahan. Semudah itu, anda telah menajamkan foto menggunakan alat penajaman perisian ini.
Cara ke-3. Cara Menajamkan Imej pada Foto dengan Melaraskan Kecerahan & Kontras:
Tidak seperti dua cara yang kami perkenalkan, kecerahan dan kontras memfokuskan pada menyerlahkan imej yang anda muat naik untuk menjadikannya kelihatan lebih terperinci, seperti yang dilakukan oleh alat mengasah. Beberapa pengguna mengetahui pilihan ini, jadi jika anda ingin menggunakan pilihan ini dan mula menajamkan imej yang anda miliki, ikuti langkah di bawah.
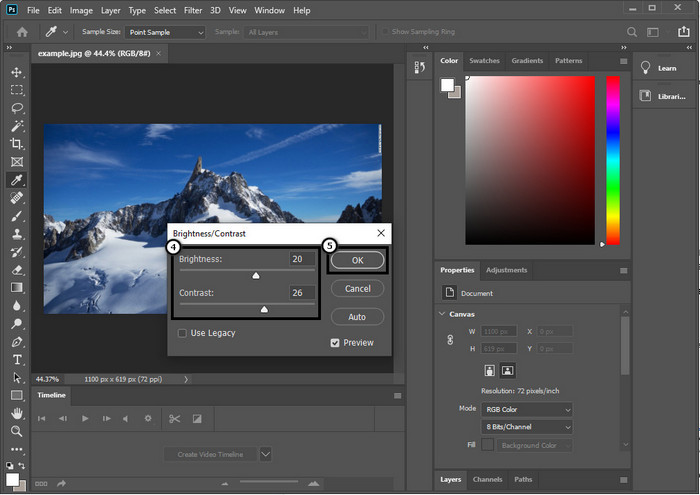
Langkah 1. Selepas memuat naik imej anda ke Photoshop, teruskan dengan mengklik menu Image.
Langkah 2. Beberapa pilihan akan dipaparkan; tekan Adjustment, kemudian klik Brightness and Contrast.

Langkah 3. Laraskan brightness dan contrast dengan menyeret slider dan tekan OK untuk menyimpan perubahan yang anda tambah pada imej anda.
Berkaitan:
Panduan Ringkas Cara Menambah Tera Air pada Video di Photoshop dengan Pantas
Bahagian 2. Alternatif Terbaik kepada Photoshop untuk Mengasah Imej Dalam Talian [Perkhidmatan Percuma]
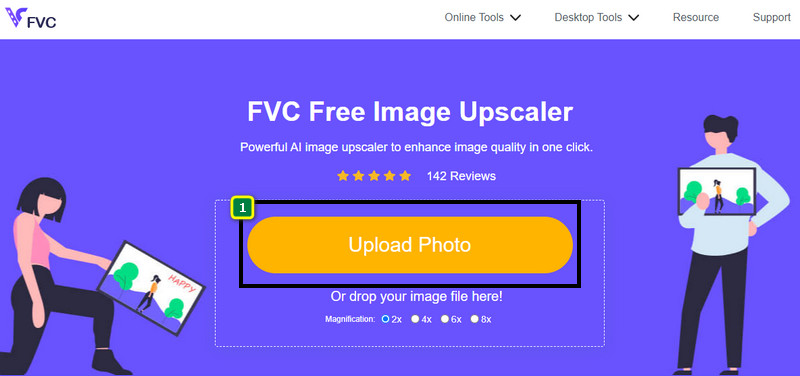
Bagaimana untuk menajamkan imej yang kabur dalam Photoshop tanpa aplikasi? Anda boleh gunakan FVC Free Image Upscaler. Alat dalam talian ini boleh menyelamatkan anda daripada melakukan perkara yang rumit di sini. Muat naik imej dan biarkan teknologi AI yang dimiliki perisian ini melakukan kerjanya untuk anda. Selain itu, anda tidak perlu membeli kunci lesen perisian atau versi premium kerana ia percuma untuk semua pengguna yang perlu menyunting gambar mereka dengan segera. Walaupun anda bukan pakar penyuntingan, anda masih boleh menajamkan imej anda dengan mengikuti langkah yang dinyatakan di bawah.
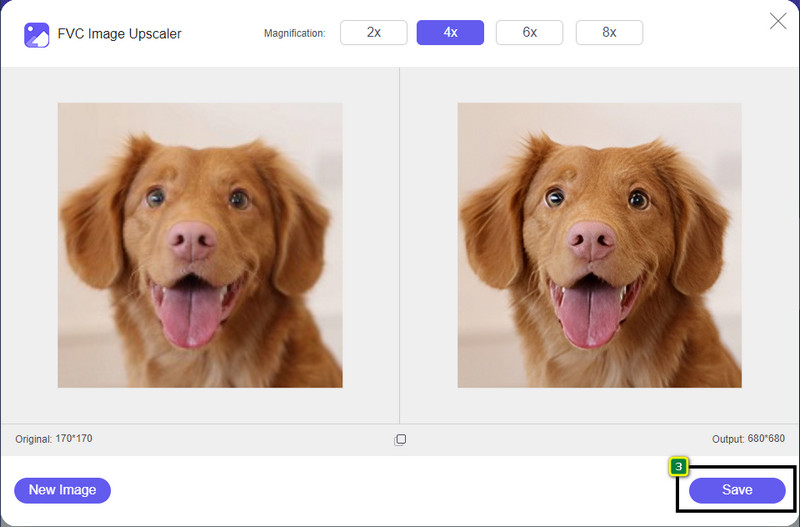
Langkah 1. Anda perlu klik pautan ini untuk membuka alat web dan menajamkan foto anda.
Langkah 2. Pada laman web, anda perlu menekan Upload Image untuk memasukkan gambar yang anda mahu tajamkan. Satu folder akan dipaparkan pada skrin anda, pilih imej tersebut, kemudian klik Open untuk memuat naiknya.
Langkah 3. Akan ada pelbagai pilihan pembesaran pada imej anda untuk menajamkan imej dengan mudah dengan bantuan teknologi AI.
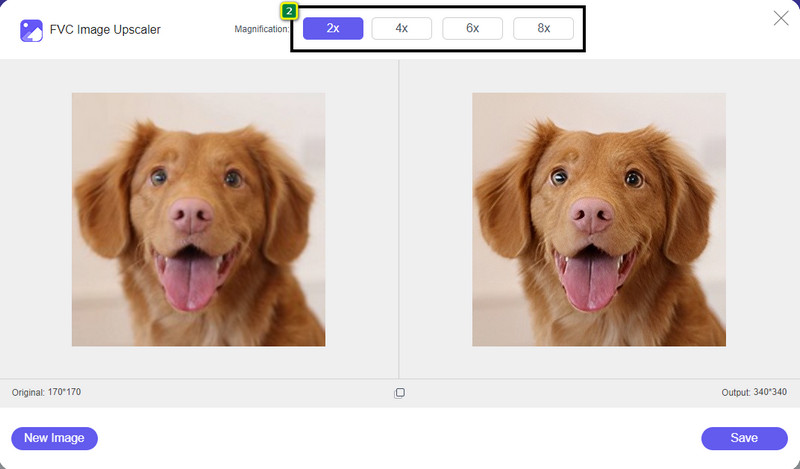
Langkah 4. Pada bahagian bawah, klik butang Save untuk memuat turun imej yang telah ditajamkan ke pemacu setempat anda.
Bahagian 3. Soalan Lazim tentang Cara Menajamkan Imej pada Photoshop
Apakah yang perlu saya lakukan jika percubaan percuma Photoshop ditamatkan?
Jika anda ingin terus menggunakan penyunting imej profesional yang dibangunkan oleh Adobe ini, anda perlu membeli pelan untuk terus menggunakannya. Tetapi jika anda mahu merasai ciri penyuntingan yang serupa dengan Photoshop, mulakan dengan menggunakan FVC Free Image Upscaler.
Apa yang boleh saya lakukan dengan Photoshop?
Anda boleh melakukan pelbagai pengeditan imej dan video di sini, yang tidak ditawarkan oleh editor lain. Ia ialah penyunting imej lengkap yang anda perlukan untuk mencipta perkara yang menakjubkan seperti menukar imej 2D kepada 3D dan banyak lagi. Walau bagaimanapun, perisian ini agak rumit, dan anda perlu meluangkan masa untuk menguasai cara menggunakannya secara keseluruhan.
Di mana saya boleh memuat turun Photoshop?
Adobe Photoshop menyokong Windows 10 dengan 64-bit atau lebih baru dan Mac 10.15 Catalina atau lebih baru. Juga, ia menyokong versi mudah alih, Editor Foto Photoshop Express.
Kesimpulannya
Dengan tutorial yang kami sertakan tentang cara menajamkan imej dalam Photoshop, kini anda boleh menajamkannya dengan mudah dalam pelbagai cara menggunakan penyunting terbaik ini. Bagaimana jika percubaan percuma anda telah tamat tetapi anda masih mahu menajamkan imej? Apa yang perlu anda lakukan? Anda tidak perlu risau kerana kami menambah satu alternatif dalam talian untuk menajamkan imej dengan lebih mudah dan percuma selagi anda mempunyai internet, iaitu FVC Free Image Upscaler.
-
 Buat Foto HD dengan Cara Terbaik yang Boleh Anda Temui di Pasaran
 Adakah anda tertanya-tanya atau mahu membuat foto HD? Anda boleh mengikuti tutorial yang kami tambahkan di bawah dengan penyelesaian berbeza yang boleh anda gunakan.
-
 4 Pengurangan Kualiti Imej Teratas Anda Boleh Gunakan Dalam Talian & Luar Talian
 Pengurang kualiti imej ini boleh membantu anda mengurangkan kualiti imej anda atas sebab tertentu. Jika anda memerlukannya, anda baca artikel ini!
-
 Cara Rasmi untuk Meningkatkan Imej kepada 4k Dengan Tutorial Hands-On
 Untuk meningkatkan imej kepada 4k, anda memerlukan perisian pada peranti anda. Jika anda tidak mempunyainya maka anda perlu memilih alat yang kami sertakan di sini.