


Cara Mengoptimumkan Imej untuk Web Menggunakan 4 Penyelesaian [Cepat]
Mengoptimumkan imej memainkan peranan penting di web kerana ia dapat mengurangkan masa pemuatan laman. Berdasarkan kajian terkini, apabila imej tidak dioptimumkan dengan baik, hampir separuh daripada pelawat akan meninggalkan laman web serta‑merta, menyebabkan pengurangan trafik dan hasil. Mempelajari cara melakukannya adalah perlu jika anda mahu mengurangkan buffering dan membina laman web yang boleh dipercayai untuk meningkatkan trafik serta memperoleh lebih banyak pendapatan. Proses ini mudah; dengan bantuan tutorial yang kami sertakan tentang cara mengoptimumkan imej untuk web dengan cara yang paling mudah.

Bahagian 1. Cara Terbaik & Percuma untuk Mengoptimumkan Imej Dalam Talian Tanpa Mengorbankan Kualiti Imej
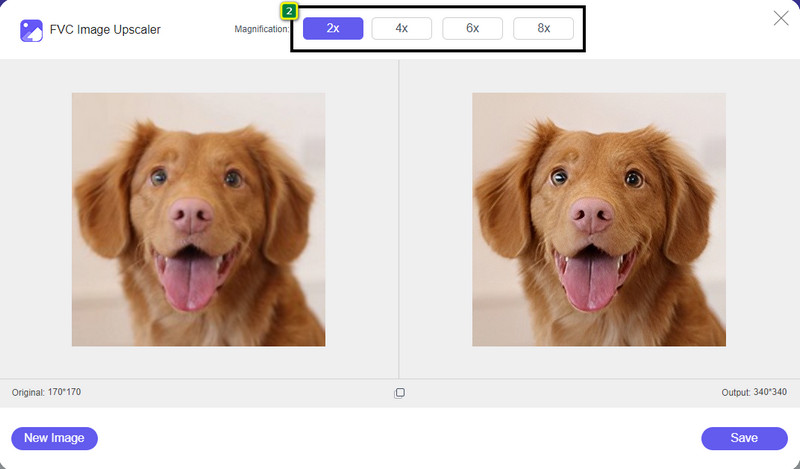
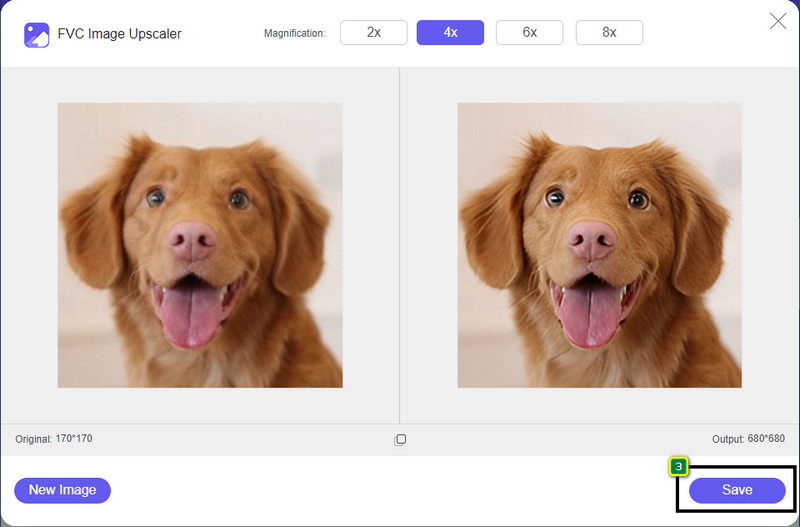
1. Penskala Imej Percuma FVC
Adakah anda sedang mencari cara untuk mengoptimumkan dimensi dan nisbah aspek imej yang anda mahu gunakan di web? FVC Free Image Upscaler ialah alat yang mampu mengoptimumkan imej dengan bantuan teknologi AI yang berkuasa. Alat upscaler ini boleh menukar saiz imej tanpa menjejaskan PPI terperinci supaya anda tidak mengalami kehilangan kualiti. Selain itu, alat dalam talian ini boleh membetulkan imej yang kabur atau berpiksel dengan mengesan ketidaksempurnaan padanya. Sebelum anda mengeksport imej, terdapat panel pratonton untuk membandingkan sebelum dan selepas. Jadi, jika anda perlu mengubah saiz imej untuk web, anda boleh ikut langkah yang kami sertakan berikutnya.
Langkah 1. Buka laman web dengan mengklik pautan ini.
Langkah 2. Tekan Upload Image untuk memasukkan gambar yang anda mahu ubah saiz di sini.
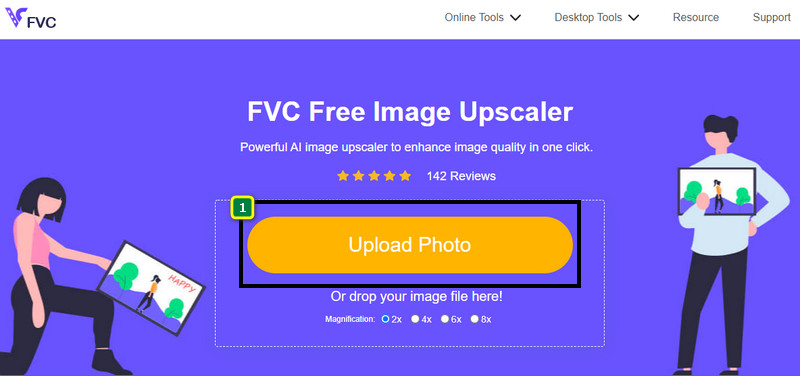
Langkah 3. Pilih pilihan yang anda mahu gunakan pada imej anda untuk mengubah saiznya.
Langkah 4. Tekan Save untuk memuat turun imej yang telah anda ubah saiz ke pemacu setempat anda.
2. Pemampat Imej Percuma FVC
FVC Free Image Compressor membolehkan sesiapa sahaja mengoptimumkan imej untuk web dengan mengecilkan saiz failnya. Ia membenarkan anda memampatkan format popular yang digunakan pada pelbagai laman web, seperti PNG, JPG, SVG, BMP dan sebagainya, dengan setiap fail kurang daripada 5MB. Dengan ini, anda boleh menjatuhkan berbilang imej untuk dijadikan saiz yang dioptimumkan supaya ia akan dimuatkan dengan lebih baik di web. Ia ialah alat berteknologi AI yang menyediakan nisbah pemampatan terbaik yang sukar dicapai pada pemampat dalam talian lain.
Langkah 1. Lawati laman web rasmi alat ini dengan mencari namanya, atau anda boleh klik pautan ini untuk mengaksesnya pada pelayar web anda.
Langkah 2. Seret dan lepas fail imej yang anda mahu muat naik di sini, atau anda boleh klik Upload Images; satu folder akan muncul pada paparan anda, klik fail yang anda mahu mampatkan, dan tekan Open. Pemampat ini boleh mengecilkan lebih daripada 40 imej pada masa yang sama.
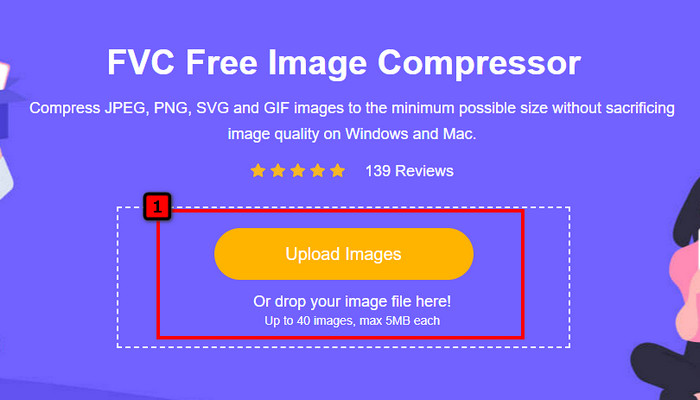
Langkah 3. Alat ini akan secara automatik mengecilkan saiz fail imej berdasarkan algoritma AI. Selepas itu, klik Download untuk mengeksport versi imej yang telah dimampatkan.

3. TinyPNG
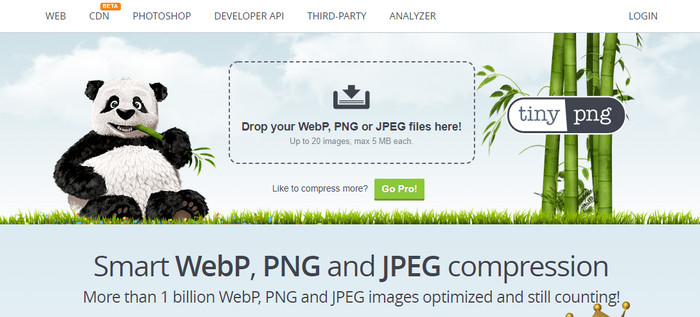
TinyPNG ialah perisian dalam talian yang popular dan boleh dipercayai yang boleh anda gunakan untuk mengoptimumkan imej. Ia ialah pemampat yang secara automatik mengecilkan imej sehingga kira‑kira 75% daripada saiz asal imej. Anda boleh memuat naik imej ke Dropbox jika ia tidak berada dalam pemacu setempat anda. Anda tidak akan menghadapi masalah untuk mempelajari cara menggunakan pemampat imej ini kerana pembangunnya membina alat ini dengan sangat ringkas.
Walaupun ia mudah digunakan, format yang disokong di sini ialah PNG dan JPG sahaja, dan tiada apa-apa lagi. Jadi, jika anda ingin memampatkan BMP, GIF, SVG, dan lebih banyak fail yang anda miliki, anda tidak boleh melakukannya di sini kerana ia tidak menyokong format tersebut. Walau bagaimanapun, ini mudah digunakan; anda boleh ikut langkah yang kami tambah.
Langkah 1. Buka enjin carian anda dan cari laman web rasmi TinyPNG.
Langkah 2. Klik ikon import untuk memuat naik imej yang anda mahu mampatkan; alat ini mampu memproses 20 imej pada masa yang sama.
Langkah 3. Tunggu proses pemampatan selesai, kemudian klik butang Download untuk menyimpan versi imej termampat yang anda muat naik di sini.
Bahagian 2. Optimumkan Imej Luar Talian Menggunakan Perisian Profesional pada Windows & Mac
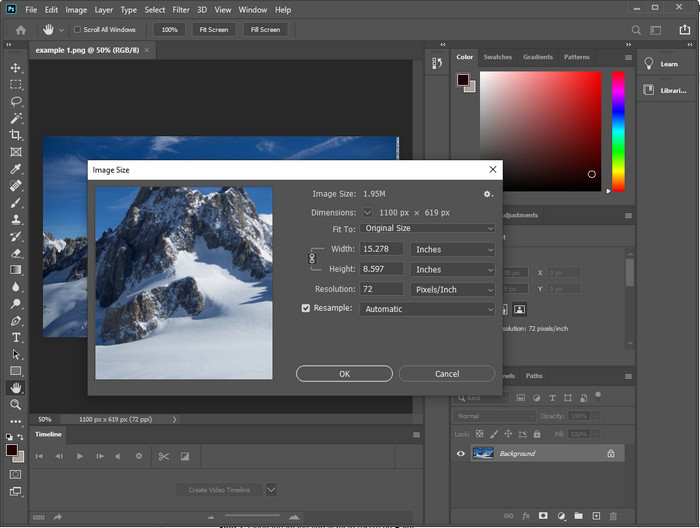
Photoshop mampu melakukan kedua‑dua tugas yang kami sebutkan di bahagian pertama: mengubah saiz foto dan mengecilkan saiznya. Walaupun alat ini bukan dikhususkan untuk tugas tersebut, ia masih boleh melaksanakannya sebagai sebahagian daripada ciri lanjutan tambahannya. Dengannya, anda boleh mula menambah penapis atau menyunting imej berdasarkan idea anda. Satu‑satunya had ialah imaginasi anda dan tahap kesukaran menggunakan perisian ini.
Tidak seperti alat dalam talian yang kami nyatakan, anda tidak memerlukan sambungan internet untuk menggunakan perisian ini setelah anda memuat turunnya pada peranti anda. Walau bagaimanapun, anda perlu membeli perisian untuk menggunakannya, jadi jika anda ingin melihat cara mengoptimumkan imej untuk web di Photoshop, terdapat arahan yang kami tambahkan di bawah, yang membolehkan anda mengecilkan dan mengubah saiz imej.
Langkah 1. Muat turun dan lancarkan perisian ini pada desktop anda untuk mula menggunakannya.
Langkah 2. Muat naik imej yang anda mahu sunting, kemudian pergi ke menu Image dan klik Image Size. Tukar ukuran mengikut spesifikasi anda, kemudian klik OK untuk menyimpan perubahan. Jika anda tidak mahu menukar nisbah aspek atau dimensi imej, sebaiknya langkau langkah 2.
Langkah 3. Tekan menu File dan klik Save as. Kotak dialog akan muncul pada paparan anda. Pilih saiz fail yang anda mahu capai, kemudian tekan OK untuk mula mengeksport imej.
Bahagian 3. Soalan Lazim tentang Cara Mengoptimumkan Imej untuk Web
Apakah format imej terbaik untuk web?
Anda lebih baik menggunakan imej dengan sambungan PNG dan JPG kerana format ini diketahui dioptimumkan dengan baik pada tapak web yang berbeza. Namun, kadangkala anda perlu mengoptimumkannya dengan mengecilkan atau mengubah saiz imej, di mana alat yang kami tambahkan di sini datang untuk membantu.
Yang membawa lebih banyak butiran di web; PNG atau JPG?
Kedua-dua imej raster berfungsi dengan baik di tapak web; mereka memuatkan lebih cepat dan mengoptimumkan tapak web. Namun masih terdapat perbezaan antara kedua-dua format ini, seperti apabila anda ingin menggunakan fotografi tulen tanpa ketelusan untuk web, format pilihan anda mestilah JPG atau JPEG. Tetapi jika anda ingin mempunyai ketelusan 1-bit di web anda dengan terperinci, PNG sedia membantu anda.
Adakah menukar saiz imej menjadikan kualiti buruk?
Jika anda memampatkan imej secara berlebihan, kualitinya boleh menjadi teruk, namun perkara ini boleh dielakkan jika anda tidak memampatkannya secara berlebihan. Setelah anda memampatkan imej, adalah lebih baik untuk mengurangkannya sekurang‑kurangnya sekitar 45% hingga 70% supaya kita dapat mengelakkan kehilangan kualiti. Namun, anda boleh menggunakan penambah imej untuk meningkatkan kualiti imej.
Kesimpulannya
Sekarang setelah anda tahu cara mengoptimumkan imej anda, lebih baik anda melakukannya supaya anda memperoleh lebih banyak lawatan dan menarik banyak perhatian. Dengan tutorial yang kami tambahkan di atas, kami pasti anda boleh melakukannya dengan mudah dan cepat tanpa menjejaskan kualiti. Jika anda perlu mengubah saiz atau memampatkan, kami mengesyorkan anda menggunakan produk FVC yang kami sertakan di sini untuk menyelesaikan masalah tanpa memuat turun sebarang pemasang.
-
 Buat Foto HD dengan Cara Terbaik yang Boleh Anda Temui di Pasaran
 Adakah anda tertanya-tanya atau mahu membuat foto HD? Anda boleh mengikuti tutorial yang kami tambahkan di bawah dengan penyelesaian berbeza yang boleh anda gunakan.
-
 4 Pengurangan Kualiti Imej Teratas Anda Boleh Gunakan Dalam Talian & Luar Talian
 Pengurang kualiti imej ini boleh membantu anda mengurangkan kualiti imej anda atas sebab tertentu. Jika anda memerlukannya, anda baca artikel ini!
-
 Cara Rasmi untuk Meningkatkan Imej kepada 4k Dengan Tutorial Hands-On
 Untuk meningkatkan imej kepada 4k, anda memerlukan perisian pada peranti anda. Jika anda tidak mempunyainya maka anda perlu memilih alat yang kami sertakan di sini.