

Panduan Pantas tentang Cara Pixlr Mengeluarkan Tera Air pada Foto
Terdapat keadaan di mana mengalih keluar tera air adalah perlu dan sesuai. Sebagai contoh, anda mungkin perlu mengalih keluar tera air jika ia diletakkan dengan salah, kelihatan terlalu besar atau mengganggu, atau menjejaskan kualiti akhir projek anda. Adalah penting untuk menghormati undang-undang hak cipta dan hanya mengalih keluar tera air daripada kandungan yang anda miliki atau diberi kuasa untuk mengedit.
Jika anda perasan tera air yang anda cipta dipaparkan dengan tidak betul atau mengganggu imej yang dieksport, artikel ini akan membimbing anda tentang cara membuang tera air dalam Pixlr dengan mudah. Selain itu, jangan lepaskan peluang untuk mengetahui alternatif terbaiknya apabila mengalih keluar tera air daripada foto. Jangan panjangkan lagi, mari kita mulakan!

Bahagian 1. Apakah Pixlr?
Pixlr ialah alat penyuntingan imej dalam talian yang berkuasa yang telah dilancarkan pada tahun 2008. Pada mulanya, ia direka sebagai platform berasaskan web untuk penyuntingan foto asas, tetapi ia dengan cepat menjadi popular kerana antara muka yang mudah digunakan dan ciri yang boleh diakses, membolehkan pengguna mengedit foto.
Ciri-ciri utama:
• Alih keluar tera air dengan Cop Klon dan Berus Penyembuh dalam Editor Pixlr.
• Sunting kumpulan dan alih keluar tera air daripada berbilang imej.
• Suntingan lancar selepas pengalihan tanda air dengan alat Retouch.
• Menyokong format output JPG, PNG, WEBP dan PDF.
• Bekerja dengan lancar pada Windows dan macOS.
Bolehkah Anda Menggunakan Pixlr untuk Mengalih Keluar Tera Air?
Ya, anda boleh menggunakan Pixlr untuk membuang tera air. Platform ini menawarkan pelbagai alat, seperti Clone Stamp, Healing Brush dan sebagainya, untuk memadam atau membuang tera air daripada imej dengan berkesan. Tambahan pula, ciri-ciri ini mudah digunakan, jadi ia memang alat yang sesuai untuk membuang tera air daripada foto.
Bahagian 2. Bagaimana untuk Mengeluarkan Tera Air dalam Pixlr?
Sekarang setelah anda mengetahui apa itu Pixlr dan ciri-cirinya, tiba masanya untuk mempelajari cara menggunakannya untuk mengalih keluar tera air daripada foto. Alat ini sangat mudah digunakan dan, sebenarnya, ia digunakan walaupun oleh pemula. Di bawah ialah panduan langkah demi langkah tentang cara membuang tera air dalam Pixlr:
Langkah 1. Mula-mula, pada enjin carian anda, cari Pixlr.
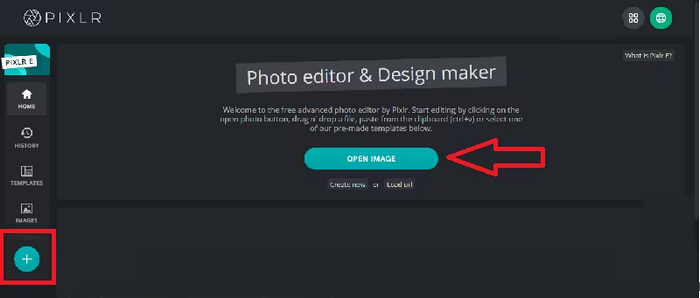
Langkah 2. Setelah anda menemui alat tersebut, klik untuk mengaksesnya. Selepas itu, klik butang Open Image untuk memuat naik foto yang mempunyai tera air yang perlu anda buang. Sebagai alternatif, anda boleh klik sahaja butang + pada panel sebelah kiri skrin anda untuk memuat naik foto anda.
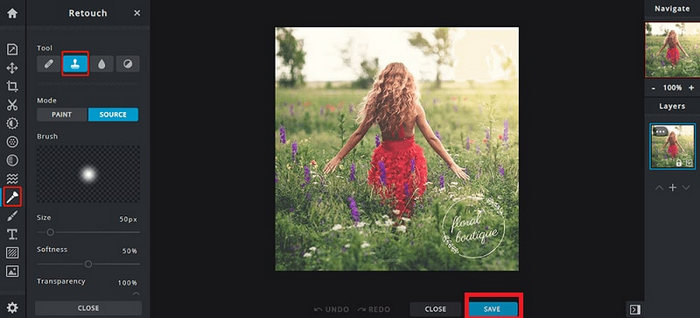
Langkah 3. Setelah foto anda dimuatkan, pada bahagian kiri skrin anda, klik butang Retouch, dan satu panel akan muncul. Selepas itu, dalam menu alat, pilih Clone Stamp.
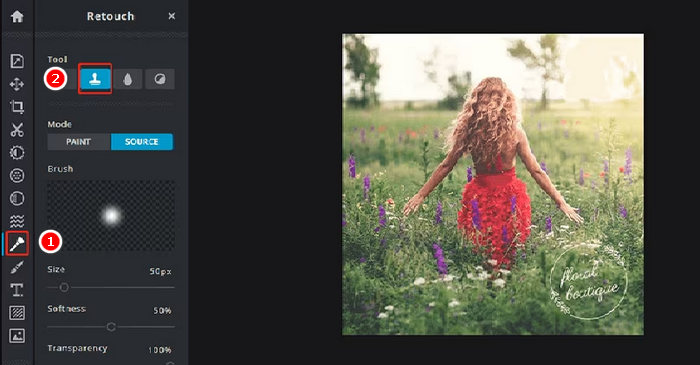
Langkah 4. Sekarang, tahan tetikus anda dan gerakkan kursor terus ke tera air yang anda mahu buang. Setelah anda selesai membuang tera air dengan Pixlr, klik butang Save.
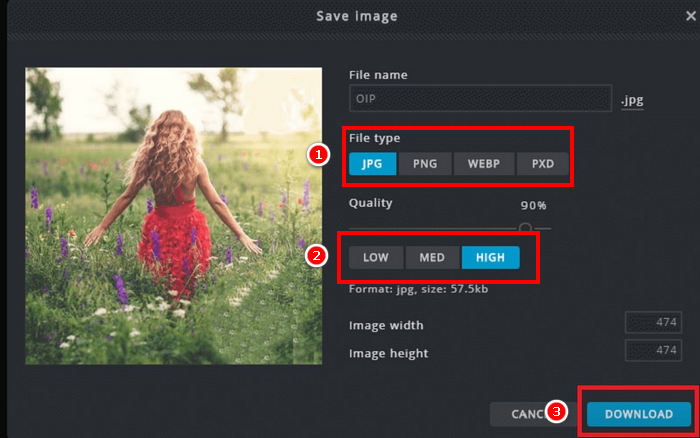
Langkah 5. Sebelum anda memuat turun fail imej, pilih resolusi dan jenis imej. Setelah selesai, klik butang Download.
Sentiasa zum masuk apabila mengalih keluar tera air dalam Pixlr. Bekerja dengan teliti pada butiran kecil membantu anda menggabungkan kawasan yang diedit dengan lebih semula jadi dan mengelakkan tompok kasar atau tidak rata pada imej akhir.
Bahagian 3. Alternatif Percuma untuk Mengalih Keluar Tera Air daripada Foto
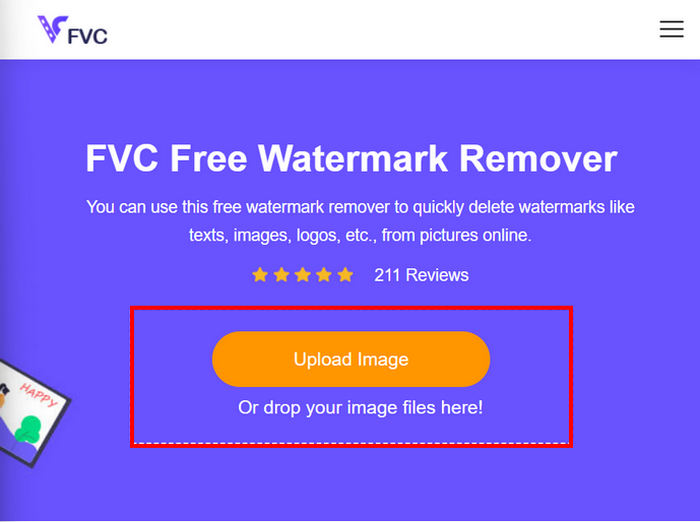
Sementara itu, jika anda mencari alternatif percuma selain daripada membuang tera air dengan Pixlr daripada foto, anda patut cuba FVC Free Watermark Remover. Ini ialah alat berasaskan web yang pada asasnya membenarkan pengguna membuang tera air daripada foto mereka. FVC menyokong format imej yang biasa digunakan seperti JPG/JPEG, PNG, BMP dan banyak lagi, memberikan pengguna lebih fleksibiliti untuk pelbagai imej yang mereka mahu buang tera airnya. Selain itu, ia menyediakan cara yang fleksibel untuk memilih dan memadam tera air. Anda boleh melukis garis besar poligon, menggunakan alat lasso, atau memberus kawasan tera air. Ini memudahkan pelarasan pilihan mengikut bentuk dan saiz tera air.
Ciri-ciri utama:
• Alih keluar teks, imej dan tera air logo daripada foto.
• Menyokong format JPG, JPEG, PNG dan BMP.
• Kekalkan kualiti imej asal selepas mengalih keluar tera air.
• Gunakan berus, laso atau garis besar poligon untuk memilih kawasan tera air.
• Pangkas imej sebelum atau selepas mengalih keluar tera air.
• Padam dan pilih semula kawasan dengan alat Pemadam.
• Serasi dengan Windows dan macOS.
Berikut ialah panduan langkah demi langkah tentang cara membuang tera air pada foto menggunakan FVC:
Langkah 1. Mula‑mula, anda perlu mengakses laman web rasmi alat ini. Jadi, pada enjin carian anda, cari FVC Free Watermark Remover.
Langkah 2. Setelah jumpa, klik butang Upload Image untuk mengimport foto yang mempunyai tera air yang perlu anda buang.
Langkah 3. Kini, daripada menu di atas, pilih apa sahaja yang anda suka untuk membuang tera air pada foto anda. Dalam contoh ini, kami menggunakan alat Brush dan memberus tera air dengan menggerakkan kursor ke arahnya. Setelah kawasan itu dilitupi, klik butang Remove di bahagian atas dan klik Save untuk memuat turun foto tersebut.
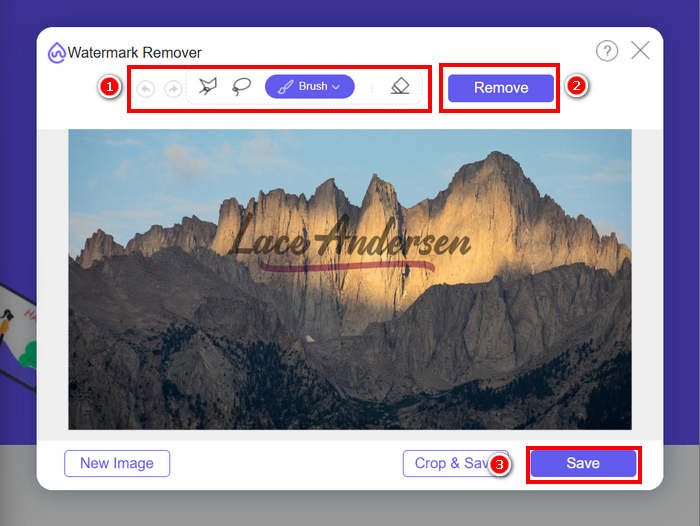
Apabila mengalih keluar tera air, pilih alat yang paling sesuai dengan bentuk tera air. Gunakan Berus untuk tera air kecil atau tidak sekata, Lasso untuk bentuk melengkung atau bentuk bebas, dan Garis Besar Poligon untuk tera air bermata lurus atau bersudut. Memilih alat yang betul membantu anda mendapatkan hasil yang lebih bersih dan lebih tepat.
Bahagian 4. Soalan Lazim tentang Pixlr Remove Watermark
Adakah penanggal tera air Pixlr selamat?
ya. Pixlr selamat digunakan untuk mengalih keluar tera air daripada foto. Ia adalah editor imej dalam talian yang dipercayai yang menggunakan pelayan selamat untuk melindungi data pengguna. Cuma pastikan anda mengakses laman web rasmi Pixlr untuk mengelakkan potensi risiko.
Bagaimana untuk menjadikan latar belakang telus dalam Pixlr?
Untuk mencipta latar belakang telus dalam Pixlr, dalam editor Pixlr anda, pilih Cipta Imej Baharu, taipkan nama untuk fail anda, tandai kotak Lutsinar dan klik OK. Seterusnya, klik Lapisan dalam menu atas dan pilih Buka Imej sebagai Lapisan untuk memuat naik imej yang ingin anda edit. Gunakan alat Wand dari bar alat, kemudian klik pada kawasan latar belakang yang ingin anda alih keluar. Laraskan tetapan Toleransi jika perlu untuk memperhalusi pemilihan. Tekan Padam untuk mengalih keluar latar belakang. Jika sebarang latar belakang kekal, gunakan alat Pemadam untuk memadamkannya secara manual. Setelah selesai, klik Fail, kemudian Simpan. Masukkan nama fail, pilih PNG sebagai format fail untuk mengekalkan ketelusan dan klik OK. Pilih lokasi untuk menyimpan imej anda dan klik Simpan.
Adakah penanggal tera air Pixlr tidak lagi percuma?
Pixlr menawarkan kedua-dua versi percuma dan premium. Alat penyingkiran tera air asas seperti Clone Stamp dan Healing Brush tersedia untuk pengguna percuma. Walau bagaimanapun, beberapa ciri lanjutan dan pilihan eksport berkualiti tinggi mungkin memerlukan langganan Pixlr Premium.
Kesimpulannya
Membuang tera air daripada foto boleh menjadi mudah dan berkesan dengan alat yang betul. Kini setelah anda tahu cara membuang tera air dengan Pixlr, anda benar-benar boleh memanfaatkan platform mesra pengguna ini yang membolehkan anda membuang tera air dengan mudah. Sesungguhnya, Pixlr menyediakan pilihan mudah diakses untuk pengguna baru mahupun berpengalaman. Selain itu, jika anda mencari alternatif percuma, FVC Free Watermark Remover menawarkan alat yang fleksibel dan menyokong pelbagai format imej untuk penyuntingan yang lancar. Sentiasa ingat untuk menghormati hak pemilikan apabila menyunting foto, dan pilih alat yang paling sesuai dengan keperluan anda untuk hasil yang bersih dan profesional.
-
 Cara Mengalih Keluar Tera Air DeviantArt Dalam Talian [5 Penyelesaian]
 Ingin mengetahui cara mengalih keluar tera air DeviantArt pada imej anda? Menggunakan penanggal tera air DeviantArt yang paling cemerlang, anda boleh mengalih keluar tera air yang menjengkelkan itu dengan mudah.
-
 Kaedah Mudah Cara Membuang Tera Air Kalis Pucuk
 Alih keluar tera air kalis pucuk dengan mengikuti kaedah mudah ini. Gunakan penanggal tera air yang menakjubkan ini untuk mengalih keluar tera air Kalis Pucuk daripada imej anda dengan mudah.
-
 5 Cara Cara Menghilangkan Tera Air B612 Menggunakan Alat Terbaik
 Ingin tahu cara membuang tera air B612 daripada foto anda? Anda boleh mengalih keluar tera air B612 daripada imej anda dengan mudah menggunakan alat yang luar biasa ini.