


Cum să faceți o captură de ecran pe Facebook: 6 moduri practice de a face acest lucru
As an avid user of social media platforms like Facebook, I know that sharing information has become an integral part of the overall social media experience. As always, when looking for something interesting, you need to be able to share news from your mutual friends, and the best way to do it is by taking a Facebook screenshot. Regardless of the context of the screenshot, doing it is very easy. Through this guide, we will delve into different ways to take a screenshot on Facebook using different devices, varying from mobile to desktop devices. In the process of knowing how to do it, we also included the use of a reliable third-party software tool that can do all screenshot-type regardless of the device you are using. To find more information on the software tool, read this article until the end and take Facebook screenshots like a pro.

Partea 1. Metode de captură de ecran pe Facebook pe diferite dispozitive
Înainte de a vă scufunda în metodele de captură de ecran a postărilor Facebook, trebuie mai întâi să decideți sau să știți ce dispozitiv veți folosi. Pentru acesta, am decis să separăm fiecare dispozitiv și să avem ghidul lor pas cu pas pornind de la Windows, Mac, iPad/iPhone, Samsung Galaxy și Android. Dispozitivele diferite ar putea avea diferențe ușoare în ceea ce privește realizarea unei capturi de ecran, ce mai mult pentru utilizarea pe o platformă de socializare precum Facebook.
Windows
Pentru Windows, există mai multe moduri de a face o captură de ecran pe Facebook, indiferent dacă un utilizator folosește Windows 7 sau o versiune ulterioară. Urmând pașii noștri de mai jos, vă asigurăm că realizați eficient o captură de ecran folosind cea mai simplă metodă. Mai mult, pașii de mai jos folosesc caracteristica Snipping Tool din Windows pentru a face o captură de ecran Facebook.
Step 1. From your Windows Start Menu, search and open the Snipping Tool software.
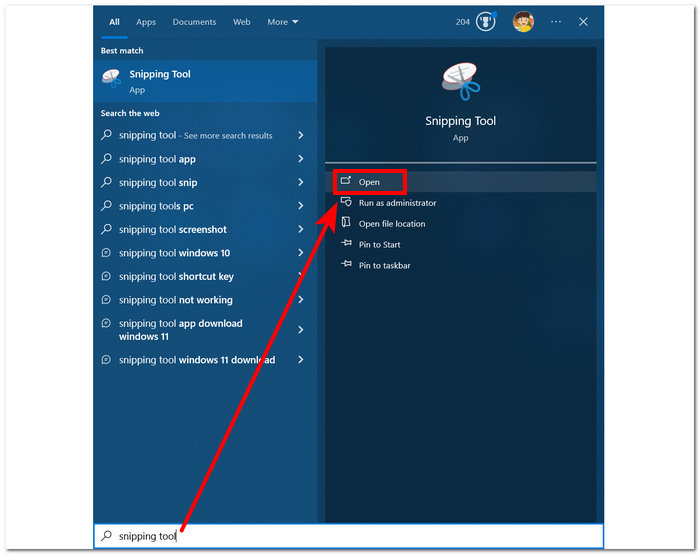
Software-ul Snipping Tool este deja preinstalat în Windows.
Step 2. Once the Snipping Tool software is open, proceed to click on the Mode drop-down button to access the snipping features. For this case, you can select the Rectangular Snip.
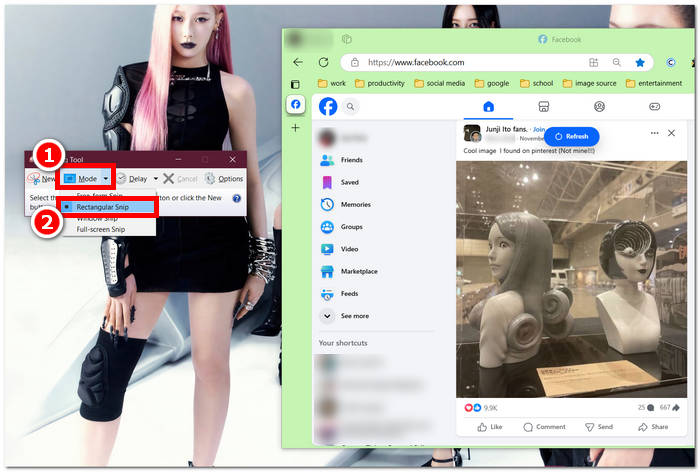
Dacă doriți o regiune personalizată în instantaneu, selectați Decupare cu formă liberă. Dacă doriți o zonă de captură de ecran dreptunghiulară, selectați Rectangular Snip. Dacă doriți să faceți o captură de ecran a unei anumite ferestre sau file, selectați Window Snip. Pentru a captura un instantaneu al întregului ecran Windows, selectați Snip pe ecran complet.
Step 3. Once you click on the Rectangular Snip, you can select the area on your Facebook web that you want to include in your screenshot. Once you've done this, a Snipping Tool window will appear containing your selected screenshot. Within that, you can customize your screenshot by adding text, highlights, annotating words, and more.
Step 4. To finish the process, click the Save button in the upper part of the Snipping Tool window.

Mac
Realizarea unei capturi de ecran a conținutului Facebook ar putea fi diferită pentru dispozitivele Mac față de modul în care o fac utilizatorii cu Windows. Cu toate acestea, pentru aceasta, le vom spune utilizatorilor doar să urmeze comenzile de bază ale comenzilor rapide de pe tastatura Mac.
Step 1. Using your Mac devices, open your Safari web browser and proceed to the Facebook website.
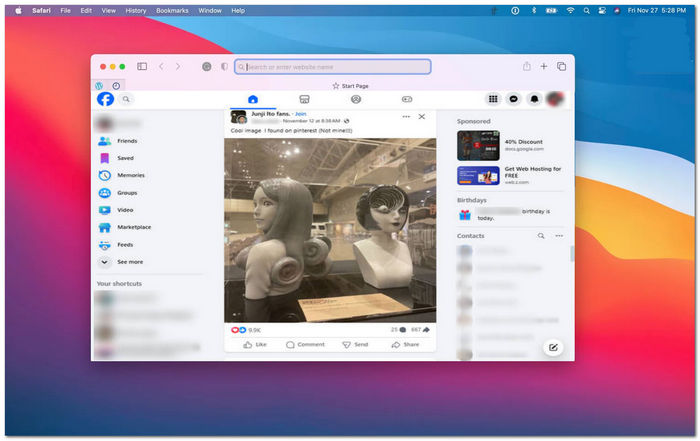
Step 2. On your Mac keyboard, to screenshot your Facebook webpage, hold down the following command + shift + 4.

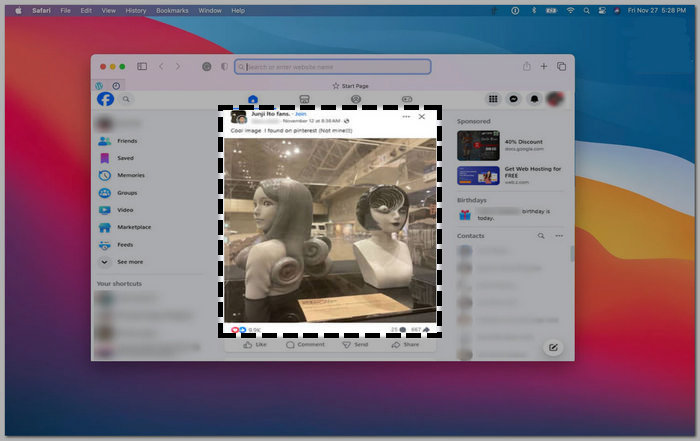
Step 3. Using your cursor, click, hold, and drag onto the area you want to capture.
Step 4. Release the cursor to instantly screenshot the Facebook consent using your Mac’s Safari web browser.
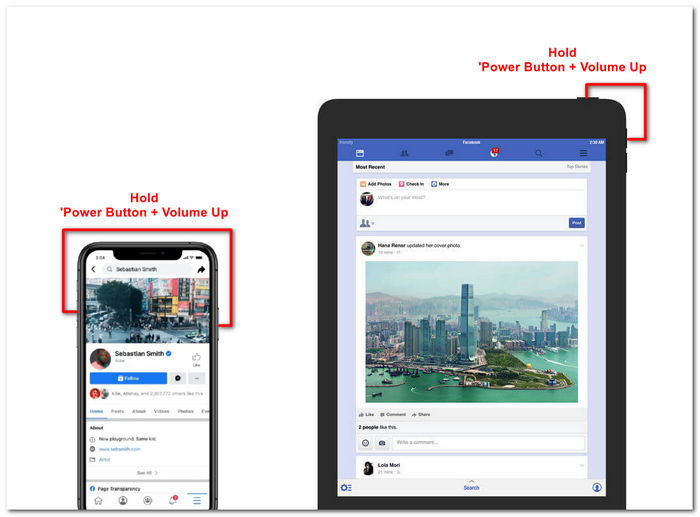
iPad/iPhone
Realizarea unei capturi de ecran este ușoară pe un dispozitiv de transport în mână, cum ar fi un iPad sau iPhone, deoarece ambele dispozitive folosesc doar butonul de pornire combinat și creșterea volumului. Indiferent dacă utilizați un iPad sau iPhone, puteți urma pașii de mai jos.
Step 1. Open your iPhone or iPad’s Facebook App and browse through your feed to find a post or perhaps a screenshot of Facebook story content.
Step 2. Once you are all set, take a screenshot of Facebook content; hold your device's Power Button + Volume Up button to capture it and have it saved in your Photos App.
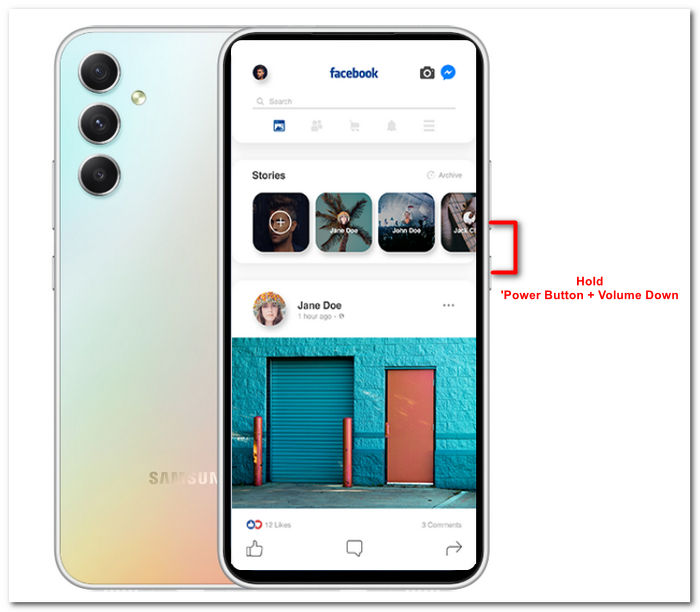
Samsung Galaxy
Dacă utilizați un dispozitiv Samsung Galaxy și nu știți cum să faceți o captură de ecran în aplicația dvs. Facebook. Apoi, pașii de mai jos vă vor ajuta.
Step 1. Through your Samsung Galaxy device, open your Facebook App and look for content within the platform you want to save as a screenshot to your device.
Step 2. Once you find the Facebook content you want to capture, hold your Power Button + Volume Down to screenshot it effectively.
It can also help you how to screenshot Samsung-specific models, like S23. You can use it to solve all your screenshot problems.
Android
Procesul de realizare a unei capturi de ecran diferă între dispozitivele Android și iOS, deoarece Android folosește butonul de reducere a volumului în loc de butonul de creștere a volumului. Pentru a captura cu ușurință un ecran Facebook, urmați procesul de mai jos.
Step 1. Open the Facebook mobile app on your Android device and browse your timeline for content you want to save as a screenshot in your Gallery.
Step 2. Once you find one, hold your mobile’s Power Button and Volume Down to screenshot it and save it directly in your Gallery App.

Partea 2. Un recorder de ecran excelent pentru a captura totul de pe desktop
If you are looking for a more convenient way to take screenshots on your Facebook with a feature that allows you to instantly make edits, annotate, highlight, crop, and more in the screenshot, then you might like using the FVC-picked screen recorder. This free-to-use screen record tool can double function as a tool to record your screen in real time and take a snapshot for easy and quick sharing of content. Moreover, this comprises four screenshot settings to cater to all types of screen capture needs, no matter whether you want to screenshot on Mac or Dell. and using it in the likes of Facebook is beneficial. To learn more about these screenshot features offered by FVC-picked screen record, it is best to show you how to do it.
Step 1. On your desktop, download and install the FVC-picked screen recorder software, then start the application.
Descărcare gratuităPentru Windows 7 sau versiuni mai noiDescărcare sigură
Descărcare gratuităPentru MacOS 10.7 sau versiuni mai noiDescărcare sigură
Step 2. Access your Facebook web using any of your preferred web browsers. In the screen recording tool, click on the Snapshot drop-down menu, then select a screenshot type to capture your Facebook screen.
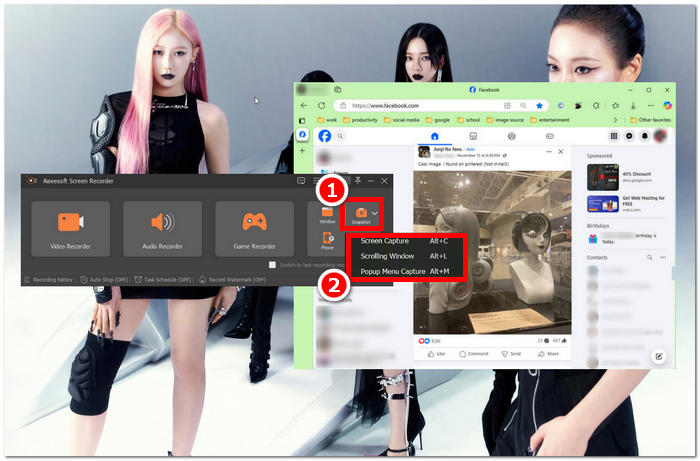
Puteți salva o captură de ecran a întregii pagini de pornire utilizând Captură ecran. Funcția Scrolling Window face un instantaneu al întregii pagini de pornire, de sus în jos. Utilizatorii pot alege o secțiune a paginii web în timp ce fac o captură de ecran personalizată cu Popup Menu Capture.
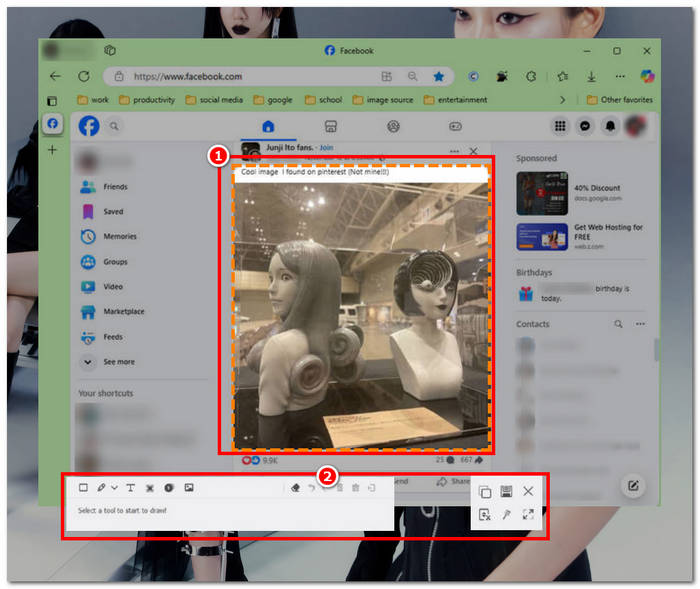
Step 3. In your Facebook timeline, click, hold, and drag your cursor on the area of the Facebook content you wish to capture as a screenshot.
Step 4. Once done, you can utilize the tools below to edit your screenshots before you can download them to your desktop download folder.
Partea 3. Întrebări frecvente despre Captură de ecran pe Facebook
Pot oamenii să vadă dacă le fac o captură de ecran în profilul, postarea sau fotografia lor?
Nu, alți utilizatori nu vor fi notificați dacă se întâmplă să faceți o captură de ecran a profilului lor de Facebook. Numai tu o poți vedea, dacă nu le partajezi captura de ecran.
Capturile de ecran din Messenger sunt detectabile?
Nu, deoarece reprezintă o problemă de securitate și de încălcare a datelor, Facebook nu notifică celălalt utilizator că tocmai ați făcut o captură de ecran a conversației dvs.
Este legal să capturi de ecran conținutul Facebook?
Capturile de ecran ale conținutului Facebook nu sunt ilegale, deoarece postările publice sunt publice și pot fi vizualizate de toată lumea. Cu toate acestea, este ilegal să folosiți conținutul sau postarea cuiva în folosul dvs. fără permisiunea acestuia.
Concluzie
Taking screenshots of Facebook content is a great way to store and quickly share it with another user. While it is greatly helpful, learning how to do it, especially using other devices, from desktop to mobile, is also helpful. Through this guide, you learn different approaches to taking a Facebook screenshot using any available device you may have. While it is very convenient, the ability to edit and highlight instantly the screenshot using the FVC-picked screen recorder is the best way to take when you want to crop or highlight a certain part of the screenshot so that you won’t have to edit them later.
-
 Cum să faci o captură de ecran pe Alcatel pentru a profita de momentul
 Te chinui să faci capturi de ecran pe dispozitivul tău Alcatel? Încercați această soluție software pentru telefon mobil și desktop și salvați ecranul pentru vizionare offline.
-
 Cum să faci capturi de ecran în Minecraft: cea mai ușoară captură de ecran de joc
 Aflați cel mai simplu mod de a face capturi de ecran în Minecraft. Încercați instrumentele încorporate și software-ul de înregistrare a ecranului pentru a vă salva creația Minecraft.
-
 Cum să faci capturi de ecran pe un Chromebook [Ghid pas cu pas]
 Descoperiți cum să faceți cu ușurință capturi de ecran pe Chromebook cu acest ghid cuprinzător pas cu pas. Fiți ghidat și obțineți acea captură de ecran perfectă acum!