


Как быстро повысить резкость изображения в Photoshop — полное руководство, которое вы должны знать
С помощью лучшего профессионального редактора изображений вы можете вывести обработку каждой вашей фотографии на новый уровень. Adobe Photoshop уже очень долго остаётся надёжным программным обеспечением, которое можно установить на Windows, Mac, iOS и Android. Благодаря разработчику — компании Adobe — этот редактор уже реализовал и революционизировал возможности обработки изображений практически по максимуму. Из-за продвинутого функционала новичкам он может казаться пугающим — из‑за интерфейса и общего принципа работы. Может показаться, что им сложно пользоваться, но это не так, особенно когда речь идёт о повышении резкости изображения. Ниже приведено подробное руководство, как быстро повысить резкость изображения в Photoshop.

Часть 1. Полное руководство по повышению резкости изображения в Photoshop [3 эффективных способа повышения резкости]
Повышение резкости изображений Photoshop может ошеломить тех, кто не использовал эту программу. Но прежде чем мы перейдем к уроку, вам нужно будет загрузить официальное программное обеспечение Adobe. Пожалуйста, выберите правильную кнопку загрузки, чтобы она появилась на вашем рабочем столе. Если вы еще не загрузили эту программу на свой компьютер, вы можете использовать ее бесплатную пробную версию, но если вы закончили пробную версию, вам нужно будет приобрести месячный или годовой план. После того, как вы выполните все, перейдите к шагам по вашему выбору, которые мы приводим ниже.
1-й способ. Как сделать изображение четким в Photoshop с помощью High Pass:
Highpass позволяет выделить изображение и применить фильтр к изображению, который может помочь вам повысить резкость краев фотографии, которую вы загружаете в Photoshop. Вы можете следовать руководству, которое мы добавляем ниже, чтобы узнать, как применять и использовать highpass для изображений, которые у вас есть.
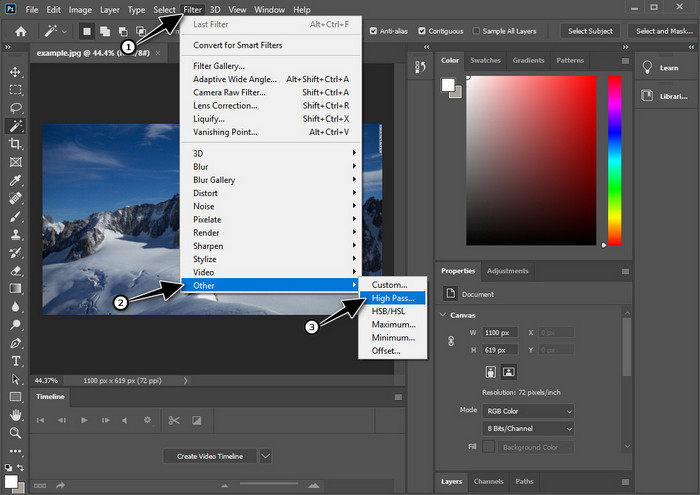
Шаг 1. Запустите программу, нажмите File (Файл) и выберите Open (Открыть), чтобы загрузить изображение и приступить к повышению резкости.
Шаг 2. Продублируйте слой с изображением, которое вы загрузили в Photoshop.
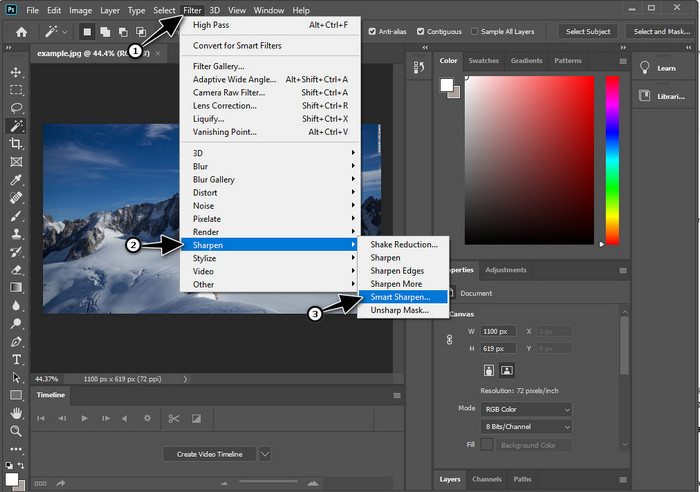
Шаг 3. В верхнем меню откройте вкладку Filter (Фильтр), выберите пункт Other (Другое), затем High Pass (Цветовой контраст). Не пугайтесь, если картинка станет серой, — это нормальная реакция при применении фильтра High Pass.
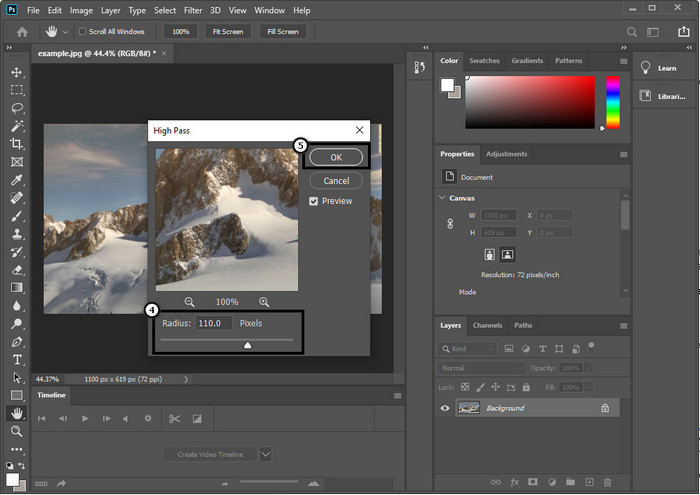
Шаг 4. На экране появится всплывающее окно, в котором можно потянуть ползунок, чтобы увеличить радиус и добиться лучшей детализации изображения. Затем нажмите OK, чтобы сохранить изменения.
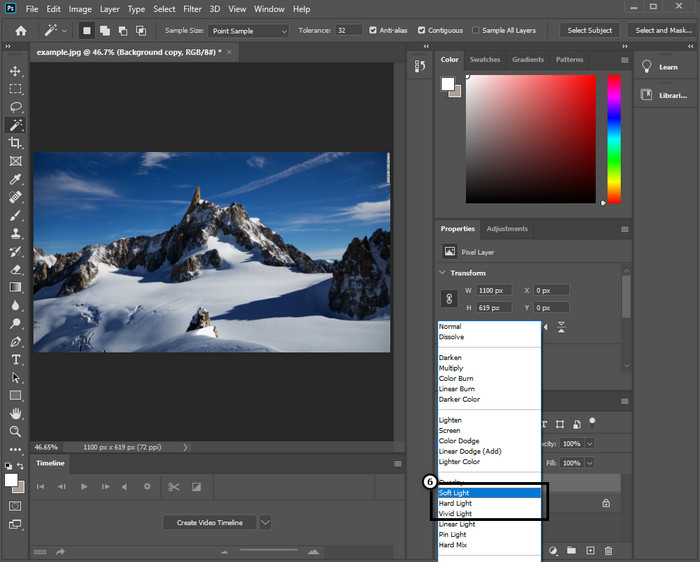
Шаг 5. Вернитесь к слоям, нажмите кнопку drop-down (раскрывающийся список режимов наложения) и выберите тип света, который хотите применить к изображению: Soft Light (Мягкий свет), Hard Light (Жёсткий свет), Vivid Light (Яркий свет) и т.п., чтобы усилить резкость. Повторяйте шаг 3 и этот шаг, чтобы дополнительно перешарпить изображение.
2-й способ. Как сделать изображение более четким в Photoshop с помощью Smart Sharper:
Функция Smart Sharpen (Умная резкость) — это эффективный инструмент в Adobe Photoshop, который позволяет повысить резкость всех элементов на изображении. Это не полностью автоматическое решение: вам нужно будет настроить ряд параметров, чтобы картинка выглядела действительно чёткой. Если вы хотите воспользоваться этим инструментом в Adobe, выполните следующие шаги.
Шаг 1. После того как вы добавили изображение, которое нужно сделать более чётким, откройте меню Filter (Фильтр).
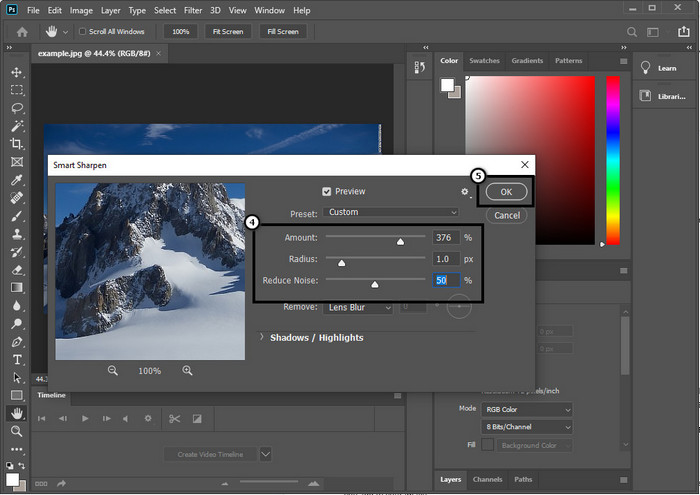
Шаг 2. В появившемся списке выберите пункт Sharpen (Резкость), затем нажмите Smart Sharpen (Умная резкость).
Шаг 3. Отрегулируйте значения Amount (Эффект) и Radius (Радиус) в соответствии с вашими предпочтениями и нажмите OK, чтобы сохранить изменения. Настолько просто — и вы уже повысили резкость фотографии с помощью этого инструмента программы.
3-й способ. Как повысить резкость изображения на фотографии, отрегулировав яркость и контрастность:
В отличие от двух способов, которые мы представили, яркость и контрастность фокусируются на выделении изображения, которое вы загружаете, чтобы сделать его более подробным, как это делают инструменты повышения резкости. Немногие пользователи знают эту опцию, поэтому, если вы хотите использовать эту опцию и начать повышать резкость изображения, которое у вас есть, выполните следующие действия.
Шаг 1. После загрузки изображения в Photoshop перейдите в меню Image (Изображение).
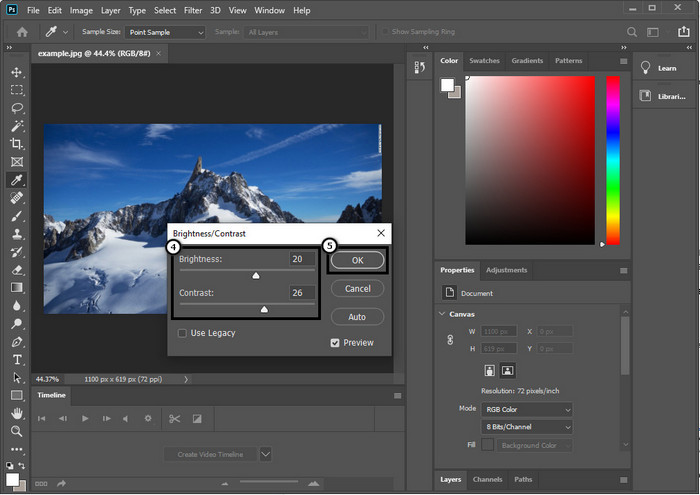
Шаг 2. Появится несколько вариантов; выберите Adjustment (Коррекция), затем нажмите Brightness and Contrast (Яркость/Контрастность).

Шаг 3. Настройте яркость и контрастность, перемещая ползунок, и нажмите OK, чтобы сохранить внесённые изменения.
Связанный материал:
Простое руководство по быстрому добавлению водяного знака на видео в Photoshop
Часть 2. Лучшая альтернатива Photoshop для повышения резкости изображения онлайн [бесплатный сервис]
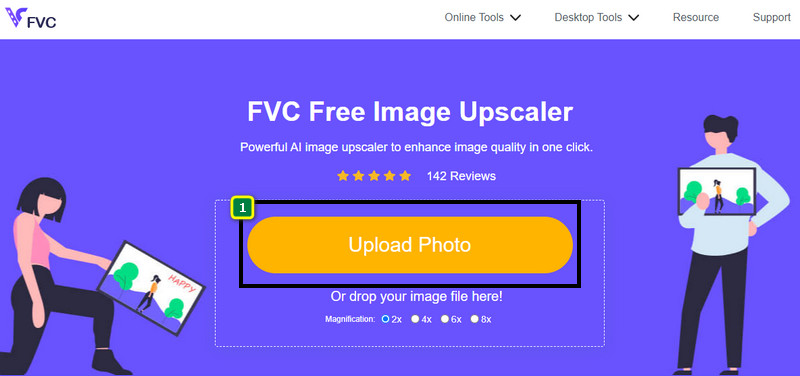
Как повысить резкость размытых изображений в Photoshop, не устанавливая приложение? Можно воспользоваться онлайн‑сервисом FVC Free Image Upscaler. Этот веб‑инструмент избавит вас от сложных настроек. Просто загрузите изображение и позвольте ИИ‑технологиям, на которых основан сервис, сделать всё за вас. Вам также не нужно покупать лицензионный ключ или премиум‑подписку — он бесплатен для всех пользователей, которым нужно быстро отредактировать свои снимки. Даже если вы не профессионал в области обработки, вы сможете повысить резкость изображения, следуя шагам, приведённым ниже.
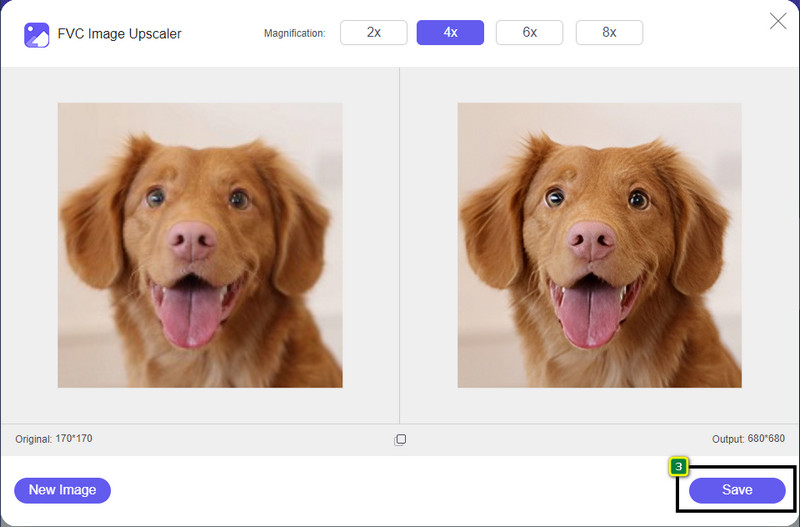
Шаг 1. Перейдите по этой ссылке, чтобы открыть веб‑инструмент и начать повышать резкость фотографии.
Шаг 2. На сайте нажмите кнопку Upload Image (Загрузить изображение), чтобы добавить фото, которое нужно сделать более чётким. Откроется окно проводника: выберите нужный файл и нажмите Open (Открыть) для загрузки.
Шаг 3. Будут доступны разные варианты масштабирования изображения, что позволит легко повысить резкость с помощью ИИ‑технологий.
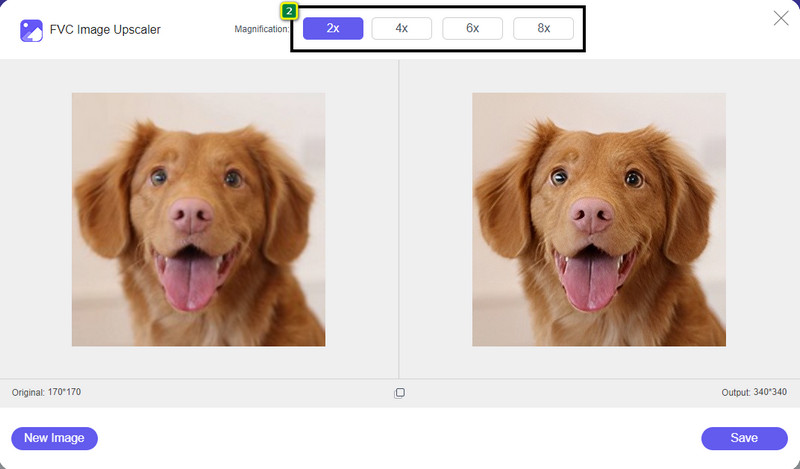
Шаг 4. В нижней части страницы нажмите кнопку Save (Сохранить), чтобы скачать изображение с повышенной резкостью на локальный диск.
Часть 3. Часто задаваемые вопросы о том, как повысить резкость изображений в Photoshop
Что делать, если бесплатная пробная версия Photoshop закончилась?
Если вы хотите и дальше пользоваться этим профессиональным редактором изображений от Adobe, вам потребуется оформить подписку, чтобы продолжить работу. Но если вы хотите получить схожий по возможностям опыт редактирования, как в Photoshop, начните пользоваться сервисом FVC Free Image Upscaler.
Что я могу сделать с фотошопом?
Здесь вы можете редактировать множество изображений и видео, чего нет в других редакторах. Это полноценный редактор изображений, который вам понадобится для создания удивительных вещей, таких как преобразование 2D-изображения в 3D и многое другое. Однако это программное обеспечение немного сложное, и вам нужно будет потратить время на то, чтобы освоить его использование в целом.
Где можно скачать Фотошоп?
Adobe Photoshop поддерживает Windows 10 с 64-разрядной версией или более поздней версии и Mac 10.15 Catalina или более поздней версии. Кроме того, он поддерживает мобильную версию Photoshop Express Photo Editor.
Заключение
С помощью приведённого нами руководства по повышению резкости изображения в Photoshop вы теперь можете легко сделать фото более чётким разными способами, используя один из лучших редакторов. Но что делать, если пробный период закончился, а вам всё ещё нужно повышать резкость изображений? Не переживайте: мы предложили онлайн‑альтернативу, с помощью которой можно улучшить резкость проще и бесплатно, главное — иметь доступ в интернет, и это FVC Free Image Upscaler.
-
 Сделайте фото HD с лучшими способами, которые вы можете найти на рынке
 Вам интересно или хотите сделать фото HD? Вы можете следовать руководству, которое мы добавляем ниже, с различными решениями, которые вы можете использовать.
-
 4 лучших средства снижения качества изображения, которые вы можете использовать онлайн и офлайн
 Эти понизители качества изображения могут помочь вам снизить качество изображения по некоторым причинам. Если вам это нужно, вы читаете эту статью!
-
 Официальные способы масштабирования изображения до 4k с помощью практического руководства
 Для масштабирования изображения до 4k вам понадобится программное обеспечение на вашем устройстве. Если у вас его нет, вам нужно будет выбрать инструмент, который мы включили здесь.