


iMovie'yi MP4'e Aktarmak İçin Kapsamlı Bir Kılavuz
iMovie, Apple tarafından Mac, iPhone ve iPad kullanıcıları için geliştirilmiş, en çok kullanılan ve en popüler video düzenleme araçlarından biridir. Bu araç, herhangi bir editörün sahip olmak isteyeceği oldukça iyi bir düzenleme özellikleri setine sahiptir. Ancak diğer yandan, kullanıcıların biraz zorlandığı bir konu vardır. Bu araçtan çıkan videolar MOV formatında dışa aktarılmaktadır. Bu varsayılan format, diğer cihazlar ve platformlarla uyumluluk söz konusu olduğunda kısıtlamalar getirebilir. Bu nedenle çoğu kullanıcı, videoları diğer video oynatıcılarında oynatabilmek için MOV dosyalarını MP4 gibi küresel olarak tanınan başka bir formata dönüştürmek zorunda kalmaktadır. Siz de iMovie’yi MP4’e aktarmanın yollarını arıyorsanız, bu makalenin tamamını okuyun.

Bölüm 1: iMovie'yi Mac'te MP4'e Nasıl Aktarırsınız
iMovie'den video dışa aktarmaya gelince, seçebileceğiniz birçok çıktı biçimi vardır. Sadece biz onun varsayılan MOV biçimine alışkınız. Bununla, ondan dışa aktarılan bir videoyu oynatırken genellikle uyumluluk sorunlarıyla karşılaşırız. Bu nedenle, iMovie'yi MP4'e nasıl dışa aktaracağınızı öğrenmek, bu biçim yaygın olarak kullanıldığından ve çoğunlukla tüm dijital cihazlar ve medya oynatıcılar tarafından desteklendiğinden beri bir şey haline geliyor. iMovie'yi Mac'te MP4'e dışa aktarmak için aşağıdaki adımları izleyin:
1. Adım. Öncelikle, Mac’inizde iMovie’yi başlatın.
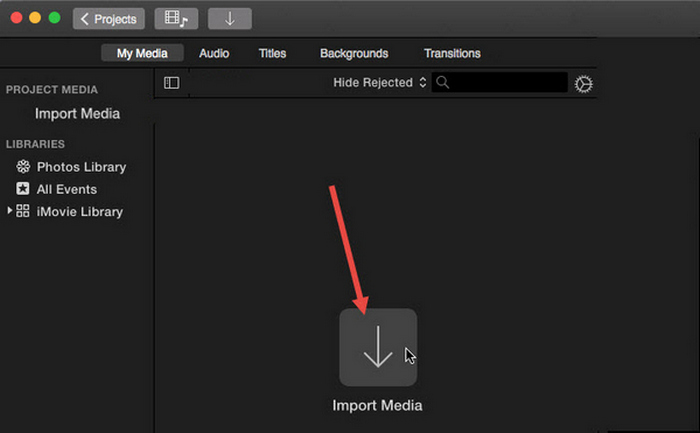
2. Adım. Ardından, Ortam İçe Aktar düğmesine tıklayarak videonuzu yazılıma aktarın.
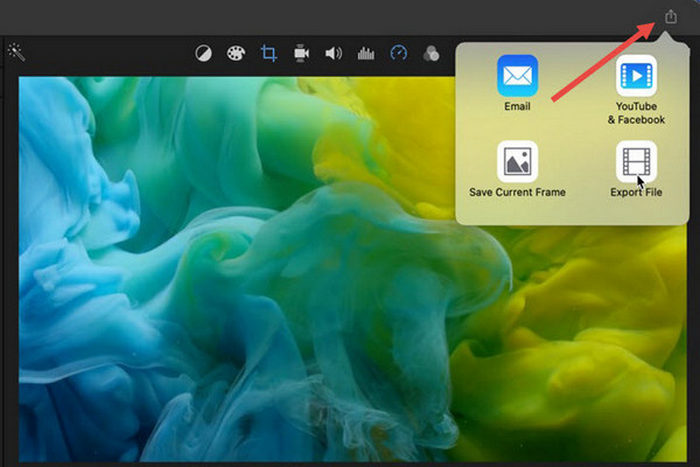
3. Adım. Şimdi, üst araç çubuğunda Dosya düğmesine tıklayın, Paylaş menüsüne gidin, ardından Dosyayı seçin ya da önizleme penceresinde Paylaş simgesine tıklayın ve açılan iletişim kutusunda Dosya seçeneğini seçin.
4. Adım. Yeni açılan dosya penceresinde çıktı formatı olarak Video ve Ses seçeneklerini seçin ve ihtiyacınıza göre çözünürlük, kalite ve diğer parametreleri ayarlayın.
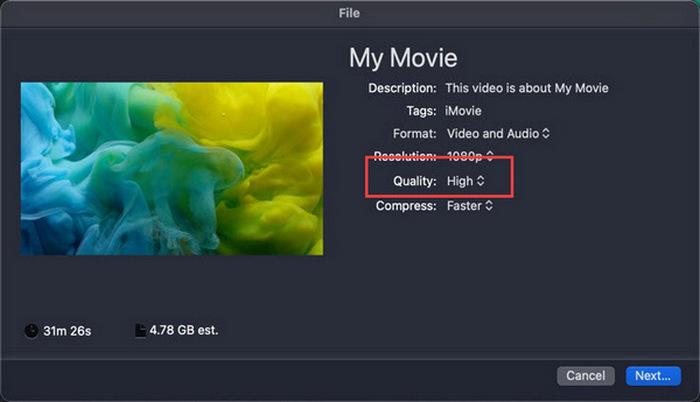
Not: Videoyu MP4 formatında dışa aktarmak istiyorsanız, dosya MOV formatında kaydedileceği için ProRes kalite seçeneğini seçmeyin.
5. Adım. Son olarak, İleri düğmesine tıklayın ve dışa aktaracağınız iMovie MP4 dosyasına bir isim verin. Bir çıktı klasörü seçmeyi unutmayın ve MP4 olarak kaydetmek için İleriye tıklayın.
iMovie'yi doğrudan Mac'ten MP4'e aktarmanın bir yolu var. Ancak, özellikle videoyu kaydederken varsayılan dosya biçimiyle uğraşırken, süreç biraz karmaşık görünebilir.
Windows’ta iMovie kullanmak istiyorsanız, buradaki bu gönderiyi kaçırmayın.
Bölüm 2: Çalışmayan iMovie Export Nasıl Düzeltilir [Genel Çözüm]
iMovie dışa aktarma işleminin düzgün çalışmamasının birkaç nedeni olabilir. Aşağıda iMovie dışa aktarma işleminin çalışmaması sorununu ele almak için bazı çözümler ve alternatifler bulunmaktadır:
Çözüm 1: Depolama Alanını Kontrol Etme
iMovie dışa aktarma sorunlarının yaygın bir nedeni Mac'inizde yetersiz disk alanıdır. Videoları dışa aktarırken sorun yaşarsanız, depolama alanınızın kullanılabilirliğini kontrol ederek başlayın.
macOS Ventura veya daha yenisi için: Apple menüsü simgesine gidin, Sistem Ayarları’nı seçin, Genel’e tıklayın ve ardından sağ tarafta Depolama’yı seçin.
Daha eski macOS sürümleri için: Apple menüsü simgesine gidin, ardından Bu Mac Hakkındaya tıklayın ve Depolama sekmesine geçin.
Ardından, Mac'inizin depolama alanı azalıyorsa, alanı boşaltmak için gereksiz dosyaları veya uygulamaları silmeyi düşünün. Bunu yaptıktan sonra, iMovie'ye geri dönün ve dışa aktarmayı tekrar deneyin.
Çözüm 2: Dosya Adını İki Kez Kontrol Edin
iMovie birkaç kez dışa aktarmayı denedikten sonra videoyu dışa aktarmayı başaramazsa, çıkış ayarlarındaki dosya adını gözden geçirip tire, eğik çizgi, virgül vb. gibi özel karakterler içermediğinden emin olmak önemlidir. Genellikle iMovie, dosyaya isim verirken özel karakterleri desteklemez.
Çözüm 3: iMovie'yi yeniden başlatın
Sorun devam ediyorsa, uygulamayı yeniden başlatıp videoyu tekrar dışa aktarmayı deneyin. Ancak önce mevcut projenizi kaydetmeyi unutmayın. iMovie’yi tamamen kapatmak için uygulama simgesine tıklayın ve Çık seçeneğini seçin. Ardından iMovie’yi yeniden başlatın, bir proje açın ve artık video dışa aktarımı yapıp yapamadığını kontrol edin. Ayrıca, sorunu gidermek için Mac’i yeniden başlatmayı da deneyin.
Çözüm 4: iMovie'yi güncelleyin
iMovie’nin güncel olmaması, genellikle düzeltilmemiş hatalar ve sistem sorunları nedeniyle dışa aktarma hatalarına yol açar. iMovie’yi güncellemek için App Storeu açın, sol tarafta Güncellemelere tıklayın ve iMovie için mevcut güncellemeleri kontrol edin; ardından üzerine tıklayarak güncelleyin.
Çözüm 5: iMovie'yi yeniden yükleyin
Diğer çözümler dışa aktarma sorununu gideremezse, iMovie’yi yeniden yüklemeyi düşünün. Mac’ten iMovie’yi kaldırmak için Launchpadi açın ve Seçenek tuşuna basın, iMovie simgesine tıklayıp basılı tutun, ardından uygulamanın yanındaki X düğmesine tıklayın ve onaylamak için Sile tıklayın. Sonra App Storea giderek iMovie’yi yeniden indirip kurun.
Bonus: Çalışmayan iMovie Export Nasıl Düzeltilir [Alternatif Yol]
Hiçbir çözüm işe yaramazsa, iMovie dışa aktarma çalışmıyor sorununu çözmek için bu alternatif yöntemi denemenin zamanı gelmiş demektir. FVC Video Converter Ultimate, kullanıcıların videoları istedikleri herhangi bir formata dönüştürmelerine olanak tanıyan kapsamlı dönüştürme yetenekleriyle bilinir. Ancak bundan daha fazlasını da sunar; video düzenlemek isteyen kullanıcılar için tasarlanmış MV gibi ek özellikleri vardır. iMovie’ye benzer şekilde, düzenlemek istediğiniz dosyaları içe aktarmanız, ardından kırpma ve döndürme, efekt ve filtre ekleme, videoyu ilgi çekici kılmak için müzik arka planı yerleştirme gibi düzenleme özelliklerini kullanmanız yeterlidir. Sonrasında dosyayı MP4 olarak dışa aktarabilirsiniz.
Üstelik bu araç HD/4K/8K çözünürlükleri destekleyerek en üst düzey çıktı kalitesini garanti eder. Ve en iyi yanı? Yıldırım hızında çalışır ve diğer yöntemlerden 120 kat daha hızlı dönüşümleri tamamlar.
1. Adım. Öncelikle, Windows veya Mac bilgisayarınıza FVC Video Converter Ultimate’ı indirin ve kurun.
Ücretsiz İndirWindows 7 veya üstü içinGüvenli İndirme
Ücretsiz İndirMacOS 10.7 veya üstü içinGüvenli İndirme
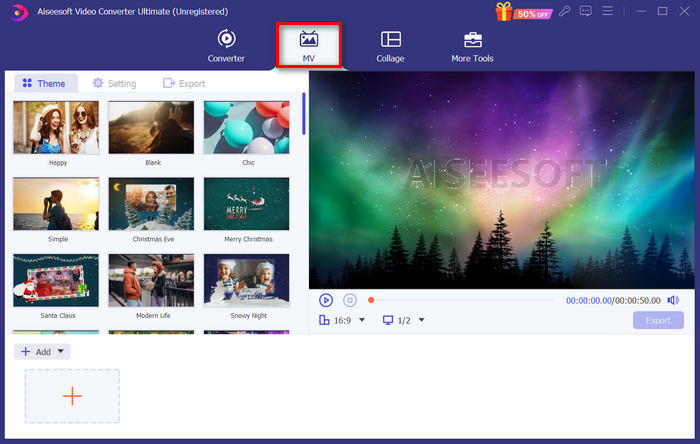
2. Adım. Ardından, aracın arayüzündeyken MV sekmesine gidin.
3. Adım. Şimdi, MP4’e dönüştürmek istediğiniz dosyaları eklemek için Dosya Ekle düğmesine tıklayın.
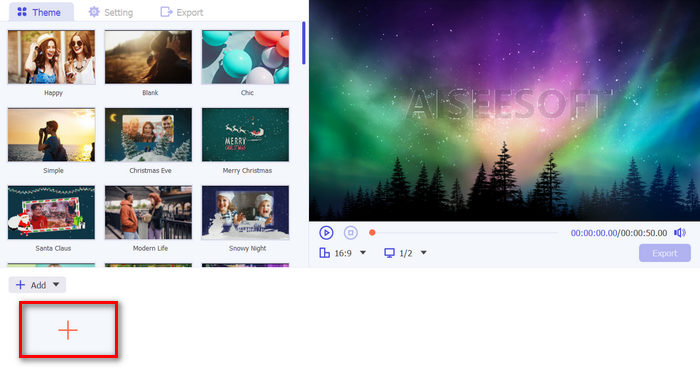
4. Adım. MP4 videonuzu eklemek, düzenlemek ve kırpmak için, Dosya Ekle düğmesinin üst kısmındaki düğmeye tıklayın. Ayrıca, üstteki Tema sekmesindeki hazır temalar listesinden seçim yaparak videonuza bir tema ekleyebilirsiniz.
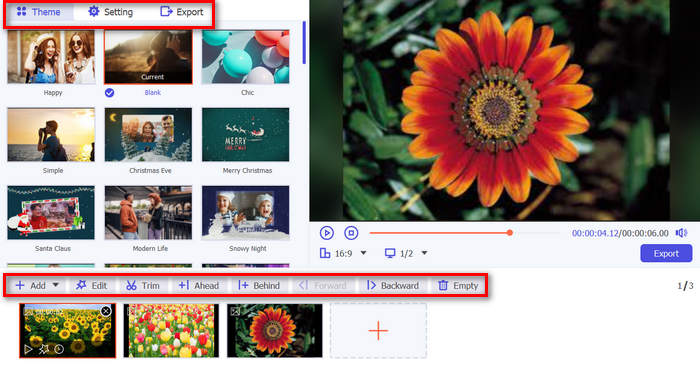
5. Adım. Düzenlemekte olduğunuz MP4 dosyasını daha da iyileştirmek için aşağıdaki Düzenle simgesine tıklayarak filtreler ve efektler ekleyebilirsiniz. Ayrıca dosyayı kişiselleştirmek için filigran da ekleyebilirsiniz.

6. Adım. İşiniz bittiğinde, formatı MP4 olarak değiştirebileceğiniz ve kare hızı, çözünürlük ve kaliteyi ayarlayabileceğiniz Dışa Aktar düğmesine tıklayın.
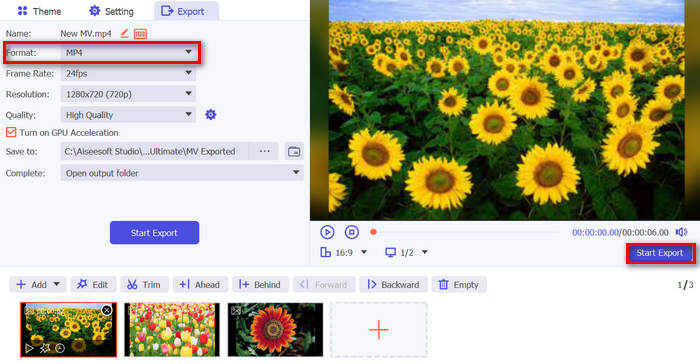
7. Adım. Son olarak, dosyanızı kaydetmek için Dışa Aktarmayı Başlat düğmesine tıklayın.
FVC Video Converter Ultimate ile, MOV formatında dışa aktarıldığında iMovie'nizi MP4 dosyalarına nasıl dönüştüreceğiniz konusunda endişelenmenize gerek kalmaz. Ayrıca, iMovie ile bir dışa aktarma sorunuyla karşılaştığınızda harika bir alternatiftir, çünkü bu tam özellikli bir araçtır. Özellikle dosyaları bir formattan diğerine dönüştürme konusunda ihtiyacınız olan her şeye sahip olabilirsiniz.
Bölüm 3: iMovie'yi iPad/iPhone'da MP4'e Nasıl Aktarırsınız
iOS veya iPadOS kullanan ve iMovie'yi iPhone veya iPad'inizde MP4'e aktarmak ve dönüştürmek isteyenler için, iMovie'yi iPad/iPhone'da MP4'e nasıl aktaracağınız aşağıda açıklanmıştır.
1. Adım. Öncelikle, iPhone veya iPad’inizde iMovie uygulamasını açın.
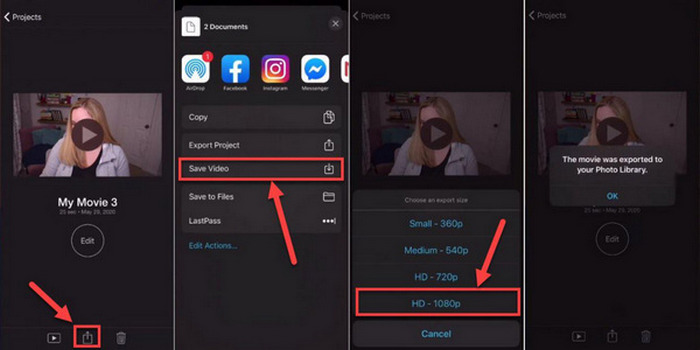
2. Adım. Ardından, Projeler sekmesinden MP4 olarak dışa aktarmak istediğiniz projeyi seçin.
3. Adım. Sonra, Paylaş düğmesine dokunun ve Projeyi Dışa Aktarı seçin.
4. Adım. Son olarak, Videoyu Kaydeti seçin, ardından bir dışa aktarma boyutu belirleyin ve iMovie projesini iPhone veya iPad’inizde MP4’e dönüştürüp kaydedin.
iMovie'yi doğrudan iPhone veya iPad'inizde MP4'e aktarırken ve dönüştürürken, aktarılan MP4 dosyasını barındıracak kadar cihazınızda yeterli depolama alanınız olduğundan emin olun; aksi takdirde aktarma sorunları ve problemleri ortaya çıkabilir.
Bölüm 4: iMovie'yi MP4'e Aktarma Hakkında SSS
iMovie video dosyam neden QuickTime ile uyumlu değil?
iMovie dosyaları, kodeklerdeki veya dosya formatlarındaki farklılıklar nedeniyle QuickTime ile uyumlu olmayabilir. QuickTime sınırlı sayıda video kodek ve dosya türünü destekler, bu nedenle iMovie dosyanız QuickTime tarafından desteklenmeyen bir kodek veya format kullanıyorsa uyumluluk sorunları ortaya çıkabilir. Bunu çözmek için iMovie projenizi QuickTime ile uyumlu farklı bir formatta veya kodekte dışa aktarmayı deneyin.
Bir iMovie'yi dışa aktarmak ne kadar zaman alır?
Dışa aktarma işlemi sırasında işleme ve kodlama genellikle projenin oynatma süresinin 1,5 ila 2 katı kadar zaman alır. Proje karmaşıklığı, video çözünürlüğü ve cihazınızın işlem gücü gibi faktörler dışa aktarma sürelerini etkileyebilir. Ek olarak, daha büyük veya daha karmaşık projeleri dışa aktarmak daha küçük veya daha basit olanlardan daha uzun sürebilir.
iMovie'yi MP4'e aktarmak videolarımın kalitesini etkiler mi?
iMovie'yi MP4'e aktarmak, uygun dışa aktarma ayarlarını seçtiğiniz sürece videolarınızın kalitesini önemli ölçüde etkilememelidir. Ancak, dışa aktarmak istediğiniz videoların kalitesini korumak için istenen çözünürlük, bit hızı ve sıkıştırma ayarlarını seçtiğinizden emin olmanız önemlidir.
Sonuç
iMovie’yi MP4’e nasıl dışa aktaracağınızı öğrenmek, video projelerinizi çeşitli cihaz ve platformlarda paylaşırken uyumluluğu ve esnekliği sağlamanız açısından önemlidir. Bu nedenle, iMovie’de dışa aktarma işlemi sırasında herhangi bir sorunla karşılaşırsanız, burada belirtilen yaygın çözümleri mutlaka gözden geçirin. Bu rehberle iMovie projelerinizi bugün itibarıyla MP4 formatına aktarmaya başlayın.
-
 Ağır Çekim Videolar Hazırlarken iMovie'yi Kullanmanın En İyi Yolları [Çözüldü]
 Normal hızlı videonuzu ağır çekime dönüştürmek için hiç iMovie'yi kullandınız mı? Bu, onun hakkında daha fazla bilgi edinme fırsatıdır.
-
 iPhone ve Mac'te iMovie'de Ses ve Video Nasıl Eşitlenir
 Ses ve videonun iPhone ve Mac'te senkronize olmaması nedeniyle bir sorun mu yaşıyorsunuz? Şimdi bu makaleyi okuyarak iMovie'nin nasıl kullanılacağına geçelim.
-
 Mac'te iMovie'de Videoya Filigran Nasıl Eklenir [All Embracing]
 iMovie'de bir videoya filigran eklemenin sırlarını bilmek ister misiniz? Kimsenin üzerine çayı dökmeyin ve bu makaleyi okuyarak öğrenin.