


En İyi 5 Olması Gereken Araçla Renk Düzeltme Nasıl Yapılır?
Renk düzeltme, bir videodaki renkleri iyileştiren ve uyumlu hale getiren, görsel olarak çekici ve dikkat çekici bir sonuç sunan video düzenlemenin temel bir sürecidir. Kontrast, doygunluk, parlaklık ve ton gibi öğeleri ayarlayarak videoya kusursuz bir görsel hava kazandırmayı içerir. İster profesyonel bir görüntü yönetmeni olun ister yükselmekte olan bir içerik üreticisi, renk düzeltmeyi nasıl uygulayacağınızı bilmek, kapsamlı ve etkileyici görseller sunmak için oyunun kurallarını değiştirir. Süreç, öncelikle görüntüdeki mevcut renk dengesini, parlak alanları, gölgeleri ve orta tonları belirleyip analiz etmekle başlar. Ardından, bu renk öğeleri üzerinde gerçekçi kontrol sağlayan özel yazılımlar kullanılarak ayarlamalar yapılır. Güvenle kullanabileceğiniz en iyi araçlarla video renk sorunları nasıl düzeltilir öğreneceğiniz bu makaleye derinlemesine dalalım.

Bölüm 1. Videoyu Doğru Renklendirmenin Beş Yolu
Videonuzun görsel çekiciliğini artırmak için çevrimiçi olarak çeşitli ücretsiz video düzenleyici renk düzeltmeleri bulmak düşündüğünüz kadar kolay olabilir. Ancak daha gelişmiş ve güvenilir olanları aramak, videolarınız için doğru havayı yaratmak açısından biraz zorlayıcıdır. Çeşitli çok yönlü yazılımlar kullanarak videonuzun renklerini mükemmelleştirmenin, hikaye anlatımınızı geliştirmenin ve izleyicilerinizin ilgisini çekmenin beş etkili yolunu keşfedin.
1. Video Dönüştürücü Ultimate
Video Converter Ultimate, parlaklık, kontrast ve doygunluk gibi temel parametreleri ayarlayarak video kalitenizi yükseltmenize olanak tanıyan hepsi bir arada bir video çözümüdür. Bu kullanışlı renk düzeltici, ayrıca kırpma, kesme ve birleştirme gibi özelliklerle videolarınızı düzenlemenizi sağlar. Bunlara ek olarak, videoları binlerce formata dönüştürmenize ve MP4, MKV, MOV, MP3, AAC, GIF, iPhone, Samsung ve Apple TV gibi çeşitli cihazlara uyarlamanıza imkân tanıyan zengin bir video dönüştürme seçeneği sunar; böylece videolarınız farklı platformlarda keyifle izlenebilir. Ayrıca kullanıcılar, videolarını daha kişisel hale getirmek için altyazı ve filigran ekleyebilir. Basit ve anlaşılır arayüzü sayesinde bu araç, ister yeni başlayan ister deneyimli bir kullanıcı olun, sizin için idealdir. Aşağıdaki adımları izleyerek Video Converter Ultimate kullanarak videonuzun rengini başarıyla nasıl düzelteceğinizi öğrenin.
Adım 1: Renk Düzelticiyi İndirin ve Kurun
Öncelikle, aşağıdaki Ücretsiz İndir düğmelerinden birine tıklayarak aracı edinin. Bilgisayarınızın işletim sistemine göre, bilgisayarınız için uygun olan Video Converter Ultimate sürümünü indirdiğinizden emin olun. Kurmak için talimatları izleyin.
Ücretsiz İndirWindows 7 veya üzeri içinGüvenli İndirme
Ücretsiz İndirMacOS 10.7 veya üstü içinGüvenli İndirme
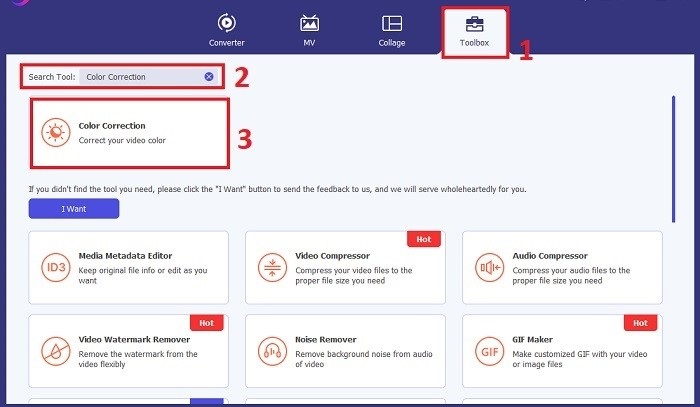
Adım 2: Video Converter Ultimate’ı Başlatın
Kurulum tamamlandıktan sonra Video Converter Ultimate’ı açın. Ana menüdeki Araç Kutusu bölümüne gidin ve Renk Düzeltme özelliğini arayın. Devam etmek için üzerine tıklayın.
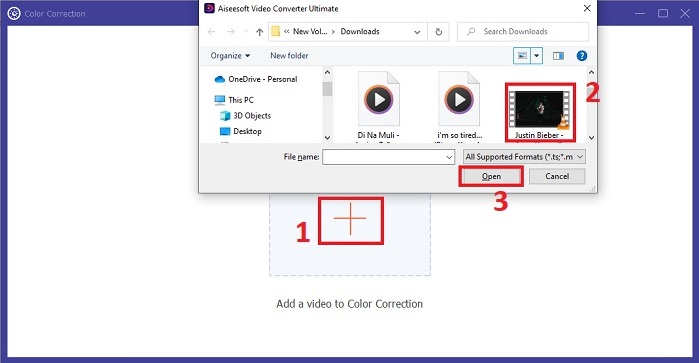
Adım 3: Renk Düzeltme için Videoyu İçe Aktarın
Şimdi, renk düzeltmesi yapmak istediğiniz videoyu içe aktarmak için Artı düğmesine tıklayın. Video dosyanızı bilgisayarınızda bulun. Ardından, yazılıma aktarmak için Aç seçeneğini tıklayın.
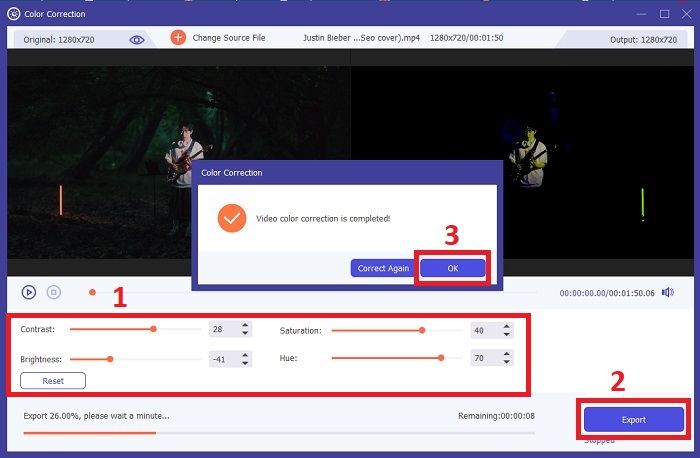
Adım 4: Video Renk Ayarlarını Yapılandırın ve Kaydedin
Videoyu içe aktardıktan sonra, istediğiniz renk düzeltmesini elde etmek için parlaklık, kontrast, doygunluk ve ton gibi renk parametrelerini ince ayar yapın. Renk ayarlarından memnun kaldığınızda Dışa Aktar düğmesine tıklayın. Aracın videoyu işlemesine izin verin ve düzeltilmiş sürümü seçtiğiniz konuma kaydedin.
2. Renk Düzeltme Premiere Pro
Premiere Pro, yüksek kaliteli video düzenleme yazılımı ve kapsamlı renk düzeltme yetenekleriyle tanınır. Hassas ayarlamalar yapmak için çeşitli renk derecelendirme araçları ve efektleri sunar. Renk Düzeltme Premiere Pro, istediğiniz görsel stili elde etmek için renk dengesini ve pozlamayı ayarlamanıza veya yaratıcı görünümler uygulamanıza olanak tanır. Ayrıca yüzlerce yerleşik video efekti ve geçiş arasından seçim yapabilir veya profesyonelce tasarlanmış şablonlarla başlayıp istediğiniz çıktıyı oluşturmak için bunları değiştirebilirsiniz. Üstelik işbirliği özelliklerine sahiptir ve diğer Adobe yazılımlarıyla sorunsuz bir şekilde entegre olur, bu da onu profesyoneller arasında en iyi seçim haline getirir.
Adım 1. Premiere Pro’yu açarak ve videonuzu içe aktararak başlayın. Ardından Renk çalışma alanına gidin.
Adım 2. Renk çalışma alanı içinde, pozlama, renk dengesi ve yaratıcı görünümleri ayarlamak için Lumetri Color panelini kullanın.
Adım 3. Yaptığınız renk ayarlarının istediğiniz sonuçla uyumlu olduğundan emin olmak için scope’ları kullanın. Son olarak, düzeltilmiş videoyu önizleyin ve dışa aktarın.

3. Davinci Renk Düzeltmeyi Çözüyor
Olağanüstü renk derecelendirme kapasitelerini keşfedin. Bu hepsi bir arada yazılım, profesyonel düzenleme, renk düzeltme, görsel efektler ve ses post prodüksiyonunu birleştirir. Aracın kullanıcı dostu arayüzü ve kapsamlı özellik seti ile yaratıcı vizyonunuzu hassasiyet ve stil ile hayata geçirebilirsiniz. Davinci Resolve Renk Düzeltme'nin gelişmiş renk derecelendirme araçları, videolarınızın öne çıkmasını sağlar. İster son teknoloji Hollywood filmleri üzerinde ister kişisel projeler üzerinde çalışıyor olun, bu araç profesyonellere ve meraklılara benzersiz kalitede ilgi çekici anlatılar yaratma gücü verir.
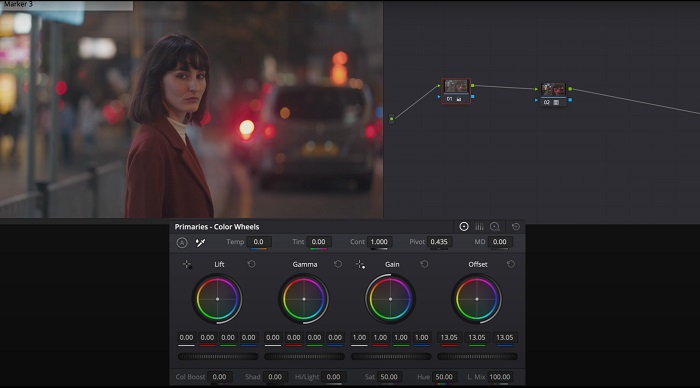
Adım 1. Davinci Resolve’u açın ve videonuzu içe aktarın. İçe aktardıktan sonra Renk sekmesine gidin.
Adım 2. Renk sekmesi içinde, videonuzun rengini düzeltmek için renk tekerleklerini, eğrileri ve düğümleri (nodes) kullanın. Hassas ayarlar için mevcut scope’lardan yararlanabilirsiniz.
Adım 3. Gerekli renk ayarlamalarını yaptıktan sonra, düzeltilmiş videoyu beklentilerinizi karşıladığından emin olmak için önizleyin. Memnun kaldığınızda, videoyu dışa aktarın ve kullanıma hazır hale getirin.
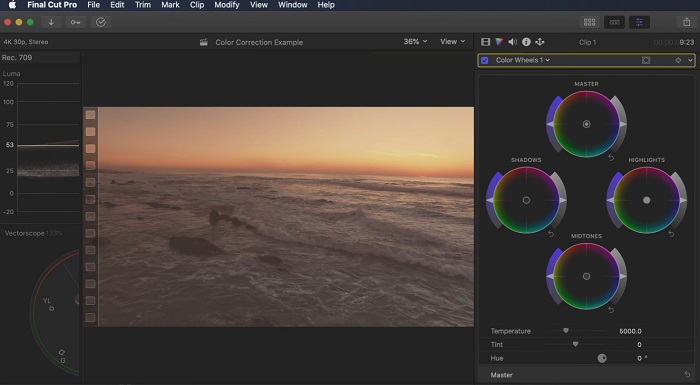
4. Final Cut Pro Renk Düzeltme
Birinci sınıf bir video düzenleme uygulaması arayan bir Mac kullanıcısıysanız Final Cut Pro harika bir seçenektir. Kullanıcı dostu bir arayüze ve düzenlemeyi çocuk oyuncağı haline getiren güçlü özelliklere sahiptir. Renk düzeltme söz konusu olduğunda Final Cut Pro, pozlamayı, doygunluğu ve tonu ayarlamak için bir Renk Kartı ve Renk Tekerleri sunar. Çekimlerinizi geliştirmek için gerçek zamanlı renk efektleri uygulayabilir ve gelişmiş derecelendirme araçlarını kullanabilirsiniz. Ayrıca, Apple cihazlarına ve popüler çevrimiçi platformlara sorunsuz bir şekilde aktarım yapar. Verimlilik ve yaratıcılık arayan bir profesyonelseniz, Final Cut Pro hiç düşünmeden kullanabilirsiniz. Optimum performans için macOS 13.4 veya sonraki bir sürümüne ve Apple silikonlu bir Mac bilgisayarınıza sahip olduğunuzdan emin olun.
Adım 1. Videonuzu Final Cut Pro’ya içe aktararak başlayın, ardından Renk çalışma alanına geçin.
Adım 2. Gerekli pozlama, doygunluk ve ton ayarlarını yapmak için Color Board veya Color Wheels araçlarını kullanın.
Adım 3. Ek renk derecelendirme araçlarını kullanarak videonuzun rengini daha da rafine edin ve en iyi sonucu elde edin. İşlemi tamamladıktan sonra videoyu önizleyin ve düzeltilmiş sürümü dışa aktarın.
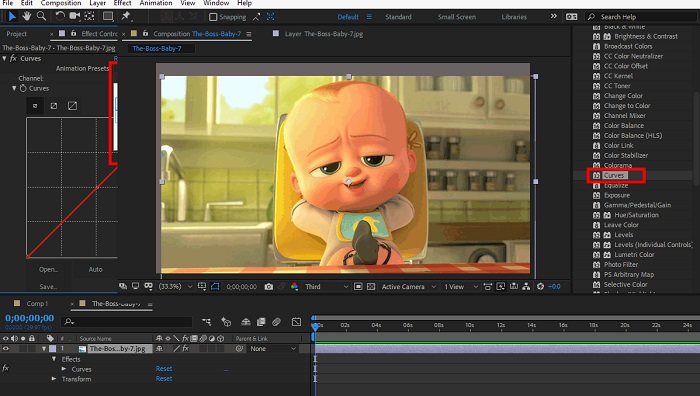
5. After Effects'te Renk Düzeltme
After Effects, güçlü renk düzeltme özelliklerine sahip ünlü bir hareketli grafik ve görsel efekt yazılımıdır. Temel renk düzeltme efektlerinin yanı sıra renkleri geliştirmek ve değiştirmek için çeşitli ayarlama katmanları ve efektleri sağlar. Metin ve grafikleri hızla canlandırabilir, büyüleyici hareketlerle onlara hayat verebilirsiniz. Renk Düzeltme After Effects, istediğiniz renk tonlamasını elde etmek için düzeylerden, eğrilerden ve karıştırma modlarından yararlanmanıza olanak tanır. Farklı Adobe ürünleriyle entegrasyonu ve eğitimler ve eklentiler sağlayan geniş bir topluluk sayesinde çok yönlü bir renk düzeltme seçeneğidir. Üstelik yazılım, sezgisel özellikler paneli, şeffaf katman kontrolü ve iş akışlarını kolaylaştıran ve yaratımları yaratıcılığın en ileri seviyesinde tutan verimli çoklu çerçeve oluşturma gibi özellikleri sunarak sürekli olarak gelişmektedir.
Adım 1. Videonuzu aracın projesine aktararak başlayın. Effects & Presets paneline gidip Curves, Levels veya Color Balance gibi uygun renk düzeltme araçlarını seçerek renk düzeltme efektleri uygulayın.
Adım 2. Uyguladığınız renk düzeltme efektinin üzerine tıklayarak parametrelerine erişin. Ardından, videonuzdaki renkleri düzeltmek ve iyileştirmek için pozlama, kontrast, doygunluk ve ton gibi ayarları değiştirin.
Adım 3. Renk düzeltmelerinin görüntü üzerinde nasıl bir etkisi olduğunu görmek için videoyu Composition panelinde önizleyin. İstediğiniz renk düzeltmesine ulaşana kadar önizlemenize göre ince ayarlar yapın ve ardından videoyu işleyip (render) dışa aktarın.
Daha Fazla Okuma:
Android ve iOS için Ücretsiz En İyi Fotoğraf Renk Geliştirici Uygulamaları
Windows ve macOS’te Videoya Filtre Eklemenin 4 Harika Yolu
Bölüm 2. Video Renk Düzelticileri Hakkında SSS
iMovie'de renk düzeltmeyi nasıl gerçekleştiririm?
iMovie’de renk düzeltmesi yapmak için video klibinizi içe aktarın, seçin ve Renk Düzeltme düğmesine (sihirli değnek simgesi) tıklayın. Tercih ettiğiniz görünümü elde etmek için pozlama, doygunluk ve renk kaydırıcılarını ayarlayın.
OpenShot'ta renk düzeltme araçlarına nasıl erişebilirim?
OpenShot Video Editor’da renk düzeltmesi yapmak için bir klip seçin, Efektler sekmesine gidin ve Color Correction seçeneğine tıklayın. İstediğiniz renk düzeltmesini elde etmek için parlaklık, kontrast, ton ve doygunluk kaydırıcılarını ayarlayın.
Sony Vegas'taki renk düzeltme araçlarına nasıl erişebilirim?
Sony Vegas’ta renk düzeltmesi yapmak için, rengini düzeltmek istediğiniz klibi seçin, Video FX sekmesine gidin ve Color Corrector araması yapın. Bu efekti klibin üzerine sürükleyip bırakın ve Effect Controls penceresinden renk özelliklerini ayarlayın.
Sonuç
Renk düzeltme konusunda ustalaşmak, videolarınızın görsel çekiciliğini artırmak ve etkileyici bir izleme deneyimi oluşturmak için kritik öneme sahiptir. Bu rehberde, kusursuz renk düzeltmesine ulaşmak için beş güçlü renk düzelticiyi inceledik. Yüksek kaliteli video düzenleme araçları arıyorsanız, Video Converter Ultimate, Premiere Pro, Final Cut Pro, DaVinci Resolve veya After Effects’i kullanmayı düşünebilirsiniz. Bu programlar, profesyonel görünümlü videolar oluşturmanıza yardımcı olacak geniş bir özellik ve yetenek yelpazesi sunar. Her program, farklı tercihlere ve uzmanlık seviyelerine hitap eden kendine özgü özellik ve işlevlere sahiptir.
-
 Resim ve Video Göndermeden Önce Instagram Filtresi Nasıl Eklenir ve Yapılır
 Instagram'daki filtreler nelerdir? Nasıl uygulanır? Nasıl yapılır? Bu soruların bu yazıda basit cevapları olacak, bu yüzden onları okuyun.
-
 Görüntüleri Siyah Beyaza Dönüştürmenin Sorunsuz Yöntemleri
 Fotoğraflarınızın nostaljik görünmesini ister misiniz? Size bir cevabımız var. Bu gönderi, renkli bir görüntüyü siyah beyaza dönüştürmenin dikkate değer yollarını sunacak.
-
 Snapchat'te En Sevilen 6 Snapchat Hareketli Snapchat Filtresi
 Snapchat videolarına filtre eklemenin en iyi yollarını bilmek ister misiniz? Pekala, buna tıklayabilir ve Snapchat videolarına uygulamak için kullanabileceğiniz farklı filtreleri öğrenebilirsiniz.