

Cách dễ dàng thêm hình mờ vào video | 3 phương pháp tốt nhất
Hình mờ (watermark) đóng vai trò thiết yếu trong các nội dung số mà chúng ta xuất bản, vì chúng vừa là dấu nhận diện vừa là một lớp bảo vệ chống lại việc sử dụng trái phép. Vì vậy, nếu bạn là người sáng tạo nội dung đăng tải video và muốn video của mình không bị dùng lại khi chưa được phép hoặc không ghi nguồn, thì thêm hình mờ là một giải pháp đơn giản nhưng hiệu quả. Do đó, trong bài viết này, chúng tôi sẽ giúp bạn thêm hình mờ vào video theo ba cách khác nhau. Nếu bạn đã sẵn sàng, hãy bắt đầu ngay.

Phần 1. Thêm hình mờ vào video | Giải pháp tối ưu
Giải pháp tối ưu để thêm hình mờ vào video là sử dụng FVC Screen Video Converter Ultimate. Với công cụ này, người dùng có thể dễ dàng thêm hình mờ vào video của mình bằng tính năng Video Watermark. Đúng vậy, trình chuyển đổi video này có một Hộp công cụ (Toolbox) chứa nhiều công cụ khác nhau mà người dùng có thể sử dụng bất cứ khi nào họ cần giải pháp cho bất kỳ vấn đề âm thanh và video nào gặp phải.
Những đặc điểm chính
• Hỗ trợ hơn 1000 định dạng đầu vào, có thể đáp ứng hầu hết mọi loại video.
• Cho phép người dùng thêm hình mờ vào video.
• Cho phép người dùng thêm hình mờ văn bản vào video.
• Cho phép tùy chỉnh và chỉnh sửa cơ bản hình mờ đã thêm vào.
• Hỗ trợ nhiều tùy chọn đầu ra video khác nhau.
Sau đây là cách thêm hình mờ vào video bằng FVC Video Converter Ultimate:
Bước 1. Trước tiên, bạn cần tải xuống và cài đặt FVC Video Converter Ultimate trên máy tính. Lưu ý rằng nó tương thích với cả Windows và macOS.
Tải xuống miễn phí cho Windows 7 trở lên. Tải xuống an toàn.
Tải xuống miễn phí cho MacOS 10.7 trở lên. Tải xuống an toàn.
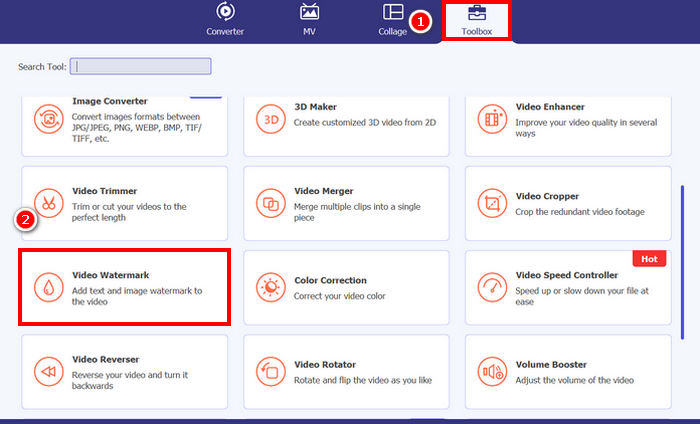
Bước 2. Khởi chạy công cụ, nhấp vào thẻ Toolbox, và từ đó chọn Video Watermark.
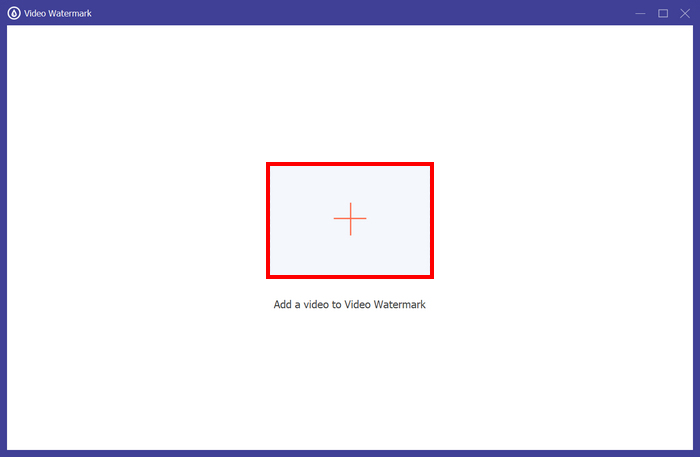
Bước 3. Sau đó, hãy nhấp vào Add a Video to Video Watermark và chọn video mà bạn muốn thêm hình mờ dạng ảnh.
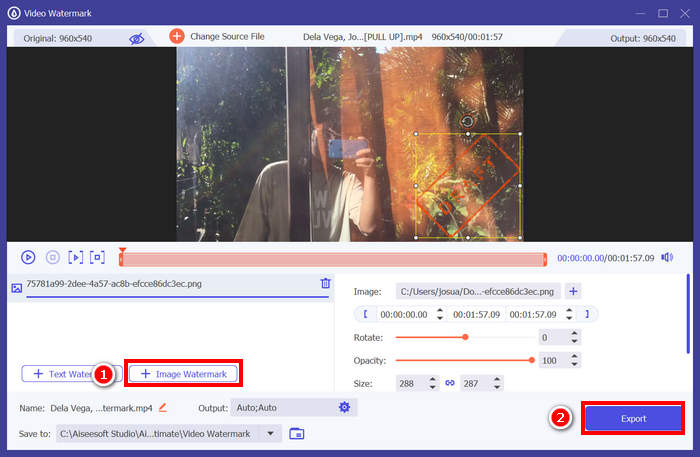
Bước 4. Bây giờ, chọn + Image Watermark để thêm hình ảnh mà bạn muốn dùng làm watermark cho video. Tại đây, bạn có thể điều chỉnh nó. Khi xong, nhấp nút Export.
Với FVC Video Converter Ultimate, bạn có thể dễ dàng thêm hình mờ vào video, lưu ý rằng bạn có thể thêm hình mờ dạng văn bản hoặc hình ảnh. Ngoài ra, nó còn có các tính năng chỉnh sửa cơ bản, cho phép bạn điều chỉnh độ mờ, kích thước và thậm chí xoay hình mờ. Cuối cùng, giao diện rất đơn giản và trực quan, vì vậy ngay cả người mới bắt đầu cũng có thể dễ dàng học cách sử dụng.
Phần 2. Làm thế nào để thêm hình mờ vào video trong Canva?
Canva là một công cụ chỉnh sửa phổ biến, chắc chắn bạn đã từng nghe đến. Nhưng bạn có biết rằng công cụ này cũng có thể dùng để thêm hình mờ vào video không? Đúng vậy, với giao diện thân thiện và tính năng kéo‑thả mạnh mẽ, Canva giúp bạn dễ dàng tải lên logo hoặc hình mờ tùy chỉnh và đặt nó chính xác ở vị trí bạn muốn trên video. Dưới đây là hướng dẫn từng bước cách thêm hình mờ vào video bằng Canva:
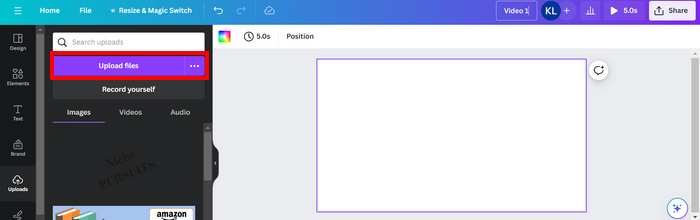
Bước 1. Trước tiên, bạn cần có tài khoản Canva. Bạn có thể đăng ký mới hoặc đăng nhập bằng tài khoản Google.
Bước 2. Tiếp theo, mở Canva và nhấp vào Create a Design, rồi chọn tùy chọn Upload để nhập tệp video mà bạn muốn thêm hình mờ.
Bước 3. Bây giờ, hãy làm tương tự với hình mờ của bạn: tải nó lên rồi kéo thả vào video. Khi đã đặt vào vị trí, bạn có thể phóng to hoặc thu nhỏ hình mờ, chỉnh màu sắc và độ trong suốt của nó.
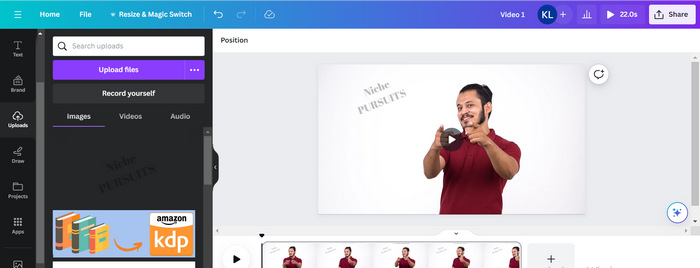
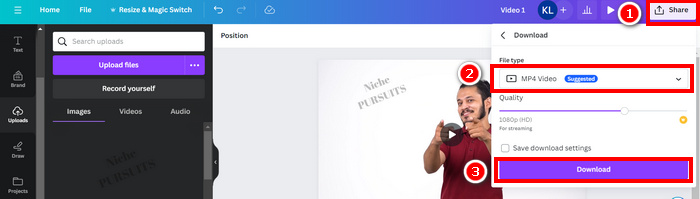
Bước 4. Phát video để xem trước xem hình mờ đã hiển thị trên video chưa. Nếu mọi thứ hoạt động ổn, hãy nhấp nút Share và tải tệp xuống dưới dạng tệp video MP4 bằng cách nhấp nút Download.
Lưu ý: Trong trường hợp hình mờ của bạn quá sáng hoặc quá tối so với video, bạn có thể điều chỉnh độ trong suốt để nó hòa trộn tự nhiên hơn với cảnh quay, không lấn át hình ảnh hay làm người xem bị phân tâm.
Phần 3. Thêm hình mờ văn bản vào video trực tuyến [Miễn phí]
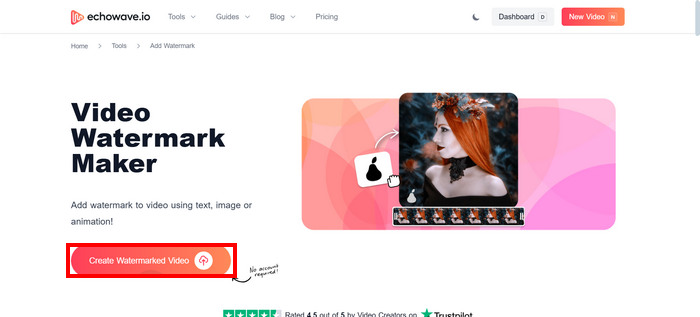
Nếu bạn thích một phương pháp miễn phí và trực tuyến để thêm hình mờ vào video, echowave.io có thể là một lựa chọn tuyệt vời. Công cụ nền tảng trực tuyến này cung cấp các tính năng trực quan cho phép người dùng tạo, chỉnh sửa và trực quan hóa nội dung âm thanh và video. Ngoài ra, với công cụ này, người dùng có thể tận dụng tính năng chỉnh sửa, cho phép thêm hình mờ văn bản. Dưới đây là hướng dẫn từng bước về cách thêm hình mờ văn bản vào video trực tuyến:
Bước 1. Trước hết, trên trình duyệt Chrome của bạn, hãy tìm trang echowave.io.
Bước 2. Tiếp theo, khi đã ở giao diện của công cụ, hãy nhấp vào Create Watermarked Video.
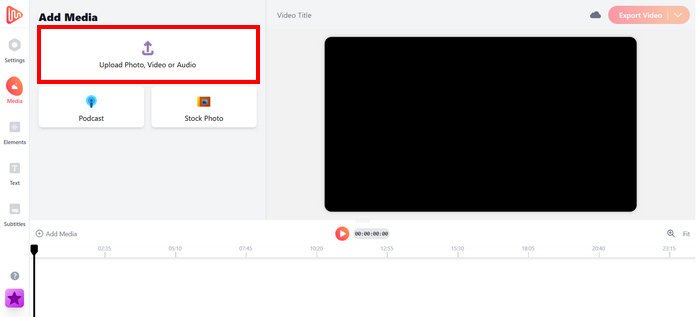
Bước 3. Sau đó, nhấp vào Upload Photo, Video, or Audio để tải lên video mà bạn muốn thêm hình mờ.
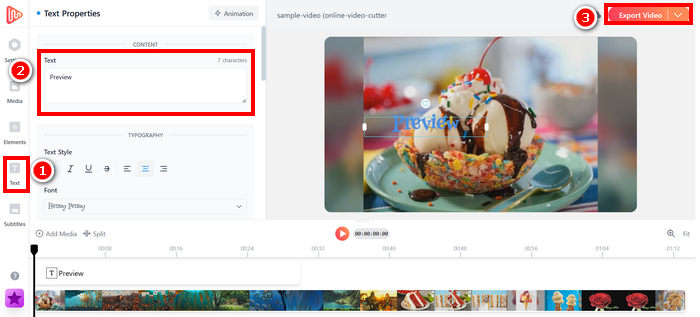
Bước 4. Cuối cùng, ở bảng điều khiển bên trái màn hình, nhấp vào Text để thêm và soạn phần chữ cho hình mờ mà bạn muốn tạo. Trước hết, bạn cần chọn định dạng chữ muốn dùng, sau đó nhập nội dung. Khi hoàn tất, bạn có thể điều chỉnh vị trí đặt hình mờ, và khi mọi thứ đã ổn, hãy nhấp nút Export để lưu tệp.
Mặc dù việc thêm hình mờ vào video bằng echowave.io rất đơn giản và dễ dàng cho người mới bắt đầu, nhưng công cụ này đôi khi có thể bị chậm, ngay cả khi xử lý video ngắn hoặc tệp có kích thước nhỏ.
Nhấp vào đây để đọc thêm về cách thêm hình mờ vào GIF nếu bạn quan tâm.
Phần 4. Câu hỏi thường gặp về việc thêm hình mờ vào video
Có phải việc che hình mờ là bất hợp pháp không?
Có, việc này là bất hợp pháp. Hình mờ thường được sử dụng như một hình thức bảo vệ bản quyền, thể hiện quyền sở hữu hoặc quyền tác giả của nội dung. Việc cố ý ẩn hoặc xóa chúng có thể vi phạm luật bản quyền và có thể dẫn đến hậu quả pháp lý, đặc biệt nếu nội dung đã thay đổi được phân phối lại, sử dụng lại hoặc sử dụng cho mục đích thương mại.
Làm thế nào để thêm hình mờ vào video trong DaVinci Resolve?
Để thêm hình mờ trong DaVinci Resolve, hãy nhập video và hình mờ hoặc văn bản. Đặt video vào dòng thời gian, sau đó kéo hình mờ lên trên video trên một track riêng. Sử dụng bảng Inspector để thay đổi kích thước, di chuyển và điều chỉnh độ mờ. Khi mọi thứ đã ổn, hãy xuất video đã bao gồm hình mờ.
Làm thế nào để thêm hình mờ vào video trong Lightroom?
Để thêm hình mờ vào video trong Lightroom, hãy bắt đầu bằng cách mở Lightroom và chọn ảnh bạn muốn thêm hình mờ. Sau đó, nhấp vào tab Lightroom ở đầu màn hình và chọn "Chỉnh sửa Hình mờ" từ menu thả xuống. Trong cửa sổ "Trình chỉnh sửa Hình mờ" xuất hiện, hãy nhập văn bản hình mờ mong muốn vào ô bên dưới ảnh xem trước. Từ đó, bạn cũng có thể tùy chỉnh kiểu dáng, phông chữ, kích thước và vị trí đặt hình mờ.
Phần kết luận
Thêm hình mờ vào video thực sự rất quan trọng, và biết cách thực hiện là điều thiết yếu để bảo vệ nội dung cũng như khẳng định quyền sở hữu. Dù có rất nhiều công cụ khác nhau, FVC Video Converter Ultimate mang đến một cách thêm hình mờ vào video đơn giản và hiệu quả. Đây thực sự là lựa chọn thực tiễn cho người mới bắt đầu muốn có giải pháp nhanh gọn, nhưng việc khám phá thêm các công cụ khác như Canva hoặc các trình chỉnh sửa trực tuyến cũng có thể hữu ích tùy theo nhu cầu của bạn.
-
 5 cách xóa hình mờ khỏi video trong cách xử lý chuyên nghiệp
 Bạn cần xóa hình mờ khỏi video để video trông chuyên nghiệp? Chà, hãy đọc bài viết này khi chúng tôi thêm phần hướng dẫn về cách thực hiện!
-
 2 ứng dụng tuyệt vời bạn có thể sử dụng để xóa hình mờ khỏi video MP4
 Bài viết này sẽ cung cấp cho bạn những cách đơn giản và dễ dàng nhất về cách xóa hình mờ khỏi video MP4 bằng các thiết bị của bạn như Windows và Mac
-
 Xóa hình mờ Animotica trên các video đã xuất với 3 cách đã được chứng minh
 Bạn đã bao giờ tự hỏi liệu có thể xóa hình mờ Animotica trên các video bạn đã xuất hay không? Bài viết này cung cấp cách thực hiện.