


3 Cách Nén Ảnh Dễ Dàng Cho Email [Hướng Dẫn]
Email là một nền tảng tuyệt vời để gửi tin nhắn có tệp đính kèm ảnh và các tệp khác cần thiết. Tuy nhiên, một số người dùng gặp khó khăn khi gửi ảnh tệp lớn vì chúng dẫn đến thời gian tải lên chậm, gửi không thành công hoặc vượt quá giới hạn kích thước tệp đính kèm do nhà cung cấp email áp đặt. Để tránh những vấn đề này, việc thay đổi kích thước ảnh trước khi gửi là điều cần thiết.
Với điều đó, trong bài viết này, chúng tôi sẽ hướng dẫn bạn 3 phương pháp về cách nén ảnh để gửi qua email, đảm bảo tệp ảnh đính kèm của bạn dễ gửi và nhận mà không làm giảm chất lượng.

Phần 1. Lợi ích của việc nén ảnh cho Email
Nén ảnh nói chung có rất nhiều lợi ích, bao gồm cả việc sử dụng email. Sau đây là những điều bạn có thể tận hưởng khi thay đổi kích thước ảnh để gửi email:
. Vì nén ảnh đồng nghĩa với việc thay đổi kích thước ảnh sang kích thước nhỏ hơn, bạn có thể dễ dàng gửi nhiều tệp ảnh đính kèm trong một email hơn so với ảnh chưa nén.
. Thông thường, các nhà cung cấp dịch vụ email đặt giới hạn về dung lượng tệp đính kèm mà bạn có thể gửi. Bằng cách nén ảnh để gửi email, bạn có thể nằm trong giới hạn này, đảm bảo email của bạn được gửi đi mà không gặp sự cố. Điều này hữu ích khi gửi email cho nhiều người nhận hoặc khi bạn đính kèm thêm các loại tệp khác cùng với ảnh.
. Khi ảnh được nén, điều đó chỉ có nghĩa là chúng chiếm ít dung lượng hơn, cho phép bạn sử dụng tốt hơn hạn mức lưu trữ email của mình.
. Các tệp đính kèm email dung lượng lớn đôi khi có thể bị máy chủ email gắn cờ, dẫn đến lỗi gửi hoặc email bị đánh dấu là spam. Nén ảnh để gửi email giúp tránh những vấn đề này, đảm bảo tệp đính kèm đến được tay người nhận như dự định.
. Trong một số trường hợp khi người dùng dùng điện thoại di động để kiểm tra email, những ảnh đã được nén sẽ dễ tải xuống và xem trên thiết bị di động hơn so với ảnh chưa nén.
Phần 2. Nén ảnh để gửi qua email bằng cách chuyển đổi định dạng ảnh
Nếu bạn muốn nén ảnh để gửi qua email, phương pháp đầu tiên bạn có thể thử là sử dụng công cụ chuyển đổi ảnh. Với công cụ này, nó sẽ chuyển đổi ảnh của bạn sang định dạng bạn mong muốn, trong đó quá trình chuyển đổi cũng tối ưu hóa ảnh của bạn thành kích thước mong muốn và dễ quản lý hơn.
FVC Free Image Converter là một công cụ chuyển đổi miễn phí cho phép người dùng chuyển đổi ảnh của họ sang nhiều định dạng tệp hình ảnh khác nhau, như JPG, PNG và GIF. Vì vậy, nếu bạn đang gửi một tệp hình ảnh qua email ở định dạng chứa nhiều dữ liệu hơn, làm cho dung lượng tệp lớn hơn, bạn hoàn toàn có thể tận dụng công cụ này. Hơn nữa, nó rất lý tưởng khi bạn muốn gửi nhiều tệp lớn vì có thể chuyển đổi hàng loạt tối đa 40 ảnh cùng một lúc. Dưới đây là cách bạn có thể dùng công cụ này để nén ảnh gửi email:
Bước 1. Trước hết, trên trình duyệt, hãy tìm kiếm FVC Free Image Converter để bạn có thể truy cập công cụ trực tuyến này.
Bước 2. Tiếp theo, chọn định dạng tệp đầu ra mà bạn muốn trong tùy chọn Convert to. Sau đó, nhấp vào nút Add Images để nhập những ảnh mà bạn muốn chuyển đổi.
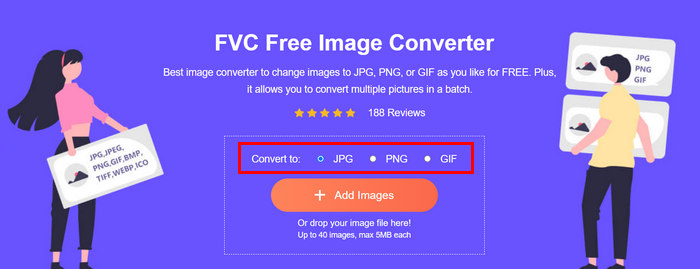
Bước 3. Khi hoàn tất, hãy nhấp vào nút Download All.
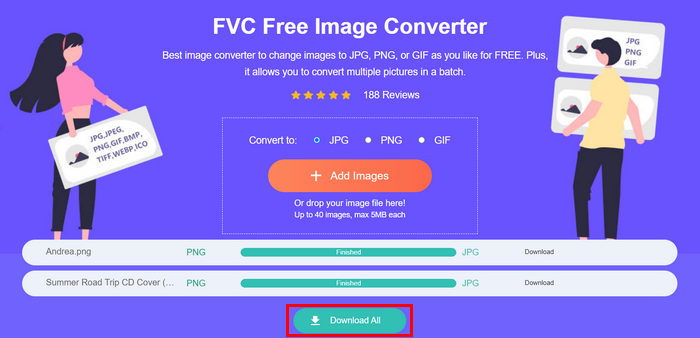 Với công cụ chuyển đổi ảnh miễn phí FVC, bạn có thể yên tâm rằng ảnh đã chuyển đổi của bạn sẽ được nén và giảm kích thước, rất phù hợp để sử dụng qua email.
 Phần 3. Thu nhỏ ảnh cho Email bằng Công cụ nén trực tuyến
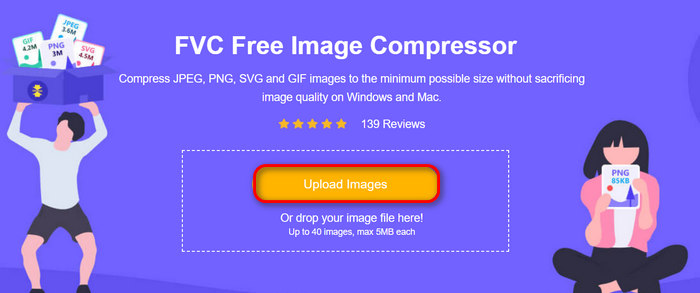
FVC Free Image Compressor là một công cụ nén trực tuyến miễn phí giúp đơn giản hóa quá trình nén ảnh để gửi email. Người dùng chỉ cần tải lên hoặc nhập các tệp hình ảnh và để công cụ tự động nén chúng. Nếu bạn lo lắng về việc giảm chất lượng, công cụ này sử dụng khả năng tối ưu hóa tốt nhất và các thuật toán nén tiên tiến. Điều này sẽ đảm bảo chất lượng hình ảnh của bạn được giữ nguyên khi nén để gửi qua email.
Ngoài ra, nếu bạn phải nén hàng loạt một hình ảnh, công cụ này cho phép bạn nén đồng thời 40 hình ảnh cùng một lúc. Cuối cùng, nó hỗ trợ nhiều định dạng hình ảnh phổ biến như JPEG, PNG, SVG và GIF động.
Bước 1. Trên trình duyệt, truy cập trang web chính thức của họ.
Bước 2. Sau đó, nhấp Upload Images để nhập những ảnh mà bạn muốn nén cho web của mình. Xin lưu ý rằng công cụ này sẽ tự động nén ảnh của bạn ngay sau khi bạn chọn và nhấp Mở (Open).
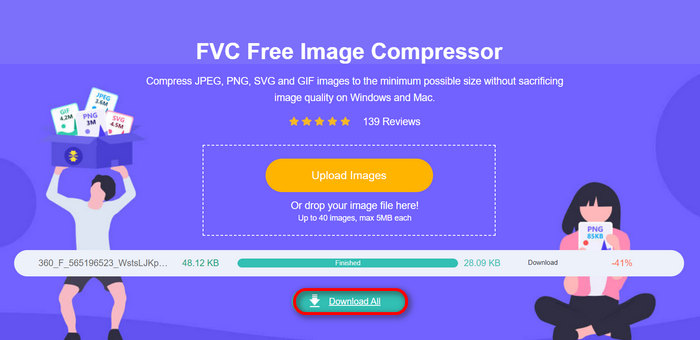
Bước 3. Sau khi nén ảnh, bạn có thể xem trước bằng cách kiểm tra dung lượng mới của chúng sau khi nén. Cuối cùng, nhấp Download All để lưu ảnh của bạn.
Phương pháp này thực sự có thể giúp bạn nén ảnh để gửi qua email mà không cần trải qua các bước phức tạp và phí đăng ký. Hơn nữa, giao diện trực quan và thân thiện với người dùng khiến nó trở thành công cụ lý tưởng cho mọi cấp độ người dùng. Vì vậy, nếu bạn muốn tối ưu hóa ảnh để sử dụng qua email, hãy thử phương pháp này ngay.
Phần 4. Thay đổi kích thước ảnh để gửi qua email theo kích thước đã chỉ định
Nếu bạn muốn thay đổi kích thước ảnh để gửi qua email theo kích thước đã chỉ định, thì bạn có thể thử công cụ IMGonline. Công cụ nén ảnh này cho phép bạn thay đổi kích thước ảnh theo kích thước bạn chọn. Sau đây là cách thực hiện:
Bước 1. Trên trang web của họ, nhấp vào nút Choose File để thêm ảnh mà bạn muốn nén.

Bước 2. Tiếp theo, thiết lập các cài đặt cho việc nén tệp JPEG. Nhập dung lượng bạn muốn, theo KB hoặc MB, tùy theo lựa chọn của bạn.

Bước 3. Trong menu Size Reducing in Megapixel, chọn mức độ bạn muốn nén ảnh hoặc cách bạn muốn giới hạn mức độ nén của ảnh.
Bước 4. Sau đó, chọn giữa Standard JPG hoặc Progressive JPG.
Bước 5. Khi hoàn tất, chỉ cần nhấp nút OK.
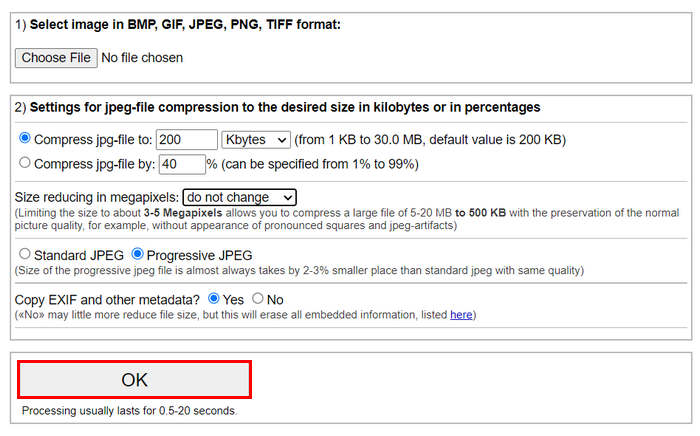
Khi lựa chọn giữa JPG chuẩn và JPG tuần tự, hãy nhớ rằng kích thước của tệp jpeg tuần tự luôn nhỏ hơn 2-3% so với jpeg chuẩn với cùng chất lượng.
Phần 5. Câu hỏi thường gặp về Nén Ảnh cho Email
Tôi nên thay đổi kích thước ảnh bao nhiêu để gửi qua email?
Khi nói đến kích thước lý tưởng để gửi ảnh qua email, mặc dù không có giới hạn nào, nhưng nhìn chung, bạn nên thay đổi kích thước ảnh của mình thành tối đa 1024x768 pixel. Ngoài ra, giữ kích thước ảnh dưới 1MB giúp tránh các vấn đề về giới hạn tệp đính kèm và giúp người nhận dễ dàng tải xuống và xem ảnh hơn.
Làm thế nào để nén hình ảnh cho Gmail?
Nén ảnh cho Gmail có thể được thực hiện bằng nhiều phương pháp khác nhau. Một trong những cách dễ nhất là dùng các công cụ nén trực tuyến như công cụ nén ảnh miễn phí FVC. Để sử dụng, bạn chỉ cần tải lên các tệp hình ảnh của mình và công cụ sẽ tự động nén chúng.
Loại hình ảnh nào là tốt nhất cho email?
Các định dạng ảnh tốt nhất cho email là JPEG và PNG. JPEG được sử dụng rộng rãi nhờ tỷ lệ nén tốt và sự cân bằng giữa dung lượng tệp và chất lượng, rất lý tưởng cho ảnh và hình ảnh có nhiều màu sắc. PNG được ưa chuộng cho các hình ảnh cần độ trong suốt hoặc có văn bản, logo, hoặc đồ họa với cạnh sắc nét vì nó giữ chất lượng cao hơn cho những yếu tố này, mặc dù dung lượng tệp có thể lớn hơn so với JPEG.
Phần kết luận
Việc biết cách nén ảnh để gửi email là vô cùng quan trọng để tránh thời gian tải lên chậm, lỗi gửi và giới hạn dung lượng tệp đính kèm. Bằng cách làm theo các phương pháp đã được trình bày chi tiết trong bài viết này, bạn có thể đảm bảo tệp ảnh đính kèm của mình dễ quản lý và nhanh chóng để gửi và nhận.
Bạn còn chờ gì nữa? Hãy bắt đầu tối ưu hóa tệp đính kèm trong email của bạn ngay hôm nay bằng 3 cách dễ dàng sau đây.
-
 Ảnh bị nén quá mức: Đây là cách dễ dàng để khắc phục chúng
 Bạn đang tự hỏi phải làm gì khi hình ảnh của bạn bị nén quá mức? Hãy đọc bài viết này và tìm hiểu lý do tại sao sự cố hình ảnh này xảy ra và tìm hiểu 2 phương pháp khắc phục chúng.
-
 Thay đổi kích thước hình ảnh thành 100KB: 3 cách tốt nhất để nén hiệu quả
 Bạn đang tìm kiếm một công cụ giúp bạn thay đổi kích thước hình ảnh xuống 100KB? Hãy đọc bài viết này và tìm hiểu 3 phương pháp để thu nhỏ hình ảnh của bạn xuống kích thước tệp mong muốn.
-
 Cách nén ảnh trong Word [Windows và Mac]
 Bạn đang tự hỏi làm thế nào bạn có thể tận dụng Word để nén hình ảnh? Hướng dẫn này sẽ hướng dẫn bạn cách nén hình ảnh trong Word để nén liền mạch.