


Cách tối ưu hóa hình ảnh cho web bằng 4 giải pháp [Nhanh chóng]
Tối ưu hóa hình ảnh đóng vai trò rất quan trọng trên web vì nó giúp giảm thời gian tải trang. Dựa trên các nghiên cứu gần đây, khi hình ảnh không được tối ưu tốt, gần một nửa số khách truy cập sẽ rời khỏi website ngay lập tức, làm giảm lưu lượng truy cập và doanh thu. Việc học cách thực hiện điều này là cần thiết nếu bạn muốn giảm tình trạng tải chậm và xây dựng một trang web ổn định để tăng lượng truy cập và từ đó có thêm thu nhập. Thao tác này khá dễ; với sự trợ giúp của hướng dẫn mà chúng tôi thêm vào về cách tối ưu hóa hình ảnh cho web theo cách đơn giản nhất có thể.

Phần 1. Các cách tốt nhất và miễn phí để tối ưu hóa hình ảnh trực tuyến mà không hy sinh chất lượng hình ảnh
1. FVC Free Image Upscaler
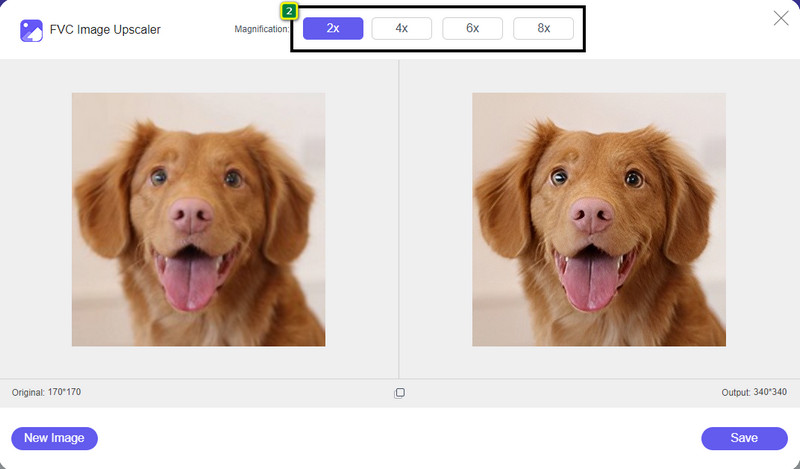
Bạn đang tìm cách tối ưu kích thước và tỉ lệ khung hình của ảnh muốn dùng trên web? FVC Free Image Upscaler là một công cụ có khả năng tối ưu hình ảnh nhờ công nghệ AI mạnh mẽ. Trình phóng to này có thể thay đổi kích thước ảnh mà không làm ảnh hưởng đến độ chi tiết theo PPI, vì vậy bạn sẽ không bị mất chất lượng. Ngoài ra, công cụ trực tuyến này còn có thể sửa các ảnh bị mờ hoặc vỡ hạt bằng cách dò và khắc phục những chỗ khiếm khuyết trên ảnh. Trước khi xuất ảnh, sẽ có khung xem trước để so sánh ảnh trước và sau. Vì vậy, nếu bạn cần thay đổi kích thước ảnh để dùng trên web, bạn có thể làm theo các bước mà chúng tôi đưa ra bên dưới.
Bước 1. Mở trang web bằng cách nhấp vào liên kết này.
Bước 2. Nhấn Upload Image để chèn bức ảnh bạn muốn thay đổi kích thước vào đây.
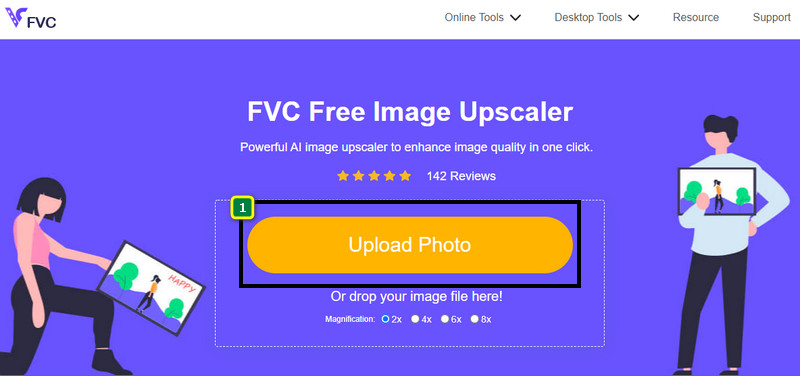
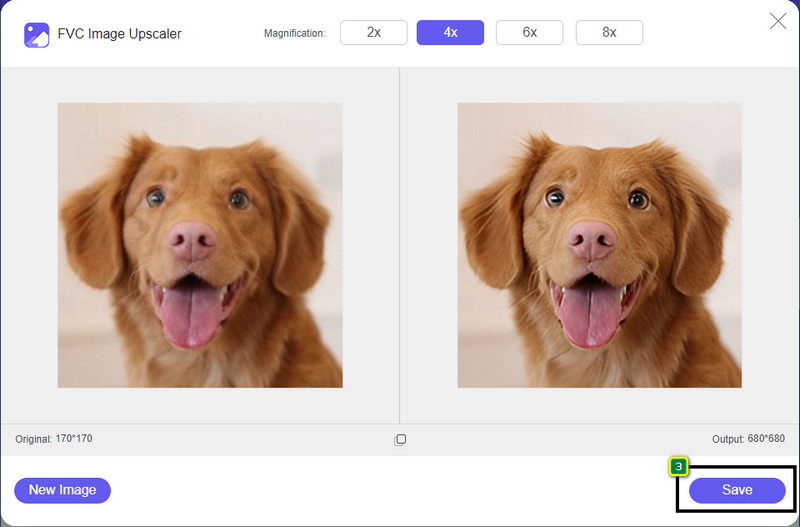
Bước 3. Chọn tùy chọn bạn muốn áp dụng cho ảnh để thay đổi kích thước.
Bước 4. Nhấn Save để tải ảnh đã thay đổi kích thước về ổ đĩa cục bộ của bạn.
2. Máy nén hình ảnh miễn phí FVC
FVC Free Image Compressor cho phép bất kỳ ai tối ưu hình ảnh cho web bằng cách giảm dung lượng tệp. Công cụ này cho phép bạn nén các định dạng phổ biến được dùng trên nhiều website như PNG, JPG, SVG, BMP, v.v., với dung lượng dưới 5MB mỗi ảnh. Với nó, bạn có thể thả nhiều hình ảnh để nén về kích thước tối ưu giúp chúng tải nhanh hơn trên web. Đây là công cụ sử dụng công nghệ AI cung cấp tỉ lệ nén tốt nhất mà bạn khó có thể đạt được với các trình nén trực tuyến khác.
Bước 1. Truy cập trang web chính thức của công cụ bằng cách tìm theo tên, hoặc bạn có thể nhấp vào liên kết này để mở nó trên trình duyệt web của mình.
Bước 2. Kéo và thả tệp hình ảnh bạn muốn tải lên vào đây, hoặc bạn có thể nhấp vào Upload Images; một thư mục sẽ xuất hiện trên màn hình, hãy chọn tệp bạn muốn nén rồi nhấn Open. Công cụ nén này có thể giảm kích thước hơn 40 ảnh cùng lúc.
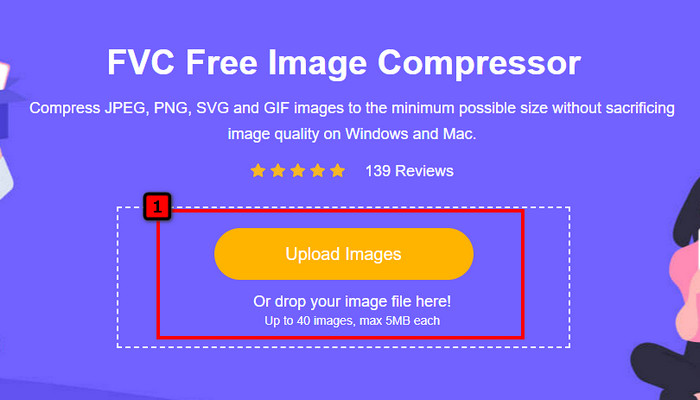
Bước 3. Công cụ sẽ tự động giảm dung lượng tệp ảnh dựa trên thuật toán AI. Sau đó, nhấp Download để xuất bản sao đã nén của hình ảnh.

3. TinyPNG
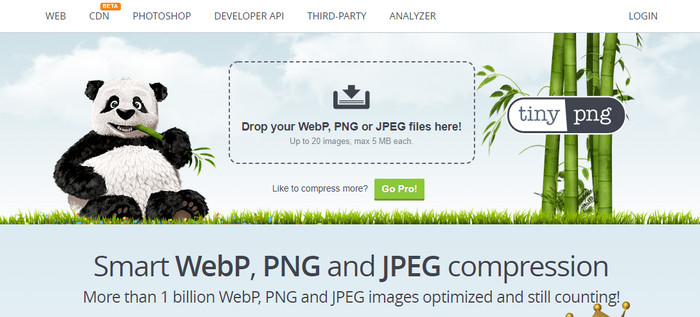
TinyPNG là phần mềm trực tuyến phổ biến và đáng tin cậy mà bạn có thể dùng để tối ưu ảnh. Đây là trình nén có thể tự động giảm kích thước ảnh xuống tới 75% so với kích thước gốc. Bạn có thể tải ảnh từ Dropbox nếu chúng không nằm trong ổ đĩa cục bộ của bạn. Bạn sẽ không gặp khó khăn khi học cách sử dụng trình nén ảnh này vì nhà phát triển đã thiết kế nó rất đơn giản.
Mặc dù nó rất dễ sử dụng, nhưng định dạng được hỗ trợ ở đây chỉ là PNG và JPG và không có bất kỳ định dạng nào khác. Vì vậy, nếu bạn muốn nén BMP, GIF, SVG và các tệp khác mà bạn có, bạn không thể thực hiện ở đây vì nó không hỗ trợ định dạng đã nói. Tuy nhiên, điều này rất dễ sử dụng; bạn có thể làm theo các bước chúng tôi thêm.
Bước 1. Mở công cụ tìm kiếm của bạn và tìm trang web chính thức của TinyPNG.
Bước 2. Nhấp vào biểu tượng nhập để tải lên ảnh bạn muốn nén; công cụ này có thể xử lý 20 ảnh cùng một lúc.
Bước 3. Chờ quá trình nén hoàn tất, sau đó nhấp nút Download để lưu phiên bản ảnh đã được nén mà bạn đã tải lên đây.
Phần 2. Tối ưu hóa Hình ảnh Ngoại tuyến Sử dụng Phần mềm Chuyên nghiệp trên Windows & Mac
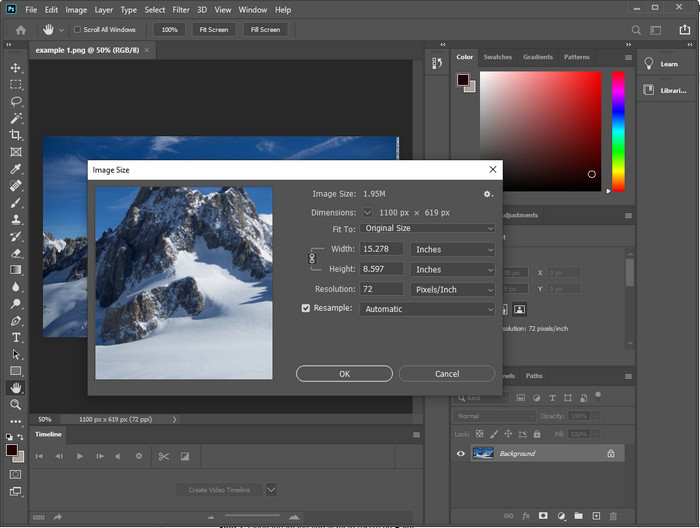
Photoshop có thể thực hiện cả hai tác vụ mà chúng tôi đã đề cập ở phần đầu: thay đổi kích thước và giảm dung lượng ảnh. Mặc dù công cụ này không được tạo ra chỉ để làm việc đó, nó vẫn có thể thực hiện như một tính năng nâng cao bổ sung. Với nó, bạn có thể bắt đầu thêm bộ lọc hoặc chỉnh sửa ảnh theo ý tưởng của mình. Giới hạn duy nhất là trí tưởng tượng của bạn và mức độ phức tạp khi sử dụng phần mềm này.
Không giống như công cụ trực tuyến mà chúng tôi đã đề cập, bạn sẽ không cần kết nối Internet để sử dụng phần mềm này sau khi tải xuống thiết bị của mình. Tuy nhiên, bạn sẽ cần phải mua phần mềm để sử dụng nó, vì vậy nếu bạn muốn xem cách tối ưu hóa hình ảnh cho web trên Photoshop, có một hướng dẫn chúng tôi thêm bên dưới, cho phép bạn giảm kích thước và thay đổi kích thước hình ảnh.
Bước 1. Tải xuống và khởi chạy phần mềm trên máy tính để bắt đầu sử dụng.
Bước 2. Tải lên ảnh bạn muốn chỉnh sửa, sau đó vào menu Image và nhấp Image Size. Thay đổi kích thước theo thông số bạn mong muốn, rồi nhấp OK để lưu thay đổi. Nếu bạn không muốn thay đổi tỉ lệ khung hình hoặc kích thước ảnh, tốt hơn là bỏ qua bước 2.
Bước 3. Nhấn menu File và chọn Save as. Một hộp thoại sẽ hiện lên trên màn hình. Chọn dung lượng tệp bạn muốn đạt được, rồi nhấn OK để bắt đầu xuất ảnh.
Phần 3. Câu hỏi thường gặp về Cách Tối ưu hóa Hình ảnh cho Web
Định dạng hình ảnh tốt nhất cho web là gì?
Tốt hơn bạn nên sử dụng hình ảnh có phần mở rộng là PNG và JPG vì các định dạng này được biết đến là tối ưu hóa tốt trên các trang web khác nhau. Tuy nhiên, đôi khi bạn sẽ cần phải tối ưu hóa nó bằng cách giảm kích thước hoặc thay đổi kích thước hình ảnh, đó là nơi mà công cụ chúng tôi đã thêm vào đây để trợ giúp.
Điều này mang lại nhiều thông tin chi tiết hơn trên web; PNG hay JPG?
Cả hai hình ảnh raster đều hoạt động tốt trên trang web; chúng tải nhanh hơn và tối ưu hóa các trang web. Tuy nhiên, vẫn có sự khác biệt giữa hai định dạng này, chẳng hạn như khi bạn muốn sử dụng nhiếp ảnh thuần túy mà không có độ trong suốt cho web, định dạng bạn muốn sử dụng phải là JPG hoặc JPEG. Nhưng nếu bạn muốn có độ trong suốt 1 bit trên web của mình với độ chi tiết cao, PNG sẵn sàng giúp bạn.
Thay đổi kích thước hình ảnh có làm cho chất lượng xấu không?
Nếu bạn nén ảnh quá mức, rất có thể chất lượng sẽ kém đi, tuy nhiên có thể tránh được nếu bạn không nén quá đà. Khi nén ảnh, tốt nhất là nên giảm khoảng 45% đến 70% để tránh bị mất chất lượng. Nhưng bạn cũng có thể sử dụng trình tăng cường ảnh để tăng chất lượng hình ảnh.
Phần kết luận
Bây giờ bạn đã biết cách tối ưu hóa hình ảnh của mình, bạn nên làm điều đó tốt hơn để có được nhiều lượt truy cập hơn và thu hút nhiều sự chú ý. Với hướng dẫn mà chúng tôi bổ sung ở trên, tin chắc rằng bạn có thể thực hiện một cách dễ dàng, nhanh chóng mà không ảnh hưởng đến chất lượng. Nếu bạn cần thay đổi kích thước hoặc nén, chúng tôi khuyên bạn nên sử dụng sản phẩm FVC mà chúng tôi đưa vào ở đây để giải quyết vấn đề mà không cần tải xuống bất kỳ trình cài đặt nào.
-
 Tạo ảnh HD bằng những cách tốt nhất bạn có thể tìm thấy trên thị trường
 Bạn đang tự hỏi hoặc muốn làm cho hình ảnh HD? Bạn có thể làm theo hướng dẫn mà chúng tôi thêm bên dưới với các giải pháp khác nhau mà bạn có thể sử dụng.
-
 4 công cụ giảm chất lượng hình ảnh hàng đầu mà bạn có thể sử dụng trực tuyến và ngoại tuyến
 Những công cụ giảm chất lượng hình ảnh này có thể giúp bạn giảm chất lượng hình ảnh của mình vì một số lý do. Nếu bạn cần một cái, bạn đọc bài viết này!
-
 Các cách chính thức để nâng cấp hình ảnh lên 4k với hướng dẫn thực hành
 Để nâng cấp hình ảnh lên 4k, bạn sẽ cần một phần mềm trên thiết bị của mình. Nếu bạn chưa có thì bạn sẽ cần chọn công cụ mà chúng tôi đưa vào ở đây.