


دليل شامل حول كيفية قلب مقاطع الفيديو للحصول على تأثيرات بصرية مذهلة
يمكن أن يؤدي قلب مقطع فيديو أو عكسه إلى إنشاء تأثير مرئي فريد وإضافة بُعد جديد إلى لقطاتك. سواء كنت ترغب في إنشاء كشف مثير أو إضافة لمسة ممتعة إلى المحتوى الخاص بك ، فإن قلب مقطع فيديو يمكن أن يضيف عنصرًا ديناميكيًا إلى مشروعك. يمكن تحقيق هذه التقنية باستخدام مجموعة متنوعة من برامج تحرير الفيديو ، من الخيارات المجانية مثل iMovie و Shotcut إلى أدوات أكثر تقدمًا مثل Final Cut Pro و Sony Vegas.
مع إمكانية قلب مقاطع الفيديو أفقيًا أو عموديًا أو حتى في مساحة ثلاثية الأبعاد، تصبح الاحتمالات الإبداعية لا نهائية عندما يتعلق الأمر بقلب أو عكس اللقطات. فلماذا لا تجرّب هذه التقنية وترَ إلى أين يمكن أن تقود مشروع الفيديو التالي لديك؟ في هذا الدليل، سنستعرض أساسيات قلب الفيديو وأفضل الأدوات والتطبيقات لـعكس الفيديو وتعديل لقطاتك المفضلة. بنهاية هذه المقالة ستكون قد امتلكت المعرفة والمهارات اللازمة لإتقان فن قلب الفيديو وإنشاء صور مرئية مذهلة تجذب انتباه جمهورك.

الجزء 1. طريقة بسيطة وفعالة لقلب مقاطع الفيديو
يُعد Video Converter Ultimate من FVC برنامجًا متكاملًا لتحويل الفيديو يمكنه ليس فقط تحويل ملفات الفيديو والصوت بين صيغ مختلفة، بل يوفّر أيضًا أدوات تحرير قوية لتحسين ملفات الوسائط لديك. ومن أبرز مميزاته قدرته على قلب الفيديو بسرعة.
سواء كنت ترغب في تدوير مقطع فيديو تم تسجيله في الاتجاه الخاطئ أو قلبه أفقيًا أو رأسيًا لأغراض فنية ، يمكن أن يساعدك Video Converter Ultimate في تحقيق ذلك دون عناء. من خلال واجهته البديهية وخطواته البسيطة ، يمكنك قلب مقاطع الفيديو ببضع نقرات. علاوة على ذلك ، يدعم التطبيق معالجة الدُفعات ، مما يتيح لك قلب مقاطع فيديو متعددة في وقت واحد لتوفير الوقت والجهد. اتبع الدليل أدناه لعكس مقاطع الفيديو باستخدام هذا البرنامج.
الخطوة 1. حمِّل البرنامج وثبِّته
أولًا، تحتاج إلى تنزيل نسخة من مُثبِّت البرنامج بالضغط على زر Free Download أدناه. بعد ذلك، قم بتثبيته بمساعدة معالج التثبيت. مباشرة بعد الانتهاء، شغِّله على جهاز الكمبيوتر لديك وتعرّف على واجهته.
تنزيل مجانيلنظام Windows 7 أو أحدثتنزيل آمن
تنزيل مجانيلنظام MacOS 10.7 أو أحدثتنزيل آمن
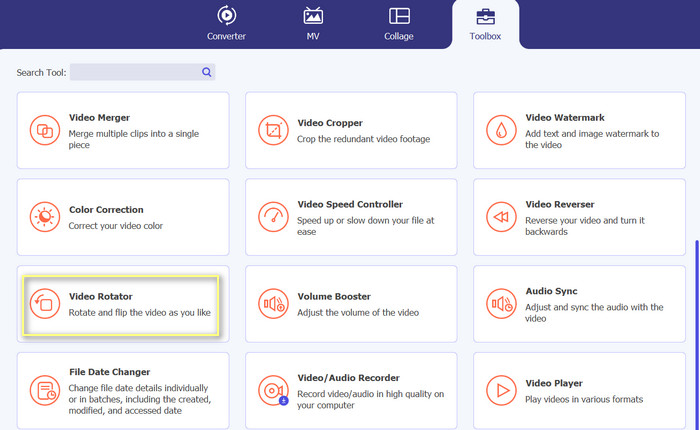
الخطوة 2. الوصول إلى أداة قلب الفيديو
بعد تشغيل الأداة، سترى أربعة تبويبات رئيسية في الواجهة الأساسية. اختر Toolbox > Video Rotator. بديلًا عن ذلك، يمكنك البحث عن الأداة باستخدام شريط البحث للوصول إلى الخيار بسرعة.
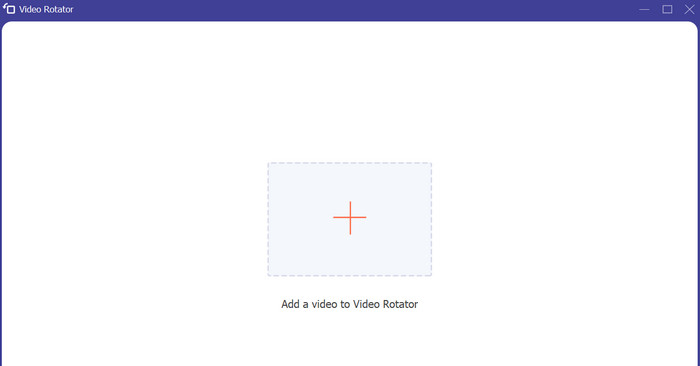
الخطوة 3. إضافة ملف فيديو
يمكنك النقر على زر علامة الزائد في لوحة رفع الملفات الخاصة بـ Video Rotator. بعد ذلك، سيتم نقلك إلى واجهة القلب.
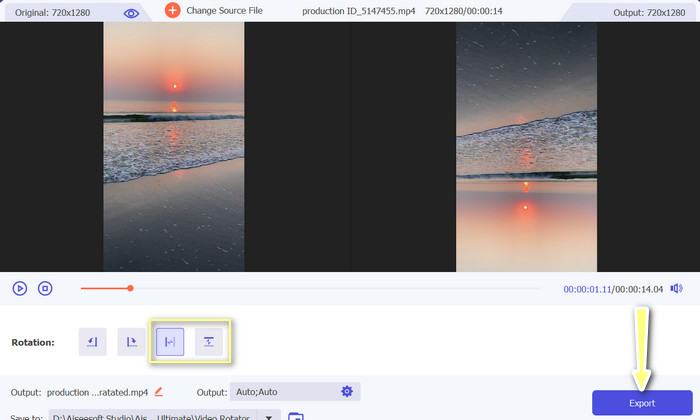
الخطوة 4. قلب الفيديو
بعد ظهور واجهة القلب، ستحصل على إمكانية استخدام أزرار القلب. هناك خيارات لقلب الفيديو أفقيًا أو عموديًا. ما عليك سوى اختيار الزر المناسب ثم النقر على زر Export لإنهاء العملية.
الجزء 2. كيفية قلب مقاطع الفيديو في العرض الأول
يدعم Adobe Premiere Pro مجموعة متنوعة من تنسيقات ملفات الفيديو ، بما في ذلك MP4 و FLV و MOV و WMV وما إلى ذلك. تعد قدرة Premiere Pro على قلب مقاطع الفيديو واحدة من العديد من الميزات التي تجعله متميزًا عن المنافسة. تتيح لك هذه الميزة إنشاء تأثيرات فريدة ومذهلة بصريًا في مقاطع الفيديو الخاصة بك ببضع نقرات فقط. يتضمن تأثيرات مدمجة انعكاس أفقي و انعكاس عمودي. تتيح لك وظيفة الانقلاب الأفقي إنشاء مقطع فيديو يمثل صورة معكوسة للأصل. يتم عكس الفيديو أثناء استخدام Vertical Flip.
ميزة بارزة أخرى في Premiere Pro هي تكامله مع تطبيقات Adobe Creative Cloud الأخرى، مثل After Effects وPhotoshop. يتيح لك هذا التكامل الانتقال السريع بين التطبيقات والعمل بانسيابية عبر مشروعات مختلفة. بالإضافة إلى ذلك، يقدّم Premiere Pro مجموعة واسعة من الملحقات (Plugins) والتكاملات مع أدوات طرف ثالث، ما يجعله حلًا شديد القابلية للتخصيص ومرنًا لتحرير الفيديو، مثل تسريع الفيديوهات، وإضافة الانتقالات، وغير ذلك الكثير.
إتقان كيفية قلب مقطع فيديو في Premiere ، ارجع إلى الخطوات أدناه.
الخطوة 1. افتح Adobe Premiere Pro وابدأ مشروعًا جديدًا
انقر على قائمة File واختر New من شريط القوائم الرئيسي.
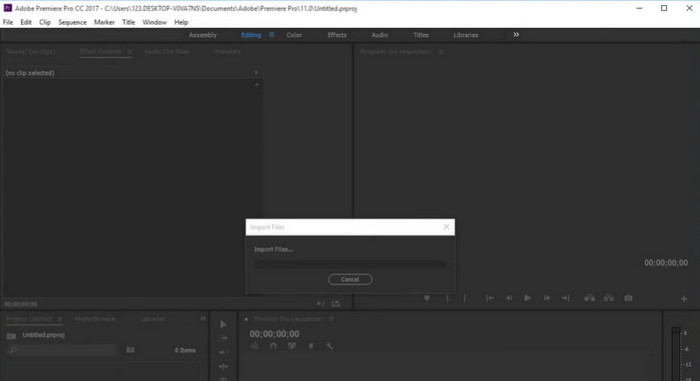
الخطوة 2. استيراد الفيديو الذي تريد تدويره
اختر Import من قائمة File في شريط القوائم. ثم استخدم مستعرض الملفات لاختيار الفيديو وانقر على Open.
الخطوة 3. ضع الفيديو في لوحة المخطط الزمني Timeline
سيظهر الفيديو الذي قمت باستيراده الآن في لوحة Project. اسحب وأسقط المقطع في لوحة Timeline لإضافته إلى المخطط الزمني.
الخطوة 4. اختر الفيديو من المخطط الزمني
لتحويل (تدوير) الفيديو، تحتاج إلى تحديده. انقر على الفيديو في لوحة Timeline لاختياره.
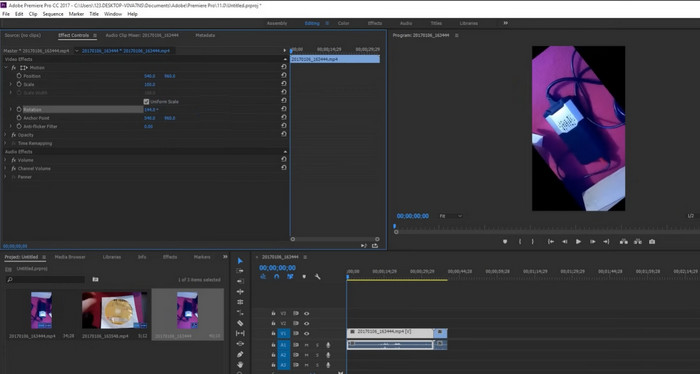
الخطوة 5. تدوير الفيديو
انقر على قائمة Motion المنسدلة في تبويب Effect Controls. سيظهر لك عندها خيار Rotation. انقر على الرقم (النص الأزرق الذي يوضح الدرجات) بجانب Rotation واكتب عدد الدرجات التي تريدها. يمكن تدوير الفيديو إلى 90 أو 180 أو 270 درجة.
الخطوة 6. قلب الفيديو
اذهب إلى تبويب Effects في لوحة Project، وانقر على قائمة Distort المنسدلة، ثم انقر مرتين على Transform من القائمة المنبثقة. بعد ذلك، أزل علامة الصح عن خيار Uniform Scale. لقلب الفيديو أفقيًا أو عموديًا، غيّر الرقم بجانب Scale Width أو Scale Height إلى -100.
الجزء 3. كيفية قلب مقطع فيديو في iMovie
يمكنك إضافة لمسة إبداعية إلى مشروع iMovie الخاص بك عن طريق قلب مقطع. يمكن أن تكون النتائج رائعة حقًا. أو ربما تحتاج إلى قلب مقطع فيديو لتشغيله بشكل صحيح. مهما كانت الحالة ، فإن iMovie تجعل من السهل تدوير وتدوير وقلب الفيديو على أجهزة Mac و iPad و iPhone. تعد قدرة iMovie على العمل مع منتجات Apple الأخرى مثل iPhones و iPads واحدة من أفضل ميزاتها.
هذا يجعل من السهل جدًا استيراد مقاطع الفيديو والعمل على مشاريع على أجهزة مختلفة. يحتوي iMovie أيضًا على مجموعة متنوعة من القوالب والسمات التي تجعل من السهل إنشاء مقطع فيديو يبدو احترافيًا ببضع نقرات فقط. بالإضافة إلى قلب مقطع رأسيًا أو أفقيًا ، يمكنك أيضًا تدويره لليسار أو لليمين. على الرغم من أن iMovie لا يحتوي على العديد من الميزات المتقدمة مثل بعض منافسيه الأكثر احترافًا ، إلا أنه خيار رائع للأشخاص الذين يريدون طريقة سهلة الاستخدام وغير مكلفة لتحرير مقاطع الفيديو. من بين الأشياء العديدة التي تجعله خيارًا شائعًا بين مستخدمي Mac هو أنه يمكنه قلب مقاطع الفيديو.
لذلك ، افتح iMovie على جهاز Mac الخاص بك وتابع الإرشادات أدناه لمعرفة كيفية قلب مقطع فيديو في Premiere.
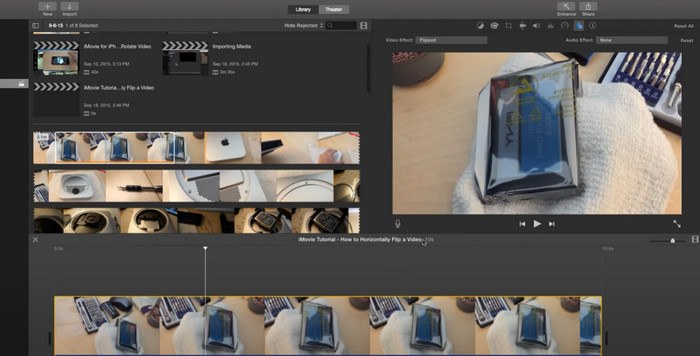
الخطوة 1. افتح iMovie وادخل إلى أداة القص
شغّل iMovie واسقط ملفات الوسائط في المخطط الزمني لبدء التحرير. اختر الفيديوهات التي تريد قلبها في المخطط الزمني، ثم حدد رمز Cropping من شريط الأدوات فوق نافذة الفيديو.
الخطوة 2. قص الفيديو
عند الدخول إلى عارض أداة القص، اسحب الإطار المستطيل إلى الحجم الذي تريده. لتحصل على علامة زائد، حرك المؤشر إلى أحد الزوايا. يمكنك تغيير حجم الفيديو بسحب شريط التمرير. للحفاظ على حدود سوداء حول الفيلم، يمكنك استخدام خيار allow black. يُعد هذا خيارًا رائعًا إذا كنت ترغب في إطار افتراضي في الفيديو النهائي.
الخطوة 3. تدوير الفيديو
لتدوير الصورة، استخدم زر Rotate في أداة القص. تدوير الفيديو إلى اليسار أو اليمين يتم ببساطة عن طريق تدوير المقاطع مع عقارب الساعة أو عكسها. يمكن قلب أو عكس مقاطع الفيديو بسهولة في iMovie. فقط حدد زر Filter. ثم في النافذة التي تظهر، اختر Flipped filter بالنقر على زر Clip Filter.
الخطوة 4. قلب اللقطات
فور الوصول إلى المظهر الذي تريده، اختر زر Apply لتأكيد اختياراتك. يمكن معاينة العمل النهائي في هذه المنطقة. عندما تصبح راضيًا، اضغط على زر Finish. سيتم حفظ الفيديو تلقائيًا.
هل تبحث عن تطبيق iMovie لنظام ويندوز?
الجزء 4. VLC Flip Video Tutorial
مشغل وسائط VLC هو مشغل وسائط متعدد الاستخدامات وشائع الاستخدام اكتسب سمعة لكونه أحد أكثر مشغلات الوسائط موثوقية ومليئة بالميزات المتاحة اليوم. بفضل قدرته على تشغيل مجموعة كبيرة من تنسيقات الوسائط وبرامج الترميز ، بما في ذلك ملفات الصوت والفيديو ، فقد أصبح خيارًا مفضلًا للمستخدمين في جميع أنحاء العالم. علاوة على ذلك ، هذا التطبيق متوافق مع أجهزة كمبيوتر Mac و Windows. يمكن تنزيل برنامج VLC لنظام التشغيل Windows إذا لم يكن لديك بالفعل.
ولكن ما يميز مشغل وسائط VLC حقًا هو التزامه بالتنوع وإمكانية الوصول. إنه متاح عبر العديد من الأنظمة الأساسية ، بما في ذلك Windows و macOS و Linux وحتى الأجهزة المحمولة مثل Android و iOS ، مما يجعله في متناول مجموعة واسعة من المستخدمين. بالإضافة إلى ذلك ، فهو يدعم العديد من اللغات ، مما يجعله خيارًا شائعًا للمستخدمين الذين يتحدثون لغات أخرى غير الإنجليزية.
اتبع الخطوات أدناه لاستخدام ميزة VLC flip video:
الخطوة 1. افتح ملف الفيديو
لقلب فيديو قمت بتسجيله في VLC على ويندوز، افتح البرنامج واضغط على Media ثم اختر خيار فتح ملف (open file).
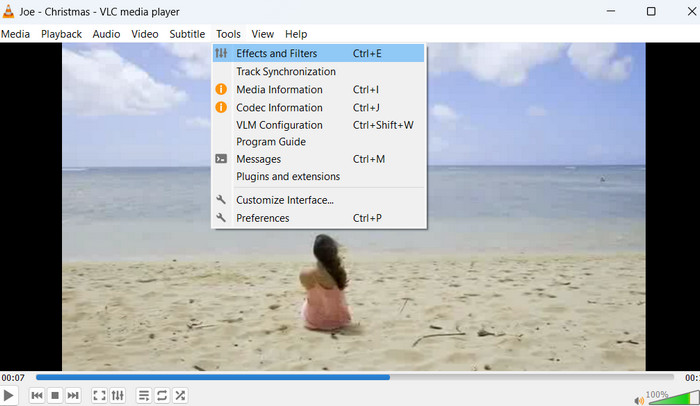
الخطوة 2. الوصول إلى الفلاتر والتأثيرات
بالضغط على أيقونة Tools يمكنك الوصول بسرعة إلى أدوات تحرير الفيديو في VLC. من هناك، يمكنك الوصول إلى مجموعة من Effects and Filters.
الخطوة 3. فتح تأثيرات الفيديو
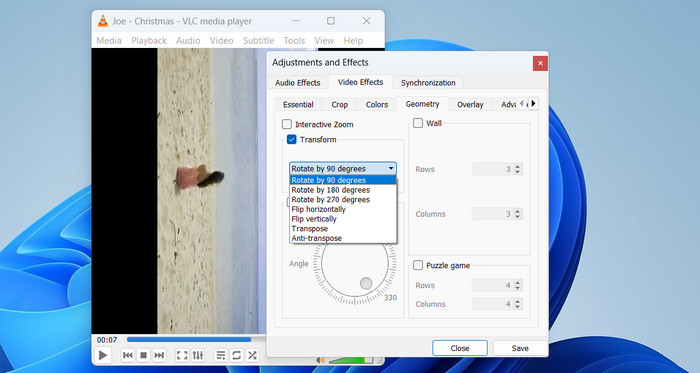
بالنقر على نافذة Adjustments and Effects يمكنك الآن الانتقال إلى تبويب Video Effects.
الخطوة 4. الانتقال إلى Video Effects ثم Geometry
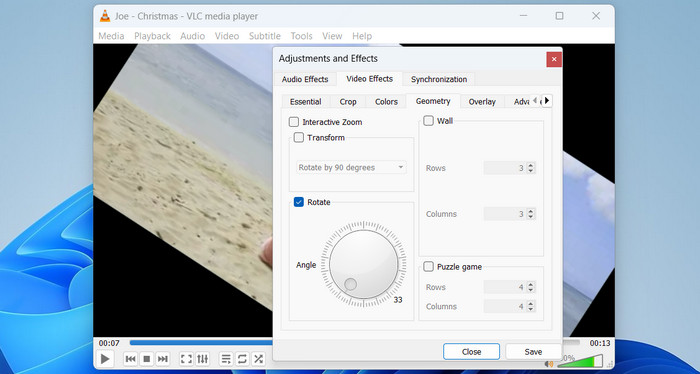
انقر على خيار Geometry، وهو أحد التبويبات الفرعية لتأثيرات الفيديو.
الخطوة 5. خيارات القلب في صندوق Transform
يمكنك تدوير الفيديو بطريقتين مختلفتين. يمكنك القيام بنفس الإجراء لإتقان كيفية قلب مقاطع الفيديو في Windows 10.
الطريقة الأولى: تدويره مقدارًا محددًا
تتمثل إحدى الطرق في التدوير بمقدار 90 أو 180 أو 270 درجة أو تدوير الفيديو أفقيًا ورأسيًا. للقيام بذلك ، انقر فوق مربع التحويل واختر أحد الخيارات من القائمة المنسدلة ، مثل التدوير بمقدار 90 درجة.
الطريقة الثانية: تحريك الدائرة يدويًا
يمكنك أيضًا تدوير الفيديو باختيار زاوية الدوران يدويًا. للقيام بذلك ، حدد المربع بجوار التدوير. يمكنك تحريك رمز الدائرة للعثور على زاوية جيدة. في الركن الأيمن السفلي ، ستجد زاوية الدوران.
الجزء 5. كيفية عكس مقاطع الفيديو في Final Cut Pro
Final Cut Pro هو برنامج حديث لتحرير مقاطع الفيديو التي تم إنشاؤها لتلبية احتياجات المحترفين. تعد القدرة على قلب مقاطع الفيديو أحد أفضل الأشياء في Final Cut Pro. تتيح هذه الميزة المفيدة جدًا للمستخدمين إضافة تأثيرات خاصة إلى مقاطع الفيديو الخاصة بهم والتي تكون فريدة وجميلة في النظر إليها. يجعل محول الفيديو هذا من السهل جعل الفيديو يبدو كصورة معكوسة أو مجرد قلبه أفقيًا أو رأسيًا.
لكن هذه مجرد قمة جبل الجليد فيما يتعلق بإمكانات Final Cut Pro. فهو يقدّم مجموعة واسعة من الأدوات المتقدمة والتأثيرات التي تتيح للمستخدمين إنشاء فيديوهات عالية الجودة بسهولة. يمتلك Final Cut Pro كل ما تحتاجه لإنشاء فيديوهات بمستوى احترافي، بدءًا من تصحيح الألوان وتحرير الصوت وصولًا إلى إزالة العلامات المائية والتأثيرات الخاصة.
الخطوة 1. اختر مقطعًا من المخطط الزمني
في البداية ، يجب عليك استيراد المقاطع إلى البرنامج. الآن ، يوجد الجدول الزمني في الجزء السفلي من Final Cut Pro. بعد وضع المقاطع على المخطط الزمني ، يمكنك منحها عناوين ونصوص قبل وضعها في مقاطع الفيديو الخاصة بك.
الخطوة 2. انقر على زر Transform
يمكنك الوصول إلى أداة Transform من قائمة منبثقة. توجد في الزاوية السفلية اليسرى، لذلك من السهل رؤيتها. يمكنك أيضًا استخدام الاختصار بالضغط على (shift-T). أو اضغط بزر الفأرة الأيمن (Control-click) في العارض واختر Transform.
الخطوة 3. قلب مقاطع الفيديو
انقر على مقاطع الفيديو التي تريد قلبها في المخطط الزمني وتأكد من تمييزها. ثم انقر على أيقونة Inspector في الجهة اليمنى لفتح لوحة Inspector، حيث سترى خيار Transform.
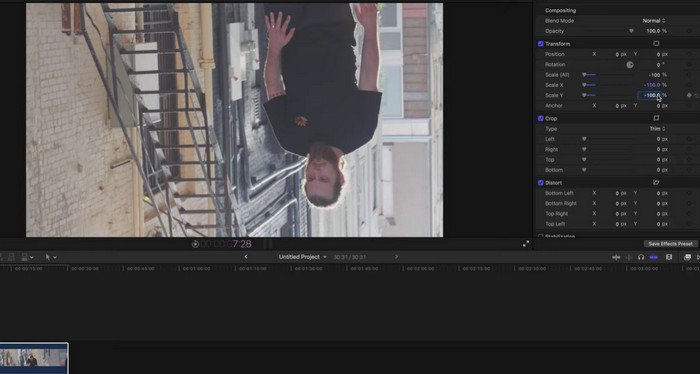
يتيح لك زر Scale تغيير حجم الصورة. إذا قمت بالنقر فوق السهم الصغير الموجود بجانبه ، فسترى X و Y كخيارات. أدخل 1.00 في الشريط الجانبي X واضغط على مفتاح Enter لقلب مقطع الفيديو. ثم سترى أن المقطع المحدد في المخطط الزمني قد انعكس أفقيًا. إذا وضعت -100 في الشريط الجانبي Y ، فسيتم قلب المقطع رأسياً أو قلبه إلى الأعلى بطريقة خاطئة.
الجزء 6. كيفية قلب مقاطع الفيديو في حل دافينشي
إذا كنت قد سئمت من استخدام برامج تحرير الفيديو التي لا تقطعها؟ لا تنظر إلى أبعد من DaVinci Resolve ، البرنامج المتوافق مع معايير الصناعة لتحرير الفيديو الاحترافي. يعد DaVinci Resolve أيضًا متعدد الاستخدامات بشكل لا يصدق ، مع التوافق عبر مجموعة من الأجهزة والأنظمة الأساسية ، بما في ذلك Windows و Mac و Linux. وهذا يجعله خيارًا مثاليًا لمحرري الفيديو الذين يحتاجون إلى العمل عبر أجهزة متعددة أو الذين يرغبون في التعاون مع الآخرين في مشروع ما.
تعد القدرة على قلب مقاطع الفيديو واحدة من أفضل ميزات DaVinci Resolve. باستخدام هذه الميزة ، يمكنك إضافة تأثيرات مذهلة إلى مقاطع الفيديو الخاصة بك والتي ستجعلها مميزة. يجعل DaVinci Resolve من السهل قلب مقطع فيديو أفقيًا أو رأسيًا أو إنشاء تأثير صورة معكوسة. هل تريد معرفة كيفية قلب مقاطع الفيديو في DaVinci Resolve؟ اتبع الخطوات الموضحة:
الخطوة 1. افتح DaVinci
على جهاز الكمبيوتر لديك، افتح برنامج DaVinci. في النافذة الأولى، يمكنك فتح بعض المشاريع القديمة. انقر على New Project إذا كنت تريد إنشاء مشروع جديد. أدخل اسم المشروع ثم انقر على Create.
Step 2. ضع الفيديو في البرنامج
انقر على Media بعد أن تذهب إلى File > Import. يمكنك أيضًا استخدام اختصار لوحة المفاتيح Ctrl+I. اختر فيديو من جهاز الكمبيوتر لديك ثم انقر على Import. سيكون الفيديو الذي قمت باستيراده في حوض الوسائط (media pool). الآن، فقط اسحب الفيديو إلى الخط الزمني (timeline).
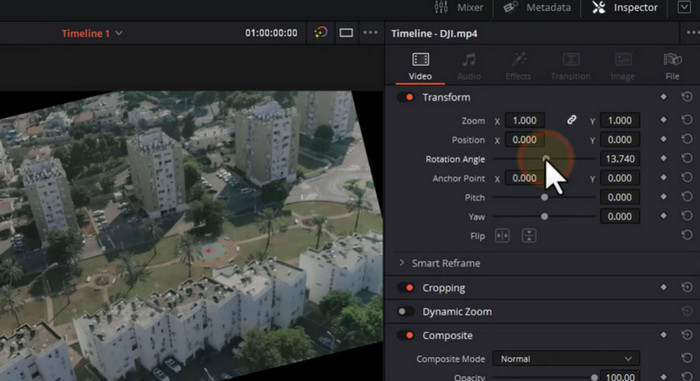
Step 3. كيفية عكس الفيديو في DaVinci
يمكنك العثور على إعداد العكس (flip) في لوحة Inspector. يمكنك عكس الفيديو عن طريق النقر على زر Inspector في الزاوية العلوية اليمنى من الشاشة. ستظهر اللوحة على اليمين. ابحث عن خيار Flip. ستكون هناك خيارات للعكس إلى اليسار وإلى اليمين. يمكنك النقر على أي نوع عكس تريده.
Step 4. تعديل الفيديو
الأمر متروك لك عندما تريد تعديل الفيديو أكثر. مع DaVinci ، محرر فيديو كامل الميزات ، يمكنك إضفاء لمسة احترافية على مقاطع الفيديو الخاصة بك. استخدم هذه الأداة لتلميع عملك بدقة بكسل.
Step 5. حفظ الفيديو للمشاركة أو للمشاهدة لاحقًا
ما عليك سوى اختيار Quick Export من قائمة File. بعد تعديل الفيديو بالشكل الذي تريده، اضغط على زر Export.
الجزء 7. أسئلة وأجوبة حول تقليب مقاطع الفيديو
هل هناك حد لحجم الملف أو طول الفيديو الذي يمكن قلبه في OpenShot؟
لا ، يمكنك استخدام OpenShot لقلب مقاطع الفيديو دون أي قيود محددة على حجم الملف أو طول الفيديو الذي يمكن قلبه. ومع ذلك ، قد تستغرق معالجة مقاطع الفيديو الأكبر والأطول وقتًا أطول وقد تتطلب طاقة معالجة وذاكرة أكبر على كمبيوتر المستخدم.
هل من السهل قلب مقاطع الفيديو في PowerDirector؟
نعم ، يعد قلب مقاطع الفيديو في PowerDirector عملية بسيطة. يستخدم المستخدمون PowerDirector لقلب مقاطع الفيديو بسرعة عن طريق تحديد مقطع الفيديو الذي يريدون قلبه واختيار أداة Rotate and Flip من شريط الأدوات. من هناك ، يمكنهم تحديد الخيار Flip Horizontally أو Flip Vertically لقلب الفيديو.
هل يمكن لـ Shotcut تصدير مقاطع الفيديو بتنسيقات ودقة مختلفة؟
بعد وظيفة ShotCut flip video ، يمكنك تصدير مقاطع الفيديو التي تم تحريرها في مجموعة متنوعة من التنسيقات والدقة ، بما في ذلك HD و 4 K وحتى الدقة المخصصة. يمكن للمستخدمين أيضًا الاختيار من بين مجموعة من الإعدادات المسبقة للتصدير بناءً على الاستخدام المقصود للفيديو ، مثل YouTube أو Vimeo أو الوسائط الاجتماعية.
ما هي ميزات تحرير الفيديو الأخرى التي تقدمها Sony Vegas إلى جانب تقليب مقاطع الفيديو؟
تقدم Sony Vegas عددًا كبيرًا من ميزات تحرير الفيديو ، بما في ذلك تشذيب الفيديو وتقسيمه ودمجه ، بالإضافة إلى ميزات متقدمة مثل تدرج الألوان والمؤثرات الخاصة والتحرير ثلاثي الأبعاد بصرف النظر عن ميزة Sony Vegas flip video. كما أن لديها مجموعة قوية لتحرير الصوت مع أدوات لتقليل الضوضاء والتوازن وخلط الصوت المحيطي.
خاتمة
باختصار، يمكن أن يضيف عكس الفيديو عنصرًا مثيرًا وفريدًا إلى محتوى الفيديو الخاص بك، مما يمنحك منظورًا جديدًا وتأثيرًا بصريًا ديناميكيًا. سواء كنت تُنشئ منشورًا ممتعًا لوسائل التواصل الاجتماعي أو إنتاجًا احترافيًا، فإن القدرة على عكس اللقطات أفقيًا أو عموديًا مفيدة للغاية. إضافة إلى ذلك، هناك مجموعة واسعة من برامج تحرير الفيديو المتاحة، مما يجعل من السهل والبسيط flip videos، بحيث يمكنك تجربة تقنيات مختلفة والعثور على الأسلوب المثالي الذي يناسب مشروعك.
-
 كيفية ضغط مقاطع الفيديو مجانًا / جرب هذه الضواغط السبعة للفيديو عبر الإنترنت
 اقرأ واحصل على 7 طرق لضغط مقاطع الفيديو مجانًا على جهاز الكمبيوتر أو الهاتف. يمكنك تقليل مقاطع الفيديو الكبيرة إلى أحجام ملفات صغيرة للبريد الإلكتروني و Twitter و Instagram و YouTube و WhatsApp والمزيد بسهولة.
-
 4 طرق مذهلة لإضافة فلتر إلى الفيديو على نظامي التشغيل Windows و macOS
 هل تريد معرفة أفضل طريقة لوضع المرشحات على مقاطع الفيديو؟ لحسن الحظ ، وجدنا برامج تحرير الفيديو الثلاثة التي يمكنك استخدامها في هذه المهمة ؛ استمر في قراءة هذا المنشور لمعرفة المزيد.
-
 كيفية تقصير الفيديو بسهولة باستخدام أفضل الأدوات
 تعرف على كيفية تقصير مقطع فيديو باستخدام الأداة الأفضل والأكثر استخدامًا. اقرأ هذه المقالة للتعرف على التفاصيل الكاملة حول الأدوات وكيفية استخدامها.