

4 maneres de desenfocar fotos a l'iPhone per obtenir resultats semblants a professionals
En el vertiginós món de la fotografia amb telèfon intel·ligent, l’iPhone destaca com una potència, ja que ofereix als usuaris una àmplia selecció de funcions per capturar moments inoblidables amb una facilitat incomparablement gran. Una joia sovint passada per alt en l’arsenal d’edició de fotos de l’iPhone és la capacitat d’empa-rar (difuminar) imatges. Aquesta tècnica pot afegir profunditat, dramatisme i un toc de professionalitat a les teves instantànies. En aquest article, t’explicarem pas a pas el procés de difuminar fotos amb el teu iPhone, desbloquejant un món de possibilitats creatives a l’abast de la teva mà, des de l’ús del mode retrat, eines en línia i aplicacions de tercers.

Part 1. Com desenfocar fotos a l'iPhone
Mode retrat
El mode retrat a l'iPhone és una funció especialitzada dissenyada per afegir profunditat a la qualitat de les fotografies. Crea aquesta poca profunditat de camp, que permet que el subjecte destaqui del seu fons. Preguntes com Pots desenfocar el fons d'una foto en un iPhone solen fer algú nou a l'ecosistema d'Apple. És possible desdibuixar les vostres fotos a l'iPhone, ja que iOS va introduir el mode retrat al seu model 7 Plus fins al darrer, que es detallen a continuació els passos per fer-ho.
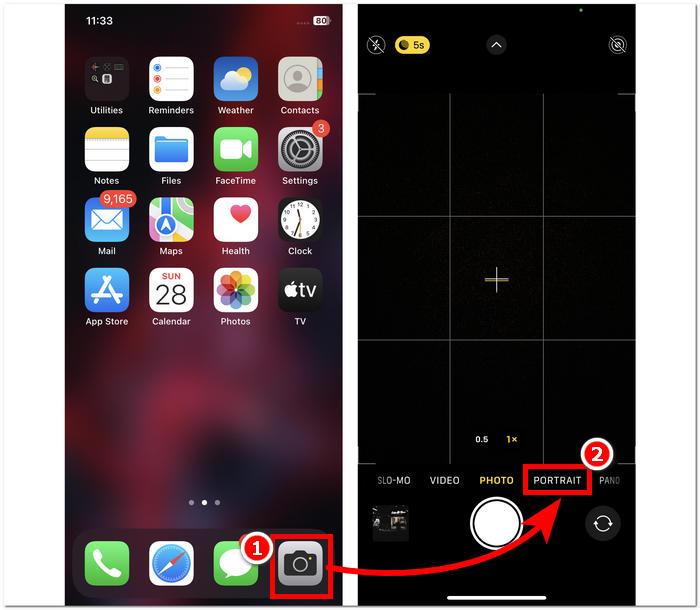
Pas 1. Al teu iPhone, obre l’aplicació Càmera.
Pas 2. Prem la secció Retrat a la configuració de la teva càmera.
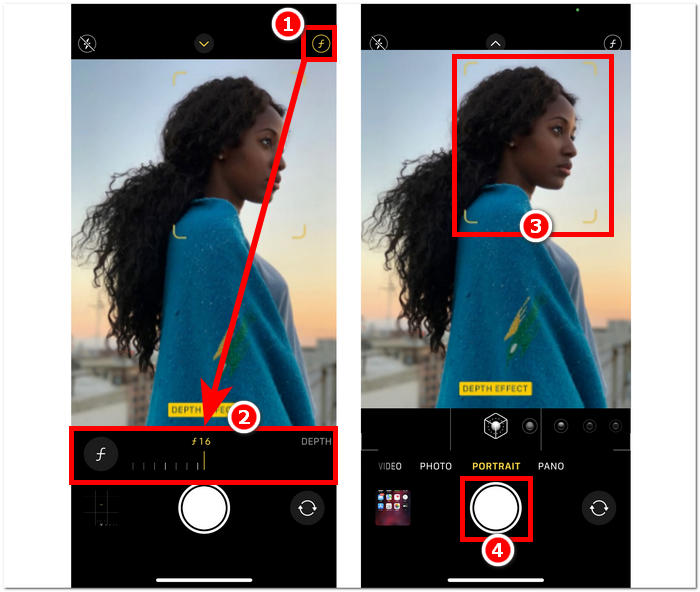
Pas 3. A la pantalla, toca la icona f situada a l’angle superior dret i ajusta la profunditat que vols a les teves fotos.
Pas 4. Quan estiguis satisfet amb la profunditat, toca el teu subjecte per enfocar la foto i, finalment, prem el botó Obturador per capturar les fotos.
Fer servir el mode retrat a l’iPhone és senzill quan entens l’efecte de la profunditat de camp a les teves fotos i saps moure’t per la interfície de l’aplicació de càmera. A més, si te’n penedeixes, pots treure el difuminat de les imatges fàcilment.
Sense el mode retrat
Com desenfocar una foto en un iPhone sense el mode retrat? Desenfocar fotos amb el vostre iPhone quan no té el mode retrat pot ser un repte, ja que el mode retrat s'introdueix al seu model 7 Plus i superior. Per tant, trobem maneres per als usuaris que no tenen el mode retrat als seus iPhones. Això s'assembla més a una punta o hack i requereix la mà d'obra manual de l'usuari. Si es fa de manera eficaç, podeu aconseguir resultats similars al mode retrat.
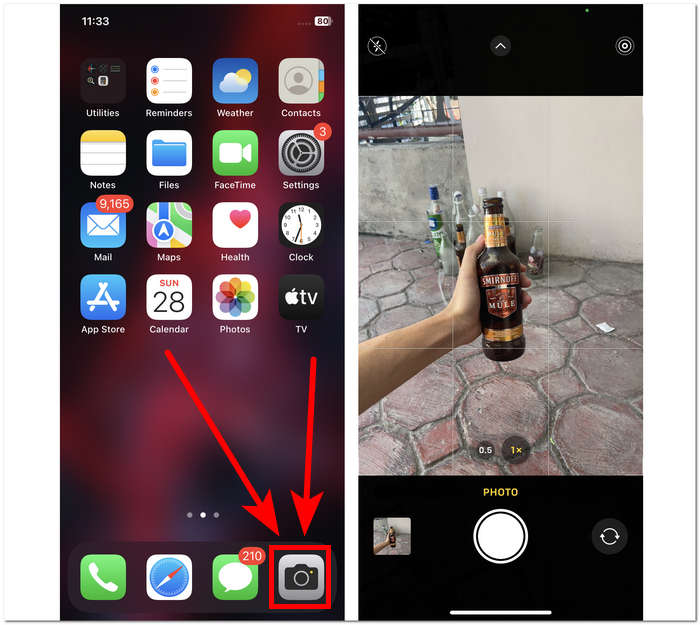
Pas 1. A l’iPhone, obre l’aplicació Càmera.
Pas 2. A la interfície principal, col·loca’t tu i el subjecte lluny del fons movent-te enrere.
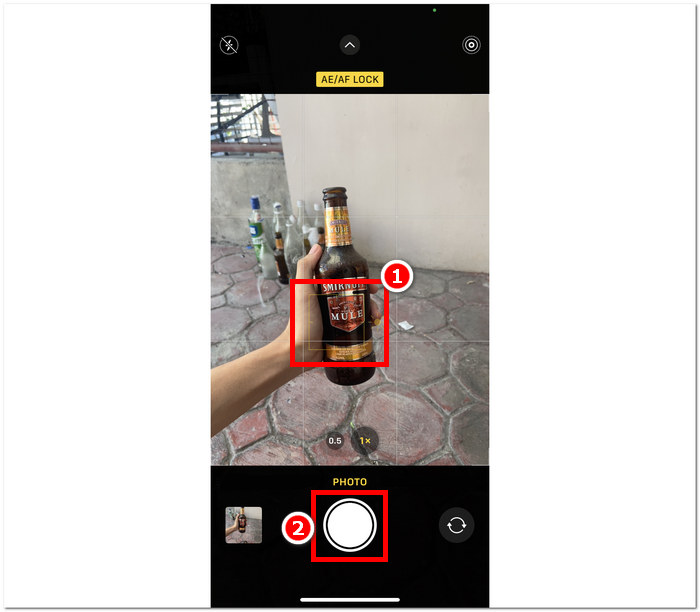
Pas 3. Mantén premut el subjecte fins que aparegui AE/AF LOCK a la part superior de la pantalla. Això farà que el subjecte sigui el punt de focus de la càmera i que el fons quedi difuminat.
Pas 4. Quan el subjecte destaqui sobre el fons borrós, ja estaràs a punt per capturar les fotos. Només cal que premis el botó Obturador per fer les fotos.
És possible desenfocar fotos en un iPhone fins i tot sense les funcions del mode retrat a la configuració de la càmera creant manualment una distància entre el subjecte i el fons, així com enfocar correctament. Aquest pas no només s'aplica als usuaris d'iOS, sinó també als usuaris d'Android que no tenen el mode vertical a la configuració de la càmera.
Aplicació de tercers: Snapseed
Snapseed es troba entre les aplicacions d'edició de fotos potents i de qualitat professional desenvolupades per Google. Aquesta aplicació està plena de funcions i eines que un usuari necessita per a cada tasca d'edició de fotografies, i entre elles hi ha desenfocar les teves fotos amb només el teu iPhone. Recórrer a una aplicació de tercers també us pot ajudar a resoldre els vostres dubtes sobre com desenfocar les cares de les persones a les fotos de l'iPhone, ja que l'aplicació us permet decidir quina part voleu desenfocar, a diferència del mode retrat, on només podeu seleccionar o toqueu els subjectes per enfocar.
Pas 1. Descarrega i obre Snapseed al teu iPhone des de l’App Store.
Pas 2. Un cop siguis a la interfície de l’aplicació, toca la pantalla per afegir les fotos a les quals vols aplicar el difuminat.
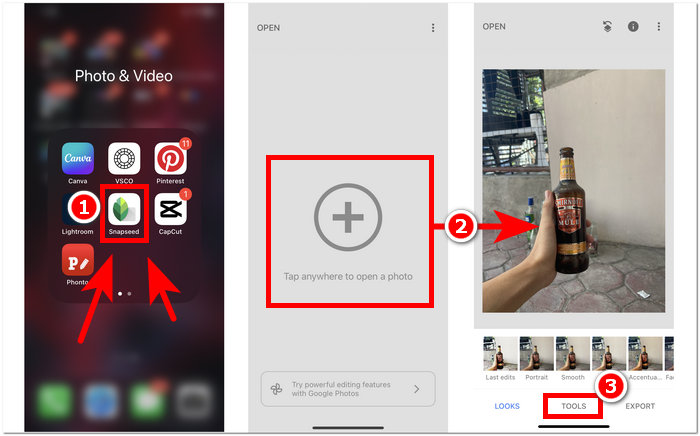
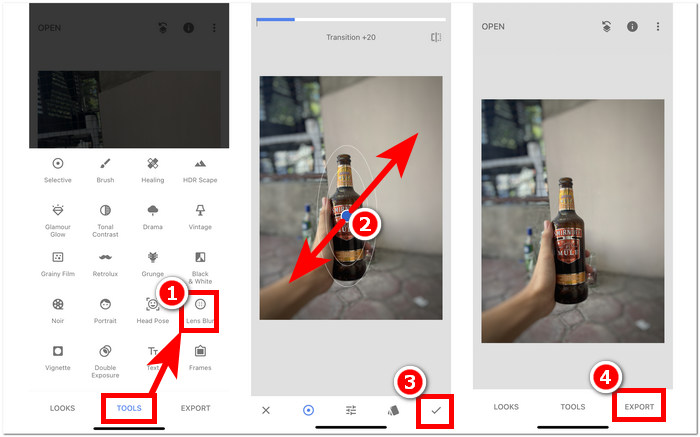
Pas 3. A la secció EINES (TOOLS), cerca i prem l’opció Lens Blur. A continuació la teva foto apareixerà amb un enquadrament circular; aquest cercle representa el focus, mentre que la zona que l’envolta es difuminarà.
Pas 4. Tanca els dits fent pessic a la pantalla per ajustar la mida del cercle. Recorda adaptar la mida del cercle al teu subjecte i, quan estiguis satisfet amb l’edició, toca el botó de validació i tot seguit prem EXPORT per desar els canvis a les fotos.
La versatilitat de Snapseed s'estén a diverses tasques d'edició de fotos, inclosa l'addició perfecta de borroses a les vostres imatges. Aquesta aplicació no només és accessible als iPhones, sinó que també està disponible en altres dispositius, la qual cosa la converteix en una eina ideal i còmoda per als usuaris que busquen una experiència d'edició completa. Amb la interfície fàcil d'utilitzar de Snapseed i la compatibilitat entre dispositius, aconseguir l'efecte de desenfocament desitjat a les teves fotos mai no ha estat més accessible.
Part 2. Com eliminar un objecte de la foto de l'iPhone sense desenfocar
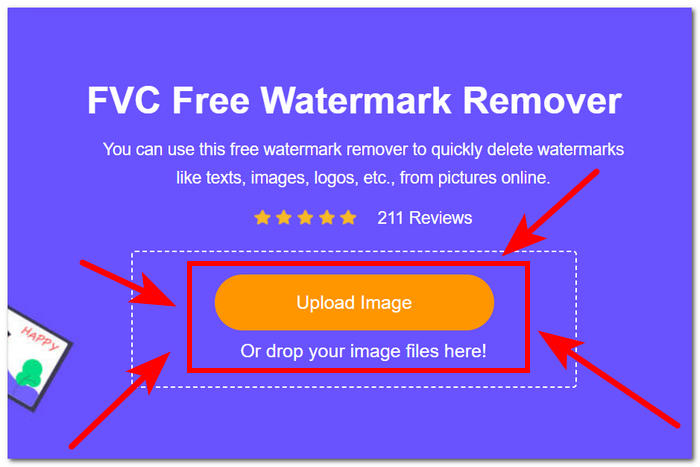
Aconseguir un efecte de difuminat perfecte a les fotos de l’iPhone pot ser tot un repte, amb problemes com una falta de nitidesa general o objectes que es veuen poc clars. Quan et trobis amb objectes que no es poden arreglar difuminant-los, el millor és eliminar-los. Per sort, FVC Free Watermark Remover ajuda tant els usuaris d’iOS com els d’altres dispositius a eliminar objectes borrosos no desitjats i fins i tot marques d’aigua de les seves fotos de manera gratuïta. FVC és una eina basada en el web accessible des de tota mena de navegadors en múltiples dispositius. Promou l’ús gratuït del servei per a tots els usuaris, sense necessitat d’instal·lació ni subscripció. Només cal seguir els passos següents per garantir un resultat polit sense difuminar-los.
Pas 1.Visita FVC Free Watermark Remover al teu navegador habitual, ja sigui des del mòbil o des de l’ordinador, i puja la imatge fent clic al camp Upload Image.
Pas 2. Quan la teva foto ja sigui a la interfície, prem la eina de llaç (Lasso tool) de la part superior i ressegueix-hi l’objecte o el text borrós; finalment, prem el botó Remove per eliminar-los de les fotos.
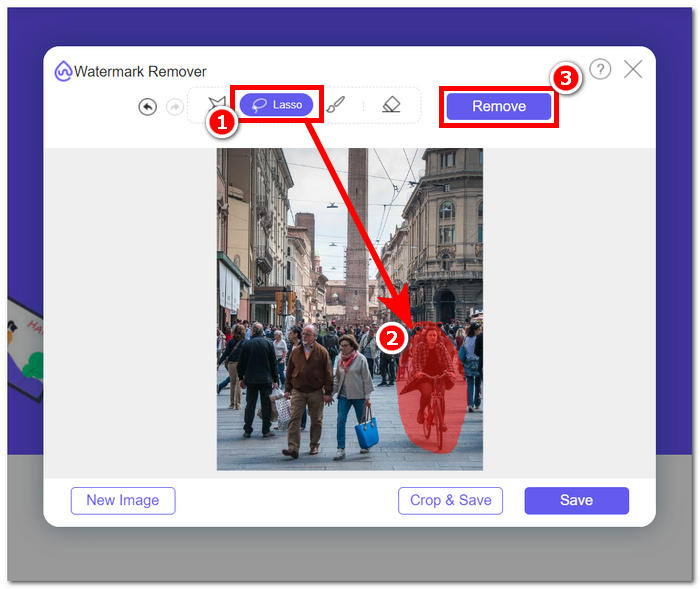
Pas 3. Quan la foto hagi acabat de processar-se, podràs veure la previsualització de la teva imatge acabada d’editar i, si estàs satisfet amb l’eliminació de l’objecte, prem el botó Save per descarregar la foto.
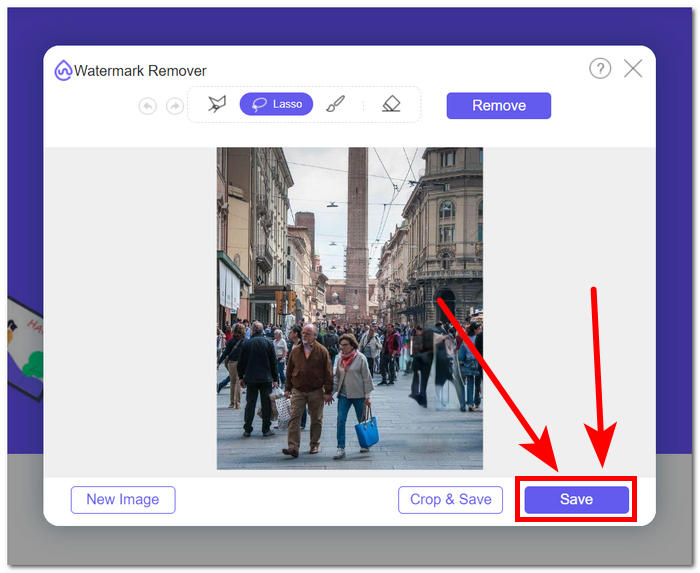
FVC Free Watermark Remover ha demostrat la seva capacitat per eliminar objectes sense provocar cap difuminat a les teves fotos. Es pot afirmar amb seguretat que, tant si difumines les fotos mitjançant el mode retrat com amb una aplicació de tercers, aquesta eina és un complement excel·lent per ajudar-te a resoldre qualsevol problema que pugui sorgir pel camí. A més, va ser dissenyada originalment per a la supressió de marques d’aigua de JPG, PNG i altres formats.
Part 3. Preguntes freqüents sobre com desenfocar fotos a l'iPhone
Com desenfocar una imatge en un iPhone sense l'aplicació?
Per desenfocar una imatge en un iPhone sense utilitzar una aplicació, podeu utilitzar les funcions d'edició integrades. Obriu l'aplicació Fotos, seleccioneu la foto que voleu editar, toqueu Edita, trieu la icona de tres punts i seleccioneu Marcat. A partir d'aquí, podeu utilitzar l'eina llapis per dibuixar sobre les àrees que voleu desenfocar.
L'aplicació iPhone Photo té una eina de desenfocament?
L'aplicació iPhone Photo no té una eina de desenfocament dedicada. Tot i així, ofereix diverses opcions d'edició, inclosa l'eina Profunditat per ajustar el desenfocament del fons a les fotos en mode Retrat. Obriu l'aplicació Foto, seleccioneu una foto en mode Retrat, toqueu Edita i utilitzeu el control lliscant Profunditat per controlar el desenfocament del fons.
Tots els iPhones tenen mode retrat i difuminen el fons?
No tots els iPhones tenen el mode Retrat i la capacitat de desenfocar el fons. El mode retrat estava disponible a l'iPhone 7 Plus i superior. Per comprovar si el vostre iPhone té el mode Retrat, obriu l'aplicació Càmera i comproveu si Retrat apareix com a opció.
Com desenfocar el fons en un iPhone després de fer una foto?
Per difuminar el fons d'un iPhone després de fer una foto, podeu utilitzar la funció del mode retrat si el vostre iPhone l'admet. Obriu l'aplicació Fotos, seleccioneu la foto, toqueu Edita i, a continuació, ajusteu el desenfocament del fons amb el control lliscant Profunditat. Tingueu en compte que aquesta funció està disponible en models específics d'iPhone.
Com desenfocar part d'una foto en un iPhone?
Desenfocar una part d'una foto en un iPhone es pot fer amb l'eina de marcatge de l'aplicació Fotos. Obriu l'aplicació Fotos, seleccioneu la foto, toqueu Edita, trieu la icona de tres punts i seleccioneu Marcat. Utilitzeu l'eina llapis per dibuixar sobre l'àrea que voleu desenfocar i ajustar la intensitat segons sigui necessari.
Conclusió
En conclusió, difuminar fotos amb el teu iPhone obre un ventall infinit de possibilitats, ja que permet als usuaris millorar les seves imatges amb profunditat, dramatisme i un toc de professionalitat. Des de l’ús del mode Retrat integrat fins a l’ús d’aplicacions de tercers com Snapseed, el procés ofereix flexibilitat tant per a principiants com per a fotògrafs experimentats. A més, eines com FVC Free Watermark Remover resolen els problemes relacionats amb objectes no desitjats a les fotos sense comprometre’n la nitidesa. A mesura que els usuaris d’iPhone continuïn explorant aquestes tècniques i eines, el viatge pel fascinant món del difuminat de fotos es converteix en una aventura emocionant i assequible. Així doncs, agafa el teu iPhone, experimenta amb aquests mètodes i porta la teva fotografia a resultats gairebé professionals!
-
 Com eliminar el fons de la imatge amb GIMP
 Comenceu amb GIMP i el procés pas a pas per eliminar fons de les imatges. Descobriu maneres eficients de crear imatges transparents amb GIMP avui!
-
 Com augmentar la mida de la imatge en línia i fora de línia
 Descobriu la manera més senzilla d'augmentar la mida de la imatge sense perdre qualitat. Consulteu les nostres eines i programari de canvi de mida per garantir una qualitat òptima per a les vostres imatges.
-
 Com elimina el PPT la imatge de fons? Guia integral
 Estàs preparat per portar la teva presentació al següent nivell? En aquest article, descobreix com PPT elimina imatges de fons i crea presentacions de PowerPoint excepcionals fàcilment.