

4 måder at sløre billeder på iPhone for pro-lignende resultater
I den tempofyldte verden af smartphone-fotografering skiller iPhone sig ud som en kraftfuld enhed, der giver brugerne et bredt udvalg af funktioner til at fange mindeværdige øjeblikke med enestående lethed. En ofte overset perle i iPhone’ens foto-redigeringsarsenal er muligheden for at sløre billeder. Denne teknik kan tilføje dybde, drama og et strejf af professionalisme til dine snapshots. I denne artikel guider vi dig trin for trin gennem processen med at sløre billeder på din iPhone og åbner op for en verden af kreative muligheder lige ved hånden, fra brug af Portræt-tilstand til onlineværktøjer og tredjepartsapps.

Del 1. Sådan sløres billeder på iPhone
Portrættilstand
Portrættilstand på iPhone er en specialiseret funktion designet til at tilføje dybde til kvaliteten af ens fotografier. Det skaber denne lave dybdeskarphed, som lader motivet skille sig ud fra dets baggrund. Spørgsmål som Kan du sløre baggrunden for et billede på en iPhone bliver ofte stillet af en person, der er ny i Apples økosystem. Det er muligt at sløre dine fotos på iPhone, da iOS introducerede portrættilstanden i deres 7 Plus-model op til den seneste, som trinene til at gøre det er angivet nedenfor.
Trin 1. Åbn din Kamera-app på din iPhone-enhed.
Trin 2. Tryk på sektionen Portræt i dine kameraindstillinger.
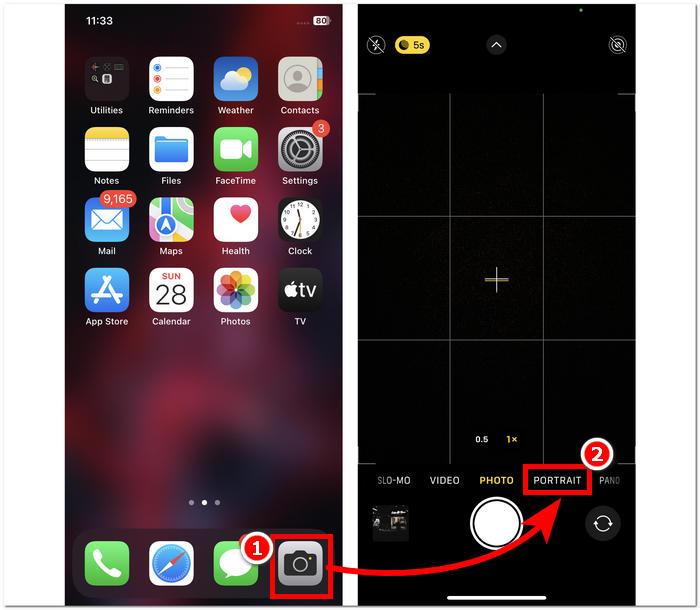
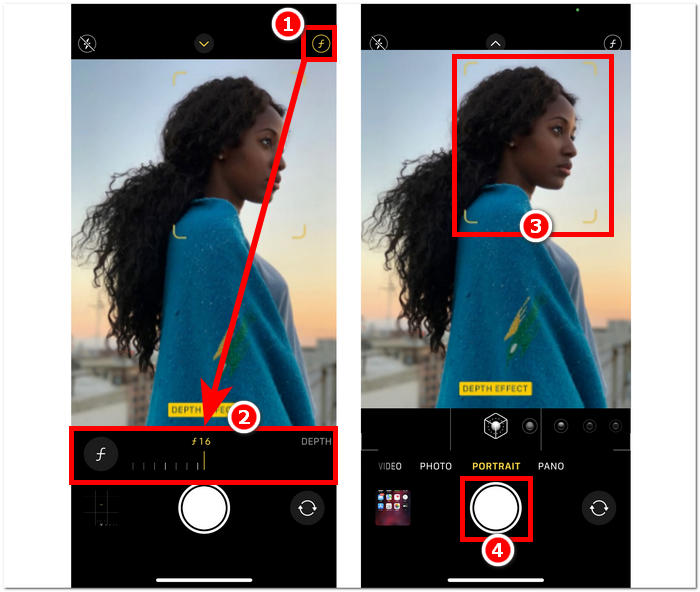
Trin 3. Tryk på f-ikonet øverst til højre på skærmen, og justér den dybdeskarphed, du ønsker i dine fotos.
Trin 4. Når du er tilfreds med dybden, skal du trykke på dit motiv for at fokusere billedet, og til sidst trykke på Lukker-knappen for at tage dine fotos.
At bruge portrættilstand på iPhone er ligetil, når du forstår, hvordan dybdeskarphed påvirker dine billeder, og du kan finde rundt i kameraappens grænseflade. Skulle du fortryde, kan du desuden nemt gøre slørede billeder skarpe igen.
Uden portrættilstand
Hvordan sløres et billede på en iPhone uden portrættilstand? Det kan være en udfordring at sløre billeder ved hjælp af din iPhone, når den ikke har portrættilstand, da portrættilstand introduceres i deres 7 Plus og nyere model. Derfor finder vi måder for brugere, der ikke har portrættilstand på deres iPhones. Dette er mere som et tip eller hack og kræver brugerens manuelle arbejde. Hvis det gøres effektivt, kan du opnå lignende resultater som portrættilstand.
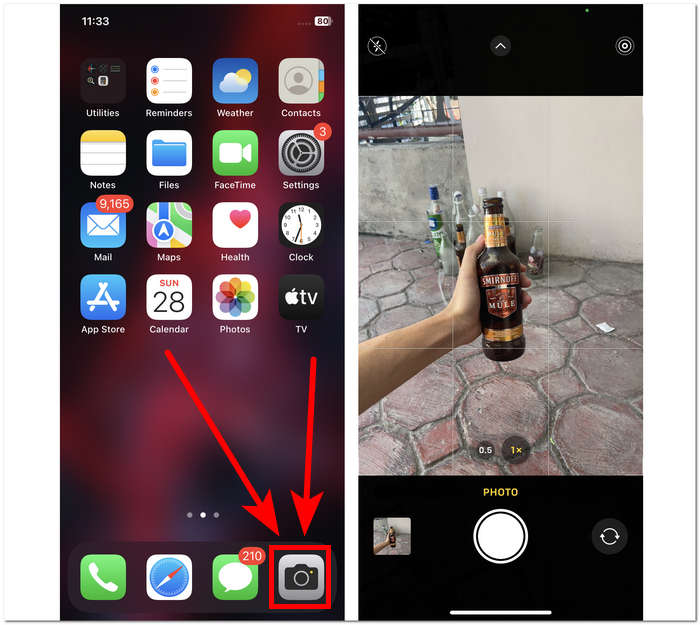
Trin 1. Åbn Kamera-appen på din iPhone.
Trin 2. På hovedskærmen skal du placere dig selv og motivet langt fra baggrunden ved at bevæge dig bagud.
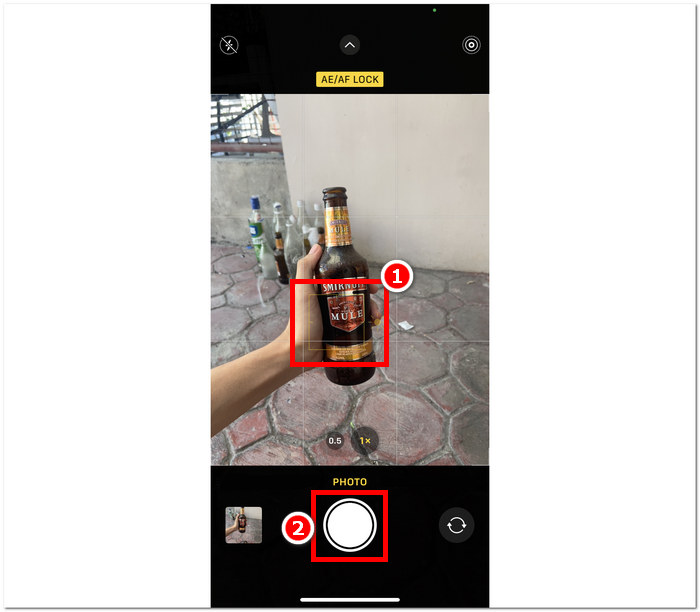
Trin 3. Tryk og hold nede på motivet, indtil AE/AF LÅS vises øverst på skærmen. Dette gør dit motiv til kameraets fokuspunkt og gør baggrunden sløret.
Trin 4. Når motivet tydeligt skiller sig ud fra den slørede baggrund, er du klar til at tage dine fotos. Tryk blot på Lukker-knappen for at tage dine billeder.
Det er muligt at sløre billeder på en iPhone, selv uden portrættilstandsfunktionerne i kameraindstillingerne ved manuelt at skabe en afstand mellem dit motiv og dets baggrund samt få dit fokus rigtigt. Dette trin anvendes ikke kun til iOS-brugere, men også til Android-brugere, der ikke har portrættilstand i deres kameraindstillinger.
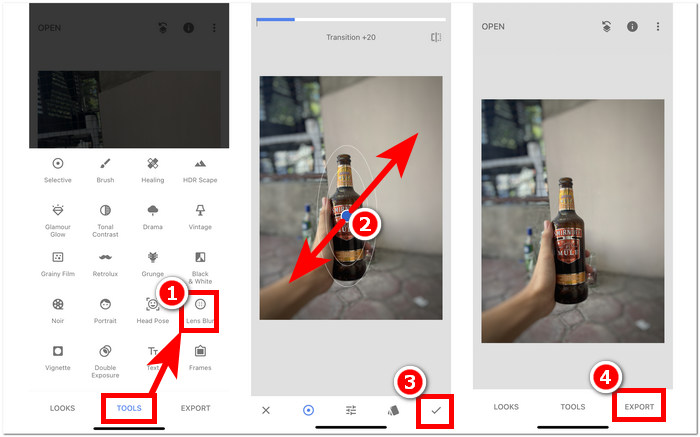
Tredjeparts-app: Snapseed
Snapseed er blandt de kraftfulde og professionelle fotoredigeringsapplikationer udviklet af Google. Denne app er fuld af funktioner og værktøjer, som en bruger har brug for til enhver billedredigeringsopgave, og blandt dem er at sløre dine billeder ved hjælp af kun din iPhone. At ty til en tredjepartsapplikation kan også hjælpe dig med at løse dine bekymringer om, hvordan du slører folks ansigter på billeder på iPhone, da appen lader dig bestemme, hvilken del du vil sløre, i modsætning til portrættilstanden, hvor du kun kan vælge eller tryk på motiver for at fokusere.
Trin 1. Hent og åbn Snapseed på din iPhone fra App Store.
Trin 2. Når du er i appens grænseflade, skal du trykke på skærmen for at tilføje de fotos, du ønsker at tilføje sløring til.
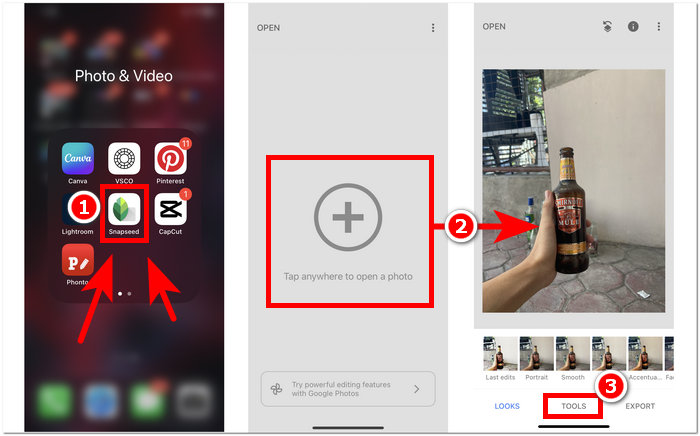
Trin 3. Gå til sektionen VÆRKTØJER, find og tryk på indstillingen Linse-sløring (Lens Blur). Dit foto vil derefter blive vist med en cirkulær markering; denne cirkel repræsenterer fokusområdet, mens det omkringliggende område bliver sløret.
Trin 4. Saml fingrene (knib-bevægelse) for at justere cirklens størrelse. Husk at tilpasse cirklens størrelse til dit motiv, og når du er tilfreds med din redigering, skal du trykke på fluebenet og derefter trykke på EXPORT for at gemme ændringerne i dine fotos.
Snapseeds alsidighed strækker sig til forskellige fotoredigeringsopgaver, herunder den sømløse tilføjelse af sløring til dine billeder. Denne app er ikke kun tilgængelig på iPhones, men er også tilgængelig på andre enheder, hvilket gør den til et ideelt og praktisk værktøj for brugere, der søger en omfattende redigeringsoplevelse. Med Snapseeds brugervenlige grænseflade og kompatibilitet på tværs af enheder har det aldrig været mere tilgængeligt at opnå den ønskede sløringseffekt på dine billeder.
Del 2. Sådan fjerner du et objekt fra dit iPhone-foto uden at sløre
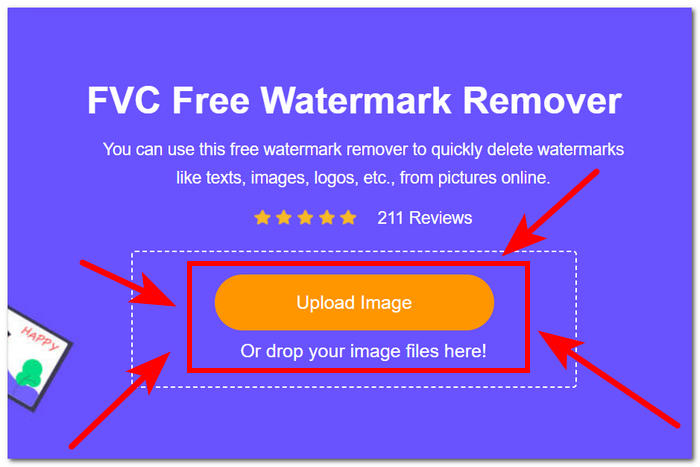
At opnå en fejlfri sløreffekt på iPhone-fotos kan være udfordrende, med problemer som generel uklarhed eller objekter, der fremstår utydelige. Når du står over for objekter, der ikke kan rettes ved hjælp af sløring, er det bedst at fjerne dem. Heldigvis kan FVC Free Watermark Remover hjælpe både iOS-brugere og brugere af andre enheder med at fjerne slørede, uønskede objekter og endda vandmærker fra deres fotos gratis. FVC er et webbaseret værktøj, der er tilgængeligt i alle typer webbrowsere på tværs af flere enheder. Det tilbyder gratis brug af tjenesten for alle brugere uden krav om installation eller abonnement. Ved blot at følge nedenstående trin kan du få et poleret resultat uden at sløre elementerne.
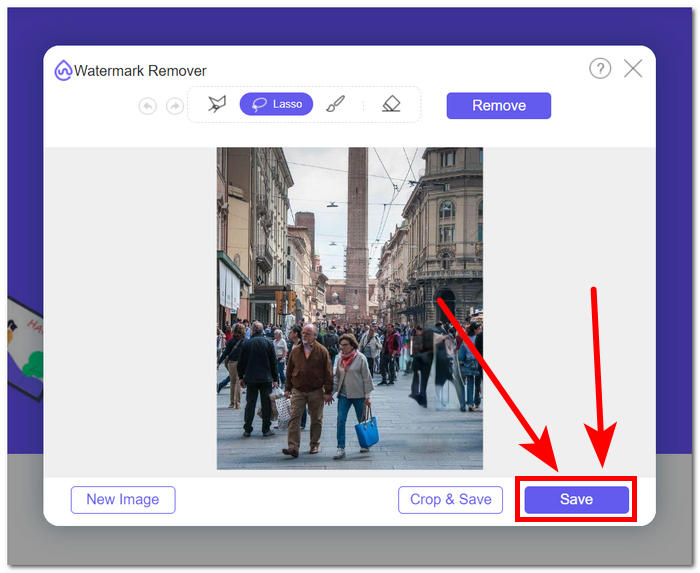
Trin 1. Gå ind på FVC Free Watermark Remover i din foretrukne browser, enten fra mobil eller computer, og upload dit billede ved at klikke på feltet Upload Image.
Trin 2. Når dit foto er i grænsefladen, skal du klikke på lassoværktøjet øverst og tegne rundt om det slørede objekt eller den tekst, du vil fjerne, og derefter klikke på knappen Remove for at fjerne dem fra dit foto.
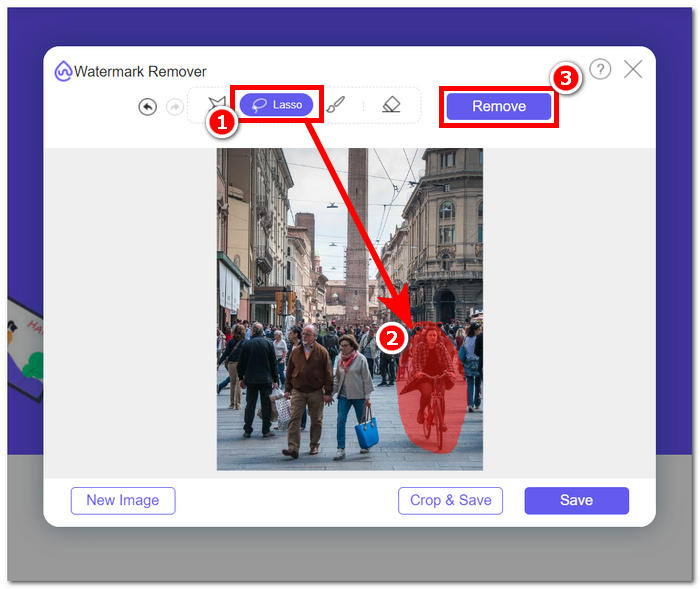
Trin 3. Når dit foto er færdigbehandlet, kan du se en forhåndsvisning af dit nyredigerede billede, og når du er tilfreds med fjernelsen af objektet, skal du klikke på knappen Save for at downloade dit foto.
FVC Free Watermark Remover har vist, at det kan fjerne objekter uden at skabe yderligere sløring i dine fotos. Det er derfor rimeligt at sige, at uanset om du slører dine billeder via portrættilstand eller en tredjepartsapp, er dette værktøj et fremragende supplement til at hjælpe dig med at løse problemer, der måtte opstå undervejs. Det er desuden oprindeligt udviklet til at fjerne vandmærker fra JPG, PNG og meget mere.
Del 3. Ofte stillede spørgsmål om, hvordan man slører billeder på iPhone
Hvordan slører du et billede på en iPhone uden appen?
For at sløre et billede på en iPhone uden at bruge en app, kan du bruge de indbyggede redigeringsfunktioner. Åbn appen Fotos, vælg det billede, du vil redigere, tryk på Rediger, vælg ikonet med tre prikker, og vælg Markup. Derfra kan du bruge penneværktøjet til at tegne over områder, du vil sløre.
Har iPhone Photo-appen et sløringsværktøj?
iPhone Photo-appen har ikke et dedikeret sløringsværktøj. Alligevel tilbyder den forskellige redigeringsmuligheder, inklusive dybdeværktøjet til at justere baggrundssløringen i portrætbilleder. Åbn Foto-appen, vælg et billede i portrættilstand, tryk på Rediger, og brug skyderen Dybde til at styre baggrundssløringen.
Har alle iPhones portrættilstand og slører baggrunden?
Ikke alle iPhones har portrættilstand og mulighed for at sløre baggrunden. Portrættilstand var tilgængelig på iPhone 7 Plus og nyere. For at kontrollere, om din iPhone har Portrættilstand, skal du åbne Kamera-appen og se, om Portræt vises som en mulighed.
Hvordan sløres baggrunden på en iPhone efter at have taget et billede?
For at sløre baggrunden på en iPhone efter at have taget et billede, kan du bruge Portrættilstand-funktionen, hvis din iPhone understøtter det. Åbn appen Fotos, vælg billedet, tryk på Rediger, og juster derefter baggrundssløringen ved hjælp af skyderen Dybde. Husk, at denne funktion er tilgængelig på specifikke iPhone-modeller.
Hvordan slører man en del af et billede på en iPhone?
Sløring af en del af et billede på en iPhone kan gøres ved hjælp af Markup-værktøjet i Fotos-appen. Åbn appen Fotos, vælg billedet, tryk på Rediger, vælg ikonet med tre prikker, og vælg Markup. Brug penneværktøjet til at tegne over det område, du vil sløre, og juster intensiteten efter behov.
Konklusion
Afslutningsvis giver at sløre billeder på din iPhone uendelige muligheder og lader brugerne forbedre deres billeder med dybde, drama og et strejf af professionalisme. Fra at udnytte den indbyggede Portræt-tilstand til at bruge tredjepartsapps som Snapseed, giver processen fleksibilitet for både begyndere og erfarne fotografer. Derudover håndterer værktøjer som FVC Free Watermark Remover uønskede objekter i fotos uden at gå på kompromis med skarpheden. Efterhånden som iPhone-brugere fortsætter med at udforske disse teknikker og værktøjer, bliver rejsen ind i den fascinerende verden af billedsløring både spændende og let tilgængelig. Så tag din iPhone, eksperimentér med disse metoder, og løft din fotografering til et næsten professionelt niveau!
-
 Sådan fjerner du baggrund fra billede ved hjælp af GIMP
 Kom godt i gang med GIMP og trin-for-trin-processen med at fjerne baggrunde fra billeder. Opdag effektive måder at skabe gennemsigtige billeder ved hjælp af GIMP i dag!
-
 Sådan øger du billedstørrelsen online og offline
 Opdag den nemmeste måde at øge billedstørrelsen på uden at miste kvalitet. Se vores værktøjer og software til tilpasning af størrelse for at sikre optimal kvalitet til dine billeder.
-
 Hvordan fjerner PPT baggrundsbillede? Omfattende guide
 Klar til at tage din præsentation til næste niveau? I denne artikel kan du opdage, hvordan PPT fjerner baggrundsbilleder og nemt opretter fremragende PowerPoint-præsentationer.