

Sådan beskæres fotos på iPhone for hurtigt at ændre størrelsen på dem
Beskæring er et grundlæggende værktøj i fotoredigering til at fjerne uønskede elementer fra det overordnede visuelle udtryk i dine billeder. At lære det og mestre det fuldt ud er en fordel, fordi det kan løfte og forbedre kompositionen i dine fotos, så historien eller budskabet i billedet bliver fremstillet langt tydeligere. At beskære fotos på en iPhone er derimod en lidt anden historie, da iOS er kendt for sine adaptive funktioner og sin softwaregrænseflade, som nogle gange kan gøre en opgave lidt besværlig, fordi iOS kan være lidt „ekstra“ i måden funktioner og kommandoer er placeret på enheden. Det er derfor, denne artikel findes: Når du ændrer dine billeders visuelle udtryk ved at beskære dem, bør det ikke være noget besvær. Læs videre for at se trin, tips og detaljer om, hvordan du beskærer fotos på iPhone.

Del 1. Sådan beskærer du billeder på iPhone
Er du blandt de nye iOS-brugere, der har svært ved at udføre simple opgaver, og det tager evigheder at finde ud af? Gad vide, hvordan man beskærer et iphone-billede. Fortvivl ikke mere, da vi listede hurtige måder til at beskære dine billeder ved hjælp af din iPhone uden at skulle stresse over det.
Almindelige trin
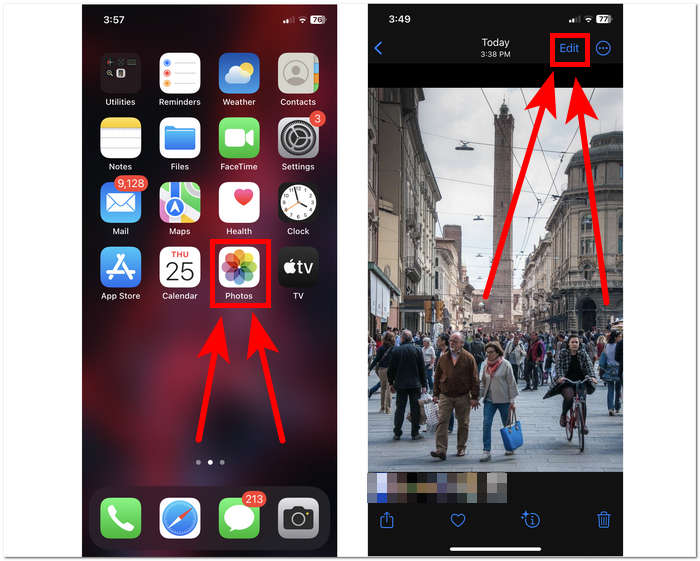
Trin 1. Gå på din iOS‑enhed til Billeder, og vælg eller gå til det billede, du vil beskære.
Trin 2. Find knappen Rediger i øverste højre hjørne af skærmen, og tryk på den.
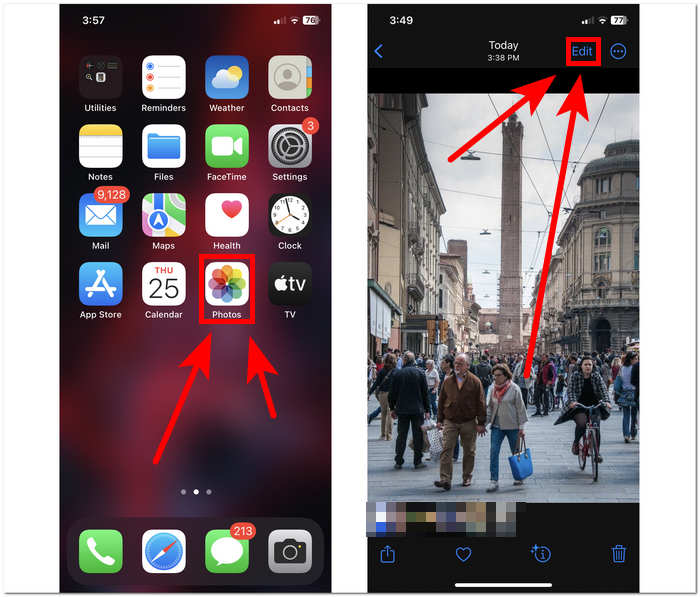
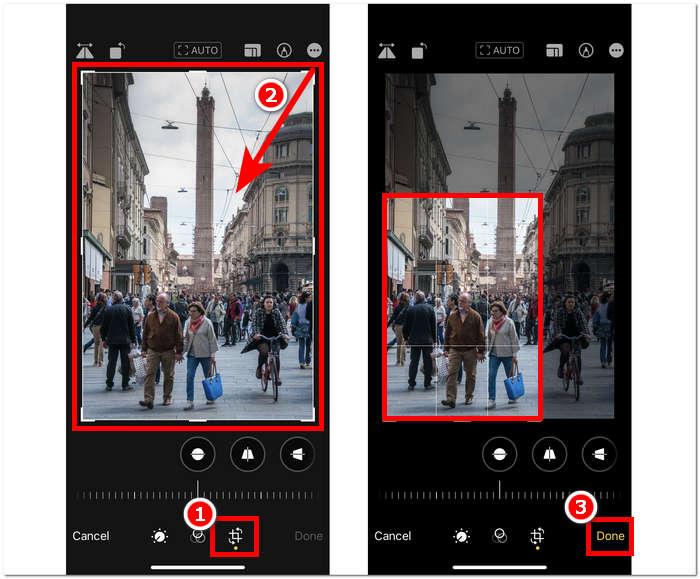
Trin 3. I Rediger‑indstillingerne finder og trykker du på Størrelse-indstillingerne nederst på skærmen.
Trin 4. Når rektanglets hjørner vises, trækker du dem manuelt, så de indrammer det område, du vil beholde i billedet. Når du er tilfreds, trykker du på OK for at gemme ændringerne i dit foto.
Hurtig beskæring i iOS 17
Trin 1. Gå til appen Billeder på din iOS‑enhed, og vælg eller find det billede, du vil beskære.
Trin 2. Brug to fingre til at lave en udvidelsesbevægelse (zoom ind‑bevægelse).
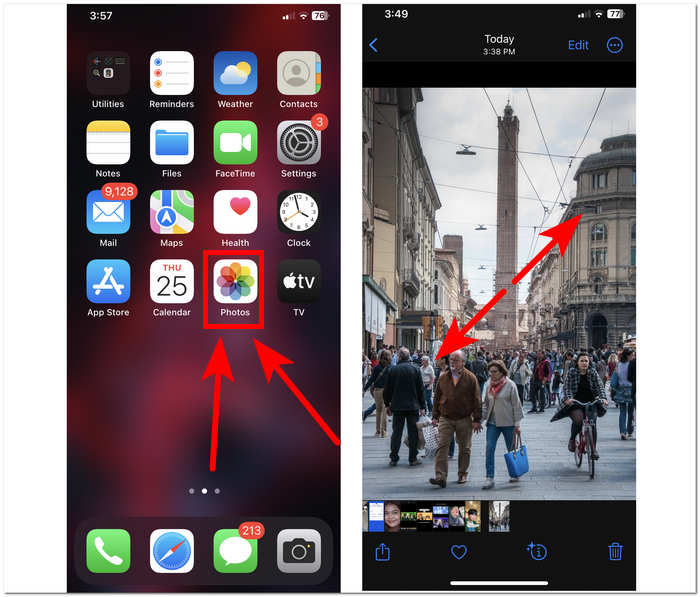
Trin 3. En Beskær‑knap vises derefter øverst til venstre på skærmen. Tryk blot på den for at fortsætte.
Trin 4. Når rektanglets hjørner vises, kan du trække dem manuelt, så de indrammer det område, du vil beholde i billedet. Tryk derefter på OK, når du vil gemme dit foto.
Automatisk beskæring af fotos med iPhone‑genvej
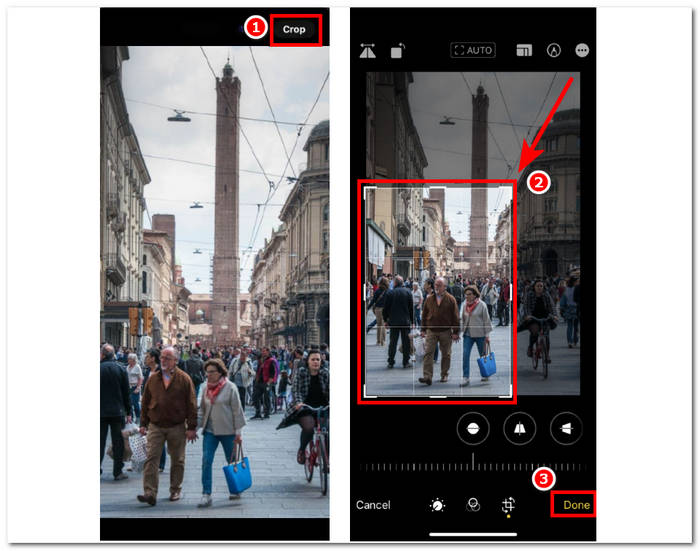
Trin 1. Gå til det foto, du vil beskære, på din iOS‑enhed: Åbn Billeder, og vælg billedet.
Trin 2. Find knappen Rediger i øverste højre hjørne af skærmen, og vælg den.
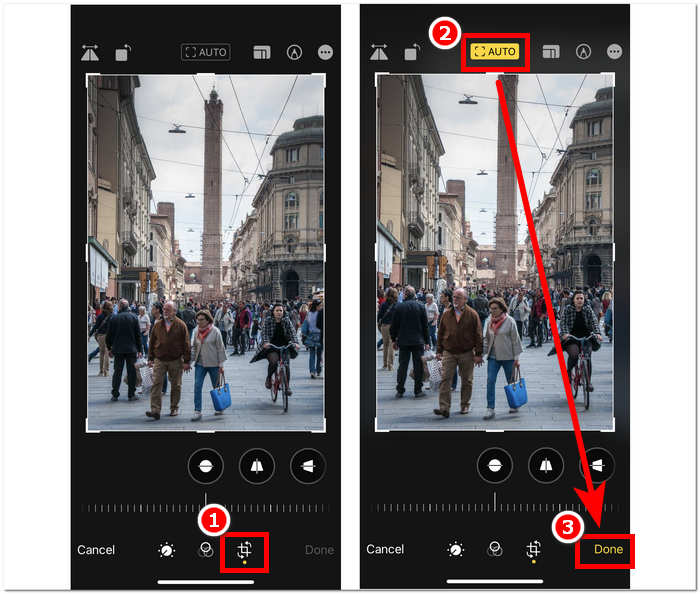
Trin 3. I Rediger‑indstillingerne finder og vælger du Størrelse‑indstillingerne nederst på skærmen.
Trin 4. Find AUTO-beskæringsgenvejen øverst på skærmen, tryk på den for automatisk at beskære dit billede, og tryk derefter på OK for at gemme det.
Beskæringsværktøjet på iOS behøver ikke at være så kompliceret, som du tror, det er. IOS tilbyder tre måder, som er anført ovenfor; uanset om du bruger den sædvanlige beskæring, hurtig beskæring eller iPhone automatisk beskæringsgenvej til billeder, fungerer de alle fint. Det er kun et spørgsmål om brugerens præference og bekvemmelighed, som den skal bruge.
Del 2. Sådan beskærer du hurtigt nogen ud af et iPhone-billede
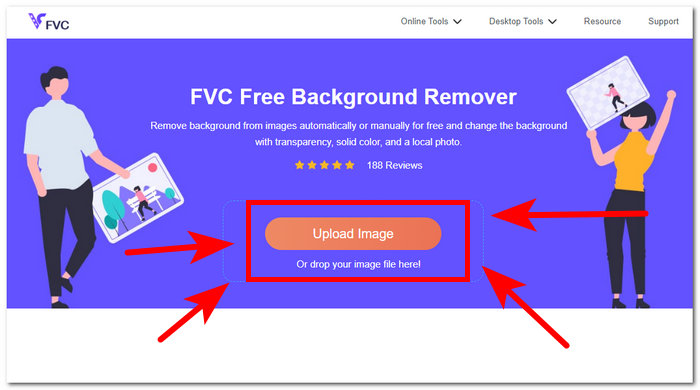
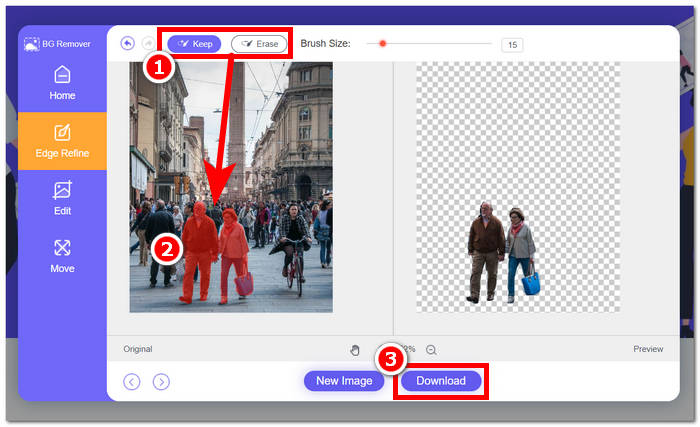
Når man beskærer fotos, støder brugere nogle gange på uønskede motiver eller objekter, som ikke kan beskæres væk med enhedens egne indstillinger. Her er det praktisk at bruge tredjepartsværktøjer. FVC Free Background Remover er et af de betroede webbaserede værktøjer, der findes på internettet i dag, af flere grunde. En af disse grunde er sikkerhed og tilgængelighed; med tilgængelighed mener FVC fuld adgang for brugere på tværs af enheder helt gratis – inklusive dine iOS‑enheder. Grænsefladen er let at forstå, da den er skabt med et ligetil design for øje og derfor tilbyder enkle, avancerede funktioner til at fjerne uønskede motiver eller baggrunde i dine fotos. For at bruge dette gratis baggrundsfjernerværktøj til at beskære en person væk fra dit foto kan du følge trinnene nedenfor.
Trin 1. Gå til websiden FVC Free Background Remover i Safari‑browseren på din iOS‑enhed, og upload det ønskede billede i feltet Upload Image.
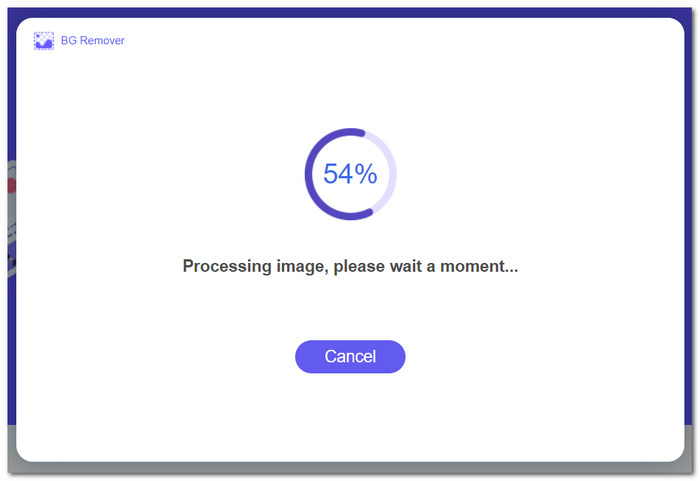
Trin 2. Dets AI vil automatisk behandle billedet og fjerne det, den vurderer, du ønsker fjernet.
Trin 3. Når FVC er færdig med at behandle dit foto, går du til sektionen Rediger øverst i værktøjet. Beskær manuelt en person i dit foto ved at trække hjørnerne til det ønskede område, så vedkommende inkluderes i billedet.
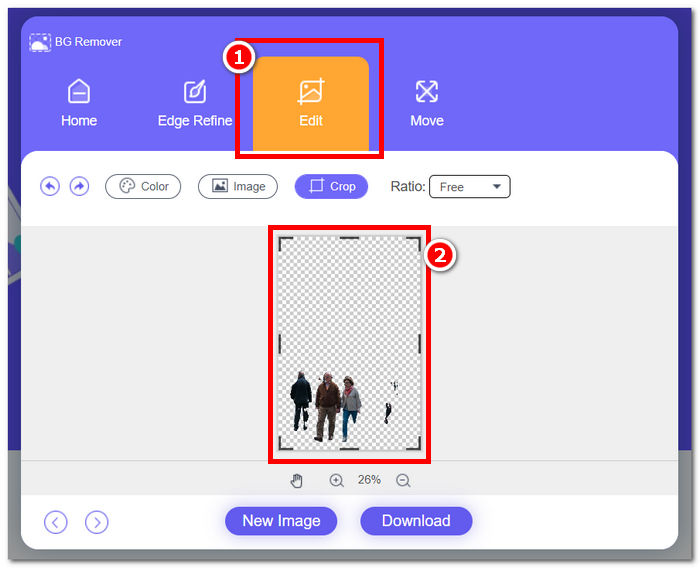
Trin 4. Når du er tilfreds, kan du beskære personen ud af dit foto og gemme billedet på din iPhone ved at klikke på knappen Download, som gemmer det.
Du behøver aldrig mere spekulere på, hvordan man beskærer en person ud af et foto på en iPhone. Begynd i stedet at undersøge, hvordan du effektivt kan beskære og fjerne nogen i dine fotos – enten ved at bruge beskæringsindstillingerne på din enhed eller en app til ændring af billedstørrelse. Begge løsninger lever op til det, de lover.
Del 3. Ofte stillede spørgsmål om, hvordan man beskærer billeder på iPhone
Hvor er beskæringsknappen på iPhone-fotos?
Beskæringsknappen i iPhone Photos findes typisk i redigeringsgrænsefladen. Når du har valgt et billede, skal du trykke på Rediger-indstillingen, og du vil se beskæringsknappen, der ligner en firkant, der overlapper to retvinklede trekanter nederst på skærmen.
Hvordan forhindrer jeg iPhone i at beskære tapet?
For at forhindre din iPhone i automatisk at beskære tapeter, skal du gå til Indstillinger, derefter Baggrund og trykke på Vælg et nyt tapet. Når du vælger et billede, skal du sørge for at justere zoomniveauet efter din smag og sikre, at tapetet ikke automatisk beskæres. Du kan bruge knib-til-zoom-bevægelsen til at finjustere tapetstørrelsen.
Kan iPhone lave et cirkulært billede?
Mens iPhones native Photos-app ikke har en direkte funktion til at skabe cirkulære billeder, kan du opnå denne effekt ved hjælp af tredjepartsapps med cirkulære beskæringsværktøjer. Disse apps giver dig mulighed for at beskære dine billeder til en cirkulær form, hvilket giver et unikt og æstetisk tiltalende resultat.
Kan jeg bevare det originale billedformat, når jeg beskærer?
Ja, når du beskærer et billede på din iPhone, kan du bevare det originale billedformat ved at sørge for, at indstillingen Begrænsning er aktiveret. Dette sikrer, at proportionerne af det beskårede billede forbliver de samme som originalen.
Formindsker beskæring billedkvaliteten?
Selve beskæringen forringer ikke nødvendigvis billedkvaliteten på iPhone. Men hvis du beskærer et foto kraftigt og derefter zoomer ind på det beskårne område, kan du opleve tab af detaljer, fordi billedet i praksis bliver forstørret ud over sin oprindelige opløsning. Det er vigtigt at finde en balance mellem at beskære for bedre komposition og samtidig bevare den ønskede billedkvalitet. Hvis du desuden oplever lavere billedkvalitet efter komprimering, kan du bruge et tredjeparts‑værktøj til forbedring af billedopløsning til at opskalere billedet.
Konklusion
At lære at beskære fotos på din iPhone er i sidste ende en essentiel færdighed, der kan forbedre dine billeders visuelle udtryk markant. Det gælder ikke kun iOS‑brugere, men også generelt brugen af beskæringsværktøjer på andre enheder. Fremgangsmåden kan være forskellig, men med de råd og enkle trin, der er vist i denne artikel, kan du let forvandle almindelige fotos til visuelt imponerende billeder. Uanset om du foretrækker den klassiske beskæringsmetode, den hurtige beskæringsfunktion i iOS 17 eller den automatiske beskæringsgenvej, giver iOS en række muligheder, der kan tilpasses dine behov og præferencer. Dertil kommer et værktøj som FVC Free Background Tool, der tilbyder samme kvalitet – ikke kun til beskæring, men også til at fjerne uønskede objekter i dine fotos – og gør det endnu nemmere at beskære fotos på din iPhone.
-
 Top 9 Image Background Remover for hurtige og nøjagtige resultater
 Oplev hurtigheden og nøjagtigheden af det toptydende viskelæder for baggrundsbilleder. Sig farvel til kompleks baggrundsfjerner og omfavn ni effektive måder i dag!
-
 Sådan fjerner du baggrund fra billede: Problemfri værktøjer
 Oplev seks værktøjer til at fjerne baggrunden fra ethvert billede uden besvær. Sig farvel til kompliceret redigering og slet billedbaggrunde med lethed i dag!
-
 Sådan fjerner du baggrund fra billede ved hjælp af GIMP
 Kom godt i gang med GIMP og trin-for-trin-processen med at fjerne baggrunde fra billeder. Opdag effektive måder at skabe gennemsigtige billeder ved hjælp af GIMP i dag!