

Nyttigt skema, der vedrører OBS-lydforsinkelsesdilemma
Du vil optage en videopræsentation, så du kan vise den i morgen for din klasse eller afspille den til dine forretningsmøder. For at gøre det bruger du OBS Studio til at gennemføre optagelsen og gemme den på din computer. Men når du begynder at redigere videopræsentationen for at tilføje nogle detaljer om præsentationen, opdager du, at lyden er forsinket og ude af sync. I denne artikel får du at vide, hvorfor OBS-lyd er ude af sync. Og hvis du ikke ved, hvordan du slipper af med denne situation, giver vi også nemme metoder til at rette lydforsinkelsen.

Del 1. Hvorfor er OBS-lyd ude af synkronisering?
Det største problem for de fleste streamere er, når deres lyd er ude af sync; den virker okay i de første par minutter, men begynder at få en lydforsinkelse, der ikke passer til bevægelsen af dine læber i løbet af den næste time. I desperation efter at løse usikkerheden i streamen går nogle ind i avancerede lydindstillinger for at justere sync-forskydningen, som kun kan indstille en forsinkelse på lydkilden i et vist tidsrum, hvilket ikke kan anbefales. I stedet er grunden til, at OBS-lyd er ude af sync, en uoverensstemmelse i samplingsfrekvensen.
Del 2. 7 nemme trin til at rette OBS-lydforsinkelse
Lydforsinkelsen sker ved enhver lejlighed; det kan være i streamingplatforme, optagede præsentationer og endda live-udsendelser. Det meste af grunden til, at dette sker, er forbindelsesproblemer, tekniske problemer og fejlprogrammerede applikationer. For eksempel bruger du OBS-studiet som en platform for din streamingaktivitet, og det sker, at hvert videooutput, du streamer, har en vis forsinkelse. Godt, at der er perfekte måder at forhindre disse situationer på ved at bruge den samme platform. Her er de nemme trin:
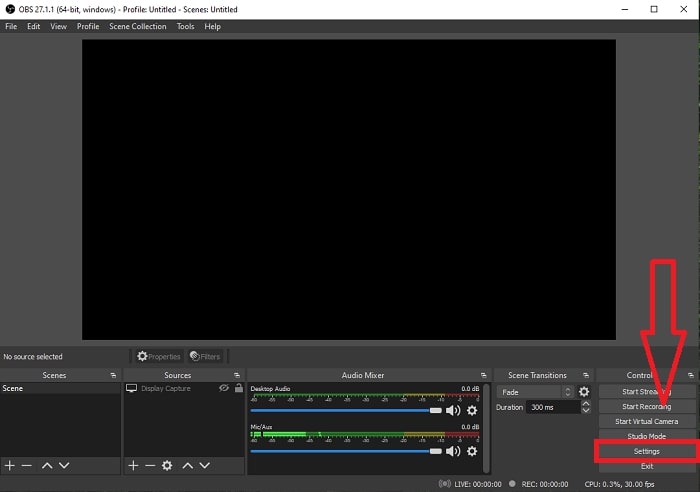
Trin 1: Find indstillingerne
Åbn OBS Studio for at fortsætte med applikationsgrænsefladen, og klik på Indstillinger i nederste højre hjørne.
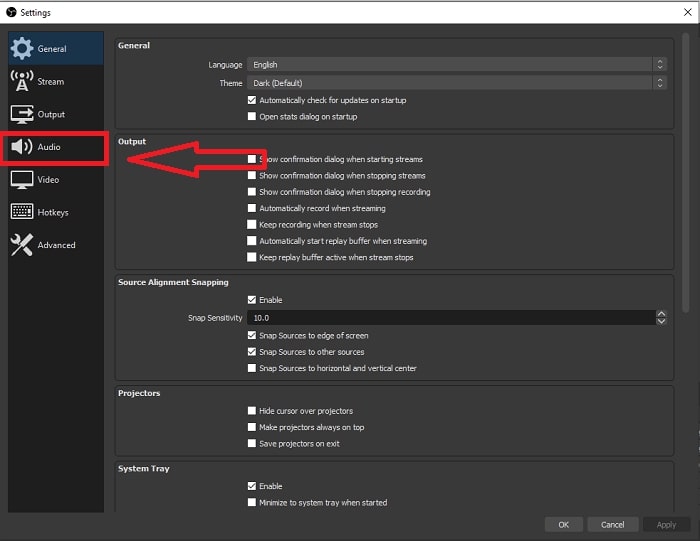
Trin 2: Gå til lydindstillinger
Når du har klikket på Settings, vises der et nyt vindue på skærmen. Dette vindue giver dig et overblik over de generelle indstillinger i OBS Studio. Men for at fortsætte med at rette lydforsinkelsen i OBS Studio skal du klikke på Audio i venstre side af vinduet.
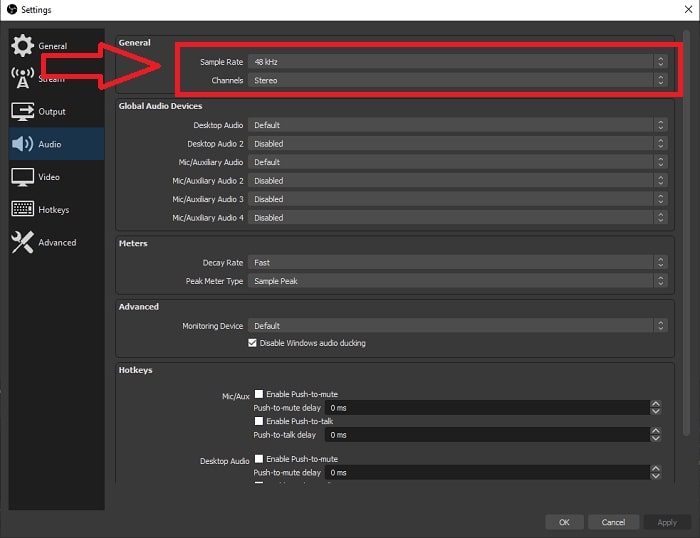
Trin 3: Vælg en passende samplingsfrekvens
Rediger samplingsfrekvensen baseret på den foretrukne samplingsfrekvens for dit skrivebord og optageenheder. Antag, at din optageenhed er en smule gammel, og du har en gammel opsætning. I så fald vil det være bedre at sænke samplefrekvensen fra standard sample rate på 48 kHz og øge dens justering fra 48 kHz, hvis du vil observere din enheds foretrukne sample rate. For jo højere videoens samplingshastighed stiger, jo tættere på vil den genskabe den originale lyd. Desuden kan du kun ændre kanalindstillingen afhængigt af hvilket værktøj du bruger til at afspille videoen.
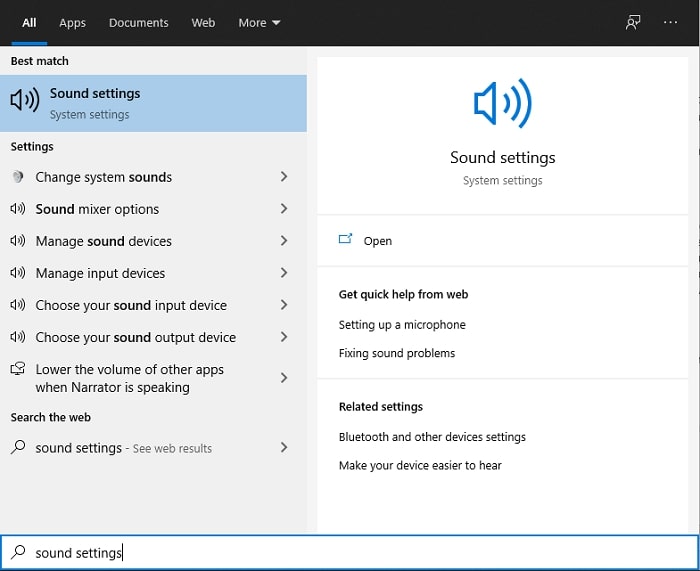
Trin 4: Åbn lydindstillingerne
Når du har indstillet din ønskede samplingsfrekvens i OBS Studio, skal du skrive Sound Settings i søgefeltet på proceslinjen, finde Sound Settings og klikke på det for at gå videre til indstillingerne på dit skrivebord.
Trin 5: Find lydkontrolpanelet
Klik på Sound Control Panel. Når du åbner det, vises der endnu et lydvindue på skærmen – et overblik over alle tilgængelige enheder, der har med lydudgang at gøre.
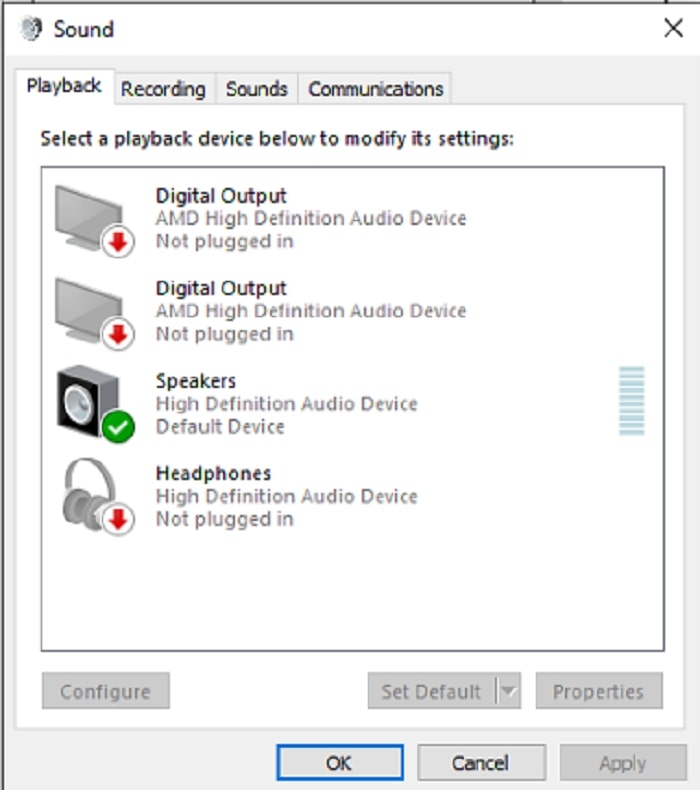
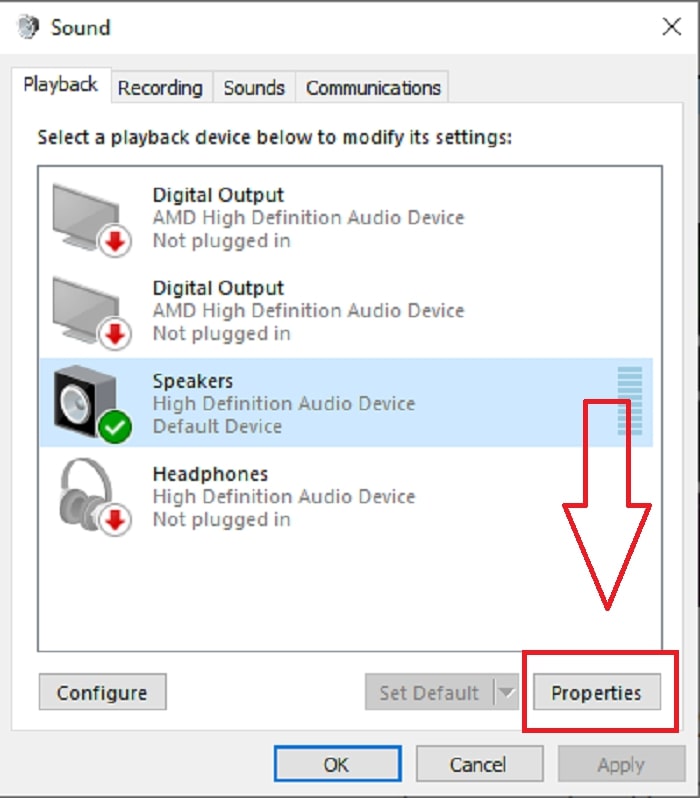
Trin 6: Vælg enhed til lydudgange
De tilstedeværende muligheder er de tilgængelige enheder i din optagelsesopsætning, uanset om det er en højttaler eller hovedtelefoner. Vælg, hvilken enhed der gør lyden ude af synkronisering, og klik på egenskaberne bagefter.
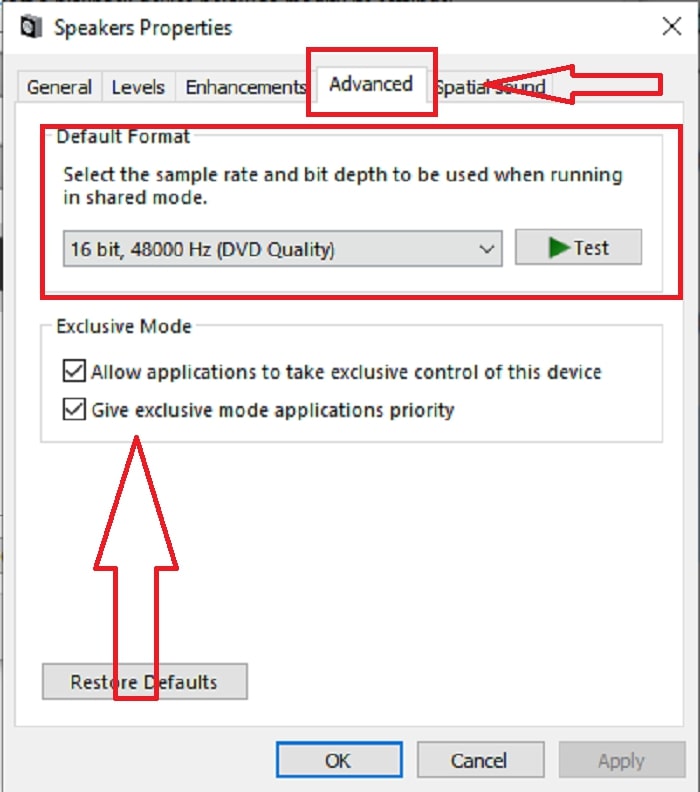
Trin 7: Fortsæt i avancerede indstillinger
Når du derefter klikker på egenskaberne for den ønskede enhed til lydudgang, skal du klikke på Advance, og du vil se standardformatet; test hvert format i valgmulighederne, og vælg det format, der ikke får lyden til at være ude af sync.
Del 3. Bedste måde at rette OBS-lydforsinkelse på
Løsningen ovenfor forklarer, hvordan man undgår lydforsinkelse ved hjælp af OBS Studio, men hvad nu hvis problemet er, at den optagede lyd, du vil præsentere eller uploade, er ude af sync? Brug FVC Video Converter Ultimate, et program med forskellige funktioner til at forbedre et videoklip. En af de funktioner, der tilbydes, kan rette lydsynkroniseringen i et videoklip ved at justere forsinkelsen. Følg trinene nedenfor for at lære, hvordan du bruger softwaren:
Trin 1: For at gemme softwaren på din computers harddisk skal du klikke på knappen Free Download. Derefter kan du installere softwaren og tilpasse indstillingerne, som du ønsker.
Gratis download til Windows 7 eller nyere Sikker download
Gratis download til MacOS 10.7 eller nyere Sikker download
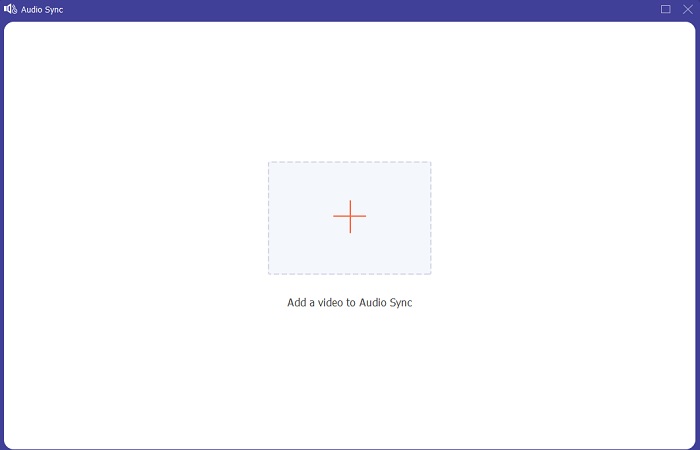
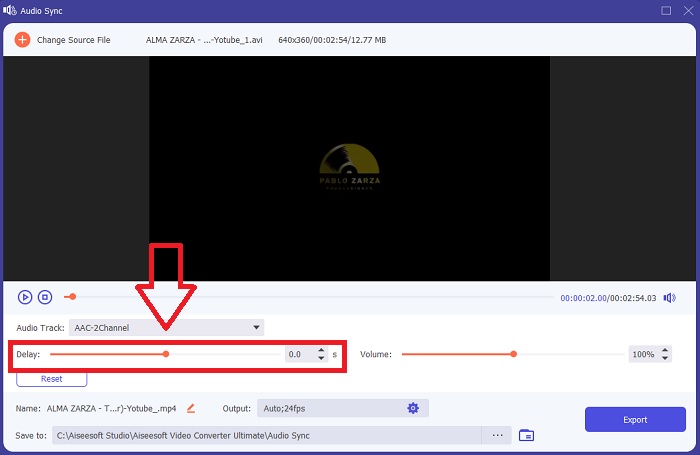
Trin 2: Klik på funktionen Toolbox, efter du har startet softwaren, og fortsæt med at klikke på Audio Sync.

Trin 3: Klik på +-knappen efter at have klikket på Audio Sync, og begynd at redigere videoklippet.
Trin 4: Juster Slider for lyden, så den bliver synkroniseret med videoklippet. Samtidig kan du også ændre outputenhed og begynde at tilpasse lydstyrken på dit videoklip.
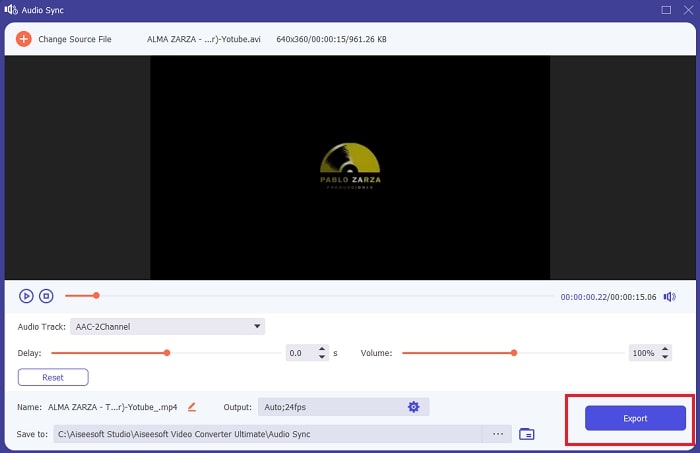
Trin 5: Klik på Export, og vælg, hvor du vil gemme din fil, når du er færdig med at redigere.
Relateret:
Sådan tilføjer du lyd til video
Del 4. Ofte stillede spørgsmål om OBS Audio Delay
Hvad er et samplingsfrekvensmismatch?
Lydsamplingshastigheden, udtrykt i kilohertz, er den hastighed, hvormed systemet tager disse målinger. Lydsamplingshastigheden bestemmer det frekvensområde, du kan fange i digital lyd - samplingshastigheden ændrer sig i dine lydpræferencer i de fleste DAW'er. Ændring af samplingshastigheden påvirker kvaliteten af din lyd. Imidlertid er samplingsfrekvensmismatch en ulige modtagelse og afsendelse af lydsamplehastighed til kilden. Denne hændelse sker altid, hvis højttalerudgangen og hovedtelefonudgangen ikke er den samme samplerate, hvilket forårsager en lydforsinkelse.
Mister jeg kvaliteten af lyden, hvis jeg justerer samplingshastigheden?
Samplingsfrekvensen ændrer sig, hvis du vil lytte til lyden i dit videoklip og ikke ændre den. Når du bruger FVC Video Converter Ultimate, vil du kun ændre lydforsinkelsen for videoklippet for at synkronisere dets lyd. Du vil ikke længere justere samplingshastigheden og være bange for at miste lydkvaliteten.
Hvilken samplingshastighed foretrækkes, hvis jeg bruger lydoutput af lav kvalitet?
Lydkvaliteten afhænger af lydoutputtet. Hvis din mikrofon eller højttaler kun understøtter en lavfrekvent lydhastighed, er det bedre at sænke standard samplingsfrekvensen til 44,1 kHz end at indstille den til 48 Hz. Samplingsfrekvensen kan påvirke lydsynkroniseringsforsinkelsen, hvis der ikke er ens frekvensflow til output og input.
Konklusion
For at opsummere kan den lydforsinkelse, der ofte opstår i OBS Studio, løses på forskellige måder. Vi har gennemgået uoverensstemmelse i samplingsfrekvensen og kontrolleret forskellige lydudgange, men den bedste måde at vise en løsning på for at få lyden ud af sync er at bruge FVC Video Converter Ultimate. Ud over funktionen til at rette lydsynkronisering har den mange andre funktioner, der kan hjælpe med at forbedre dit videoklip.
-
 De 2 bedste løsninger til løsning af Windows Media Player, der ikke afspiller DVD'er
 Når du vil afspille DVD-videoer via Windows Media Player, men kun modtager fejlen "Filtypen understøttes ikke", kan du lære 3 nemme måder at rette op på Windows Media Player, der ikke afspiller DVD'er.
-
 [Løst] Sådan repareres videoer, der ikke afspilles på iPhone, med detaljerede trin
 Lokale videoer i galleriet kan ikke afspilles på din iPhone via standardvideoafspilleren? Online YouTube -videoer, der ikke afspilles på iPhone, sker altid? Her er 5 løsninger til at hjælpe dig i denne artikel.
-
 Vejledning om, hvordan man reparerer videoer, der ikke afspilles på Android -telefoner
 Vil du vide, hvad er årsagerne til, at videoer på din Android-enhed ikke kan afspilles? Og hvis ja, er der nogen måder at løse problemet på på egen hånd? Fortsæt med at læse for at vide mere.