


Πώς να βελτιστοποιήσετε την εικόνα για τον Ιστό χρησιμοποιώντας τις 4 λύσεις [Γρήγορα]
Η βελτιστοποίηση μιας εικόνας παίζει ζωτικό ρόλο στον ιστό, καθώς μειώνει τον χρόνο φόρτωσης του ιστότοπου. Σύμφωνα με πρόσφατες μελέτες, όταν οι εικόνες δεν είναι σωστά βελτιστοποιημένες, σχεδόν οι μισοί επισκέπτες εγκαταλείπουν αμέσως τον ιστότοπο, γεγονός που κοστίζει σε επισκεψιμότητα και έσοδα. Είναι απαραίτητο να μάθετε πώς να το κάνετε, αν θέλετε να μειώσετε το buffering και να δημιουργήσετε έναν αξιόπιστο ιστότοπο, ώστε να αυξήσετε την κίνηση και, ως αποτέλεσμα, το εισόδημά σας. Αυτό είναι εύκολο· με τη βοήθεια του οδηγού που προσθέτουμε σχετικά με το πώς να βελτιστοποιήσετε την εικόνα για τον ιστό με τον πιο απλό δυνατό τρόπο.

Μέρος 1. Καλύτεροι και δωρεάν τρόποι για να βελτιστοποιήσετε την εικόνα στο Διαδίκτυο χωρίς να θυσιάσετε την ποιότητα της εικόνας
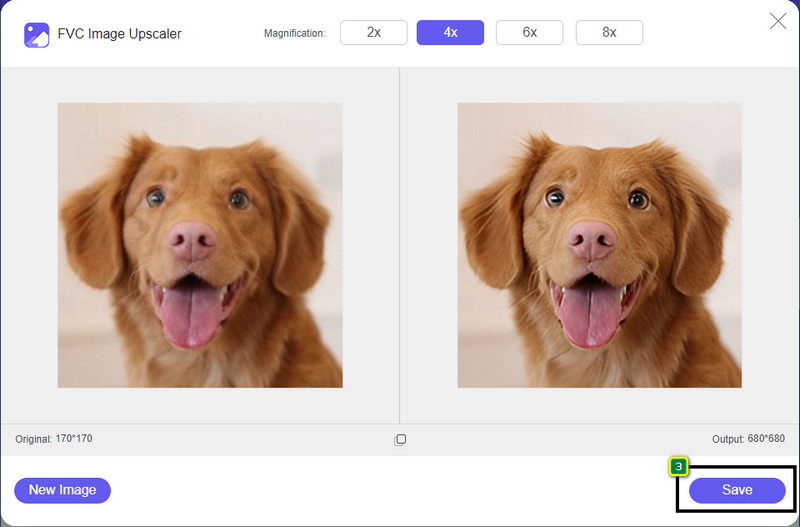
1. FVC Free Image Upscaler
Ψάχνετε έναν τρόπο να βελτιστοποιήσετε τις διαστάσεις και την αναλογία πλευρών της εικόνας που θέλετε να χρησιμοποιήσετε στον ιστό; Το FVC Free Image Upscaler είναι ένα εργαλείο ικανό να βελτιστοποιεί εικόνες με τη βοήθεια της ισχυρής τεχνολογίας ΤΝ (AI) που διαθέτει. Αυτός ο upscaler μπορεί να αλλάξει το μέγεθος μιας εικόνας χωρίς να θυσιάσει την λεπτομερή ανάλυση (PPI), ώστε να μην αντιμετωπίσετε απώλεια ποιότητας. Επίσης, αυτό το online εργαλείο μπορεί να διορθώσει θολές ή pixelated εικόνες εντοπίζοντας τις ατέλειες επάνω τους. Πριν εξαχθεί η εικόνα, υπάρχει παράθυρο προεπισκόπησης για να συγκρίνετε το πριν και το μετά. Άρα, αν χρειάζεται να αλλάξετε το μέγεθος της εικόνας που έχετε για τον ιστό, μπορείτε να ακολουθήσετε τα βήματα που παραθέτουμε στη συνέχεια.
Βήμα 1. Ανοίξτε τον ιστότοπο πατώντας αυτόν τον σύνδεσμο.
Βήμα 2. Πατήστε Upload Image για να εισαγάγετε την εικόνα που θέλετε να αλλάξετε μέγεθος εδώ.
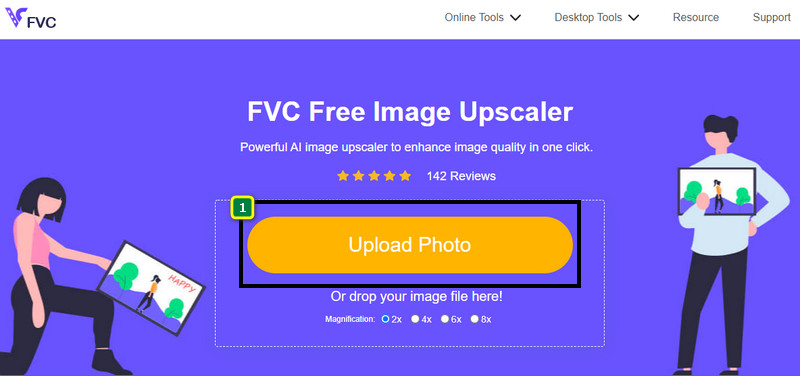
Βήμα 3. Επιλέξτε την επιλογή που θέλετε να εφαρμόσετε στην εικόνα σας για να αλλάξετε το μέγεθός της.
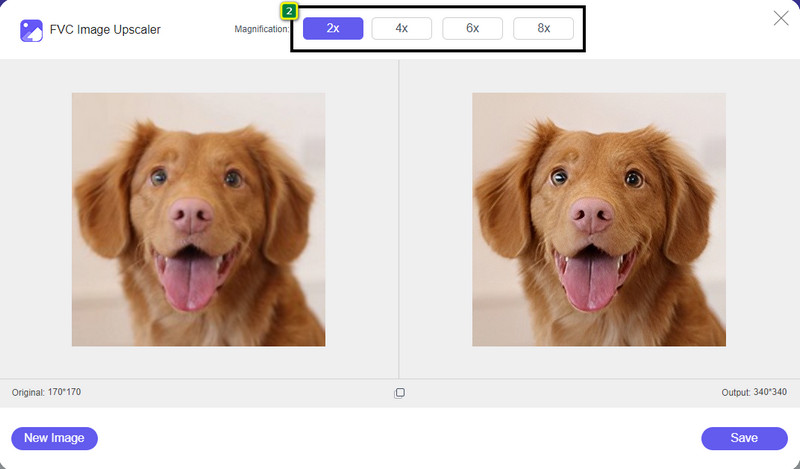
Βήμα 4. Πατήστε Save για να κατεβάσετε την εικόνα με το νέο μέγεθος στον τοπικό σας δίσκο.
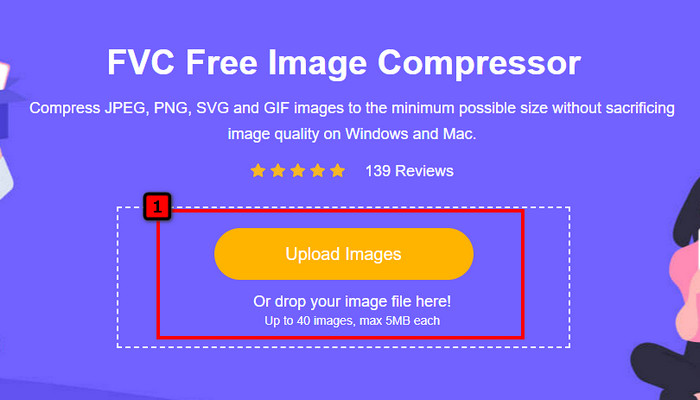
2. Δωρεάν Συμπιεστής Εικόνας FVC
Το FVC Free Image Compressor επιτρέπει σε οποιονδήποτε να βελτιστοποιήσει μια εικόνα για τον ιστό, μειώνοντας το μέγεθος του αρχείου της. Σας επιτρέπει να συμπιέζετε δημοφιλείς μορφές που χρησιμοποιούνται σε διάφορους ιστότοπους, όπως PNG, JPG, SVG, BMP κ.λπ., με μέγεθος μικρότερο από 5MB η καθεμία. Με αυτό, μπορείτε να ρίξετε πολλαπλές εικόνες και να τις φέρετε σε βελτιστοποιημένο μέγεθος, ώστε να φορτώνουν καλύτερα στον ιστό. Πρόκειται για ένα εργαλείο με τεχνολογία ΤΝ (AI) που προσφέρει τον καλύτερο λόγο συμπίεσης, τον οποίο δεν μπορείτε να πετύχετε σε άλλο online συμπιεστή.
Βήμα 1. Επισκεφτείτε την επίσημη ιστοσελίδα του εργαλείου αναζητώντας το όνομά του ή μπορείτε να κάνετε κλικ σε αυτόν τον σύνδεσμο για να το ανοίξετε στον φυλλομετρητή σας.
Βήμα 2. Σύρετε και αφήστε το αρχείο εικόνας που θέλετε να ανεβάσετε εδώ, ή μπορείτε να κάνετε κλικ στο Upload Images. Ένας φάκελος θα εμφανιστεί στην οθόνη σας· κάντε κλικ στο αρχείο που θέλετε να συμπιέσετε και πατήστε Open. Αυτός ο συμπιεστής μπορεί να μειώσει το μέγεθος περισσότερων από 40 εικόνων ταυτόχρονα.
Βήμα 3. Το εργαλείο θα μειώσει αυτόματα το μέγεθος αρχείου της εικόνας βάσει του αλγορίθμου ΤΝ (AI). Έπειτα, κάντε κλικ στο Download για να εξαγάγετε τη συμπιεσμένη εκδοχή της εικόνας.

3. TinyPNG
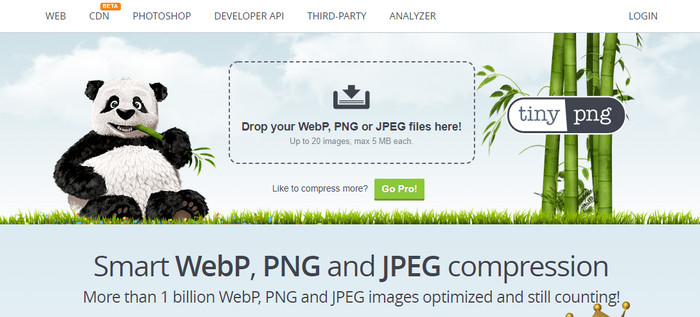
Το TinyPNG είναι ένα δημοφιλές και αξιόπιστο λογισμικό που μπορείτε να χρησιμοποιήσετε για να βελτιστοποιήσετε εικόνες online. Είναι ένας συμπιεστής που μειώνει αυτόματα το μέγεθος της εικόνας έως και στο 75% του αρχικού μεγέθους της. Μπορείτε να ανεβάσετε τις εικόνες στο Dropbox σας αν δεν βρίσκονται στον τοπικό σας δίσκο. Δεν θα δυσκολευτείτε να μάθετε πώς να χρησιμοποιείτε αυτόν τον συμπιεστή εικόνων χάρη στην απλότητα με την οποία τον δημιούργησε ο προγραμματιστής.
Αν και είναι εύκολο στη χρήση, η υποστηριζόμενη μορφή εδώ είναι μόνο PNG και JPG και δεν υπάρχει τίποτα άλλο. Επομένως, εάν θέλετε να συμπιέσετε τα αρχεία BMP, GIF, SVG και άλλα αρχεία που έχετε, δεν μπορείτε να το κάνετε εδώ επειδή δεν υποστηρίζει την εν λόγω μορφή. Ωστόσο, αυτό είναι εύκολο στη χρήση. μπορείτε να ακολουθήσετε τα βήματα που προσθέτουμε.
Βήμα 1. Ανοίξτε τη μηχανή αναζήτησής σας και βρείτε την επίσημη ιστοσελίδα του TinyPNG.
Βήμα 2. Κάντε κλικ στο εικονίδιο εισαγωγής για να ανεβάσετε την εικόνα που θέλετε να συμπιεστεί· αυτό το εργαλείο μπορεί να επεξεργαστεί 20 εικόνες ταυτόχρονα.
Βήμα 3. Περιμένετε να ολοκληρωθεί η διαδικασία συμπίεσης και στη συνέχεια κάντε κλικ στο κουμπί Download για να αποθηκεύσετε τη συμπιεσμένη εκδοχή της εικόνας που ανεβάσατε εδώ.
Μέρος 2. Βελτιστοποιήστε την εικόνα εκτός σύνδεσης χρησιμοποιώντας το επαγγελματικό λογισμικό σε Windows & Mac
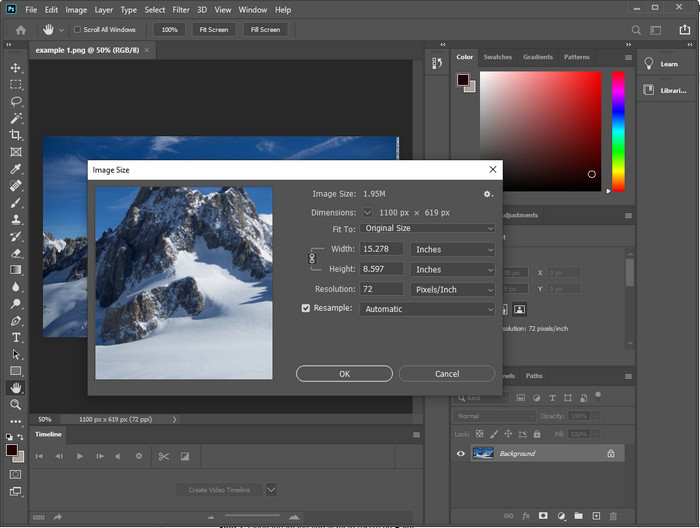
Το Photoshop είναι ικανό να εκτελέσει και τις δύο εργασίες που αναφέραμε στο πρώτο μέρος: αλλαγή διαστάσεων και μείωση μεγέθους αρχείου. Αν και αυτό το εργαλείο δεν δημιουργήθηκε ειδικά για αυτή την εργασία, μπορεί παρ’ όλα αυτά να την εκτελέσει ως μέρος των επιπλέον προηγμένων λειτουργιών του. Με αυτό, μπορείτε να αρχίσετε να προσθέτετε φίλτρα ή να επεξεργάζεστε την εικόνα με βάση τις ιδέες σας. Ο μόνος περιορισμός είναι η φαντασία σας και το πόσο δύσκολο είναι να χρησιμοποιήσετε αυτό το λογισμικό.
Σε αντίθεση με το διαδικτυακό εργαλείο που αναφέραμε, δεν θα χρειαστείτε σύνδεση στο διαδίκτυο για να χρησιμοποιήσετε αυτό το λογισμικό αφού το κατεβάσετε στη συσκευή σας. Ωστόσο, θα χρειαστεί να αγοράσετε το λογισμικό για να το χρησιμοποιήσετε, οπότε αν θέλετε να δείτε πώς να βελτιστοποιήσετε την εικόνα για τον Ιστό στο Photoshop, υπάρχει μια οδηγία που προσθέτουμε παρακάτω, η οποία σας επιτρέπει να μειώσετε και να αλλάξετε το μέγεθος της εικόνας.
Βήμα 1. Κατεβάστε και εκκινήστε το λογισμικό στον υπολογιστή σας για να αρχίσετε να το χρησιμοποιείτε.
Βήμα 2. Ανεβάστε την εικόνα που θέλετε να επεξεργαστείτε και μετά πηγαίνετε στο μενού Image και κάντε κλικ στο Image Size. Αλλάξτε τις μετρήσεις σύμφωνα με τις προδιαγραφές σας και έπειτα κάντε κλικ στο OK για να αποθηκεύσετε τις αλλαγές. Αν δεν θέλετε να αλλάξετε την αναλογία πλευρών ή τις διαστάσεις της εικόνας, είναι καλύτερα να παραλείψετε το βήμα 2.
Βήμα 3. Πατήστε το μενού File και έπειτα Save as. Ένα παράθυρο διαλόγου θα εμφανιστεί στην οθόνη σας. Επιλέξτε το μέγεθος αρχείου που θέλετε να πετύχετε και πατήστε OK για να ξεκινήσει η εξαγωγή της εικόνας.
Μέρος 3. Συχνές ερωτήσεις σχετικά με τον τρόπο βελτιστοποίησης της εικόνας για τον Ιστό
Ποια είναι η καλύτερη μορφή εικόνας για τον Ιστό;
Χρησιμοποιήστε καλύτερα μια εικόνα με επέκταση PNG και JPG, επειδή αυτές οι μορφές είναι γνωστό ότι είναι καλά βελτιστοποιημένες σε διαφορετικούς ιστότοπους. Ωστόσο, μερικές φορές θα χρειαστεί να το βελτιστοποιήσετε μειώνοντας ή αλλάζοντας το μέγεθος της εικόνας, όπου το εργαλείο που προσθέσαμε εδώ ήρθε να βοηθήσει.
Το οποίο φέρνει περισσότερες λεπτομέρειες στον Ιστό. PNG ή JPG;
Και οι δύο εικόνες ράστερ έχουν καλή απόδοση στον ιστότοπο. φορτώνουν πιο γρήγορα και βελτιστοποιούν τους ιστότοπους. Ωστόσο, εξακολουθούν να υπάρχουν διαφορές μεταξύ αυτών των δύο μορφών, όπως όταν θέλετε να χρησιμοποιήσετε καθαρή φωτογραφία χωρίς διαφάνεια για τον ιστό, η βασική σας μορφή πρέπει να είναι JPG ή JPEG. Αλλά αν θέλετε να έχετε τη διαφάνεια 1 bit στον ιστό σας με μεγάλη λεπτομέρεια, το PNG είναι εδώ για να σας βοηθήσει.
Η αλλαγή του μεγέθους της εικόνας κάνει την ποιότητα κακή;
Αν συμπιέσετε υπερβολικά μια εικόνα, είναι πιθανό να έχει κακή ποιότητα, αλλά αυτό μπορεί να αποφευχθεί αν δεν την παρασυμπιέσετε. Μόλις συμπιέσετε την εικόνα, είναι προτιμότερο να μειώσετε το μέγεθός της κατά τουλάχιστον 45% έως 70%, ώστε να αποφύγουμε την απώλεια ποιότητας. Ωστόσο, μπορείτε να χρησιμοποιήσετε έναν βελτιωτή εικόνας για να αυξήσετε την ποιότητα της εικόνας.
συμπέρασμα
Τώρα που ξέρετε πώς να βελτιστοποιήσετε την εικόνα σας, καλύτερα να το κάνετε για να κερδίσετε περισσότερες επισκέψεις και να τραβήξετε πολλή προσοχή. Με το σεμινάριο που προσθέσαμε παραπάνω, είμαστε σίγουροι ότι μπορείτε να το κάνετε εύκολα και γρήγορα χωρίς να επηρεάζετε την ποιότητα. Εάν χρειάζεται να αλλάξετε το μέγεθος ή να συμπιέσετε, σας συνιστούμε να χρησιμοποιήσετε το προϊόν FVC που περιλαμβάνουμε εδώ για να λύσετε το πρόβλημα χωρίς να κάνετε λήψη προγράμματος εγκατάστασης.
-
 Κάντε Photo HD με τους καλύτερους τρόπους που μπορείτε να βρείτε στην αγορά
 Αναρωτιέστε ή θέλετε να φτιάξετε φωτογραφία HD; Μπορείτε να ακολουθήσετε το σεμινάριο που προσθέτουμε παρακάτω με διαφορετικές λύσεις που μπορείτε να χρησιμοποιήσετε.
-
 Κορυφαίοι 4 μειωτήρες ποιότητας εικόνας που μπορείτε να χρησιμοποιήσετε online και εκτός σύνδεσης
 Αυτοί οι μειωτήρες ποιότητας εικόνας μπορούν να σας βοηθήσουν να μειώσετε την ποιότητα της εικόνας σας για ορισμένους λόγους. Εάν χρειάζεστε ένα, διαβάστε αυτό το άρθρο!
-
 Επίσημοι τρόποι για να αναβαθμίσετε την εικόνα σε 4k με ένα Hands-On Tutorial
 Για να αναβαθμίσετε την εικόνα σε 4k, θα χρειαστείτε ένα λογισμικό στη συσκευή σας. Εάν δεν έχετε, θα πρέπει να επιλέξετε το εργαλείο που περιλαμβάνουμε εδώ.