


Πώς να ακονίσετε γρήγορα την εικόνα στο Photoshop - Ένας πλήρης οδηγός που πρέπει να γνωρίζετε
Με τον κορυφαίο επαγγελματικό επεξεργαστή εικόνας μπορείτε να επεξεργαστείτε κάθε φωτογραφία που έχετε σε άλλο επίπεδο. Το Adobe Photoshop είναι εδώ και πολλά χρόνια το πιο αξιόπιστο λογισμικό που μπορείτε να κατεβάσετε σε Windows, Mac, iOS και Android. Χάρη στον δημιουργό του, την Adobe, έχει ήδη εισαγάγει και φέρει την επεξεργασία εικόνας στο μέγιστο των δυνατοτήτων της. Λόγω των προηγμένων λειτουργιών του, πολλοί νέοι χρήστες φοβούνται τον επεξεργαστή εξαιτίας του περιβάλλοντος εργασίας και της συνολικής λειτουργικότητάς του. Μπορεί να φαίνεται δύσκολο στη χρήση, δεν είναι όμως, ειδικά όταν πρόκειται για όξυνση της εικόνας σας. Εδώ θα παρουσιάσουμε ένα πλήρες σεμινάριο για το πώς να οξύνεις γρήγορα μια εικόνα στο Photoshop.

Μέρος 1. Ένα πλήρες σεμινάριο για το πώς να ακονίσετε την εικόνα στο Photoshop [3 αποτελεσματικοί τρόποι ακονίσματος]
Η όξυνση των εικόνων του Photoshop θα μπορούσε να συντρίψει όσους δεν έχουν χρησιμοποιήσει αυτό το πρόγραμμα. Αλλά προτού προχωρήσουμε στο σεμινάριο, θα χρειαστεί να κατεβάσετε το επίσημο λογισμικό στην Adobe. Επιλέξτε το σωστό κουμπί λήψης για να το έχετε στην επιφάνεια εργασίας σας. Εάν δεν έχετε κατεβάσει αυτό το πρόγραμμα στον υπολογιστή σας, μπορείτε να χρησιμοποιήσετε τη δωρεάν δοκιμή του, αλλά εάν έχετε ολοκληρώσει τη δοκιμή, θα πρέπει να αγοράσετε ένα μηνιαίο ή ετήσιο πρόγραμμα. Μετά από όλα τα παρακάτω, προχωρήστε στα βήματα της επιλογής σας τρόπους που περιλαμβάνουμε παρακάτω.
1ος τρόπος. Πώς να κάνετε ευκρινή εικόνα στο Photoshop χρησιμοποιώντας High Pass:
Το Highpass σάς επιτρέπει να επισημάνετε την εικόνα και να εφαρμόσετε ένα φίλτρο στην εικόνα που θα μπορούσε να σας βοηθήσει να ακονίσετε τις άκρες της φωτογραφίας που ανεβάζετε στο Photoshop. Μπορείτε να ακολουθήσετε το σεμινάριο που προσθέτουμε παρακάτω για να μάθετε πώς να εφαρμόζετε και να χρησιμοποιείτε το highpass στις εικόνες που έχετε.
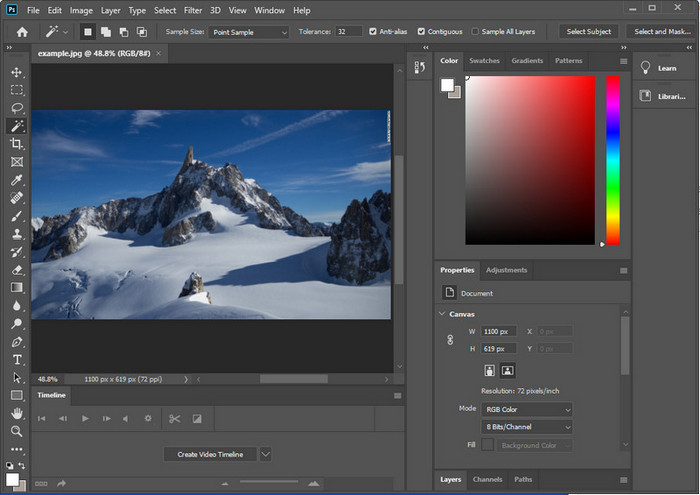
Βήμα 1. Εκκινήστε το λογισμικό, κάντε κλικ στο File και πατήστε Open για να ανεβάσετε την εικόνα και να αρχίσετε να προσθέτετε όξυνση.
Βήμα 2. Αντιγράψτε το layer της εικόνας που ανεβάσατε στο Photoshop.
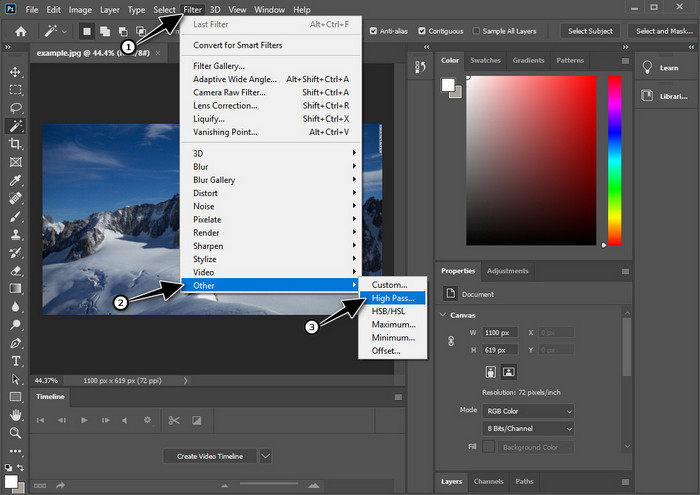
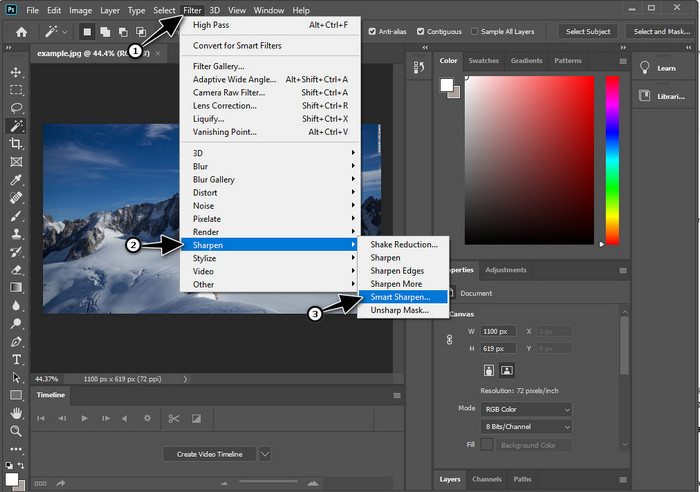
Βήμα 3. Στο επάνω τμήμα, κάντε κλικ στο μενού Filter, πατήστε Other και έπειτα High Pass. Δεν χρειάζεται να ανησυχείτε αν η εικόνα σας γίνει γκρι, γιατί αυτό είναι φυσιολογικό όταν προσθέτετε High Pass.
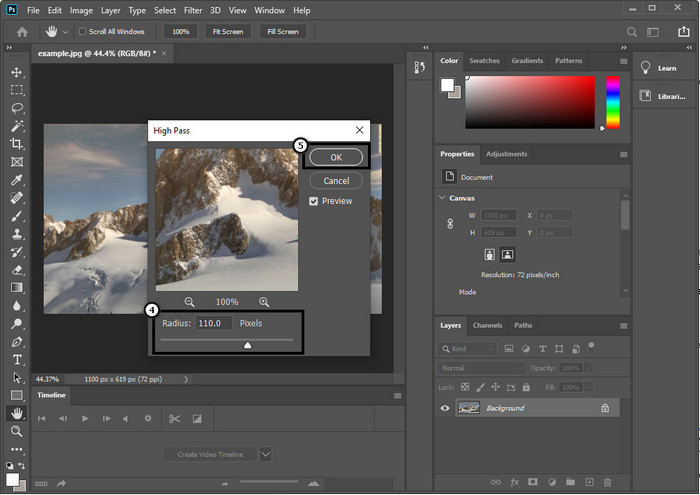
Βήμα 4. Ένα αναδυόμενο παράθυρο θα εμφανιστεί στην οθόνη σας, όπου μπορείτε να αρχίσετε να σύρετε το slider για να αυξήσετε την ακτίνα και να έχετε καλύτερες λεπτομέρειες στην εικόνα σας. Έπειτα πατήστε OK για να την αποθηκεύσετε.
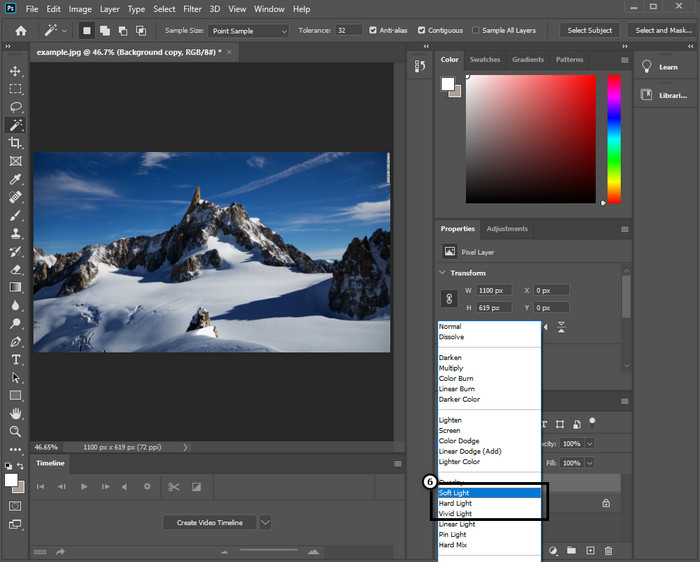
Βήμα 5. Επιστρέψτε στο layer, κάντε κλικ στο κουμπί drop-down και επιλέξτε τι είδος φωτός θέλετε να εφαρμόσετε στην εικόνα σας – από soft, hard και vivid light για όξυνση. Επαναλάβετε το βήμα 3 έως αυτό το βήμα για να επαναλάβετε την όξυνση της εικόνας.
2ος Τρόπος. Πώς να κάνετε πιο ευκρινή εικόνα στο Photoshop με το Smart Sharper:
Το Smart Sharpen είναι μια αποτελεσματική λειτουργία που μπορείτε να χρησιμοποιήσετε στο Adobe Photoshop για να οξύνεις τα πάντα στην εικόνα σου. Αυτή η λειτουργία δεν είναι αυτόματη λύση· θα χρειαστεί να ρυθμίσετε ορισμένες παραμέτρους ώστε όλα να φαίνονται ευκρινή. Αν λοιπόν θέλετε να χρησιμοποιήσετε αυτή τη δυνατότητα στο Adobe, μπορείτε να ακολουθήσετε τα επόμενα βήματα που παραθέτουμε.
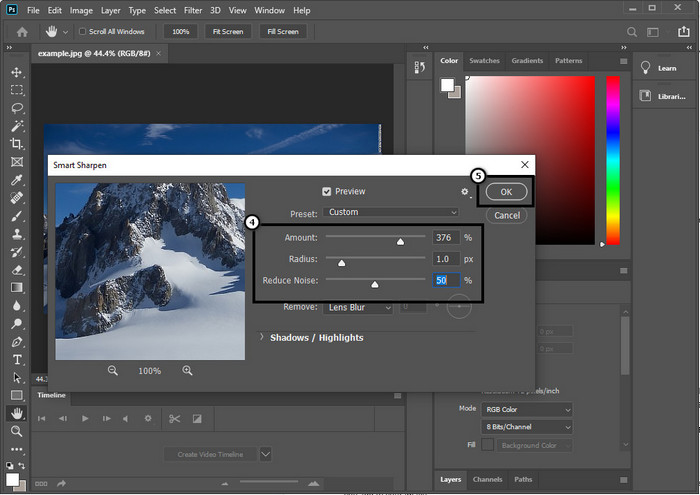
Βήμα 1. Αφού προσθέσετε την εικόνα που θέλετε να οξύνει, κάντε κλικ στο μενού Filter.
Βήμα 2. Στις επιλογές που θα εμφανιστούν, κάντε κλικ στο Sharpen και μετά πατήστε Smart Sharpen.
Βήμα 3. Ρυθμίστε την τιμή του amount και την ακτίνα της όξυνσης σύμφωνα με τις προτιμήσεις σας και κάντε κλικ στο OK για να αποθηκεύσετε τις αλλαγές. Τόσο απλά, έχετε οξύνει τη φωτογραφία με το εργαλείο όξυνσης αυτού του λογισμικού.
3ος Τρόπος. Πώς να ακονίσετε την εικόνα στη φωτογραφία ρυθμίζοντας τη φωτεινότητα και την αντίθεση:
Σε αντίθεση με τους δύο τρόπους που παρουσιάσαμε, η φωτεινότητα και η αντίθεση εστιάζουν στην επισήμανση της εικόνας που ανεβάζετε για να φαίνεται πιο λεπτομερής, όπως κάνουν τα εργαλεία ευκρίνειας. Λίγοι χρήστες γνωρίζουν αυτήν την επιλογή, οπότε αν θέλετε να χρησιμοποιήσετε αυτήν την επιλογή και να αρχίσετε να ακονίζετε την εικόνα που έχετε, ακολουθήστε τα παρακάτω βήματα.
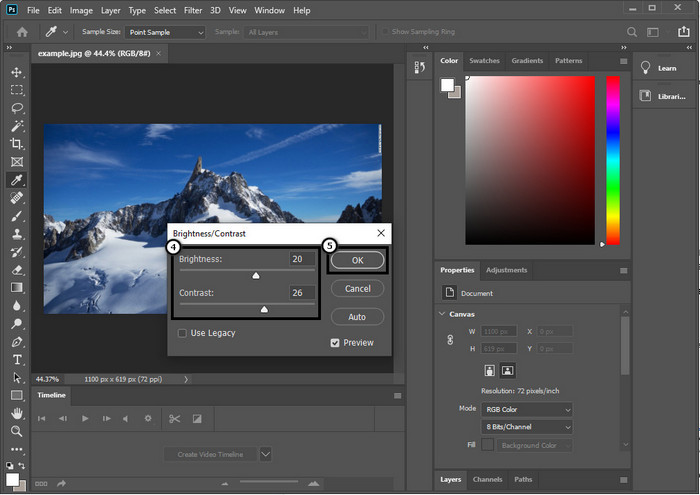
Βήμα 1. Αφού ανεβάσετε την εικόνα σας στο Photoshop, συνεχίστε κάνοντας κλικ στο μενού Image.
Βήμα 2. Θα εμφανιστούν αρκετές επιλογές· πατήστε Adjustment και μετά κάντε κλικ στο Brightness and Contrast.

Βήμα 3. Ρυθμίστε τη φωτεινότητα και την αντίθεση σύροντας το slider και πατήστε OK για να αποθηκεύσετε τις αλλαγές που κάνατε στην εικόνα σας.
Σχετικά:
Απλό οδηγός για το πώς να προσθέσετε υδατογράφημα σε βίντεο στο Photoshop γρήγορα
Μέρος 2. Καλύτερη εναλλακτική λύση στο Photoshop για την όξυνση της εικόνας στο Διαδίκτυο [Δωρεάν υπηρεσία]
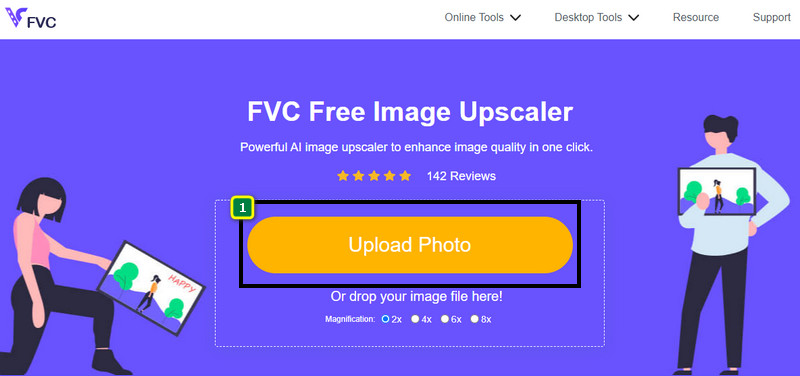
Πώς να οξύνω μια θολή εικόνα στο Photoshop χωρίς την εφαρμογή; Μπορείτε να χρησιμοποιήσετε το FVC Free Image Upscaler. Αυτό το online εργαλείο μπορεί να σας γλιτώσει από πολύπλοκες διαδικασίες. Ανεβάστε την εικόνα και αφήστε την τεχνολογία AI που διαθέτει το λογισμικό να κάνει τη δουλειά για εσάς. Επίσης, δεν χρειάζεται να αγοράσετε κωδικό άδειας ή έκδοση premium, γιατί είναι δωρεάν για όλους τους χρήστες που χρειάζεται να επεξεργαστούν άμεσα τις φωτογραφίες τους. Ακόμα κι αν δεν είστε ειδικός στην επεξεργασία, μπορείτε και πάλι να οξύνει την εικόνα σας ακολουθώντας τα παρακάτω βήματα.
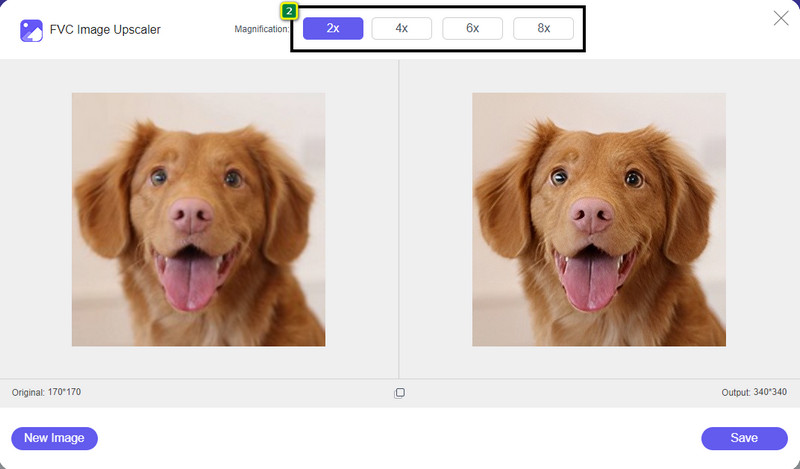
Βήμα 1. Πρέπει να κάνετε κλικ σε αυτόν τον σύνδεσμο για να ανοίξετε το online εργαλείο και να οξύνει τη φωτογραφία σας.
Βήμα 2. Στον ιστότοπο θα πρέπει να πατήσετε Upload Image για να εισαγάγετε την εικόνα που θέλετε να οξύνει. Ένας φάκελος θα εμφανιστεί στην οθόνη· επιλέξτε την εικόνα και κάντε κλικ στο Open για να την ανεβάσετε.
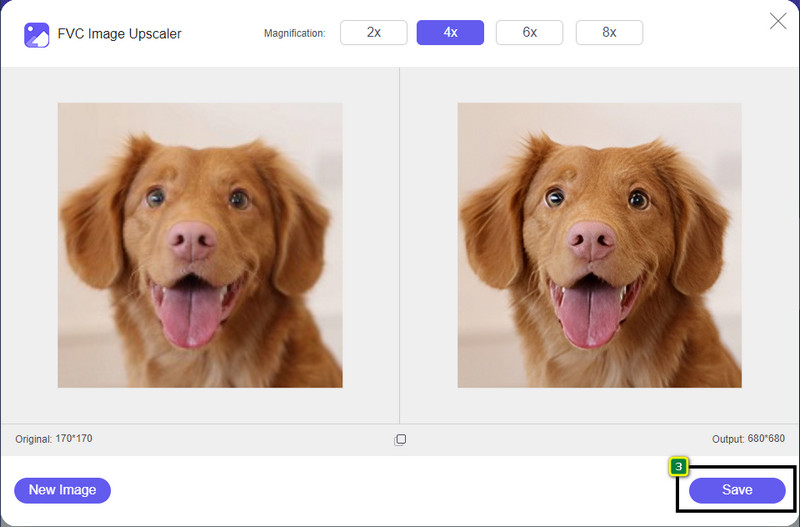
Βήμα 3. Θα υπάρχουν διάφορες επιλογές μεγέθυνσης της εικόνας σας ώστε να την οξύνει εύκολα με τη βοήθεια της τεχνολογίας AI.
Βήμα 4. Στο κάτω μέρος, κάντε κλικ στο κουμπί Save για να κατεβάσετε την οξυμένη εικόνα στον τοπικό σας δίσκο.
Μέρος 3. Συχνές ερωτήσεις σχετικά με το πώς να ακονίσετε τις εικόνες στο Photoshop
Τι πρέπει να κάνω εάν λήξει μια δωρεάν δοκιμή του Photoshop;
Αν θέλετε να συνεχίσετε να χρησιμοποιείτε αυτόν τον επαγγελματικό επεξεργαστή εικόνας που έχει αναπτύξει η Adobe, θα χρειαστεί να αγοράσετε ένα πλάνο για να συνεχίσετε να τον χρησιμοποιείτε. Αν όμως θέλετε να ζήσετε παρόμοια εμπειρία επεξεργασίας με αυτή του Photoshop, ξεκινήστε να χρησιμοποιείτε το FVC Free Image Upscaler.
Τι μπορώ να κάνω με το Photoshop;
Μπορείτε να κάνετε πολλές επεξεργασίες εικόνων και βίντεο εδώ, τις οποίες ο άλλος επεξεργαστής δεν προσφέρει. Είναι ένα πλήρες πρόγραμμα επεξεργασίας εικόνας που θα χρειαστείτε για να δημιουργήσετε εκπληκτικά πράγματα, όπως η μετατροπή της εικόνας 2D σε 3D και πολλά άλλα. Ωστόσο, αυτό το λογισμικό είναι λίγο περίπλοκο και θα χρειαστεί να αφιερώσετε χρόνο για να μάθετε πώς να το χρησιμοποιείτε συνολικά.
Πού μπορώ να κατεβάσω το Photoshop;
Το Adobe Photoshop υποστηρίζει Windows 10 με 64-bit ή μεταγενέστερη έκδοση και Mac 10.15 Catalina ή μεταγενέστερη έκδοση. Επίσης, υποστηρίζει μια έκδοση για φορητές συσκευές, το Photoshop Express Photo Editor.
συμπέρασμα
Με το σεμινάριο που προσθέσαμε για το πώς να οξύνεις μια εικόνα στο Photoshop, μπορείτε πλέον εύκολα να την οξύνει με διαφορετικούς τρόπους χρησιμοποιώντας τον καλύτερο επεξεργαστή. Τι γίνεται όμως αν λήξει η δωρεάν δοκιμή σας και θέλετε να οξύνει την εικόνα; Τι πρέπει να κάνετε; Δεν χρειάζεται να ανησυχείτε, γιατί προσθέσαμε μια online εναλλακτική λύση για να οξύνει την εικόνα σας πιο εύκολα και δωρεάν, αρκεί να έχετε σύνδεση στο διαδίκτυο, και αυτή είναι το FVC Free Image Upscaler.
-
 Κάντε Photo HD με τους καλύτερους τρόπους που μπορείτε να βρείτε στην αγορά
 Αναρωτιέστε ή θέλετε να φτιάξετε φωτογραφία HD; Μπορείτε να ακολουθήσετε το σεμινάριο που προσθέτουμε παρακάτω με διαφορετικές λύσεις που μπορείτε να χρησιμοποιήσετε.
-
 Κορυφαίοι 4 μειωτήρες ποιότητας εικόνας που μπορείτε να χρησιμοποιήσετε online και εκτός σύνδεσης
 Αυτοί οι μειωτήρες ποιότητας εικόνας μπορούν να σας βοηθήσουν να μειώσετε την ποιότητα της εικόνας σας για ορισμένους λόγους. Εάν χρειάζεστε ένα, διαβάστε αυτό το άρθρο!
-
 Επίσημοι τρόποι για να αναβαθμίσετε την εικόνα σε 4k με ένα Hands-On Tutorial
 Για να αναβαθμίσετε την εικόνα σε 4k, θα χρειαστείτε ένα λογισμικό στη συσκευή σας. Εάν δεν έχετε, θα πρέπει να επιλέξετε το εργαλείο που περιλαμβάνουμε εδώ.