


Cómo hacer un vídeo más oscuro para los vídeos de su proyecto
En lo que respecta a la producción de vídeo, una técnica muy utilizada consiste en oscurecer zonas concretas de la grabación. Este proceso puede realizarse por varios motivos, como crear un ambiente o atmósfera, dirigir la atención a una parte específica de la pantalla o ayudar a disimular imperfecciones. Uno de los principales motivos para oscurecer un vídeo es añadir dramatismo y tensión a una escena. Al reducir la exposición y aumentar el contraste, se intensifican las sombras y se minimizan las luces, lo que confiere al material un aspecto más ominoso y amenazador. Este proceso puede ser especialmente eficaz en películas de terror o thrillers, donde se pretende que el público se sienta en tensión. Para el vídeo de tu proyecto, debes aprender esta técnica con las guías detalladas que encontrarás a continuación.

Parte 1. Cómo oscurecer un vídeo sin conexión
1. Video Converter Ultimate
Video Converter Ultimate es una potente aplicación y herramienta de edición de vídeo que puede ofrecerte todo lo que necesitas. ¿Necesitas ayuda para reducir el brillo de tu vídeo de proyecto? Esta herramienta incluye una forma práctica de disminuir el brillo de la apariencia de tu vídeo. Cuenta con una utilidad de vídeo avanzada, un Mejorador de vídeo que ajusta automáticamente el brillo y el contraste del vídeo del proyecto. Analiza el archivo internamente y modifica el contraste para proporcionar una mejor iluminación del archivo, como si se hubiera grabado en un entorno o escenario con poca luz. Puedes consultar las instrucciones siguientes para aprender la guía detallada sobre cómo usar esta aplicación.
Paso 1. Descarga la aplicación
Empieza a mejorar y modificar tu archivo de vídeo descargando el software en tu PC. Haz clic en Descarga gratuita que aparece debajo de este paso. Obtén su instalador y ejecútalo en tu ordenador.
Descarga gratuitaPara Windows 7 o posteriorDescarga segura
Descarga gratuitaPara macOS 10.7 o posteriorDescarga segura
Paso 2. Importar vídeo
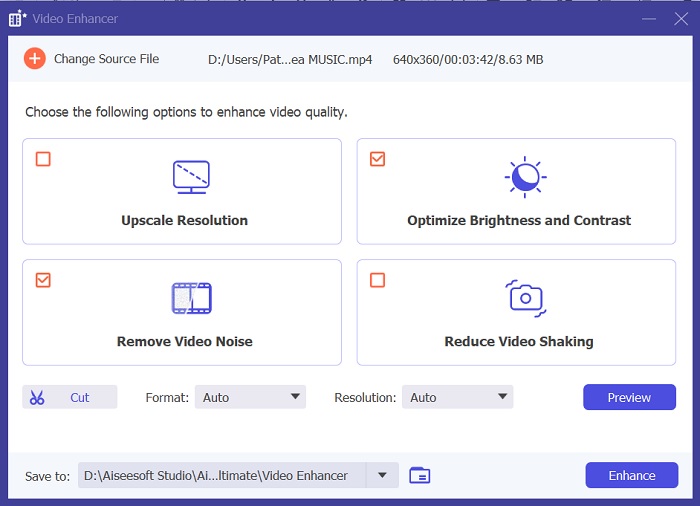
El siguiente paso es iniciar la aplicación y añadir el vídeo que necesitas mejorar. Ve a la opción Caja de herramientas, donde se encuentran todas las funciones avanzadas. Selecciona la función Mejorador de vídeo para acceder a su cuadro de diálogo. Importa el archivo pulsando el icono +.
Paso 3. Finaliza el proceso
A continuación, una vez importado el vídeo elegido, aparecerán cuatro opciones en tu pantalla. Selecciona el menú Brillo y contraste optimizados para procesar el vídeo automáticamente. Después, el vídeo se exportará a la carpeta de salida designada. Localiza el archivo y reprodúcelo para comprobar el contraste del vídeo del proyecto.
2. Adobe Premiere Pro
Premiere Pro es un innovador software de utilidad de vídeo que se ha convertido en la opción preferida de muchos editores de vídeo profesionales, con su interfaz intuitiva, integración perfecta con otros productos de Adobe y funciones sólidas. Uno de los beneficios críticos de Premiere Pro es su capacidad para procesar una amplia gama de formatos de video, desde SD hasta HD, 4K y más. Esta función facilita el trabajo con imágenes de diversas fuentes, incluidas cámaras, dispositivos móviles y drones. Si es necesario ajustar la iluminación de su vídeo, Adobe Premiere Pro es de gran ayuda con su función Lumetri Color Panel, que puede ajustar el contraste y el brillo de un archivo. Además, Premiere Pro ofrece herramientas avanzadas de corrección de color, capacidades de edición de audio, efectos visuales y más.
Paso 1. Para editar el brillo en Premiere Pro, primero debes descargar la aplicación en tu PC. Puedes buscar su instalador en su página web principal y obtener el firmware para instalar la app. Inicia la herramienta e importa el archivo de vídeo pulsando el botón Importar.
Paso 2. Abre el panel de Lumetri Color haciendo clic en la pestaña Color en la esquina superior izquierda de la pantalla. En el panel Lumetri Color verás varias opciones de corrección de color. Para ajustar el brillo, localiza la sección Corrección básica. Aquí puedes usar el control deslizante de Exposición para cambiar el brillo del clip. Arrastra el control hacia la derecha para aumentar el brillo o hacia la izquierda para disminuirlo.
Paso 3. Por último, haz clic en el botón Exportar para guardar el archivo. Espera a que el vídeo se renderice y búscalo en la carpeta de salida de la herramienta. Reproduce y revisa los cambios en el vídeo del proyecto y comprueba si se ajustan a tus preferencias.
3. Adobe After Effects
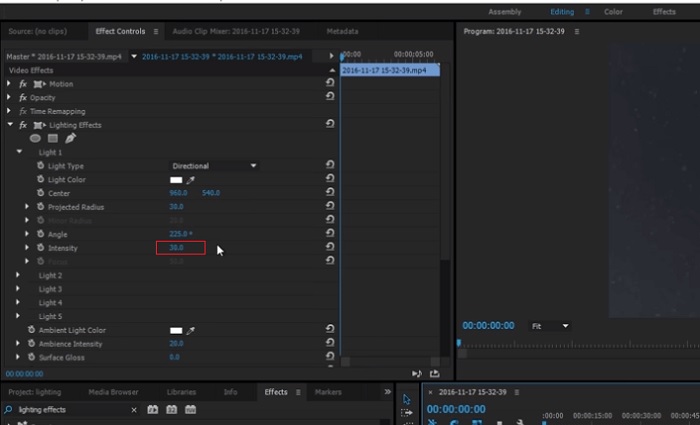
Al ajustar el brillo en After Effects, varias funciones resultan útiles. En primer lugar, el efecto Niveles se puede utilizar para ajustar el brillo y el contraste. Este efecto le permite establecer puntos en blanco y negro, lo que ayuda a garantizar que la imagen no se vuelva demasiado descolorida ni demasiado oscura. También puedes utilizar el efecto Curvas para ajustar el brillo y el contraste de partes específicas del vídeo. Esta característica puede resaltar detalles en las sombras o luces. Otra característica útil es el efecto Exposición, que le permite modificar el brillo y el contraste de toda la imagen. Este efecto también incluye opciones para ajustar la gamma y el desplazamiento, lo que puede ayudarle a ajustar el aspecto de su imagen.
Paso 1. El primer paso para editar la apariencia de un vídeo en After Effects es obtener el firmware de la herramienta e instalarlo en tu PC. Puedes descargarlo o adquirirlo desde la página oficial de Adobe y ejecutar su instalador. Después, inicia la aplicación y navega por sus funciones.
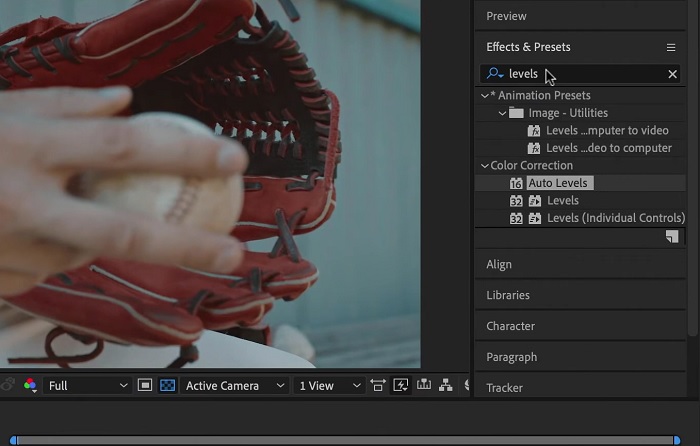
Paso 2. A continuación, importa el vídeo yendo a la opción Archivo y pulsando en Importar. Localiza tu vídeo y tócala para añadirla a la edición. Después, ve a la pestaña Ventanas y haz clic en Efectos y ajustes preestablecidos. Aparecerá un cuadro de búsqueda donde podrás encontrar la opción Niveles.
Paso 3. Por último, pulsa Nivel automático y arrastra y suelta este efecto sobre el vídeo al que necesitas reducirle el brillo en tu clip de proyecto. Haz clic en la opción Exportar para guardar las modificaciones. También puedes usar diferentes ajustes preestablecidos para modificar el brillo de tu archivo. Ve a la carpeta de salida para previsualizar y comprobar el vídeo del proyecto ya modificado.
4. Resolución de DaVinci
Cuando se trata de modificación de video, Davinci Resolve es un poderoso software y utilidad de video que ofrece una variedad de funciones de edición para mejorar la calidad de su metraje. Una de las técnicas de edición más comunes es oscurecer un vídeo, lo que puede afectar drásticamente sus imágenes. Una de las funciones favoritas de los usuarios de este software de edición de vídeo es la capacidad de clasificar fácilmente el color del metraje. El software tiene una amplia gama de herramientas de gradación de color que autorizan a los usuarios a revisar la apariencia del metraje para que coincida con una visión artística. También viene con un panel de línea de tiempo en el que los usuarios pueden proporcionar un mejor proceso de edición. Davinci Resolve hace que este proceso sea fácil y eficiente con sus herramientas avanzadas.
Paso 1. La guía inicial para ajustar la exposición de un vídeo con DaVinci Resolve es obtener la herramienta en tu PC. Descarga la aplicación desde su página web oficial y ejecuta el instalador para instalarla. Después, inicia el editor de vídeo y revisa sus funciones para familiarizarte con sus utilidades de edición.
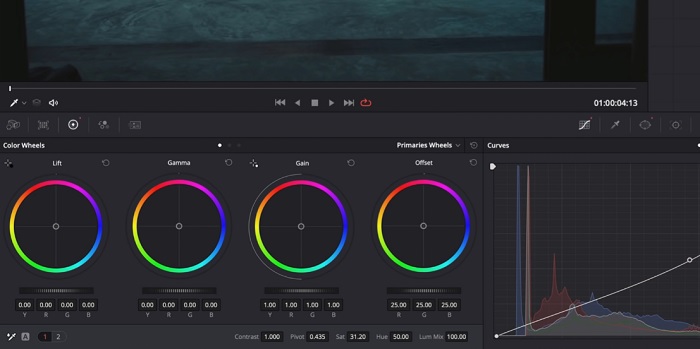
Paso 2. Para oscurecer un vídeo con Davinci Resolve, importa el vídeo haciendo clic en la opción Archivo y accediendo al botón Importar archivo. A continuación, puedes utilizar las herramientas de corrección de color del software. Selecciona el clip que quieras oscurecer en la línea de tiempo y luego abre la página Color.
Paso 3. Desde ahí, puedes usar los controles Lift, Gamma y Gain para ajustar el brillo y el contraste del clip. Después, pulsa y selecciona el botón Exportar para guardar los cambios realizados en el proyecto de vídeo. Accede a la carpeta de salida para previsualizar el archivo.
Parte 2. Cómo oscurecer videos en línea
¿Estás cansado de utilizar software de edición de vídeo más voluminoso para ajustar un simple clip de vídeo en tu PC? Pues Clideo puede ser de gran ayuda como alternativa a la edición de vídeo, ya que consume una gran cantidad de espacio en el ordenador. Esta herramienta en línea permite a los usuarios acceder fácilmente a su panel de línea de tiempo e importar videos a su API sin la necesidad de instalar o iniciar sesión en una cuenta. Los usuarios pueden cargar directamente el archivo de video que necesitan editar y la herramienta en línea analizará y proporcionará funciones de edición para modificar y mejorar la apariencia del clip del proyecto. Puede consultar la guía detallada a continuación sobre el uso completo de esta aplicación en línea.
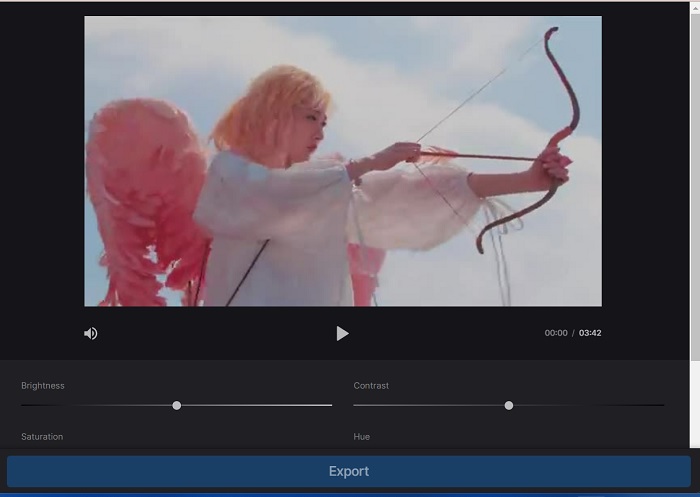
Paso 1. Para ajustar el brillo en Clideo, accede a la aplicación desde tu navegador web. Abre la interfaz principal y empieza a subir tu clip de vídeo a la plataforma pulsando Elegir archivo. Selecciona el vídeo que necesitas editar e impórtalo a la herramienta en línea.
Paso 2. A continuación, selecciona la opción Ajustar en el menú situado debajo del reproductor de vídeo. Este método utilizará varias herramientas de edición, incluida una opción para ajustar el brillo. Arrastra el deslizador de brillo hacia la izquierda o la derecha para disminuir o aumentar el brillo, respectivamente.
Paso 3. También puedes usar el botón de autoajuste para modificar el brillo automáticamente. Una vez que estés satisfecho con el nivel de brillo, haz clic en el icono o botón Aplicar para guardar los cambios. Por último, descarga tu vídeo editado haciendo clic en la opción Exportar.
Lecturas recomendadas:
Filtro de vídeo: mejora tu vídeo con filtros y efectos en el escritorio
5 increíbles creadores de películas para YouTube | Crea contenidos de vídeo excelentes
Parte 3. Preguntas frecuentes sobre oscurecer vídeo
¿Cómo oscurecer un vídeo en un iPhone?
Existen diferentes programas que puede usar e instalar en su dispositivo móvil y que pueden ajustar la exposición del clip de su proyecto. También puedes utilizar una herramienta en línea que puede ayudarte a ajustar videos directamente en tu teléfono inteligente. Se recomienda Clideo, ya que se puede acceder a él desde navegadores web, incluido Safari y otros que son compatibles con dispositivos Apple.
¿Cómo se oscurece un vídeo en iMovie?
Ajuste la configuración de brillo y contraste para oscurecer un video en iMovie. También puedes agregar una superposición oscura o un filtro al video para que parezca más oscuro. Otra opción es ajustar los niveles de exposición para oscurecer el vídeo. Experimente con estas configuraciones hasta lograr el aspecto deseado para su video.
¿Por qué querrías oscurecer un vídeo en un iPhone?
Oscurecer un vídeo puede resultar útil en muchos escenarios, como mejorar la calidad general del vídeo, mejorar el contraste o crear un determinado estado de ánimo o atmósfera.
Conclusión
Tras probar diferentes métodos, este artículo concluye que oscurecer un vídeo en un PC puede ser bastante sencillo. Necesitarás usar un software de edición de vídeo como Video Converter Ultimate, Adobe Premiere Pro, DaVinci Resolve y After Effects para conseguirlo. Una vez que tengas instalado el software, podrás modificar fácilmente la exposición de tu vídeo para lograr el efecto de oscurecimiento deseado. Sin embargo, es fundamental evitar que el vídeo quede tan oscuro que resulte difícil ver los detalles. Con estos consejos sobre cómo arreglar un vídeo demasiado brillante, podrás oscurecer tu vídeo con éxito y crear un resultado final visualmente atractivo.
-
 La guía definitiva para cambiar la resolución de video disponible en varias plataformas
 ¿Necesita cambiar la resolución de video del video? Si es así, aprenda las diferentes formas que puede hacer fácilmente para cambiar la resolución de video del video que está viendo.
-
 ¿Qué es una marca de agua en un video y cómo agregarla o eliminarla?
 ¿Quieres saber qué es una marca de agua, qué tipos diferentes y la razón por la que los fotógrafos agregan una? Bueno, todo lo que necesitas hacer es leer este artículo.
-
 Cómo recortar un archivo MP4 sin perder la calidad del video [2023]
 Aprenda a recortar MP4 con sencillos pasos proporcionados solo para usted. Por lo tanto, mantenga el ritmo porque le presentamos las mejores herramientas de recorte que puede utilizar.