


Kuinka muokata valokuvan selkeyttä alle minuutissa vihjeiden ja temppujen avulla
Jokainen valokuvauksen harrastaja haluaa tehdä ottamastaan kuvasta mahdollisimman näyttävän muiden kuvaajien otoksiin verrattuna. Erilaisten tekniikoiden avulla voit helposti terävöittää kuvaa ja lisätä voimakkaita värejä, jotta kuvasta tulee yksityiskohtaisempi. Entä jos haluat lisätä kuvaan hieman ”rapakkuutta” ja terävyyttä? Tai pehmentää kaiken? Siinä kohtaa kuvaan tulee selkeys (clarity). Sen avulla voit säätää kuvan keskisävyjä ja kontrastia lisätäksesi juuri sen tarvittavan potkun, jotta kuvasta tulee todella näyttävä. Kiinnostaako sinua oppia, miten se tehdään? Siinä tapauksessa lue alta lisää ja opi, miten muokata valokuvan clarity-arvoa.

Osa 1. Valokuvien selkeyden parantaminen ilmaiseksi verkossa skaalaamalla kuvia
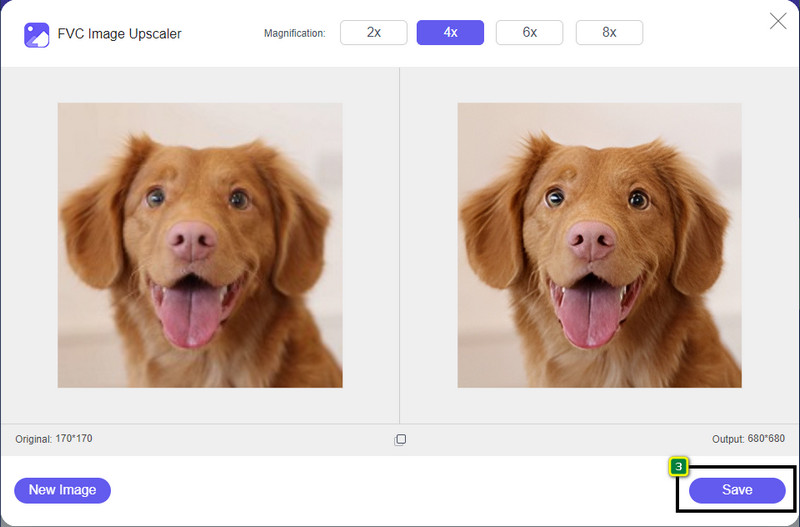
FVC Free Image Upscaler on paras kuvan selkeyttä parantava verkkosovellus, jota voit käyttää suoraan selaimessa lataamatta mitään tiedostoja tietokoneellesi. Tämä sovellus voi korjata kuvan laatua ja parantaa valokuvan tasoa upeasti tavalla, jota et ole ennen nähnyt. Vaikka et olisi tekniikasta erityisen kiinnostunut, opit käyttämään tätä ohjelmaa alle minuutissa. Jos siis haluat kokeilla tätä ohjelmaa, voit seurata alla antamaamme ohjetta.
Vaihe 1. Siirry tämän suurentimen viralliselle sivustolle napsauttamalla tätä linkkiä.
Vaihe 2. Tuo kuva, jonka selkeyttä haluat parantaa, napsauttamalla Upload Image. Tämän jälkeen avautuu kansio, josta voit etsiä tiedoston ja painaa Open.

Vaihe 3. Kun kuva on ladattu, valitse vaihtoehto, jota haluat käyttää kuvan selkeyden parantamiseen.

Vaihe 4. Kun olet parantanut kuvan selkeyttä, napsauta Save-painiketta ladataksesi täällä muokatun kuvan.
Osa 2. Valokuvien selkeyden lisääminen Photoshopissa nopeasti
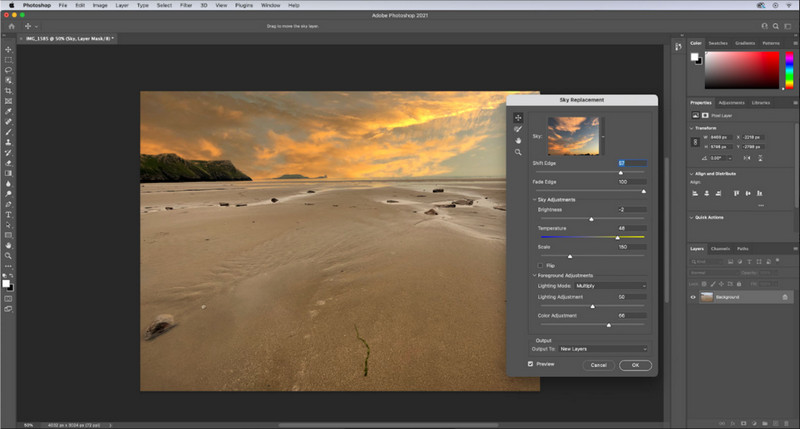
Adobe Photoshop on paras ladattava selkeydenmuokkausohjelma, jos haluat käyttää laitteellasi ammattitason työkalua. Tämä työkalu tarjoaa laajat kuvankäsittelyominaisuudet, joilla saat kuvasi näyttämään paremmalta säätämällä asetuksia ja tekemällä siitä katsojiin vetoavan. Vain harva ohjelma pystyy tarjoamaan samanlaista suorituskykyä kuin tämä. Jotta voit parantaa kuvan clarity-arvoa, sinun täytyy säätää kontrastia ja keskisävyjä. Haluatko tietää, miten se tehdään? Kopioi alla oleva ohje.
Vaihe 1. Lataa Adobe Photoshop ja avaa ohjelma. Aloita kuvan tuonti napsauttamalla File ja sitten Open.
Vaihe 2. Ylävalikosta napsauta Image, sen alta Adjustment ja valitse Brightness/Contrast.
Vaihe 3. Näytölle avautuu valintaikkuna; muuta kuvan kontrastia vetämällä liukusäädintä. Voit vapaasti siirtää sitä lisätäksesi tai vähentääksesi kontrastia, mikä vaikuttaa myös selkeyteen.
Vaihe 4. Paina OK tallentaaksesi tekemäsi muutokset kuvaan; ne otetaan käyttöön automaattisesti.
Osa 3. Valokuvan selkeyden parantaminen Adobe Lightroomissa alle minuutissa
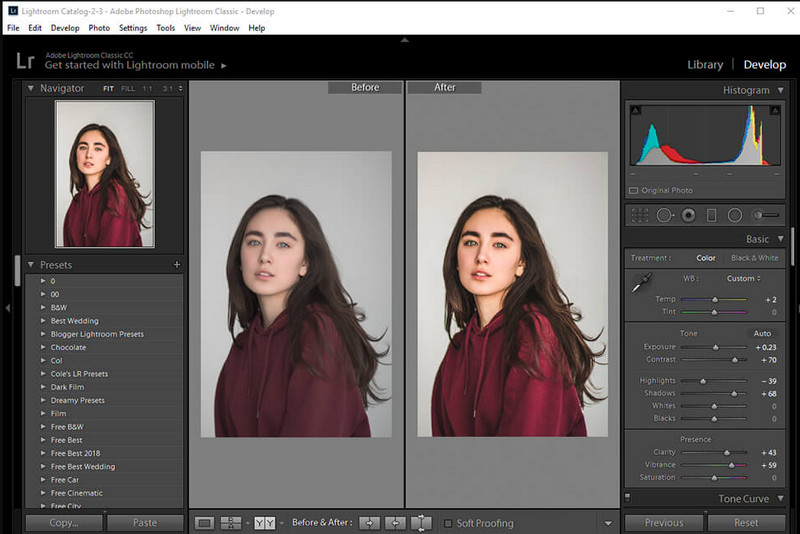
Toisin kuin Photoshopissa, Adobe Lightroom-ohjelmassa on luotettava clarity-säätö, jota voit käyttää parantamaan kuvan laatua ja tekemään kuvasta yksityiskohtaisemman värien osalta, kun arvoa nostetaan, tai pehmeämmän, kun arvoa lasketaan. Koska sekä Photoshopin että Lightroomin valmistaa Adobe, ammattimaisen lopputuloksen saat käytännössä varmasti. Voit seurata alla olevia vaiheita lisätäksesi valokuviin clarityä ja parantaaksesi raakakuvan värejä.
Vaihe 1. Lataa ja asenna Adoben virallinen ohjelmisto, käynnistä se ja tuo kuva, jota haluat muokata.
Vaihe 2. Avaa Develop-moduuli, jotta näet asetukset, joilla voit alkaa lisätä kuvaan clarityä.
Vaihe 3. Siirrä presence-osion alla olevaa clarityn liukusäädintä haluamaasi arvoon. Voit säätää myös muita asetuksia, jotta kuvastasi tulee yksityiskohtaisempi ja parempi kuin alkuperäisestä.
Osa 4. Vinkkejä valokuvien muokkaamiseen Selkeys, joka sinun on tiedettävä
Nyt kun sinulla on paras kuvien selkeyssovellus, jota voit käyttää verkossa ja offline-tilassa, seuraavat tiedot antavat sinulle vinkkejä kuvan selkeyden säätämiseen.
Vinkki 1. ÄLÄ YLITYYTY SELVYKSEEN!
Mitä tarkoitamme tällä? Nämä keinot eivät lisää kuvaasi liikaa selkeyttä, sillä se muuttuu rakeiseksi. Kaikki eivät pidä rakeisesta kuvasta, joten älä lisää sitä liikaa. Älä myöskään vähennä kirkkautta sen maksimipotentiaaliin, jotta kuva ei näytä sumealta.
Vihje 2. Kontrasti ja selkeys eivät ole sama asia
Kontrasti ja selkeys tunnetaan usein samalla tavalla, mutta eivät. Jos säädät kuvan selkeyttä, säädät sen keskisävyä ja sitten tiettyä aluetta. Jos käytät kontrastia, muutat, korostat ja varjosat kokonaiskuvaa.
Vihje 3. Tiedä kuvien selkeyden tarkoitus ennen niiden lisäämistä
Monet kuvankäsittelyohjelmat ovat tutkineet näitä vaihtoehtoja, joita he voivat muokata kuvan parantamiseksi, kuten selkeyttä, valotusta, gammaa ja monia muita. Joten jos olet uusi käyttäjä, on parempi tietää selkeyden tarkoitus ennen sen lisäämistä kuvaan. Lisäksi, jos luet selkeyttä koskevia tietoja, tiedät, onko se oikea vaihtoehto säätää kuvan näyttämiseksi paremmalta. Jos ei, älä lisää selkeyttä.
Vinkki 4. Käytä Claritya suuressa mittakaavassa
Jos kyseessä on pienimuotoinen kuva, on parempi terävöittää niitä kuin muuttaa sen selkeyttä. Sen avulla voit terävöittää valokuvasi reunoja helposti ja paremmin. Mutta jos pidät kuvaasi suurena mittakaavana, käytä selkeyttä paremmin.
Osa 5. Usein kysytyt kysymykset valokuvien selkeytyksestä
Miksi kuvasta tulee rakeinen selkeyden lisäämisen jälkeen?
Jos olet asettanut selkeyden arvoon 100%, niin rakeisen kuvan mahdollisuus epäilemättä tapahtuu. Suosittelemme, että asetat prosenttiosuudeksi 40% - 70%; voit nousta korkeammalle mieltymystesi mukaan.
Tarvitsenko editorin kuvien selkeyden lisäämiseen?
Todellakin, sinun on ladattava tai käytettävä ohjelmistoja kuvan selkeyden lisäämiseksi. Monet ohjelmistot sanovat, että ne voivat säätää selkeyttä, mutta älä anna niiden pettää. Voit käyttää tähän artikkeliin lisäämäämme ohjelmistoa, koska todistamme, että ne voivat muuttaa kuvasi selkeyttä ja tehdä siitä entistä yksityiskohtaisempi.
Voinko lisätä kontrastia kuvaan, jotta se olisi selkeä?
Kyllä, voit lisätä kuvaan kontrastia, jotta se olisi selkeämpi ja esitettävämpi. Mutta jos haluat olla tarkempi kuin vaikuttaa koko kuvaan, on parempi säätää sen selkeyttä.
Johtopäätös
Toivomme, että tämä artikkeli opetti sinulle, kuinka voit muokata valokuvien selkeyttä eri työkaluilla ja lisätyillä vaiheilla. Jos teimme mielestäsi hienoa työtä, olisimme iloisia, jos antaisit meille 5 tähteä alle. Kiitos, että luit tämän artikkelin!
-
 Kuinka lisätä kuvan resoluutiota [5 tapaa parantaa]
 Onko sinulla ongelmia, koska kuvasi resoluutio on alhainen? Älä murehdi enää! Täällä opetetaan kuinka suurentaa kuvan resoluutiota.
-
 Paranna iPhonen valokuvien resoluutiota parhailla tehosteilla
 Haluatko parantaa iPhonen valokuvien resoluutiota? No, tässä artikkelissa käsittelemme parhaat työkalut, joita voit käyttää, ja muita temppuja, jotka sinun on tiedettävä!
-
 Vanhojen valokuvien palauttaminen verkossa ja offline-tilassa [Helppo vaiheet]
 Haluatko palauttaa vanhan valokuvan? Näiden työkalujen avulla tiedät vanhan valokuvan restaurointiprosessin. Lue tämä viesti oppiaksesi yksinkertaisimmista menetelmistä.