


Oppitunti GIF-näytönkaappaamisesta tietokoneellasi
Verkko on kiistatta muuttanut suurimman osan toiminnoistamme virtuaalisiksi. Olitpa sitten valmistelemassa kokousta, tekemässä esitystä tai haluat tavoittaa tuhansia ihmisiä opettamalla heitä kokkaamaan, näytön tallentaminen on tehokas tapa kaapata kaikki tarvittava. Laitteesi omien työkalujen, kuten Xbox Game Barin tai QuickTimen näytönauhuri, käyttäminen rajoittaa kuitenkin screencastauksen mahdollisuuksia. Tässä artikkelissa olemme koonneet huipputason ohjelmistot, joilla voit viedä näytön kaappaamisen GIF-muotoon uudelle tasolle.

Osa 1: Näytön tallentaminen GIF-muotoon Windowsissa/Macissa ilmaiseksi
1. FVC Free Screen Recorder
Vain muutamalla napsautuksella näytön tallentaminen onnistuu helposti FVC Free Screen Recorderilla. Tämä verkkopohjainen ratkaisu tarjoaa laajan valikoiman perustoimintoja näytön tallennukseen ja on saanut käyttäjiltään erinomaista palautetta. FVC Free Screen Recorder pystyy tallentamaan näyttötoiminnot, kuten pelit, videot ja verkkokokoukset, lisäämättä vesileimaa lopputulokseen. Lisäksi se tallentaa tietokoneen näytön toiminnot yhdessä järjestelmä- ja mikrofonin äänen kanssa. Näin voit jättää laitteen tallentamaan ja toistaa videon, kun sitä tarvitset. Alla olemme laatineet oppaan siitä, miten tallennat GIF-tiedoston Macilla ja Windowsilla käyttäen FVC Free Screen Recorderia.
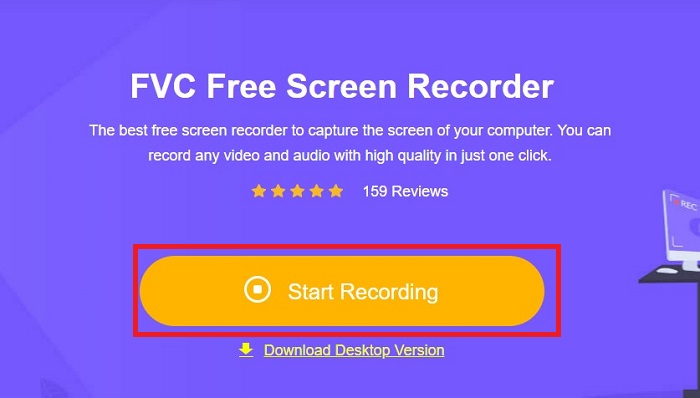
Vaihe 1. Siirry parhaaseen online-näytönauhuriin
Avaa laitteesi hakukone ja kirjoita hakukenttään FVC Free Screen Recorder. Kun työkalu on aktivoitu, napsauta keskellä olevaa Start Recording -painiketta päästäksesi tallennustyökaluihin käsiksi.
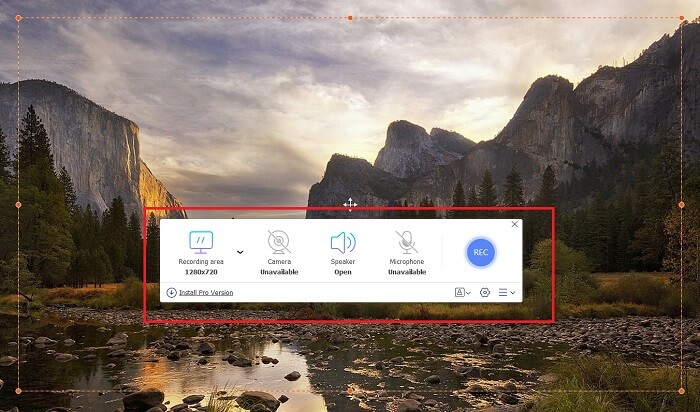
Vaihe 2. Määritä tallennus
Aseta tallennusvaatimuksesi kohdista Recording Area, System Sound ja Camera. Kun kaikki asetukset ovat kunnossa, paina REC-painiketta aloittaaksesi näytön tallennuksen.
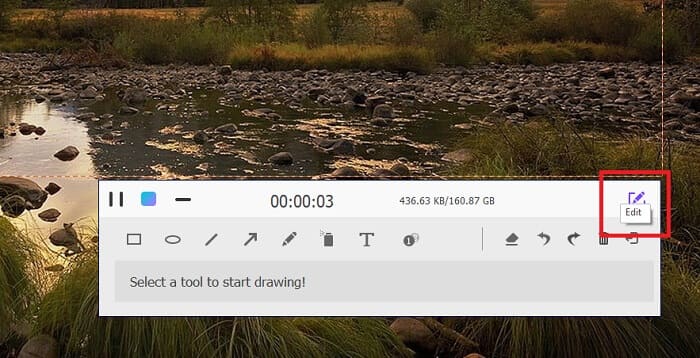
Vaihe 3. Lisää merkintöjä tallennuksen aikana
3 sekunnin lähtölaskennan jälkeen tallennat nyt näyttöäsi. Jos haluat lisätä huomautuksia, kuten tekstiä, muotoja, korostuksia ja kynää, napsauta Muokkaa-painiketta tallennusruudun vasemmassa alakulmassa.
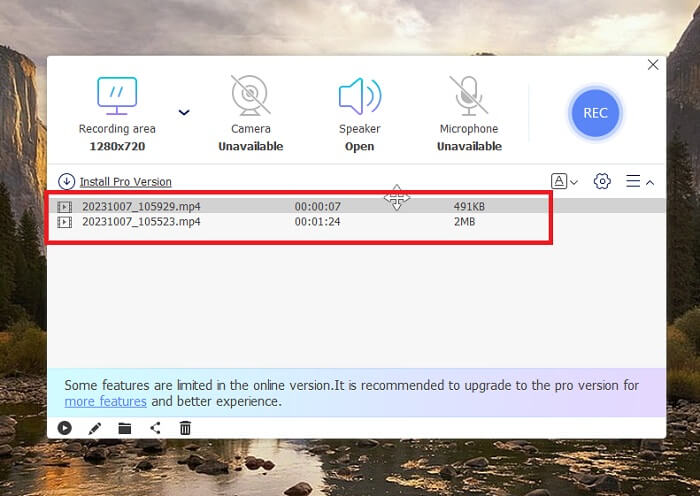
Vaihe 4. Tallenna lopputulos
Tallentaaksesi kaapatun videon paina FVC Free Screen Recorderin Stop-painiketta. Tallennuksen jälkeen sinut ohjataan työkalun Recorded-paneeliin. Voit myös napsauttaa Folder-painiketta avataksesi tallennetun tiedoston sijainnin paikallisessa kansiossa.
Ominaisuudet:
◆ Tämä ohjelma on huippuluokan työkalu reaaliaikaisten huomautusten lisäämiseen näytön lähetyksen aikana.
◆ FVC Free Screen Recorder tarjoaa erittäin yhteensopivia tulostusmuotoja, mukaan lukien MP4 ja WMV.
◆ Tämä työkalu tarjoaa kuva kuvassa -tehosteen web-kameran peittämiseksi näytölläsi.
◆ Tämä työkalu on ajaton näytönlähetysohjelmisto.
2. Chrome Capture - kuvakaappaus ja gif-työkalu
Chrome Capture on Googlen laajennustyökalu, joka muuttaa näytön tallennuksen GIF-muotoon. Tämän verkkoselainsovelluksen avulla voit kaapata näytön valituilta alueilta, välilehdeltä tai koko näytön toiminnoista. Tämän lisäksi Chrome Capture on paras vaihtoehto koko sivun web-kuvakaappausten ottamiseen, jotta saat kaikki tarvitsemasi tiedot. Useat käyttäjät jäävät koukkuun tähän työkaluun sen helppokäyttöisen käyttöliittymän ja intuitiivisten ominaisuuksien, kuten rajaus- ja huomautustyökalujen, ansiosta. ChromeCapture tekee näytön tallentamisesta vähemmän vaivaa tarjoamalla pikanäppäimiä kuvakaappauksen ottamiseksi tai itse tallennuksen pysäyttämiseksi. Luo GIF näytön tallennuksesta Chrome Capturella noudattamalla alla olevaa ohjetta.
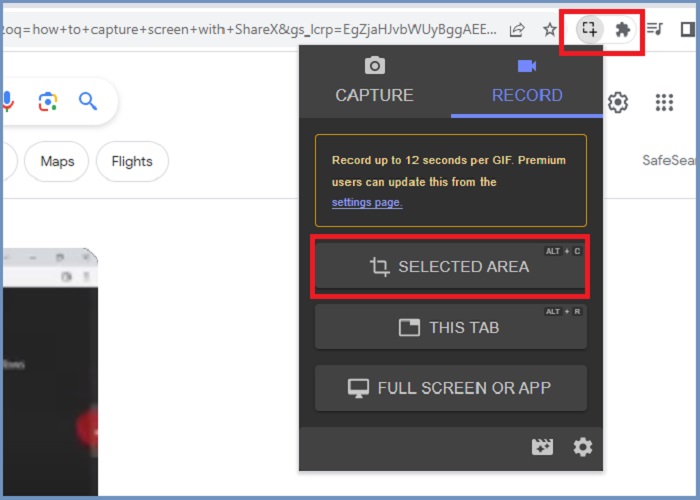
Vaihe 1. Avaa ensin Google Chromessa sivu, jonka haluat kaapata. Napsauta sen jälkeen selaimen oikeassa yläkulmassa olevissa laajennustyökaluissa Chrome Capture -kuvaketta.
Vaihe 2. Siirry nyt Chrome Capturen Record-välilehdelle ja valitse haluamasi tallennustyyppi, kuten valittu alue, välilehti tai koko näyttö. Kun olet tehnyt valintasi, tallennus alkaa. Kun olet valmis, paina Stop-painiketta siirtyäksesi tallennuksen tallentamiseen.
Vaihe 3. Luodaksesi GIF-tiedoston näytön tallennuksesta, napsauta Save-painiketta ja valitse GIF tulostiedoston muodoksi. Voit myös muuttaa tiedoston nimeä, jotta sen löytäminen myöhemmin on helpompaa.
Ominaisuudet:
◆ Chrome Capture tarjoaa tulostusmuotoja, kuten WebM ja GIF.
◆ Tämä työkalu helpottaa tallennettujen videoidesi online-jakamista.
◆ Ohjelman muokkaustyökalulla voit lisätä tekstiä, piirtää nuolia, muuttaa tallenteiden nopeutta ja paljon muuta.
Osa 2: GIF-tallenteiden tallentaminen ja muokkaaminen Macissa ja Windowsissa
1. ShareX
Mitä tulee tehokkaaseen ja samalla maksuttomaan näytön sieppaamiseen, ShareX pysyy listalla. Tämä työkalu on avoimen lähdekoodin näytön tallennustyökalu Windows-käyttöjärjestelmille. Lisäksi se tarjoaa mukautetun alueen tallennuksen, jossa voit valita tietyn alueen näytöstäsi tallennettavaksi. Tämän lisäksi ShareX sisältää vierivän kaappaustyökalun, jonka avulla käyttäjät voivat ottaa kuvakaappauksen sisällöstä kerralla useiden kuvakaappausten sijaan. Jos haluat oppia kuinka ShareX tallentaa GIF-ikkunoita, tässä on vaiheittainen opetusohjelma.
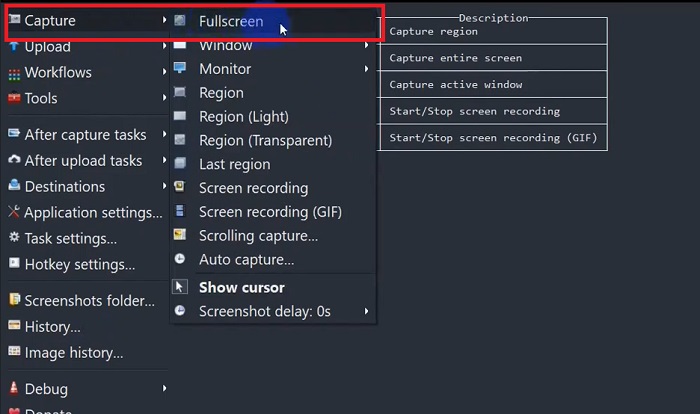
Vaihe 1. Avaa ensin ShareX Windows-laitteellasi. Siirry sitten kohtaan Capture ja valitse haluamasi tallennustyyppi.
Vaihe 2. Kun valintaruutu tulee näkyviin, siirrä kursoria korostaaksesi sen näytön alueen, jonka haluat kaapata. Napsauta sen jälkeen Start.
Vaihe 3. Tallennuksen jälkeen paina Stop-painiketta. Tämän jälkeen näytön tallennusasetukset avautuvat uudelleen, jotta voit valita Video- ja Audio-tulostusmuodot. Lopuksi napsauta Download-painiketta löytääksesi tallennetun tiedoston tietokoneeltasi.
Ominaisuudet:
◆ Se tarjoaa erityisiä pikanäppäimiä näytön tallennustoimintojen ohjaamiseksi helposti.
◆ ShareX:n avulla käyttäjät voivat muuntaa näytön tallennuksen GIF-muotoon.
◆ Työkalulla on kolme tyyppiä näytön kaappaamiseen millä tahansa alueella: suorakulmio, ellipsi tai vapaalla kädellä.
2. Tallenna
Recordit on toinen esimerkillinen ohjelmisto, jonka avulla voit tarttua näytön toimiin. Tämä työkalu on GIF-pohjainen tallennustyökalu ja on yhteensopiva Windows- ja Mac-laitteiden kanssa. Ohjelman ilmainen kokeilujakso voi kuitenkin tallentaa enintään viisi minuuttia, ja sinun on päivitettävä ohjelmiston premium-versioon ylittääksesi tämän rajoituksen. Nyt opitaan ottamaan GIF-kuvakaappaus ohjelman avulla.
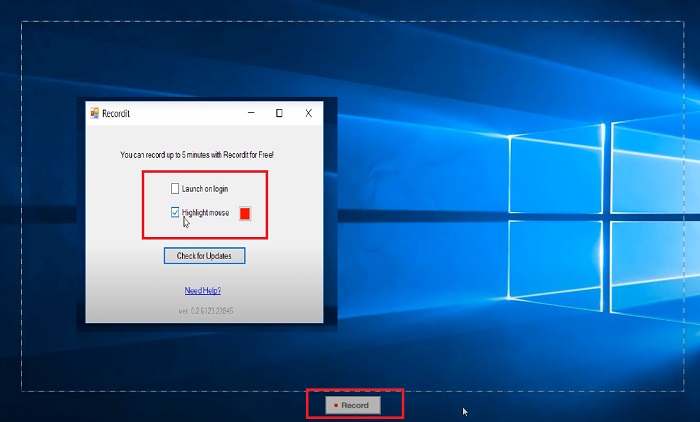
Vaihe 1. Kun olet asentanut Recorditin laitteellesi, näet sen kuvakkeen System Tray -alueella.
Vaihe 2. Odota sitten, että työkalu tulee näkyviin näytöllesi. Vedä kehys sen alueen ympärille, jonka haluat tallentaa, ja kun alue on määritetty, napsauta Start aloittaaksesi tallennuksen.
Vaihe 3. Lopuksi paina Stop-painiketta, kun tallennus on valmis. Napsauta GIF löytääksesi GIF-tiedostopäätteellä varustetun tulostiedoston asetuksista.
Ominaisuudet:
◆ Recordit tarjoaa historiallisen lokin viimeaikaisista ja menneistä näytön tallenteistasi.
◆ Tämän työkalun avulla käyttäjät voivat mukauttaa näytön tallennustoimintojaan eri alueilla.
3. ScreenToGIF
Toinen näytönkaappaaja, jota sinun ei pidä päästää irti, on ScreentoGIF-työkalu. Kuten nimestä voi päätellä, tämän ohjelmiston avulla käyttäjät voivat luoda suoraan GIF-kuvan näyttötallenteistaan. Lisäksi sitä pidetään avoimen lähdekoodin työkaluna, mikä tarkoittaa, että sinun ei tarvitse kuluttaa rahaa saadaksesi sen. ScreenToGIF voi ottaa kuvakaappauksen ja viedä tuotosi PNG-, PSD- ja videomuotoihin. Tietenkin, jos haluat jakaa GIF-tiedostosi verkossa, ScreenToGIF voi helposti ladata ne Imguriin ja Gfycatiin.
Vaihe 1. Avaa ScreenToGIF-laitteellasi tallentaaksesi GIFin Macilla tai Windowsilla.
Vaihe 2. Aloittaaksesi näytön kaappaamisen siirry työkalun Toolbox-osioon ja valitse Recorder. Siirrä sitten tähtäinkuvake tiettyyn alueeseen, jonka haluat kaapata.
Vaihe 3. Paina sen jälkeen näppäimistöltäsi F8 lopettaaksesi tallennuksen.
Ominaisuudet:
◆ Sen avulla verkkokameran peittokuva voi tallentaa itsesi ja näyttösi samanaikaisesti.
◆ Sketchboardin avulla voit tallentaa piirustuksesi reaaliajassa.
Lisälukemista:
Vaiheittainen opas MP4-videon muuntamiseen GIF-muotoon työpöydällä tai verkossa
5 parasta tapaa muuttaa kuva animoiduksi GIFiksi [päivitetty 2023]
Osa 3: Usein kysytyt kysymykset näytön tallentamisesta GIF-muotoon
Onko Macissa sisäänrakennettuja työkaluja näytön tallennuksen muuttamiseksi GIF-muotoon?
Sisäänrakennetun näytön tallentimen osalta Mac-laitteissa on sellainen tarjolla QuickTime-sovelluksessa. Tallennetut lähdöt on kuitenkin asetettu oletusarvoisesti MOV-muodossa, ja saatat tarvita kolmannen osapuolen ohjelmistoja niiden muuntamiseen GIF-muotoon.
Onko olemassa työkaluja GIF-tiedostojen tallentamiseen iPhonessa ja Androidissa?
Ehdottomasti kyllä! iPhone- ja Android-mobiililaitteissa on alkuperäinen näytön tallennin. Ne voivat myös tallentaa järjestelmän äänen ja äänesi mikrofonin kautta.
Onko ScreentoGIF turvallinen?
Ehdottomasti, ScreenToGIF on ilmainen ohjelmisto Windows-laitteille, eikä se sisällä haittaohjelmia.
Voitko asettaa GIF:n aloitusnäyttöön Macissa?
GIF-tiedoston asettaminen Macin kotinäytöksi on mahdollista ilman erillistä sovellusta. Sinun tarvitsee vain avata Asetukset > Järjestelmäasetukset > Työpöytä ja näytönsäästäjä ja valita jokin käytettävissä olevista GIF-animaatioista.
Voiko Windowsin lukitusnäyttö olla GIF?
Suurin osa Windows-taustakuvasta on staattista, toisin kuin Mac-laitteet. Saatat tarvita kolmannen osapuolen sovelluksen, kuten Lively Wallpaperin, käynnistääksesi GIF-taustakuvan Windows-laitteellasi.
Johtopäätös
Haluatpa sitten tallentaa näytön GIFiksi tai luoda staattisen kuvan, lisätä merkintöjä ja verkkokamerakuvan, screencastauksen toteuttaminen on täysin mahdollista edellä mainituilla työkaluilla. Verkkopohjaiset ratkaisut sopivat hyvin tilanteisiin, joissa tallennus pidetään varalla, mutta offline-ohjelmistoa suositellaan, jos haluat välttää internet-yhteyden aiheuttamat keskeytykset ja viiveet.
-
 Leikkaa GIF: Parhaat online-, työpöytä- ja mobiilityökalut GIF:n leikkaamiseen
 Haluatko tallentaa osan GIF-tiedostosta välittääksesi tunteesi ja reaktiosi tarkasti? Täällä voit löytää ja optimoida erilaisia työkaluja animoitujen GIF-tiedostojen leikkaamiseen.
-
 6 parasta GIF-sovellusta iPhonelle vuonna 2023 (arvostelut)
 Tämä viesti opastaa sinua parhaiden GIF-luojien sovellusten läpi iPhonelle ja tietokoneille. Tutustu niihin ja opi, mitä heillä on tarjottavanaan.
-
 Huippuluokan 3D GIF Maker -ohjelmat, joita et halua missata
 Jokaisen näkemäsi 3D GIF Maker -sovelluksen löytäminen ja arvioiminen voi viedä aikaa. Onneksi olemme koonneet luettelon, jonka voit lukea.