


כיצד לשנות גודל תמונה ב-Powerpoint מבלי לפגוע באיכות
לאחרונה אנשים רבים מציגים הכול באופן דיגיטלי במקום בדרך המסורתית, ואף עוד לפני המגפה. ככל שאנו חותרים אל העתיד, בעזרת טכנולוגיה ותוכנות להצגת העסק, עזרים חזותיים, רעיונות, מכירות ועוד – הכול יכול להיעשות בקלות רבה יותר, ואת כל זה ניתן לעשות ב‑PowerPoint. ניתן להחזיק את תוכנת המצגות הזו במכשיר שלכם למטרה זו. בנוסף, משתמשים רבים מחפשים דרך לשנות את גודל התמונה במצגת. האם תרצו ללמוד כיצד לשנות את גודל התמונה ב‑PowerPoint? המשיכו לקרוא את המאמר, שבו נסקור את כל המידע שעליכם לדעת בנושא.
חלק 1. כיצד לשנות גודל של תמונה ב-PowerPoint באמצעות 2 דרכים יעילות בהן תוכל להשתמש [באופן יחיד ומרובים]
כאשר אתה מכוון את האורך והגובה של התמונה בכל שקופית, אתה יכול להגדיר ממד מדויק או לשנות את יחס הרוחב-גובה על-ידי גרירת המסגרת. למרות שאתה יכול לעשות זאת כאן באופן טבעי, עיוות מסוים קורה כאשר גודל התמונה משתנה. לכן, אם אתה רוצה לדעת איך לשנות את גודל התמונות בשקופיות מרובות ב-PowerPoint או בנפרד, תוכל לבצע את השלבים שאנו מוסיפים להלן. עקוב אחריו בהתאם, ותשנה את גודלו תוך פחות מדקה.
3 דרכים לשנות את גודל התמונה ב-PowerPoint [ביחיד ובאצווה]
1. שינוי גודל התמונה על‑ידי גרירת המסגרת
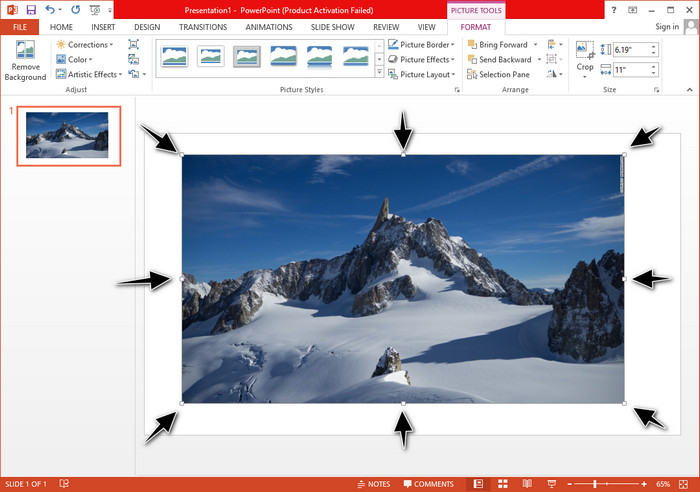
לאחר שהעלית את התמונה ל-PowerPoint, תראה עליה נקודות זעירות. נקודות אלה בתמונה ניתנות להתאמה, מה שאומר שאתה יכול לשנות את גודל התמונה באופן חופשי בהתאם למפרט שלך. ברגע שתשנה את האורך, הגובה לא יבוא כמו התאמת הגודל.
2. שינוי גודל התמונה על‑ידי שינוי הגובה והרוחב
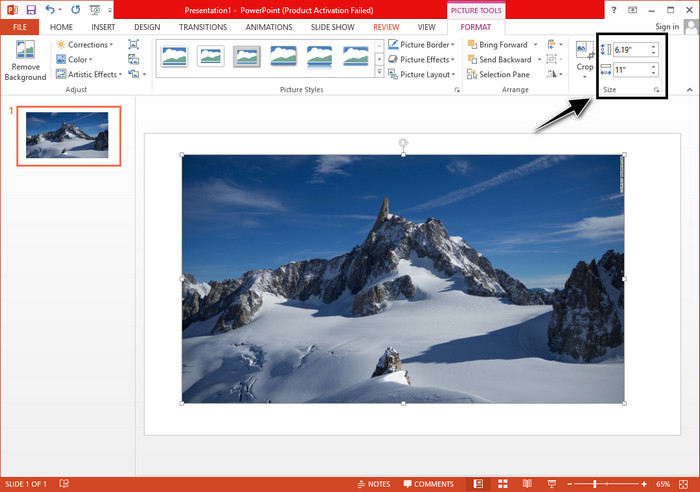
כאשר אתה מעלה את התמונה ל-PowerPoint, לחץ על הכרטיסייה עיצוב כדי לשנות את התמונה לגודל מסוים. בחלק העליון ניתן להוסיף את גובהו ואורכו המדויקים. עם זאת, לאחר ששינית מדידה אחת, השנייה תותאם אוטומטית מכיוון שיחס הגובה-רוחב הראשי פעיל.
3. שינוי גודל מספר תמונות יחד ב‑PowerPoint
מה צריך לעשות כדי לשנות את גודלן של כמה תמונות בשקופית PowerPoint אחת? לשם כך, עליכם להעלות את כל התמונות לשקופית. לאחר שהעליתם לשקופית כמה וכמה תמונות, לחצו והחזיקו את מקש Control, ואז סמנו כל תמונה שברצונכם לשנות את גודלה. לאחר מכן השתמשו באחת מאפשרויות שינוי הגודל שהצגנו למעלה: גרירת המסגרת או שינוי הערך המספרי.
חלק 2. כיצד לשנות גודל תמונה ב-PowerPoint מבלי לעוות בחינם [שירות אינטרנט]
כיצד לשנות את גודל התמונה ב‑PowerPoint בלי לעוות אותה? תוכלו להשתמש ב‑FVC Free Image Upscaler כדי לשנות אוטומטית את גודל התמונה שאתם מעלים, ושאותה תרצו להשתמש למצגת PowerPoint. למרות שזהו כלי מקוון, הביצועים שלו טובים יותר מכלי שינוי הגודל המובנה ב‑PowerPoint, מפני שהוא מייצר PPI לשמירת חדות התמונה ומונע טשטוש גם לאחר שינוי הגודל. תוהים אם כדאי להשתמש בכלי הזה ורוצים כבר להתחיל לשנות את גודל התמונה שלכם? במקרה כזה, עקבו אחרי השלבים הבאים שהכנו, וכך תלמדו להשתמש בכלי הזה בצורה הפשוטה ביותר.
יתרונות שינוי גודל תמונה באמצעות FVC Free Image Upscaler:
◆ תוכלו להשתמש בכלי שינוי גודל התמונות הזה בחינם, ללא פגיעה באיכות.
◆ הוא תומך במגוון רחב של פורמטים שאתה יכול להעלות.
◆ יש לו טכנולוגיית בינה מלאכותית חזקה שיכולה לעזור לך לשנות את גודל התמונות.
◆ אתה יכול לגשת לפתרון אינטרנט זה בכל מנוע חיפוש שיש לך על שולחן העבודה שלך.
◆ אין צורך בהתקנה או הורדה לפני השימוש בו.
שלבים כיצד לשנות את הגודל מבלי לעיוות באמצעות FVC Free Image Upscaler:
שלב 1. פתחו את אתר הכלי לשינוי הגודל על‑ידי לחיצה על קישור זה.
שלב 2. כאשר האתר נפתח, לחצו על Upload Photo כדי להעלות את התמונה שברצונכם לשנות את גודלה ולהשתמש בה במצגת PowerPoint.
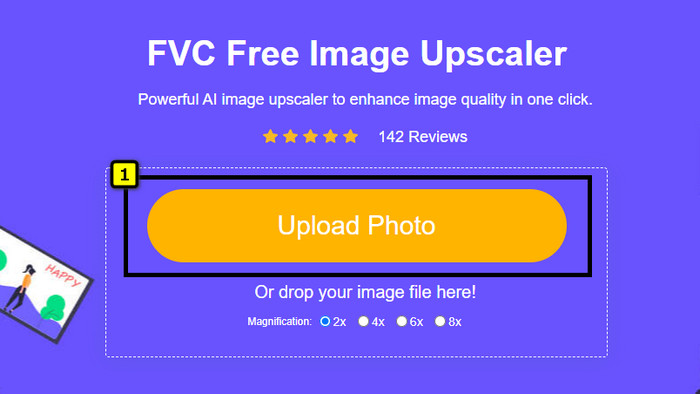
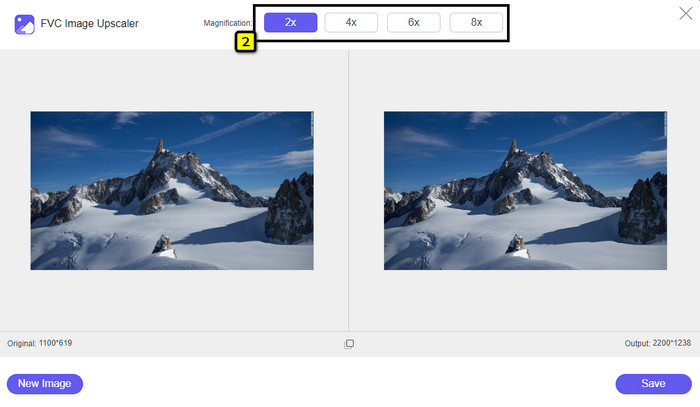
שלב 3. לאחר העלאת התמונה, המתינו עד שתיטען. בחרו את רמת ההגדלה שתרצו להחיל על התמונה שלכם מתוך האפשרויות 2x, 4x, 6x או 8x.
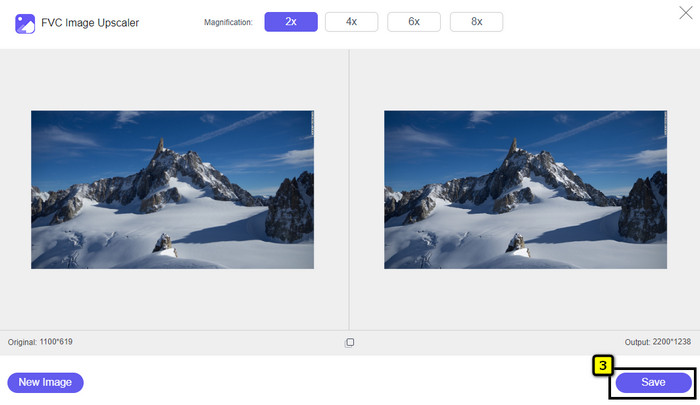
שלב 4. לחצו על Save כדי לייצא את התמונה לאחר שינוי הגודל. זה הכול – התמונה ששונה נשמרת בכונן המקומי שלכם ללא כל עיוות או טשטוש נוסף.
חלק 3. שאלות נפוצות על איך לשנות גודל תמונה ב-PowerPoint
מה האורך והגובה המרביים של תמונה עבור Powerpoint?
כאשר משנים את גודל התמונה לממד המרבי עבור Powerpoint כמסך רחב, ניתן להגדיר את הפיקסל ל-1280 x 720 פיקסלים. אבל כאשר אתה מציג אותו על המסך, תצטרך לעקוב אחר יחס הגובה-רוחב של 16:9, שהוא 1920 x 1080 פיקסלים.
האם יש קיצור דרך לשנות את גודל התמונה ב-PowerPoint?
כדי לשנות את גובה התמונה, עליך להחזיק את מקש Shift ולאחר מכן ללחוץ על החץ למעלה כדי להגדיל ועל החץ למטה כדי להקטין את גובהה. למי שרוצה לשנות את רוחב התמונה, ניתן ללחוץ שוב על מקש Shift ולאחר מכן ללחוץ על החץ ימינה להגדלת הרוחב ועל החץ השמאלי להקטנת הרוחב לפי העדפתכם.
מדוע התמונה שלי הפכה מטושטשת לאחר שינוי גודלה ב-PowerPoint?
כאשר אתה עומד לשנות את גודל התמונה ב-PowerPoint, התמונה נמתחה, ויש סיכוי שהתמונה תהפוך מטושטשת. אבל אם אתה רוצה עורך תמונות המסוגל ליצור פיקסלים תוך כדי שינוי של הממד, אז אתה יכול להימנע מלהיות תמונה מפוקסלת ב-PowerPoint.
האם אוכל להשתמש בקובצי GIF עבור Powerpoint?
כן, אתה יכול להשתמש בקובצי GIF בכל שקופית ב-PowerPoint. עם זאת, כאשר ממד ה-GIF אינו מועדף בגודל הרצוי, יהיה עליך לשנות את גודלו. והתוצאה של ה-GIF ששונה את הגודל הפכה מטושטשת או מפוקסלת.
סיכום
לסיכום, תוכלו ללמוד שלוש שיטות לשינוי גודל התמונה ב‑PowerPoint על‑ידי מעקב אחר ההדרכה שצירפנו במאמר זה. אף שניתן לבצע זאת בקלות ישירות במצגת, לעיתים שינוי ממדי התמונה גורם לעיוות. תוכלו לפתור בעיה זו באמצעות הכלי המקוון שהצגנו, מאחר שהוא אינו מעוות אף תמונה שעברה שינוי גודל. בעזרת השלבים שהוספנו תלמדו כיצד לשנות את גודל התמונה באמצעות FVC Free Image Upscaler.
-
 אפליקציית Photo Resizer הטובה ביותר באינטרנט, לא מקוון, אנדרואיד ואייפון
 מהן האפליקציות הטובות ביותר לשינוי גודל התמונות? לחץ על הדף כדי ללמוד את חמשת האפליקציות העוצמתיות ביותר לשינוי גודל התמונות שבהן תוכל להשתמש כדי לשפר או לשנות את גודל הקובץ שלך.
-
 כיצד לשנות את גודל התמונה - Adobe שינוי גודל תמונה [מקוון ולא מקוון]
 אם אתה מחפש את גודל התמונה של Adobe, אז יש לנו את הפתרון בשבילך. עיין בפוסט זה ביסודיות כדי ללמוד כיצד לשנות את גודל התמונות באמצעות Adobe במחשב האישי שלך.
-
 כיצד לשנות את גודל התמונה עבור פייסבוק [צעדים מהירים וקלים]
 אם אתה מתקשה להעלות תמונה בגודל גדול לפייסבוק, יש לנו פתרון בשבילך. סיים מאמר זה כדי ללמוד כיצד לשנות את גודל התמונות עבור פייסבוק.