


5 פתרונות להפעלה של QuickTime Player: כיצד להגיש בקשה
For Mac users, QuickTime Player should be one of the most familiar software. It comes pre-installed in the system and is usually used to play videos on the device, as well as to perform some simple multimedia file editing tasks and format conversion tasks. However, it's not a jack of all trades; it doesn't support too many formats, and it can make some errors in the course of its work. In this article, we'll summarize some of the most common problems that can occur and answer one by one how to fix QuickTime Player not working. If you're also experiencing problems with it, you can see if there's a solution in this article that fits your situation. For those who appreciate QuickTime Player but find its functionality rather basic, we also recommend one of its best alternatives.

חלק 1. תקן את QuickTime שומר על הצגת היסטוריה ב-Mac
QuickTime Player מקליט את מה שניגנת ומציג את ההיסטוריה בתוך האפשרויות 'קובץ' ו'פתח קבצים אחרונים'. משתמשים יכולים גם למצוא את הסרטונים שפתחו דרך הרשימה תחת סמל העגינה. אם אינך מעוניין לראות עוד היסטוריה זו, או אם אינך רוצה שהאדם הבא שישתמש במכשיר יראה מה פתחת, תוכל לנקות קבצים אחרונים ב-QuickTime Player.
כך תפתור את הבעיה של QuickTime שממשיך להציג היסטוריה ב-Mac.
Step 1. Open your QuickTime Play on the Mac computer. Go to the top-left corner and click on the QuickTime logo. Expand a list and choose Recent items > Clear Menu.
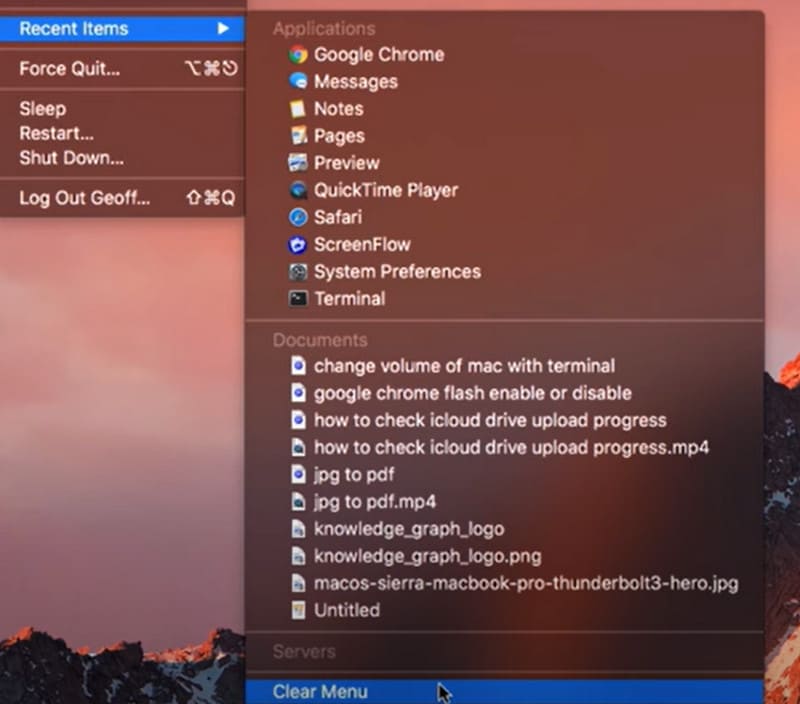
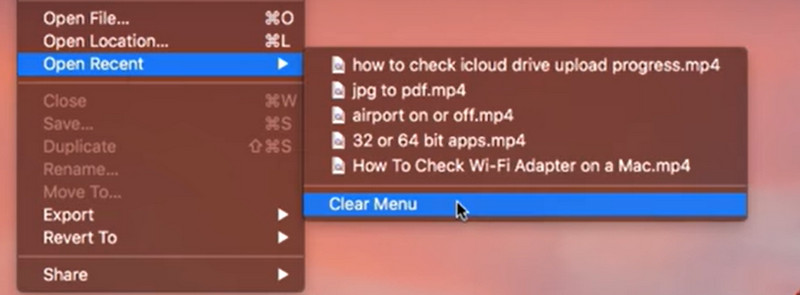
Step 2. Next, go to the File tab and choose Open Recent > Clear Menu.
Step 3. Quit your QuickTime Player and launch it again. Then, you will no longer see the recent files on this platform.
חלק 2. תקן את הבעיה שלא ניתן לחתוך וידאו בנגן QuickTime
במשך מספר שנים, משתמשים דיווחו שכאשר משתמשים ב-QuickTime Player לחיתוך סרטון, כל כפתורי האפשרויות הפכו פתאום לאפורים ולא ניתן עוד ללחוץ עליהם. נראה שכבר לא ניתן להשתמש בתכונות העריכה של QuickTime Player. למרבה המזל, נמצא פתרון לבאג זה.
כך ניתן לתקן את חוסר היכולת לחתוך וידאו ב-QuickTime Player.
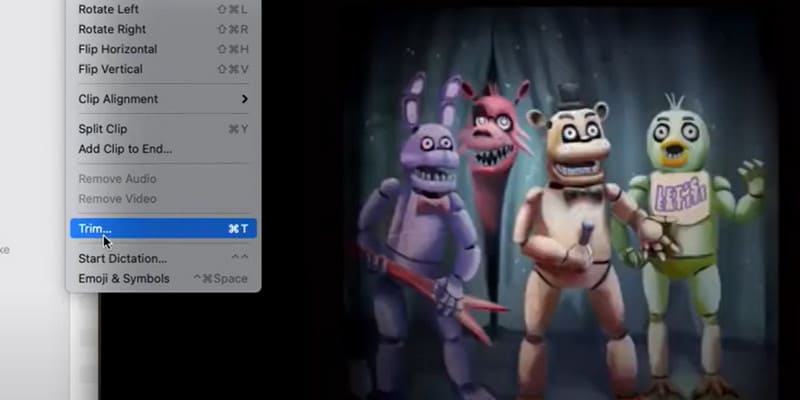
Step 1. Launch your QuickTime Player, and open the video you want to trim. If you find all the buttons under Edit are grey, close your file and go back to the main interface. Right-click on it and choose Quick Actions > Trim.

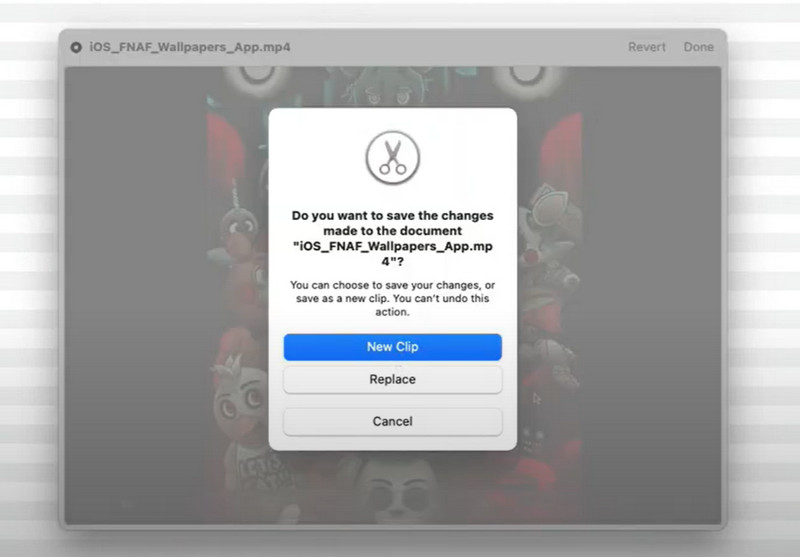
Step 2. Do a small trim on the current clip and click Done > New Clip. Save your trimmed file as a new file, and give it another name.
Step 3. Back to the main interface and open the new file. Now, you can choose Edit and select Trim again.
חלק 3. תקן את השגיאה 'QuickTime לא מצליח לפתוח קבצי MP4/MOV'
מדוע נגן ה-QuickTime שלי כבר לא יכול לפתוח קבצי MP4 או MOV? האם הוא לא תואם לשני הפורמטים? כדי לטפל בבעיה זו, נספק פתרונות בשני תרחישים.
הורד חבילת Codec תואמת QuickTime
הדבר הראשון שעלינו להבין הוא שלא כל קבצי פורמט MP4 ו-MOV זהים. קחו לדוגמה קבצי MP4; קובץ וידאו עשוי להכיל הרבה וידאו, אודיו, כתוביות, מטא-דאטה וכו', שלכולם עשויים להיות רכיבי codec שונים. עם זאת, QuickTime Player מוגבל במספר ה-codecs שהוא תואם אליהם, כך שאם אחד מה-codecs עבור כל אחד מסוגי הנתונים בקובץ שלכם אינו נתמך על ידי הנגן, תיתקלו ב-QuickTime Player שלא ייפתח. לכן תוכלו לנסות להוריד תחילה את חבילת ה-codec לווידאו התואמת ל-QuickTime. אנא ודאו שהתוכן שאתם מורידים בטוח ואינו מכיל וירוסים או תוכנות מזיקות.
Examples: DIVX codec, XVID codec, ZyGo, etc.
המרת הסרטון לפורמט תואם QuickTime באמצעות FVC Video Converter Ultimate
One solution to this type of problem, once and for all, is to use a video format converter to convert your files to a form supported by QuickTime Player. We recommend FVC Video Converter Ultimate, which can help you convert any popular video format to MP4 or MOV format supported by QuickTime Player, with the option that the codec is H.264. It also provides output format presets for iTunes that happen to be compatible with QuickTime Player-supported formats. You can also edit the video as much as you want before conversion.
הורדה חינמיתל-Windows 7 ומעלההורדה מאובטחת
הורדה חינמיתל-MacOS 10.7 ומעלההורדה מאובטחת
כך ניתן להמיר את הקובץ שאינו תואם לנגן QuickTime.
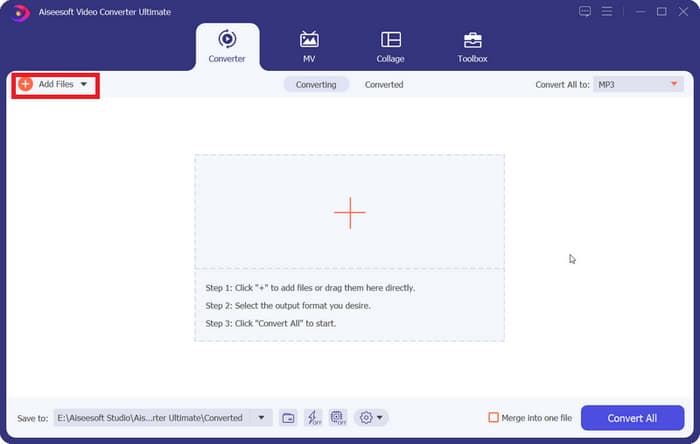
Step 1. Get FVC Video Converter Ultimate on your computer. Open it and click Add Files to upload your video.
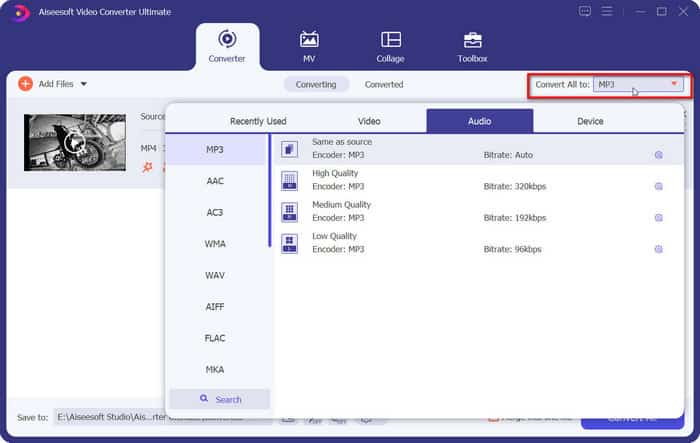
Step 2. Click Convert All to and choose MP4/MOV H.264 as the output format. You can also scroll down and find the iTunes tab, then choose one format.
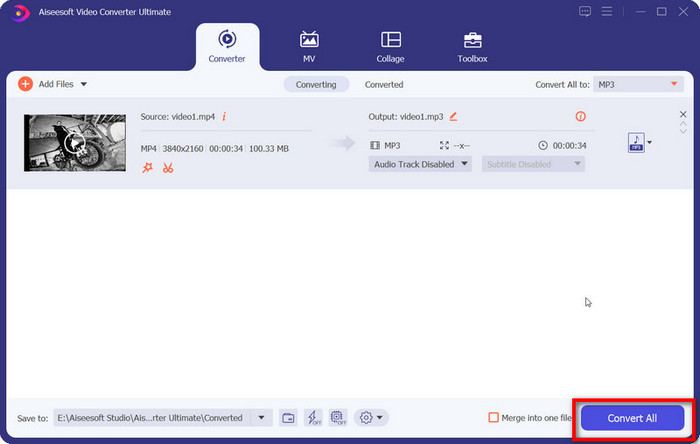
Step 3. Finally, click Convert All.
חלק 4. תקן את שגיאה בנגן QuickTime בעת הקלטת המסך
QuickTime Player also has a good built-in screen recorder. However, some users have reported that when using this feature, QuickTime Player encountered an error while recording your screen, or a Cannot Record pop-up popped up.
• ישנן מספר סיבות לכך ש-QuickTime Player אינו פועל. ראשית, עליך לשקול האם זיכרון המחשב אינו מספיק לאחסון הווידאו המוקלט. תוכל לבדוק תחילה את שטח האחסון הנותר. אפשרות נוספת היא שאירעה לפתע שגיאה ממקור לא ידוע, שגרמה ל-QuickTime Player להפסיק לפעול. בשלב זה, תוכל להפעיל מחדש את התוכנית ולראות אם הבעיה נפתרה.
• החלון הקופץ "לא ניתן להקליט" מופיע לעתים קרובות אם אתם משתמשים בשמע חיצוני כמקור. אתם יכולים לנסות להשיג מיקרופון חיצוני חדש או לשנות את מקור השמע לשמע פנימי. אם הבעיה עדיין לא נפתרה, בדקו אם יש צורך לעדכן את גרסת QuickTime Player שלכם. כמו כן, תוכלו לבדוק אם macOS היא הגרסה העדכנית ביותר; אם לא, עדכנו אותה.
• אולי כדאי לשקול גם האם הבעיה היא בסרטון המוקלט. בחלק מהפלטפורמות יש סרטונים המוגנים על ידי DRM שמשתמשים אינם יכולים לצלם. אם הפלטפורמה שבה אתם משתמשים מתאימה לפרופיל הזה, הפסיקו לנסות להקליט וראו אם יש דרך אחרת להוריד את הסרטון.
חלק 5. תקן את הצליל של QuickTime Player שלא עובד
הבעיה הנפוצה האחרונה היא שהצליל של QuickTime Player לא עובד. ייתכן שהסיבה לכך היא שאינך משתמש בגרסה העדכנית ביותר של התוכנה. נסה לעדכן לגרסה העדכנית ביותר תחילה.
כך ניתן לתקן את הבעיה של שמע ב-QuickTime Player שאינו פועל על ידי התאמת ההעדפות שלו.
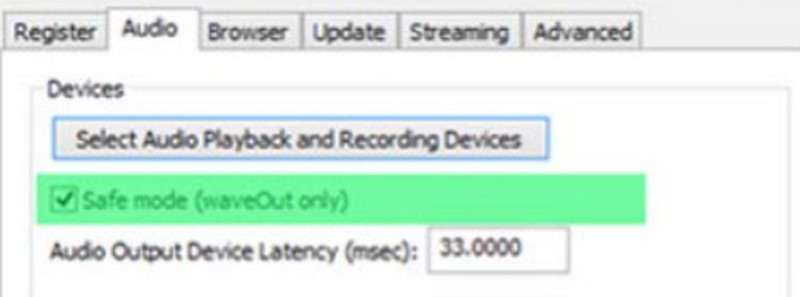
Step 1. Open QuickTime Player on your device. Choose Edit > Preference.
Step 2. In the QuickTime Preference window, choose Audio and enable the Save mode option. Then, click Apply.
Step 3. Restart your QuickTime Player. Check if the problem has been solved.
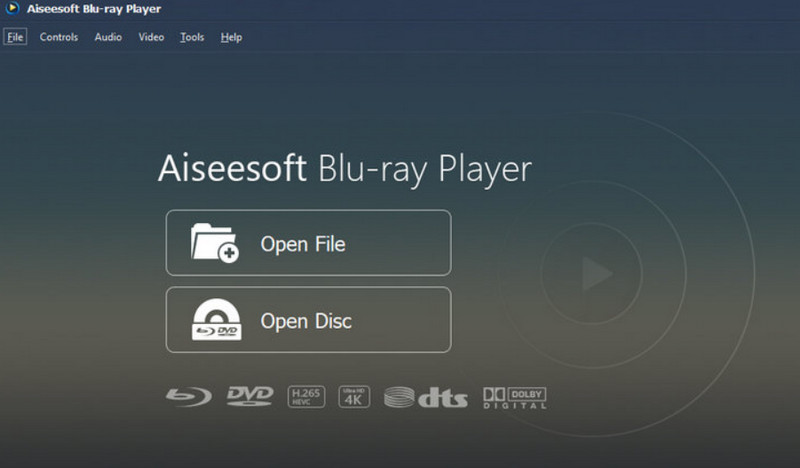
חלק 6. האלטרנטיבה הטובה ביותר לנגן QuickTime
QuickTime Player doesn't have a lot of compatible video formats, and its editing features are rather basic, so if you're looking for something similar in nature but with more comprehensive features, we recommend Aiseesoft Blu-ray Player, which can play videos in almost all digital formats and also supports reading DVDs, Blu-ray discs, or ISO images. The audio and visual quality of the program is absolutely top-notch, and you can create your own playlists with it. Aiseesoft Blu-ray Player also offers a lot of personalized playback settings, so you can take a quick screenshot of a moment when you see something great.
הורדה חינמיתל־Windows 7 ומעלההורדה מאובטחת
הורדה חינמיתל־macOS 10.7 ומעלההורדה מאובטחת
חלק 7. שאלות נפוצות לגבי נגן QuickTime שאינו פועל
למה QuickTime לא מנגן סרטונים?
ראשית, בדוק שפורמט הסרטון שלך תואם ל-QuickTime Player. אם כן, בדוק האם פלטפורמה זו אינה תומכת בקודק של הסרטון. כמובן, ייתכן שזה גם בגלל שגרסת הנגן שלך מיושנת מדי. נסה לעדכן אותה.
מה מחליף את QuickTime Player?
החלופות הטובות ביותר לנגן QuickTime הן נגן Blu-ray של Aiseesoft, נגן המדיה VLC, KMPlayer, נגן המדיה של Windows ועוד רבות.
למה QuickTime לא מנגן את קובץ ה-MOV שלי?
MOV is the default format for QuickTime Player. If you find that QuickTime Player cannot open MOV, you can check if your video file is corrupted. If not, try to convert the current file to MP4 H.264 format.
סיכום
This is a detailed guide to help you fix QuickTime Player not working issues. We've analyzed your feedback, pointed out 5 common scenarios where the problem occurs, and answered how to fix each of them. If you still find that this player doesn't work well, we recommend trying its best alternative, the Aiseesoft Blu-ray Player, which has wider compatibility and more personalized settings.
-
 הקלטת מסך QuickTime - הקלטת וידאו עם אודיו ב- Mac ובמחשב
 מסך הקלטה עם שמע ב- Mac שימושי. הנגן המובנה, QuickTime Player יכול לעשות זאת. קרא את ההודעה שלו וידע לתפוס מסך עם צליל ב- Mac ובמחשב האישי.
-
 תחליף QuickTime הטוב ביותר באינטרנט ובאופליין [2025]
 זה ינחה אותך לבחור מהי האפשרות הטובה ביותר להחלפת QuickTime Player אם נגן QuickTime אינו זמין בפלטפורמה שלך או שאתה רוצה אחד חדש.
-
 עובדות מובילות שכדאי לדעת על QuickTime Slow Motion
 האם ניסית להשתמש ב-QuickTime Media Player כדי להפעיל וידאו בהילוך איטי? קרא מאמר זה כדי לדעת יותר על השירות המעולה שיש לנגן המדיה הזה.