


सबसे शक्तिशाली एप्लिकेशन का उपयोग करके छवियों को कैसे धुंधला करें
यह जानना काफी निराशाजनक होता है कि आपने जो तस्वीर ली है वह धुंधली निकली। आपकी फोटो इसलिए धुंधली हो सकती है क्योंकि जो सब्जेक्ट आप ले रहे हैं वह हिल रहा है, कैमरा हिल रहा है, या फिर जगह की लाइटिंग अच्छी नहीं है। इसके अलावा, जब आप फोटो लेते हैं, उस पल को दोबारा वापस नहीं ला सकते, जो बहुत मायूस करने वाला होता है। उस तस्वीर को ठीक करना नामुमकिन‑सा लगता है, लेकिन ऐसा नहीं है। सौभाग्य से, कुछ खास तरीके हैं जिनसे आप धुंधली तस्वीर को साफ़ कर सकते हैं। बेहतरीन इमेज‑रिपेयर एप्लिकेशन की मदद से आप अपनी धुंधली फोटो को ठीक कर सकते हैं। यह गाइड पोस्ट आपको बिना मेहनत के यह सिखाएगा कि किसी इमेज को अनब्लर (धुंधला हटाकर साफ़) कैसे करें।.

भाग 1. किसी छवि को ऑनलाइन कैसे धुंधला करें
लोग छवियों को धुंधला करने के लिए एक ऑनलाइन एप्लिकेशन का उपयोग करना पसंद करते हैं क्योंकि यह उन्हें अपने उपकरणों पर स्थान बचाने की अनुमति देता है। साथ ही, किसी ऑनलाइन टूल का उपयोग करते समय, आपको बस इसे अपने ब्राउज़र पर एक्सेस करने की आवश्यकता होती है। सुविधाजनक सही? इसलिए, हम आपकी तस्वीर के धुंधलेपन को ठीक करने के लिए सर्वश्रेष्ठ ऑनलाइन इमेज अपस्केलर की खोज करते हैं।
अगर आप ऑनलाइन इमेज को डीब्लर करने का तरीका ढूँढ रहे हैं, तो FVC Free Image Upscaler सबसे अच्छा विकल्प है। इसके अलावा, यह फ्री है और इस्तेमाल करने के लिए सुरक्षित भी। आप इसे Google, Firefox और Safari सहित सभी वेब ब्राउज़र पर एक्सेस कर सकते हैं। साथ ही, आप अपनी इमेज की क्वालिटी को 2x, 4x, 6x और 8x मैग्निफिकेशन के ज़रिये बेहतर बना सकते हैं। यह AI (Artificial Intelligence) तकनीक का उपयोग करता है, जो आपकी इमेज के धुंधले हिस्सों को अपने‑आप पहचान कर उन्हें एन्हांस कर देता है।.
इसके अलावा, एफवीसी फ्री इमेज अपस्केलर आपको खोए हुए पिक्सल, कलर टेक्सचर और अधिक विवरण को ठीक करने में सक्षम बनाता है। और एक ऑनलाइन एप्लिकेशन होने के बावजूद, इसकी एक तेज़ अपस्केलिंग प्रक्रिया है और इसमें ऐसा कोई विज्ञापन नहीं है जो आपको विचलित कर सके। इसलिए, यदि आप मुफ्त इमेज अपस्केलर का उपयोग करने में रुचि रखते हैं, तो नीचे दिए गए सरल गाइड का पालन करें।
एफवीसी फ्री इमेज अपस्केलर का उपयोग करके छवियों को कैसे धुंधला करें:
स्टेप 1. सबसे पहले अपना ब्राउज़र खोलें और सर्च बॉक्स में FVC Free Image Upscaler टाइप करें। आप सीधे दिए गए लिंक पर क्लिक करके भी मुख्य पेज पर जा सकते हैं। फिर Upload Photo बटन पर क्लिक करके ऐप को लॉन्च करें। ऐप लॉन्च होने के बाद अगले स्टेप पर जाएँ।.
स्टेप 2. पहले इंटरफेस पर, जिस इमेज को आप अनब्लर करना चाहते हैं उसे इम्पोर्ट करने के लिए Upload Photo बटन पर क्लिक करें। आपके कंप्यूटर के फोल्डर खुल जाएँगे, जहाँ से आप अपनी फोटो चुनेंगे। उसे अपलोड करने के लिए Open पर क्लिक करें।.
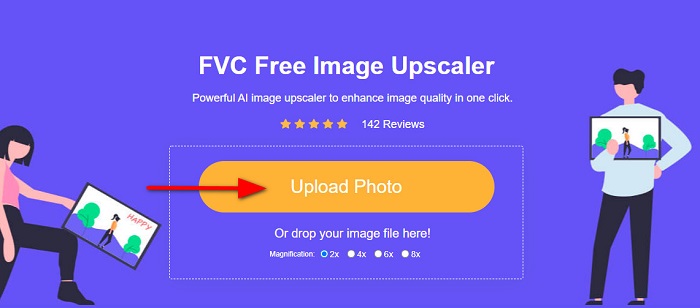
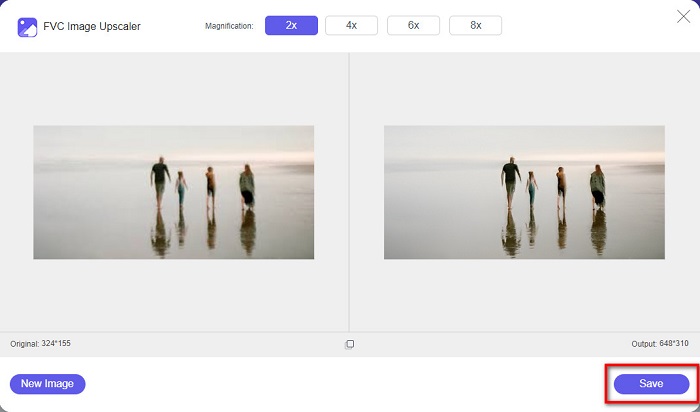
स्टेप 3. इमेज अपलोड होने के बाद, अपनी इमेज के लिए मनचाहा मैग्निफिकेशन प्रीसेट चुनें। आप 2x, 4x, 6x और 8x मैग्निफिकेशन में से चुन सकते हैं। इसके बाद, दाईं ओर आप आउटपुट का प्रीव्यू देख सकते हैं, जिससे आप मूल फाइल और नए परिणाम में फर्क देख पाएँगे।.

स्टेप 4. आख़िर में, इंटरफेस के नीचे दाईं ओर मौजूद Save बटन पर क्लिक करके अपना आउटपुट सेव करें।.
और वे चरण हैं कि कैसे एक छवि को ऑनलाइन अनब्लर किया जाए। आप परिणाम से देखेंगे कि कैसे यह निःशुल्क छवि अपस्केलर आपकी छवि की गुणवत्ता को ठीक करने में आपकी सहायता कर सकता है।
भाग 2। डेस्कटॉप पर किसी इमेज को ऑफलाइन कैसे अनब्लर करें
कई पेशेवर छवियों या वीडियो को संपादित करने के लिए कंप्यूटर का उपयोग करते हैं। साथ ही, कई फोटो एडिटिंग एप्लिकेशन केवल डेस्कटॉप पर ही उपलब्ध हैं। और इस भाग में, हम आपको अपने डेस्कटॉप पर किसी इमेज को ऑफलाइन अनब्लर करने के सर्वोत्तम तरीके सिखाएंगे।
फोटोशॉप का उपयोग करके इमेज को अनब्लर करें
Adobe Photoshop शायद सबसे बेहतरीन इमेज एडिटिंग एप्लिकेशन है जिसका उपयोग आप अपनी धुंधली तस्वीरें साफ़ करने के लिए कर सकते हैं। यह ऑफ़लाइन एप्लिकेशन कई एडिटिंग फीचर्स और टूल प्रदान करता है, जिनसे आप किसी भी इमेज को एन्हांस कर सकते हैं। अगर आपकी फोटो की क्वालिटी अच्छी नहीं है या वह धुंधली है, तो आप उसमें शार्पनेस भी जोड़ सकते हैं। इसके उन्नत एडिटिंग टूल्स की मदद से आप निश्चित रूप से बेहतरीन आउटपुट तैयार कर सकते हैं। इसके अलावा, आप अपनी इमेज से लोग या ऑब्जेक्ट हटा सकते हैं, पेंसिल या पेन टूल से कोई चित्र या ऑब्जेक्ट ड्रॉ कर सकते हैं, अपनी फोटो का रंग बदल सकते हैं, और भी बहुत कुछ। Adobe Photoshop के ज़रिये आप शानदार एडिट की हुई तस्वीरें बना सकते हैं। हालांकि, Adobe Photoshop कोई बहुत यूज़र‑फ्रेंडली टूल नहीं है। अपनी इमेज को अनब्लर या एडिट करने के लिए इसके टूल्स के बारे में गहराई से जानना ज़रूरी है। फिर भी, हम आपको Photoshop का उपयोग करके इमेज अनब्लर करने के स्टेप्स बताएँगे। हम आपको दो तरीके भी दिखाएँगे जिनसे आप Photoshop में अपनी इमेज की धुंधलाहट कम कर सकते हैं।.
Adobe Photoshop का उपयोग करके छवि को धुंधला करने की प्रक्रिया:
स्टेप 1. अपने डेस्कटॉप पर Adobe Photoshop डाउनलोड करें और इंस्टॉल करें। ऐप डाउनलोड और इंस्टॉल हो जाने के बाद इसे अपने डिवाइस पर रन करें।.
स्टेप 2. फिर, मुख्य इंटरफेस पर वह इमेज खोलें जिसे आप अनब्लर करना चाहते हैं। आप कीबोर्ड पर CTRL + O दबाकर भी आसानी से अपनी इमेज खोल सकते हैं।.
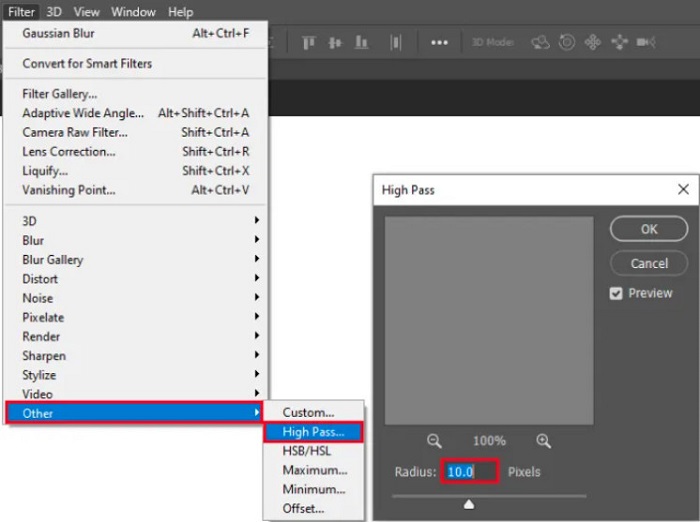
स्टेप 3. इसके बाद, अपने लेयर के बैकग्राउंड को डुप्लिकेट करें और उसे सेलेक्ट करें। फिर Filter > Other > High Pass पर क्लिक करें। High Pass को 10% पर सेट करें।.
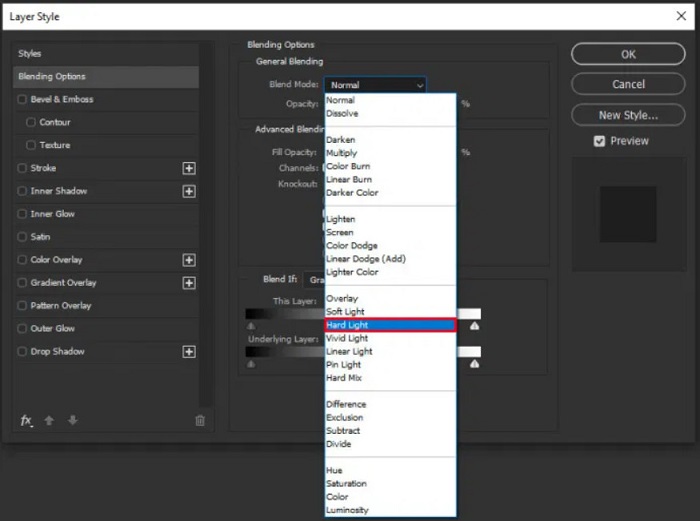
स्टेप 4. और Layer Style विंडो में, ब्लेंड मोड को नॉर्मल से बदलकर hard light कर दें, फिर opacity को इस तरह बदलें कि फोटो साफ़ या एन्हांस दिखाई देने लगे।.
यदि आप Photoshop का नया वर्ज़न इस्तेमाल कर रहे हैं, तो आप कैमरा शेक रिडक्शन ऑप्शन का उपयोग करके Photoshop में इमेज को शार्प कर सकते हैं। इसके लिए Photoshop से इमेज शार्प करना फीचर उपयोगी है।.
स्टेप 1. जिस इमेज को आप अनब्लर करना चाहते हैं, उसे Photoshop में इम्पोर्ट करें।.
स्टेप 2. फिर Filter > Sharpen > Shake Reduction पर जाएँ।.
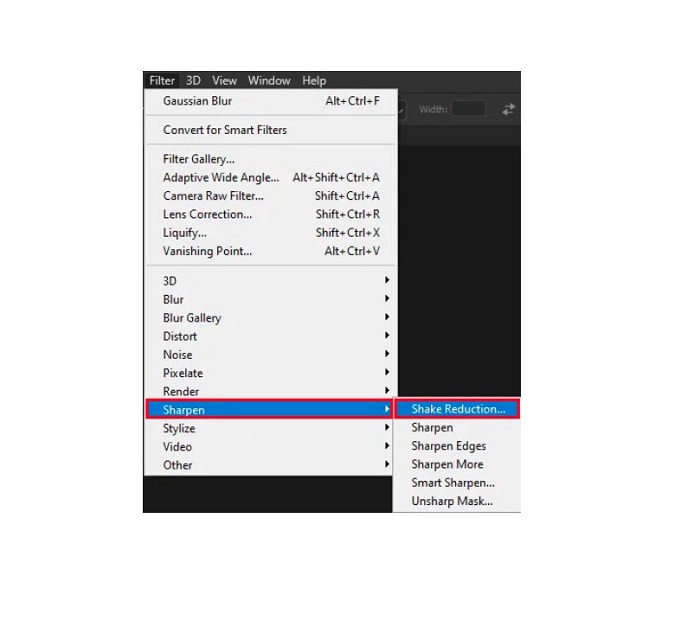
स्टेप 3. इसके बाद Photoshop आपकी इमेज पर काम करेगा, और फिर आप अपना आउटपुट देख पाएँगे।.
पेंट.नेट का उपयोग करके इमेज को धुंधला करें
एक और फ्री ऑफ़लाइन फोटो एडिटिंग सॉफ्टवेयर जिसे आप इस्तेमाल कर सकते हैं वह है Paint.net। इस एप्लिकेशन का एक शक्तिशाली फीचर इमेज को शार्प करना है। स्लाइडर को मूव करके आप अपनी इमेज में शार्पनेस की मात्रा को एडजस्ट कर सकते हैं, जिससे इमेज ज्यादा तेज़ और साफ़ दिखेगी और उसमें से ब्लर हट जाएगा। इसके अलावा, इसे Adobe Photoshop की तुलना में इस्तेमाल करना आसान है। साथ ही, इसमें और भी एडिटिंग फ़ंक्शन मौजूद हैं जिनसे आप अपनी तस्वीरों को एडिट कर सकते हैं। अगर आपको यह एप्लिकेशन इस्तेमाल करना नहीं आता, तो आप इसकी ऑनलाइन कंसल्टिंग और हाउ‑टू ट्यूटोरियल्स देख सकते हैं। इसके अतिरिक्त, Windows यूज़र्स के लिए यह सबसे लोकप्रिय इमेज एडिटर एप्लिकेशन में से एक है, क्योंकि इसमें कई करेक्शन फ़ंक्शन हैं जिनकी मदद से आप अपनी फोटो को एन्हांस कर सकते हैं। Paint.net की एक छोटी‑सी कमी यह है कि इफेक्ट्स लागू करने के बाद आप डाला हुआ टेक्स्ट एडिट नहीं कर सकते। फिर भी, यह सॉफ्टवेयर आपको मल्टी‑लेवल इमेज एडिटिंग आउटपुट तैयार करने की सुविधा देता है।.
पेंट.नेट का उपयोग करके छवि को धुंधला कैसे करें:
स्टेप 1. शुरू करने के लिए, अपने कीबोर्ड पर CTRL + O दबाकर Paint.net में अपनी इमेज खोलें। आप File में जाकर Open विकल्प भी चुन सकते हैं। इसके बाद आपके डेस्कटॉप की फाइलें नज़र आएँगी, जहाँ से आप अपनी इमेज चुनकर Open करेंगे।.
स्टेप 2. फिर Effects > Picture पर क्लिक करें और उसके बाद Sharpen चुनें।.
स्टेप 3. फिर Sharpen पैनल पर आपको स्लाइडर दिखाई देगा, जिससे आप अपनी इमेज की शार्पनेस एडजस्ट करके उसे अनब्लर कर सकते हैं। आप up/down arrow बटन पर टिक करके भी अपनी फोटो की शार्पनेस की मात्रा बदल सकते हैं।.
स्टेप 4. OK बटन दबाएँ और अपना आउटपुट सेव करें।.
भाग 3. कैसे iPhone पर एक छवि को धुंधला करने के लिए
यदि आप एक आईफोन डिवाइस उपयोगकर्ता हैं, तो आप अपनी छवि को धुंधला करने के लिए कुछ ऐप्स भी डाउनलोड कर सकते हैं। आप अपनी छवि को धुंधला करने के लिए अपने ऐप स्टोर से ऐप्स में से चुन सकते हैं। हालाँकि, कुछ ऐप्स खरीदने योग्य होते हैं, जिनका उपयोग करने से पहले आपको उन्हें खरीदने की आवश्यकता होती है। लेकिन इस भाग में, हम आपको एक मुफ्त और उल्लेखनीय एप्लिकेशन का उपयोग करके अपने iPhone पर अपनी छवि को अनब्लर करना सिखाएंगे।
Foton iPhone पर सबसे ज़्यादा इस्तेमाल होने वाले इमेज अनब्लरिंग ऐप्स में से एक है। आप इस ऐप को AppStore से फ्री डाउनलोड कर सकते हैं। इसके अलावा, इसमें कई अन्य एडिटिंग फ़ंक्शन हैं, जैसे कोलाज, क्रॉप, टेम्पलेट जोड़ना, स्प्लिट आदि। इसका इंटरफेस भी आसान है, जिससे यह एक यूज़र‑फ्रेंडली ऐप बन जाता है। इस ऐप की मदद से आप अपनी इमेज की शार्पनेस एडजस्ट करके उसे अनब्लर कर सकते हैं। और अगर आप अपनी फोटो को और ज़्यादा आकर्षक बनाने के लिए क्रिस्प इफ़ेक्ट जोड़ना चाहते हैं, तो आप इमेज का कॉन्ट्रास्ट, क्लैरिटी, सैचुरेशन और डिहेज़ भी एडजस्ट कर सकते हैं। साथ ही, यह ऐप इस्तेमाल करने के लिए सुरक्षित है, इसलिए आपको अपनी इमेज फाइल की सुरक्षा की चिंता नहीं करनी पड़ेगी। इस ऐप की कमी यह है कि इसकी अन्य सुविधाओं का उपयोग करने के लिए आपको प्रो वर्ज़न ख़रीदना होगा।.
कैसे iPhone पर एक छवि को धुंधला करने के लिए:
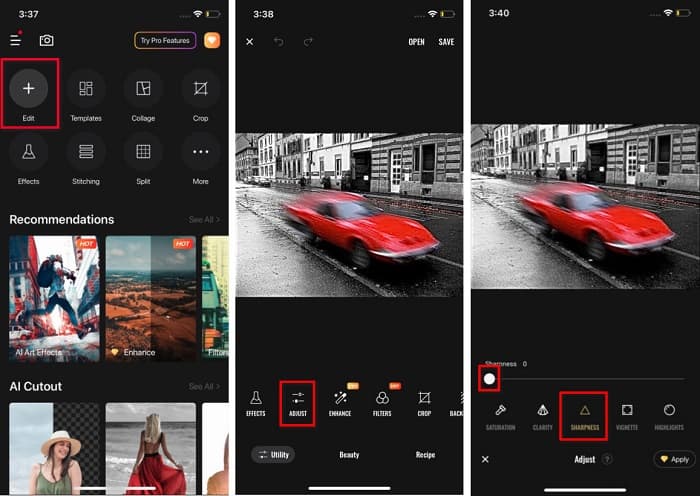
स्टेप 1. अपने iPhone पर App Store खोलें और Foton सर्च करें। इसे अपने फ़ोन पर इंस्टॉल करें और इंस्टॉल होने के बाद ओपन करें। फिर, ऐप के मुख्य इंटरफेस पर Edit विकल्प पर टैप करें।.
स्टेप 2. वह इमेज चुनें जिसे आप अनब्लर करना चाहते हैं; इसके बाद आप एक दूसरे इंटरफेस पर पहुँच जाएँगे। अपनी इमेज के नीचे मौजूद Adjust विकल्प पर टैप करें, फिर बाएँ से दाएँ स्वाइप करते हुए Sharpness फीचर को ढूँढें।.
स्टेप 3. Sharpness पैनल पर, स्लाइडर को खींचकर उतनी शार्पनेस सेट करें, जब तक आपकी इमेज की धुंधलाहट कम न हो जाए।.
स्टेप 4. आख़िर में, इंटरफेस के ऊपर दाईं ओर मौजूद Save बटन पर टैप करके अपना आउटपुट अपने iPhone डिवाइस पर सेव करें। यह जानने के लिए कि iPhone पर किसी इमेज का साइज़ कैसे बदलें, यहाँ क्लिक करें: iPhone पर इमेज का साइज़ बदलना।.
भाग 4। एंड्रॉइड फोन पर एक इमेज को कैसे अनब्लर करें
बहुत से लोगों के पास Android डिवाइस भी होते हैं, और यदि आप भी किसी एक का उपयोग कर रहे हैं, तो आप इस भाग को पढ़कर सीख सकते हैं कि Android पर छवि को कैसे धुंधला करना है। हमने एंड्रॉइड के लिए सबसे लोकप्रिय फोटो अनब्लरिंग ऐप्स की खोज की और उन्हें एक-एक करके आज़माया। सौभाग्य से, हमें एक ऐसा ऐप मिला है जिसकी सिफारिश करना सबसे अच्छा है।
अगर आप अपने Android डिवाइस पर इमेज को अनब्लर करना चाहते हैं, तो Snapseed सबसे अच्छा एप्लिकेशन है। इसके Sharpen और Structure फीचर का उपयोग करके आप अपनी इमेज में शार्पनेस बढ़ा सकते हैं और धुंधले हिस्सों को हटा सकते हैं। इसके अलावा, इसमें कई एडिटिंग फीचर्स हैं जो आपकी इमेज की क्वालिटी बेहतर बनाने में मदद करते हैं। और ऊपर बताए गए अन्य टूल्स की तरह, इसका यूज़र इंटरफेस भी सरल है। इसलिए, अगर आप शुरुआती हैं, तो भी इस ऐप से आसानी से इमेज अनब्लर कर सकते हैं। हालांकि, इस ऐप का उपयोग करने से पहले आपको अपना WiFi ऑन करना होगा।.
Snapseed का उपयोग करके Android पर छवि को कैसे धुंधला करें:
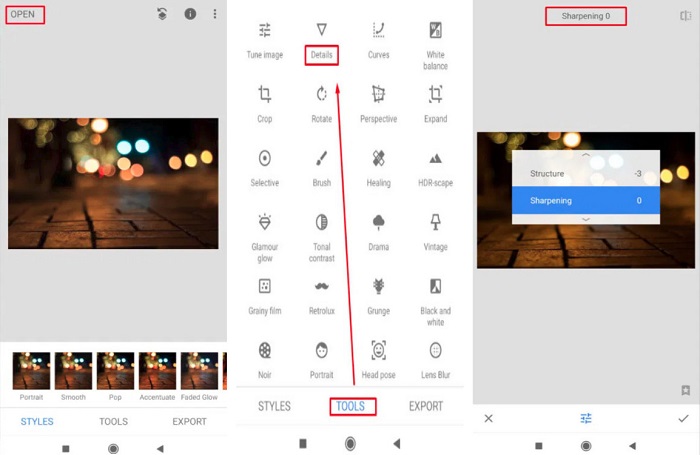
स्टेप 1. अपने Android डिवाइस पर यह ऐप डाउनलोड करें और फिर इसे खोलें। खोलने के बाद, अपनी इमेज ऐप में ओपन करें।.
स्टेप 2. फिर Tools पैनल पर जाकर Details विकल्प चुनें।.
स्टेप 3. अगला, अपनी धुंधली इमेज में फर्क लाने के लिए Sharpen या Structure विकल्प चुनें। इन दोनों विकल्पों को एडजस्ट करके आप अपनी इमेज की धुंधलाहट हटा पाएँगे।.
भाग 5. छवि को धुंधला करने के तरीके के बारे में अक्सर पूछे जाने वाले प्रश्न
जब आप छवि को धुंधला करते हैं तो क्या फ़ाइल का आकार बढ़ जाएगा?
हाँ। जब आप किसी छवि को धुंधला करते हैं, तो उसका PPI बढ़ जाएगा, जिससे फ़ाइल का आकार मूल आकार से बड़ा हो जाएगा।
जब मैं इसे बड़ा करता हूँ तो मेरी छवि धुंधली क्यों हो जाती है?
यह शायद एक संपीड़न समस्या के कारण है। जब आप किसी छवि का आकार बदलने का प्रयास करते हैं, तो आप अपनी फ़ोटो के पिक्सेल भी बढ़ा रहे होते हैं। इसलिए, छवि को संपीड़ित करने से आपकी छवि की गुणवत्ता प्रभावित हो सकती है।
क्या मैं Adobe पर JPG इमेज को अनब्लर कर सकता हूँ?
निश्चित रूप से! यदि आप किसी JPG छवि को धुंधला करना चाहते हैं तो आप Adobe Photoshop का उपयोग कर सकते हैं। एडोब फोटोशॉप पीएनजी, जेपीजी और जेपीईजी जैसे मानक छवि प्रारूपों का समर्थन करता है
निष्कर्ष
अब जब आप सबसे आसान तरीकों से किसी इमेज को अनब्लर कैसे करें यह जान चुके हैं, तो आप अपनी धुंधली तस्वीरों को साफ़ कर सकते हैं। ऊपर बताए गए सभी तरीके निश्चित रूप से आपको आपका लक्ष्य हासिल करने में मदद करेंगे। लेकिन अगर आप अपने डिवाइस में जगह बचाना चाहते हैं, तो हम आपको FVC Free Image Upscaler इस्तेमाल करने की सलाह देते हैं, जिसे आप फ्री और ऑनलाइन एक्सेस कर सकते हैं।.
-
 PowerPoint में चित्र का आकार कैसे बदलें [आकार बदलने का सबसे तेज़ तरीका]
 PowerPoint में चित्रों का आकार बदलना सीखना आवश्यक है, खासकर यदि आप इसे अपनी प्रस्तुति में उपयोग करना चाहते हैं। यह कैसे करना है जानने के लिए इस लेख को पढ़ें।
-
 1440p छवि - सभी समावेशी जानकारी जिसकी आपको आवश्यकता होगी [2022 अपडेटेड]
 क्या आप 1440p इमेज के बारे में जानना चाहते हैं? या आप इसे कहाँ प्राप्त कर सकते हैं? अपनी छवि को 1440पी में बदलें? उन सभी को जानने के लिए इसे पढ़ें।
-
 3 सर्वश्रेष्ठ फोटो अनपिक्सलेटर का उपयोग करके एक छवि को अनपिक्सेल करने के लिए ट्यूटोरियल
 क्या आपको पिक्सलेटेड छवियों को संभालने में परेशानी हो रही है? आज, हमने समस्या का समाधान कर दिया है, और आप हमारे द्वारा यहां जोड़े गए टूल का उपयोग कर सकते हैं।