


अपने कंप्यूटर पर GIF स्क्रीन कैप्चर कैसे करें पर ट्यूटोरियल
ऑनलाइन दुनिया ने निस्संदेह हमारी ज़्यादातर गतिविधियों को वर्चुअल रूप से सम्पन्न करने लायक बना दिया है। चाहे आप किसी मीटिंग की तैयारी कर रहे हों, प्रेज़ेंटेशन बना रहे हों, या फिर हज़ारों लोगों तक पहुँचकर उन्हें कोई व्यंजन बनाना सिखाना चाहते हों, अपनी स्क्रीन रिकॉर्ड करना इन सभी ज़रूरतों को कैप्चर करने का एक कारगर तरीका है। हालांकि, आपके डिवाइस के नेटिव टूल, जैसे Xbox Game Bar टूल और QuickTime स्क्रीन रिकॉर्डर से स्क्रीन रिकॉर्ड करना, आपकी स्क्री़नकास्टिंग ज़रूरतों को पूरी तरह से पूरा करने में सीमाएँ पैदा करता है। इस पोस्ट में, हमने बेहतरीन सॉफ़्टवेयर चुने हैं जो आपकी स्क्रीन को GIF के रूप में कैप्चर करने की क्षमता को अगले स्तर पर ले जाते हैं।.

भाग 1: विंडोज/मैक पर मुफ्त में स्क्रीन को जीआईएफ में कैसे रिकॉर्ड करें
1. एफवीसी फ्री स्क्रीन रिकॉर्डर
कुछ ही क्लिक में, FVC Free Screen Recorder के ज़रिए स्क्रीन रिकॉर्डिंग आपके हाथ में हो जाती है। यह ऑनलाइन समाधान बुनियादी स्क्रीन रिकॉर्डिंग की एक व्यापक रेंज देता है और अपने उपयोगकर्ताओं के बीच बेहतरीन प्रतिक्रिया प्राप्त कर चुका है। FVC Free Screen Recorder आपके गेम, वीडियो और ऑनलाइन कॉन्फ़्रेंस जैसी स्क्रीन गतिविधियों को बिना किसी वॉटरमार्क के रिकॉर्ड कर सकता है। इसके अलावा, यह सिस्टम साउंड और माइक्रोफ़ोन साउंड के साथ‑साथ आपके कंप्यूटर की स्क्रीन गतिविधियों को भी कैप्चर करने में सक्षम है। इस तरह, आप अपने डिवाइस को रिकॉर्ड पर छोड़ सकते हैं और ज़रूरत पड़ने पर रिकॉर्डिंग चला सकते हैं। नीचे, हमने Mac और Windows पर FVC Free Screen Recorder का उपयोग करके GIF रिकॉर्ड करने की गाइड तैयार की है।.
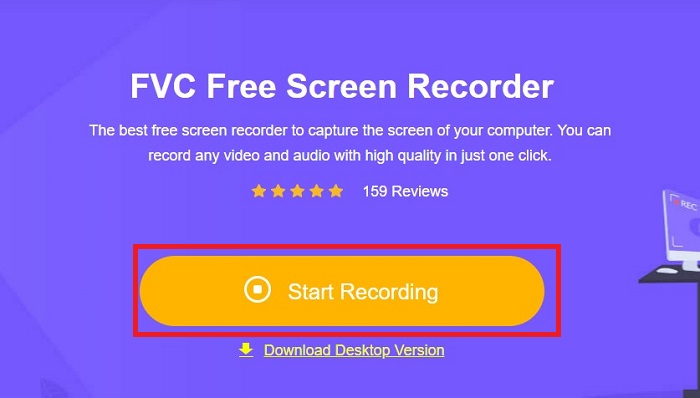
चरण 1. सर्वश्रेष्ठ ऑनलाइन स्क्रीन रिकॉर्डर पर जाएँ
अपने डिवाइस का सर्च इंजन खोलें और सर्च बार में FVC Free Screen Recorder टाइप करें। जैसे ही टूल सक्रिय हो जाए, रिकॉर्डिंग टूल्स तक पहुँचने के लिए बीच में मौजूद Start Recording बटन पर क्लिक करें।.
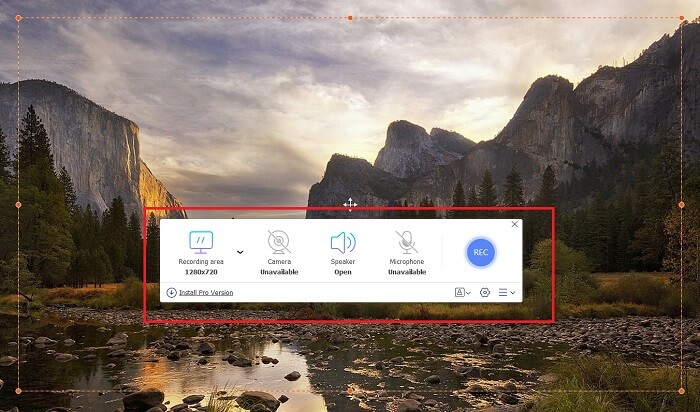
चरण 2. रिकॉर्डिंग सेट करें
अपनी रिकॉर्डिंग ज़रूरतों के अनुसार Recording Area, System Sound और Camera में सेटिंग करें। जब सभी आवश्यकताएँ पूरी हो जाएँ, तो स्क्रीन रिकॉर्डिंग शुरू करने के लिए REC बटन दबाएँ।.
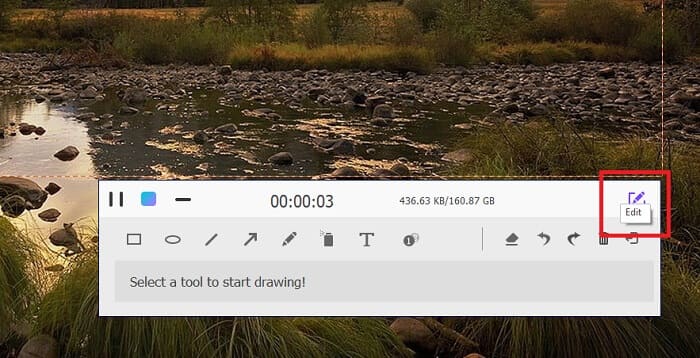
चरण 3. रिकॉर्डिंग के साथ एनोटेशन जोड़ें
3 सेकंड की उलटी गिनती के बाद, अब आप अपनी स्क्रीन रिकॉर्ड कर रहे हैं। यदि आपको टेक्स्ट, आकार, हाइलाइट्स और पेन जैसे एनोटेशन जोड़ने की आवश्यकता है, तो रिकॉर्डिंग बॉक्स के निचले बाएं कोने पर संपादन बटन पर क्लिक करें।
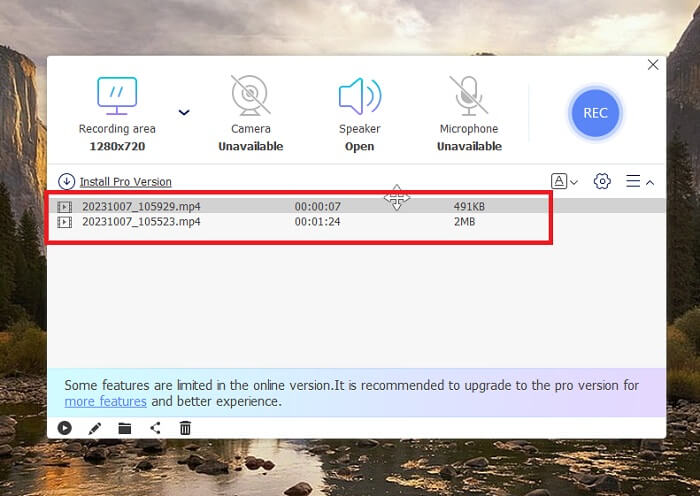
चरण 4. आउटपुट सहेजें
अपना रिकॉर्ड किया हुआ वीडियो सेव करने के लिए FVC Free Screen Recorder का Stop बटन दबाएँ। सेविंग प्रक्रिया के बाद, आप टूल के Recorded पैनल पर पहुँच जाएँगे। आप अपने आउटपुट की लोकल डायरेक्टरी तक पहुँचने के लिए Folder बटन पर भी क्लिक कर सकते हैं।.
विशेषताएँ:
◆ यह प्रोग्राम स्क्रीनकास्टिंग के दौरान रीयल-टाइम एनोटेशन जोड़ने के लिए एक शीर्ष उपकरण है।
◆ FVC फ्री स्क्रीन रिकॉर्डर MP4 और WMV सहित अत्यधिक संगत आउटपुट प्रारूप प्रदान करता है।
◆ यह टूल आपकी स्क्रीन पर एक वेब कैमरा को ओवरले करने के लिए पिक्चर-इन-पिक्चर प्रभाव प्रदान करता है।
◆ यह टूल एक बिना समय सीमा वाला स्क्रीनकास्टिंग सॉफ्टवेयर है।
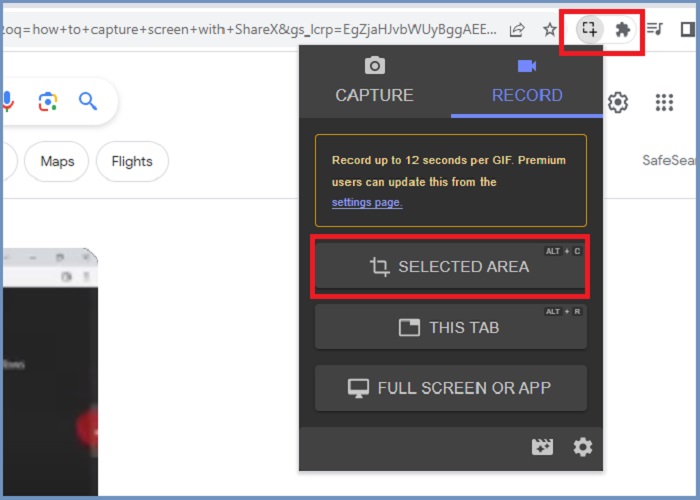
2. क्रोम कैप्चर - स्क्रीनशॉट और GIF टूल
क्रोम कैप्चर एक Google एक्सटेंशन टूल है जो स्क्रीन रिकॉर्डिंग को GIF में बदल देता है। यह वेब ब्राउज़र एप्लिकेशन आपको चयनित क्षेत्रों, टैब या फ़ुल-स्क्रीन गतिविधियों में अपनी स्क्रीन कैप्चर करने देता है। इसके अलावा, पूर्ण-पृष्ठ वेब स्क्रीनशॉट लेने के लिए क्रोम कैप्चर सबसे अच्छा विकल्प है, जिससे आपको सभी आवश्यक जानकारी मिल जाएगी। इसके उपयोग में आसान इंटरफ़ेस और क्रॉपिंग और एनोटेशन टूल जैसी सहज सुविधाओं के कारण कई उपयोगकर्ता इस टूल से जुड़ जाते हैं। ChromeCapture स्क्रीनशॉट लेने या रिकॉर्डिंग को रोकने के लिए शॉर्टकट कुंजियाँ प्रदान करके स्क्रीन रिकॉर्डिंग को कम परेशानी वाला बनाता है। नीचे दिए गए गाइड का पालन करके क्रोम कैप्चर का उपयोग करके स्क्रीन रिकॉर्डिंग से एक GIF बनाएं।
चरण 1. सबसे पहले, Google Chrome में वह पेज खोलें जिसे आप कैप्चर करना चाहते हैं। इसके बाद, अपने सर्च इंजन के दाईं ओर ऊपर एक्सटेंशन टूल्स में Chrome Capture आइकन पर क्लिक करें।.
चरण 2. अब Chrome Capture के रिकॉर्ड टैब पर जाएँ और अपनी मनचाही रिकॉर्डिंग टाइप चुनें, जैसे चुना हुआ क्षेत्र (selected area), टैब, या पूरी स्क्रीन (complete)। जैसे ही आप अपना विकल्प चुनते हैं, रिकॉर्डिंग शुरू हो जाएगी। काम पूरा हो जाने पर, सेविंग प्रक्रिया पर आगे बढ़ने के लिए Stop बटन दबाएँ।.
चरण 3. स्क्रीन रिकॉर्डिंग से GIF बनाने के लिए Save बटन पर क्लिक करें और आउटपुट फ़ाइल के रूप में GIF चुनें। तेज़ी से ढूँढने के लिए आप फ़ाइल का नाम भी बदल सकते हैं।.
विशेषताएँ:
◆ क्रोम कैप्चर वेबएम और जीआईएफ जैसे आउटपुट प्रारूप प्रदान करता है।
◆ यह टूल आपके रिकॉर्ड किए गए वीडियो को ऑनलाइन साझा करना आसान बनाता है।
◆ प्रोग्राम का संपादन टूल आपको टेक्स्ट जोड़ने, तीर खींचने, रिकॉर्डिंग की गति बदलने और बहुत कुछ करने की अनुमति देता है।
भाग 2: मैक और विंडोज़ पर जीआईएफ रिकॉर्डिंग कैसे रिकॉर्ड और संपादित करें
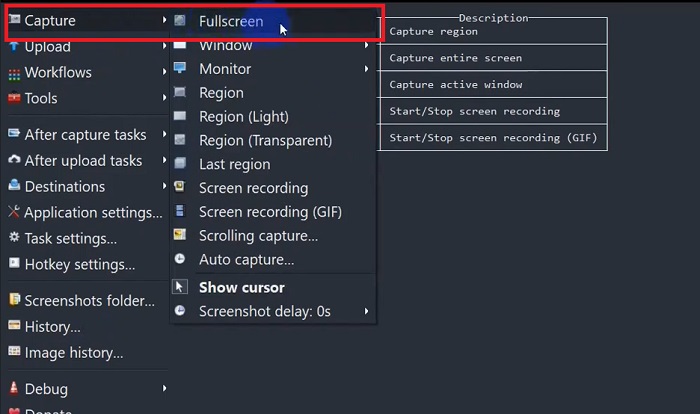
1. शेयरएक्स
एक कुशल और साथ ही, लागत-मुक्त स्क्रीन ग्रैबर के मामले में, ShareX सूची में बना हुआ है। यह टूल विंडोज़ ऑपरेटिंग सिस्टम के लिए एक ओपन-सोर्स स्क्रीन रिकॉर्डिंग टूल है। इसके अलावा, यह एक कस्टम क्षेत्र रिकॉर्डिंग प्रदान करता है, जहां आप कैप्चर करने के लिए अपनी स्क्रीन का एक विशिष्ट क्षेत्र चुन सकते हैं। इसके अलावा, ShareX में स्क्रॉलिंग कैप्चर टूल की सुविधा है, जो उपयोगकर्ताओं को कई स्क्रीनशॉट के बजाय एक बार में सामग्री का स्क्रीनशॉट लेने की अनुमति देता है। यदि आप सीखना चाहते हैं कि GIF विंडो रिकॉर्ड करने के लिए ShareX कैसा प्रदर्शन करता है, तो यहां चरण-दर-चरण ट्यूटोरियल दिया गया है।
चरण 1. सबसे पहले, अपने Windows डिवाइस पर ShareX खोलें। फिर Capture में जाएँ और अपनी पसंद का रिकॉर्डिंग प्रकार चुनें।.
चरण 2. जैसे ही चयन बॉक्स दिखाई दे, अपने कर्सर को हिलाकर स्क्रीन के उस हिस्से को हाइलाइट करें जिसे आप कैप्चर करना चाहते हैं। इसके बाद Start पर क्लिक करें।.
चरण 3. रिकॉर्डिंग के बाद Stop बटन दबाएँ। इसके बाद स्क्रीन रिकॉर्डिंग विकल्प फिर से दिखाई देंगे, जहाँ से आप अपने Video और Audio आउटपुट फ़ॉर्मैट चुन सकते हैं। अंत में, अपने कंप्यूटर पर रिकॉर्ड की गई फ़ाइल खोजने के लिए Download बटन दबाएँ।.
विशेषताएँ:
◆ यह आपकी स्क्रीन रिकॉर्डिंग गतिविधि को आसानी से नियंत्रित करने के लिए विशेष हॉटकी प्रदान करता है।
◆ ShareX उपयोगकर्ताओं को स्क्रीन रिकॉर्डिंग को GIF में बदलने की अनुमति देता है।
◆ टूल में किसी भी क्षेत्र में आपकी स्क्रीन को तीन प्रकार से कैप्चर किया जा सकता है: आयत, दीर्घवृत्त, या मुक्तहस्त।
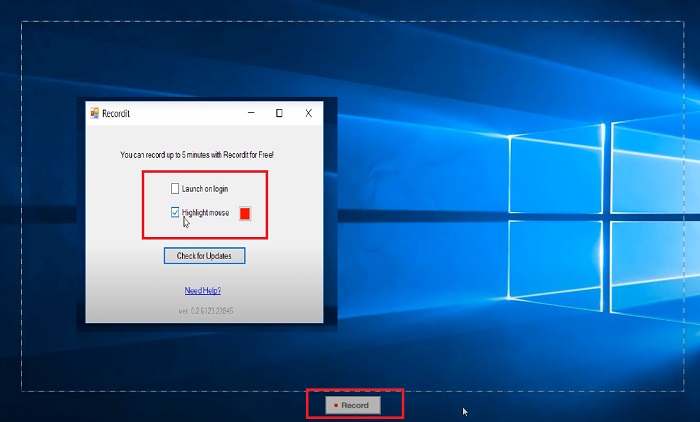
2. इसे रिकॉर्ड करें
रिकॉर्डिट एक और अनुकरणीय सॉफ्टवेयर है जो आपको अपनी स्क्रीन गतिविधियों को पकड़ने की सुविधा देता है। यह टूल एक जीआईएफ-आधारित रिकॉर्डिंग टूल है और विंडोज और मैक उपकरणों के साथ संगत है। हालाँकि, प्रोग्राम का निःशुल्क परीक्षण अधिकतम पाँच मिनट तक ही रिकॉर्ड कर सकता है, और इस सीमा को पार करने के लिए आपको सॉफ़्टवेयर के प्रीमियम संस्करण में अपग्रेड करना होगा। अब आइए जानें कि प्रोग्राम के साथ GIF स्क्रीन कैप्चर कैसे करें।
चरण 1. अपने डिवाइस पर Recordit इंस्टॉल करने के बाद, आप इसका आइकन System Tray में देख सकेंगे।.
चरण 2. अब टूल के स्क्रीन पर प्रकट होने का इंतज़ार करें। रिकॉर्ड करने के लिए स्क्रीन एरिया को ड्रैग करके चुनें, और सेट हो जाने पर रिकॉर्डिंग शुरू करने के लिए Start पर क्लिक करें।.
चरण 3. अंत में, रिकॉर्डिंग पूरी हो जाने पर Stop बटन दबाएँ। फिर सेटिंग में GIF विकल्प पर क्लिक करें, ताकि GIF फ़ाइल एक्सटेंशन वाले अपने आउटपुट को ढूँढ सकें।.
विशेषताएँ:
◆ रिकॉर्डिट आपकी हालिया और पिछली स्क्रीन रिकॉर्डिंग का एक ऐतिहासिक लॉग प्रदान करता है।
◆ यह टूल उपयोगकर्ताओं को विभिन्न क्षेत्रों में अपनी स्क्रीन रिकॉर्डिंग गतिविधियों को अनुकूलित करने देता है।
3. स्क्रीनटूजीआईएफ
एक और स्क्रीनग्रैबर जिसे आपको जाने नहीं देना चाहिए वह है ScreentoGIF टूल। जैसा कि नाम से पता चलता है, यह सॉफ़्टवेयर उपयोगकर्ताओं को सीधे उनकी स्क्रीन रिकॉर्डिंग से GIF बनाने की सुविधा देता है। साथ ही, इसे एक ओपन-सोर्स टूल माना जाता है, जिसका अर्थ है कि इसे पाने के लिए आपको कोई पैसा खर्च करने की आवश्यकता नहीं है। ScreenToGIF आपके आउटपुट का स्क्रीनशॉट लेकर उसे PNG, PSD और वीडियो में एक्सपोर्ट कर सकता है। बेशक, यदि आप अपनी GIF फ़ाइल ऑनलाइन साझा करना चाहते हैं, तो ScreenToGIF उन्हें Imgur और Gfycat पर आसानी से अपलोड कर सकता है।
चरण 1. Mac या Windows पर GIF रिकॉर्ड करने के लिए अपने डिवाइस पर ScreenToGIF खोलें।.
चरण 2. स्क्रीन कैप्चर करना शुरू करने के लिए टूल के Toolbox में जाएँ और Recorder चुनें। इसके बाद, जिस विशेष क्षेत्र को कैप्चर करना है, वहाँ तक क्रॉसहेयर आइकन को ले जाएँ।.
चरण 3. इसके बाद, रिकॉर्डिंग रोकने के लिए अपने कीबोर्ड पर F8 कुंजी दबाएँ।.
विशेषताएँ:
◆ यह एक वेबकैम ओवरले को आपको और आपकी स्क्रीन को एक साथ रिकॉर्ड करने की अनुमति देता है।
◆ स्केचबोर्ड का उपयोग करके, आप वास्तविक समय में अपने चित्र रिकॉर्ड कर सकते हैं।
अधिक पढ़ें:
डेस्कटॉप या ऑनलाइन पर MP4 को GIF में बदलने की चरण-दर-चरण गाइड
इमेज को एनिमेटेड GIF में बदलने के 5 बेहतरीन तरीके [अपडेट 2023]
भाग 3: स्क्रीन रिकॉर्ड से GIF पर अक्सर पूछे जाने वाले प्रश्न
क्या Mac में स्क्रीन रिकॉर्डिंग को GIF में बदलने के लिए अंतर्निहित टूल हैं?
बिल्ट-इन स्क्रीन रिकॉर्डर के संदर्भ में, मैक उपकरणों में क्विकटाइम एप्लिकेशन में एक की पेशकश की जाती है। हालाँकि, रिकॉर्ड किए गए आउटपुट डिफ़ॉल्ट रूप से MOV में सेट होते हैं, और उन्हें GIF में बदलने के लिए आपको तीसरे पक्ष के सॉफ़्टवेयर की आवश्यकता हो सकती है।
क्या iPhone और Android पर GIF रिकॉर्ड करने के लिए कोई उपकरण हैं?
निश्चित रूप से हां! iPhone और Android मोबाइल डिवाइस एक देशी स्क्रीन रिकॉर्डर के साथ आते हैं। वे माइक्रोफ़ोन के माध्यम से सिस्टम ध्वनि और आपकी आवाज़ को भी कैप्चर कर सकते हैं।
क्या ScreentoGIF सुरक्षित है?
बिल्कुल, ScreenToGIF विंडोज़ उपकरणों पर मुफ़्त सॉफ़्टवेयर है और दुर्भावनापूर्ण सॉफ़्टवेयर से मुक्त है।
क्या आप Mac पर होम स्क्रीन के लिए GIF सेट कर सकते हैं?
Mac होम स्क्रीन पर किसी GIF फ़ाइल को सेट करना, बिना कोई अतिरिक्त ऐप इंस्टॉल किए, संभव है। आपको बस Settings > System Preferences > Desktop and Screen Saver खोलना है और उपलब्ध GIFs में से चुनना है।.
क्या विंडोज़ लॉक स्क्रीन GIF हो सकती है?
मैक उपकरणों के विपरीत, अधिकांश विंडोज़ वॉलपेपर स्थिर हैं। आपको अपने विंडोज डिवाइस पर जीआईएफ वॉलपेपर लॉन्च करने के लिए लाइवली वॉलपेपर जैसे तीसरे पक्ष के एप्लिकेशन की आवश्यकता हो सकती है।
निष्कर्ष
चाहे आप स्क्रीन को GIF के रूप में रिकॉर्ड करना चाहते हों या स्टैटिक इमेज के रूप में, एनोटेशन और वेबकैम ओवरले जोड़ना चाहते हों, ऊपर बताए गए टूल्स की मदद से आपकी स्क्री़नकास्टिंग का लक्ष्य पूरी तरह संभव है। ऑनलाइन समाधान स्थायी रूप से तैयार रहने वाली रिकॉर्डिंग के लिए बेहतर हैं, जबकि यदि आप इंटरनेट कनेक्टिविटी में आने वाली रुकावटों और लैग से बचना चाहते हैं, तो ऑफ़लाइन सॉफ़्टवेयर की सिफ़ारिश की जाती है।.
-
 GIF ट्रिम करें: GIF ट्रिम करने के लिए सर्वश्रेष्ठ ऑनलाइन, डेस्कटॉप और मोबाइल टूल
 क्या आप अपनी भावनाओं और प्रतिक्रियाओं को सटीक रूप से व्यक्त करने के लिए GIF का एक हिस्सा कैप्चर करना चाहते हैं? यहां, आइए एनिमेटेड GIF को ट्रिम करने के लिए विभिन्न टूल खोजें और अनुकूलित करें।
-
 2023 में iPhone के लिए शीर्ष 6 अद्भुत GIF ऐप्स (समीक्षा)
 यह पोस्ट आपको iPhone और कंप्यूटर के लिए सर्वश्रेष्ठ GIF क्रिएटर ऐप्स के बारे में बताएगी। उन्हें जांचें और जानें कि वे क्या पेशकश करते हैं।
-
 शीर्ष पायदान के 3डी जीआईएफ मेकर प्रोग्राम जिन्हें आप मिस नहीं करना चाहेंगे
 आपके द्वारा देखे जाने वाले प्रत्येक 3D GIF मेकर एप्लिकेशन को ढूंढना और उसका मूल्यांकन करना समय लेने वाला हो सकता है। सौभाग्य से, हमने एक सूची संकलित की है जिसे आप पढ़ सकते हैं।